AWS Quantum Technologies Blog
Setting up a cross-Region private environment in Amazon Braket
As of 11/17/2022, D-Wave is no longer available on Amazon Braket and has transitioned to the AWS Marketplace. Therefore, information on this page may be outdated. Learn more.
As of 05/17/2023, the ARN of the IonQ Harmony device changed to arn:aws:braket:us-east-1::device/qpu/ionq/Harmony. Therefore, information on this page may be outdated. Learn more.
At AWS we say that security is “job zero”, by which we mean it is even more important than any number one priority. Amazon Braket is built around this philosophy; we often have conversations with customers who want to be able to work in a secured environment, and access Amazon Braket through private connections rather than over the public internet. Listening to their feedback, in November 2020 Amazon Braket added support for AWS PrivateLink, providing connectivity with Virtual Private Clouds (VPCs) without leaving the AWS network.
PrivateLink creates an Amazon Braket endpoint within a specific AWS Region, and connections to that endpoint can only be made from within that Region. What if you want to connect to Amazon Braket through a private connection from another Region? In this blog post, you will learn how to deploy a cross-Region development environment, ensuring that all traffic stays within the AWS network backbone, avoiding the public internet. To achieve this, you will use two main features: Inter-Region VPC Peering and PrivateLink, combined with a private hosted zone and the appropriate routing tables. You will also learn how to configure a fully functional managed Jupyter notebook in offline mode, ensuring your code can communicate with the endpoint without any issues.
Geographic scope of the Quantum Processing Unit (QPU): How to set up a private connection across Regions
Amazon Braket QPUs are local resources, aligned with the geographically closest Region. If your AWS account has Amazon Braket permissions in us-east-1, us-west-1, us-west-2, and eu-west-2 you can see all QPUs and simulators in the AWS Management Console. As a result, when you run code using the Amazon Braket SDK in a managed notebook in one of these regions, it identifies the right location for the device without you specifying it.
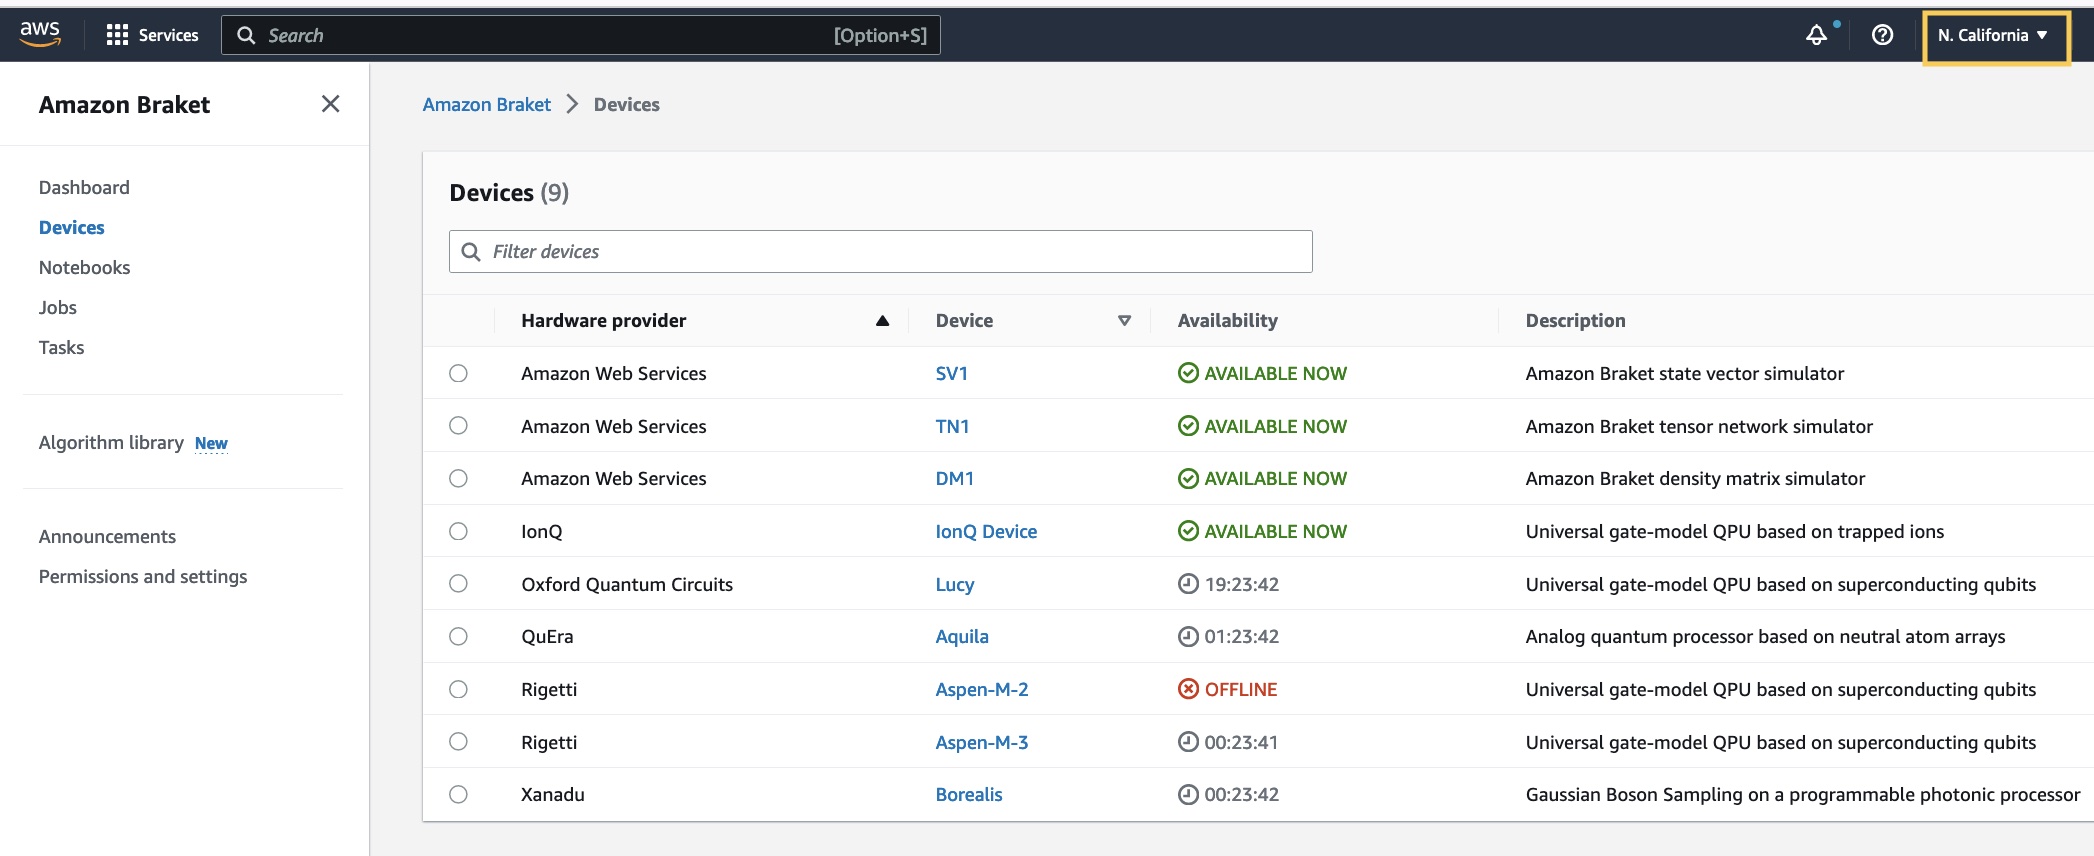
Figure 1: AWS Management Console – While logged in N. California Region (top-right corner), also known as us-west-1, you can see QPUs and Quantum simulators in other locations.
At the end of this procedure, you will be running a managed notebook in a Region where there is no Amazon Braket service privately. To make that happen, you will use two main resources: Amazon SageMaker—to host the notebook—and the inter-Region VPC Peering feature, to connect to the QPU. Bear in mind that not all Regions support SageMaker, so your Region-pair choices will be limited to those that support it. For an updated list of regions supported in SageMaker you can check the service documentation. Lastly, while you can follow this procedure to connect to the QPU within same Region, no VPC peering is needed in this case, as everything runs in the same VPC.
To simplify the deployment, you will run two AWS CloudFormation templates, that are provided below, and a few manual steps. CloudFormation is a service that gives you an easy way to automate the creation of a collection of AWS resources, and provision and manage them in an orderly and predictable fashion. The resources created are known as the CloudFormation stack. This is the summary and visual representation of the steps required:
Step 1: Run braket_qpu_environment CloudFormation template.
Step 2: Run braket_local_environment CloudFormation template.
Step 3: Link both Regions and configure network connectivity.
Step 4: Setup and configure your notebook.
Step 5: Test the solution.
The following diagram is a graphical representation on how your resources will be spread across the Regions and connected to each other once all the steps are completed:
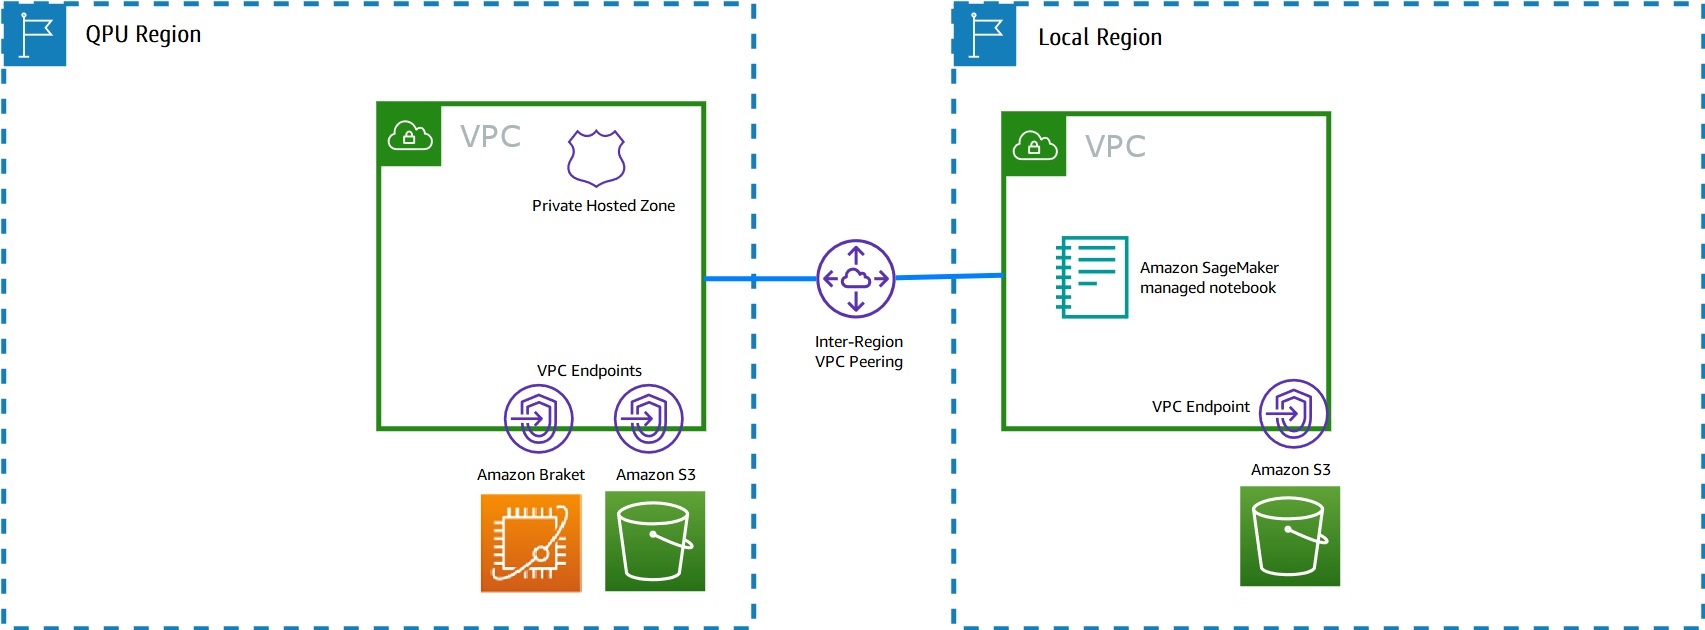
Figure 2: Architecture diagram of the Inter-Region private environment solution.
Detailed steps
Step 1: Run the template that creates the VPC, private endpoints, and hosted zone in the Region that includes your chosen QPU. You can select any Region where Amazon Braket is present (us-east-1, us-west-1, us-west-2). Going forward, this is referred to as “QPU Region”.
You can do this by going to the CloudFormation console and clicking the Create Stack button. Here, pick Template is ready in the prerequisites section, and specify the S3 URL to the template as follows: https://braket-assets.s3.amazonaws.com/braket_qpu_environment.yml Alternatively, you can download this template from your browser and upload it as a file. The estimated deployment time is 5 min.
Step 2: Run the template that creates the VPC, private endpoints, and Jupyter notebook in the region where you want to work. Here you can select any other Region where SageMaker service is available. This will be the Region from where you write your code. Going forward this is referred to as “local Region”.
As you did before, click the Create Stack button in the CloudFormation console, pick the Template is ready option in the prerequisites section, and input the S3 path to the template as follows: https://braket-assets.s3.amazonaws.com/braket_local_environment.yml Alternatively, you can download this template from your browser and upload it as a file. The estimated deployment time is 5 min.
You can launch both templates in parallel if you wish, but must wait until both CloudFormation stacks reach the CREATE_COMPLETE status. If you see ROLLBACK_COMPLETE, stop here and check the Status reason column in the Events tab for more details.
Step 3: Here, you finish the networking setup using AWS CLI: configure the VPC peering, update route tables and hosted zone VPC associations. To complete this step, you first must configure the AWS CLI if you haven’t done so. You can follow the previous post in the AWS quantum blog to do this.
- Create the VPC peering connection between QPU Region and local Region. The QPU Region (e.g. us-east-1) sends the peering request to the VPC located at the local Region (e.g. eu-west-1), as specified in the
--peer-Regionparameter. Replace the VPC IDs with their correct values, as shown in the Output section of both CloudFormation stacks in the AWS Management Console:
Figure 3: CloudFormation view in the AWS Management Console – Copy the VPC value displayed (highlighted) from the Outputs section. Repeat this step in both Regions. The ID displayed above is an example only, do not copy that value as it will differ to yours.
aws ec2 create-vpc-peering-connection \
    --region <QPU_REGION> \
    --vpc <QPU_REGION_VPC_ID> \
    --peer-region <LOCAL_REGION> \
    --peer-vpc-id <LOCAL_REGION_VPC_ID>
At the bottom of the output produced, take note of the value for VpcPeeringConnectionId, which format looks as follows (output provided is just an example):
"VpcPeeringConnectionId": "pcx-0a3da06bc6933b480"
2. The previous command generates a request to the local Region VPC that you must manually accept. To accept the VPC peering connection from the local Region, run the following command:
aws ec2 accept-vpc-peering-connection \
    --region <LOCAL_REGION> \
    --vpc-peering-connection-id <OUTPUT_FROM_PREVIOUS_COMMAND>
The output provides all the detail of the two VPCs being peered, their Regions, and a status code at the bottom. The status is set to “provisioning”.
"Status": {
    "Code": "provisioning",
    "Message": "Provisioning"
},
After a few seconds, the peering is completed. You have now established a private, cross-Region VPC that operates as a single logical resource. Two more steps are required to provide connectivity within this peered VPC.
3. Update the route tables that were created by the CloudFormation stack, so they point to the peering resource (the one starting with pcx-). This lets QPU Region and local Region communicate with each other using the Amazon Braket and SageMaker private endpoints, respectively. To complete this step, you need the route table ID for each Region. As previously shown, you can find this value in the Outputs section of the CloudFormation console:
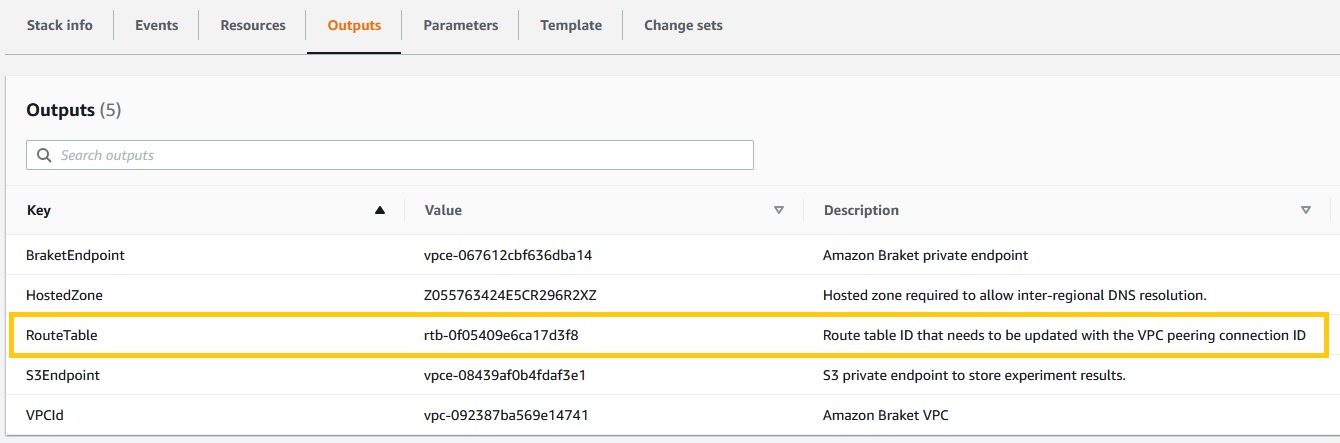
Figure 4: CloudFormation view in the AWS Management Console – Copy the RouteTable value displayed (highlighted) from the Outputs section. The ID displayed is an example from the QPU Region, you need to find the equivalent entry in the local Region.
aws ec2 create-route \
    --region <QPU_REGION> \
    --destination-cidr-block 10.20.0.0/16 \
    --route-table-id <QPU_REGION_ROUTE_TABLE_ID> \
    --vpc-peering-connection-id <PCX_ID_FROM_PREVIOUS_STEP>

aws ec2 create-route \
    --region <LOCAL_REGION> \
    --destination-cidr-block 10.10.0.0/16 \
    --route-table-id <LOCAL_REGION_ROUTE_TABLE_ID> \
    --vpc-peering-connection-id <PCX_ID_FROM_PREVIOUS_STEP>
If executed correctly, this command just returns True as output.
4. Associate VPCs with the hosted zone. To enable private DNS communication, the first CloudFormation stack creates a hosted zone, which gets associated by default with the VPC of the QPU Region (locally to where it was defined). Now that QPU and local Region VPCs are peered, it is necessary to associate both VPCs with the hosted zone to ensure connectivity.
In the AWS Management Console, go to CloudFormation in the QPU Region (the template you ran in step 1), and click in the Outputs tab. Copy the HostedZone value:
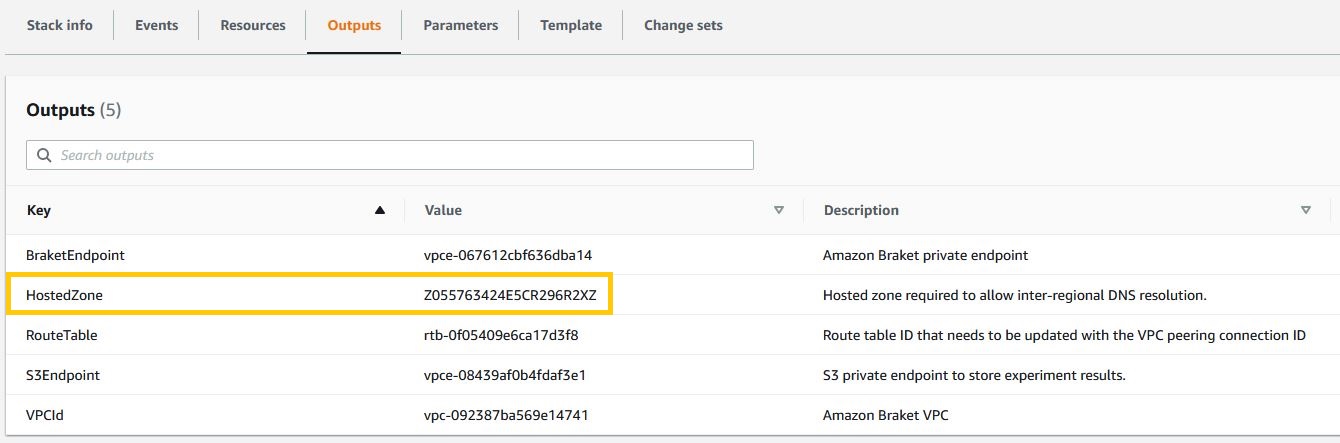
Figure 5: CloudFormation view in the AWS Management Console – Copy the HostedZone value displayed (highlighted) from the Outputs section. The ID displayed is an example only, do not copy that value as it will differ from yours.
Now, from local Region (the template you ran in step 2), go to the Outputs tab and copy the VPC value:
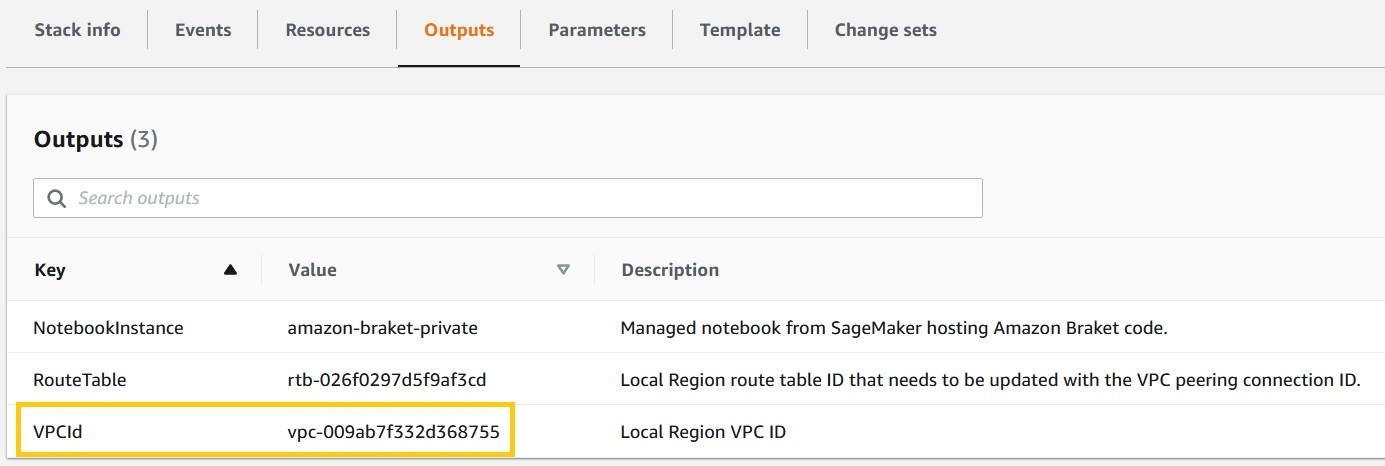
Figure 5a: CloudFormation view in the AWS Management Console – Copy the VPCId value displayed (highlighted) from the Outputs section. The ID displayed is an example only, do not copy that value as it will differ from yours.
Then run the following CLI command, replacing hosted-zone-id, VPCRegion, and VPCId parameters with the values of the hosted zone ID from the QPU stack, and the VPC Region and ID from the local stack:
aws route53 associate-vpc-with-hosted-zone \
    --hosted-zone-id <HOSTED_ZONE_ID> \
    --vpc VPCRegion=<LOCAL_REGION>,VPCId=<LOCAL_REGION_VPC_ID>
The following is an example of the execution of this command and its output (example):
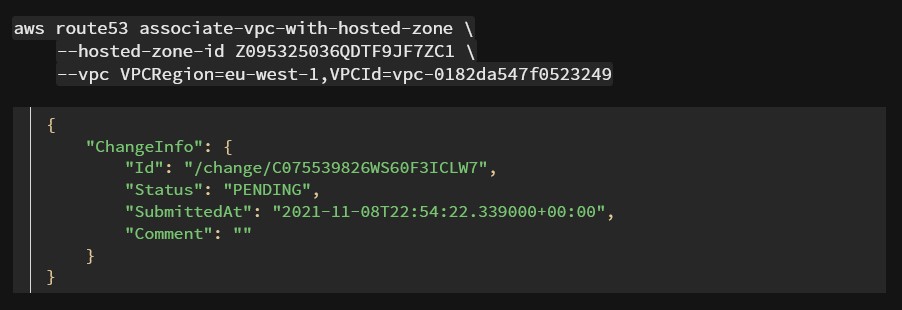
Figure 6: Associate VPC with hosted zone output command, executed in Route53 service using the AWS CLI.
To test if the change has taken effect, run the following command, replacing hosted-zone-id with your value:
Your two VPCs are attached to the hosted zone, as shown in the following example output:
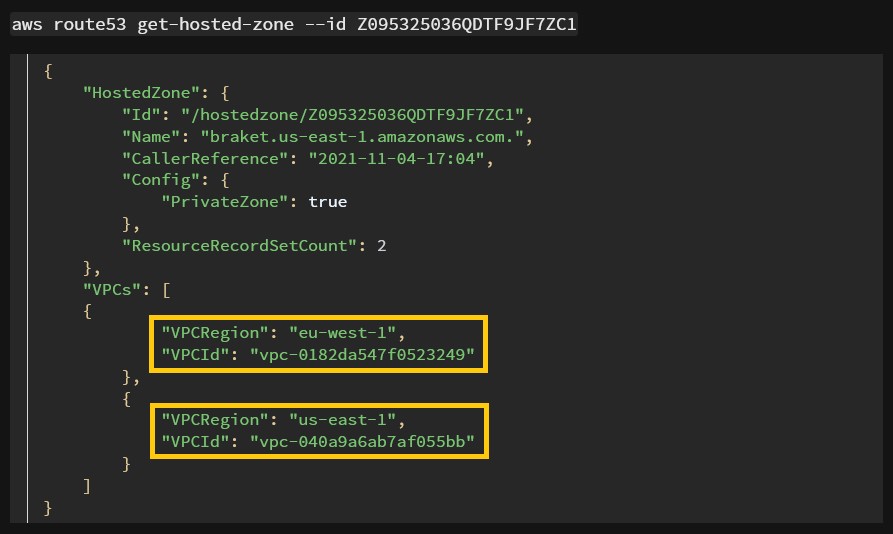
Figure 7: Get hosted zone command executed in Route53 via AWS CLI, displaying the 2 VPCs correctly associated.
This concludes the manual setup step. You have now achieved full private connectivity of your environment, and can move forward with setting up your Jupyter notebook.
Step 4: In the local Region, upload and install in offline mode, inside the private Jupyter notebook, all necessary packages, their dependencies, and notebook examples. This step is done outside the AWS console/environment you just built.
There are two important points to remember here: Firstly, this is a necessary step because fully managed native Amazon Braket notebooks are not available in the local Region. Secondly, there is no internet connection in this setup, so you must download all elements from a location where you have Internet access, and then use the AWS Management Console to upload them to your environment.
- Using Amazon Linux OS (i.e. EC2 instance or AWS Cloud9 environment), download the Amazon Braket SDK from the public repository, and all their dependencies. Additionally, you can do the same with the PennyLane plugin if you plan to run QML later, but this is optional. Note that these commands do not run in the AWS CLI as the previous ones did, but in an Amazon Linux machine with internet access. Also make sure that the
-dflag is present, this is key to install Amazon Braket SDK in offline mode.mkdir braket-deps pip download amazon-braket-sdk -d “./braket-deps/” tar cvfz braket-sdk-local.tgz braket-deps mkdir qml-deps pip download pennylane -d “./qml-deps/” tar cvfz pennylane-local.tgz qml-deps wget https://github.com/aws/amazon-braket-examples/archive/refs/heads/main.zip -O braket-examples.zipWarning: Do not download these packages using a macOS or Windows OS. Since the architecture is different to your target system, the installation will fail later if you do so. Download the files
braket-sdk-local.tgz,pennylane-local.tgzandbraket-examples.zipto your local machine. - Open the AWS Management Console in the local Region (e.g. eu-west-1), and navigate to SageMaker. Since Amazon Braket is not available in this Region, you use SageMaker to create a similar managed notebook. On the side panel, navigate to Notebook instances, and find the notebook instance that was created with the second CloudFormation template (
amazon-braket-privateif you used the default name). Click on Open Jupyter.
Figure 8: Amazon SageMaker view of the AWS Management Console, showing the notebook instance created by the stack.
- Using the Upload button in the top-right corner, upload the three files that you downloaded:
braket-sdk-local.tgz,pennylane-local.tgz, andbraket-examples.zip.
Figure 9: Jupyter notebook browser interface, while uploading the files required to run Amazon Braket SDK in offline mode.
These files will provide all the necessary dependencies to start the Amazon Braket SDK and its associated PennyLane plugin in offline mode.
- On the same window, open a notebook terminal, by clicking on New > Terminal.
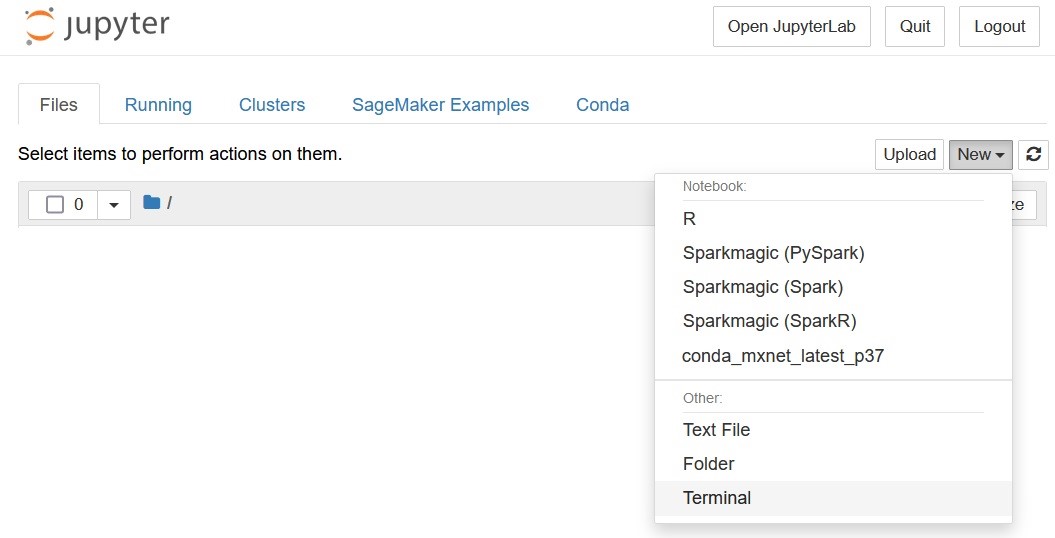
Figure 10: Jupyter notebook browser interface, displaying the new terminal menu.
Run the following commands:
bash
conda activate mxnet_latest_p37

# Prompt will change to (mxnet_latest_p37)$

cd $HOME/SageMaker/
tar xvfz braket-sdk-local.tgz
cd braket-deps
pip install * --no-index
cd $HOME/SageMaker/
tar xvfz pennylane-local.tgz
cd qml-deps
pip install * --no-index
Step 5: Test the solution.
1. Using the same terminal where you ran the previous commands, check connectivity to the Amazon Braket endpoint. As you can see in the output that follows, only private IP addresses in the range that you defined earlier are returned. If you see a public IP address here, make sure that the VPCs in both Regions have been correctly attached to the hosted zone (Step 3.4. – changes in the hosted zone configuration might take a few minutes to propagate).
# Replace <QPU_REGION> with your value: e.g. us-east-1
$ nslookup braket.<QPU_REGION>.amazonaws.com
Output (example for us-east-1):

2. Create a new notebook, using any kernel that contains Python 3.7 or newer version (conda_mxnet_latest_p37 in this example).
3. To be able to connect to QPU Region from your local environment, you must supply a custom AWS session when initiating your development environment. This is done via an AWS session constructor. Without this, the SDK will try to look up for other Regions for devices, and your code will hang as no connectivity exists. In the new notebook you created in step 3), type the following code snippet, replacing the value of the region_name and device values with your own region and QPU Amazon Resource Number (ARN), respectively:
# Basic imports to specify the devices and their Regions
import braket, boto3
from braket.devices import LocalSimulator
from braket.aws import AwsDevice, AwsQuantumTask, AwsSession

session = AwsSession(boto3.session.Session(region_name='<QPU_REGION>'))
device = AwsDevice('<QPU_ARN>', aws_session=session)

# Check that basic connectivity to QPU is working:
print(device)
print('Device Summary :',device.properties.service.deviceDocumentation.summary)
As an example, this is what the output looks like for IonQ in us-east-1:

Figure 11: Screenshot of the Jupyter notebook cell where the code runs, including the output.
If you want to run any of the notebooks that are in the examples folder, remember to define a session as explained above, and pass that session value to the device variable definition. From here, you can start developing your own circuits. In the preceding example, only the QPU Region where IonQ runs (us-east-1) is accessible, with all others being unreachable. Depending on the choice of Region for the first template, you alternatively provide access to Rigetti (us-east-2) or D-Wave (us-west-1) private endpoints.
Conclusion
In this blog, you learned how to create a private quantum development environment spanning two Regions. By using inter-Region VPC peering, and taking advantage of the support for PrivateLink in Amazon Braket, you were able to reach a QPU using private IP addresses, spinning up resources in a Region where there is no Amazon Braket. This is a convenient workaround when access to us-east-1, us-east-2 or us-west-2 is restricted by an administrator or company security policies. Besides the security aspect, by not using Internet Gateways, Network Address Translation (NAT) devices, or firewall proxies, you can simplify your internal network architecture when connecting to Amazon Braket.
Q&A
Q: My development environment uses libraries from third parties besides AWS or PennyLane. Can I bring them to this setup?
A: This depends on your organization policies. Initially, you can follow the same procedure and repeat step 4 to download your libraries and its dependencies, and use them offline in this setup.
Q: Is this setup truly secure? Aren’t QPUs located outside AWS network?
A: Traffic stays in the AWS backbone all the way from your notebook instance to Amazon Braket. Your circuit or annealing problem and associated metadata is sent to and processed by the hardware providers outside of facilities operated by AWS. This traffic uses an encrypted connection, so no other customer or third party can intercept the content of your tasks and jobs. You can check the service security FAQ for more details.
Q: What if I want to use a managed simulator in my “QPU Region” instead of a physical device?
A: The behavior will be identical, as long as the simulator is available in the Region and you pass the correct session constructor in the device definition. In the example provided earlier, you can replace IonQ backend ARN with either SV1, TN1 or DM1 simulators, as they are all available in us-east-1.
Q: Can I expand this setup to all the Regions where Amazon Braket is available, so I can connect from my local Region privately to more than one Region?
A: The stacks created by this procedure only work in two Regions: one of them being either us-east-1, us-east-2 or us-west-2, and the other being any Region where SageMaker and VPC peering are supported (and Amazon Braket is not available). For a fully connected environment with all Amazon Braket Regions, plus a local environment elsewhere, you can use Transit Gateway instead of VPC Peering, with all other networking settings kept identical. In such scenario, there is no need to define an AWS session constructor when writing your code, as the QPU will always be resolved to the right location. The architecture diagram for this scenario looks as follows:
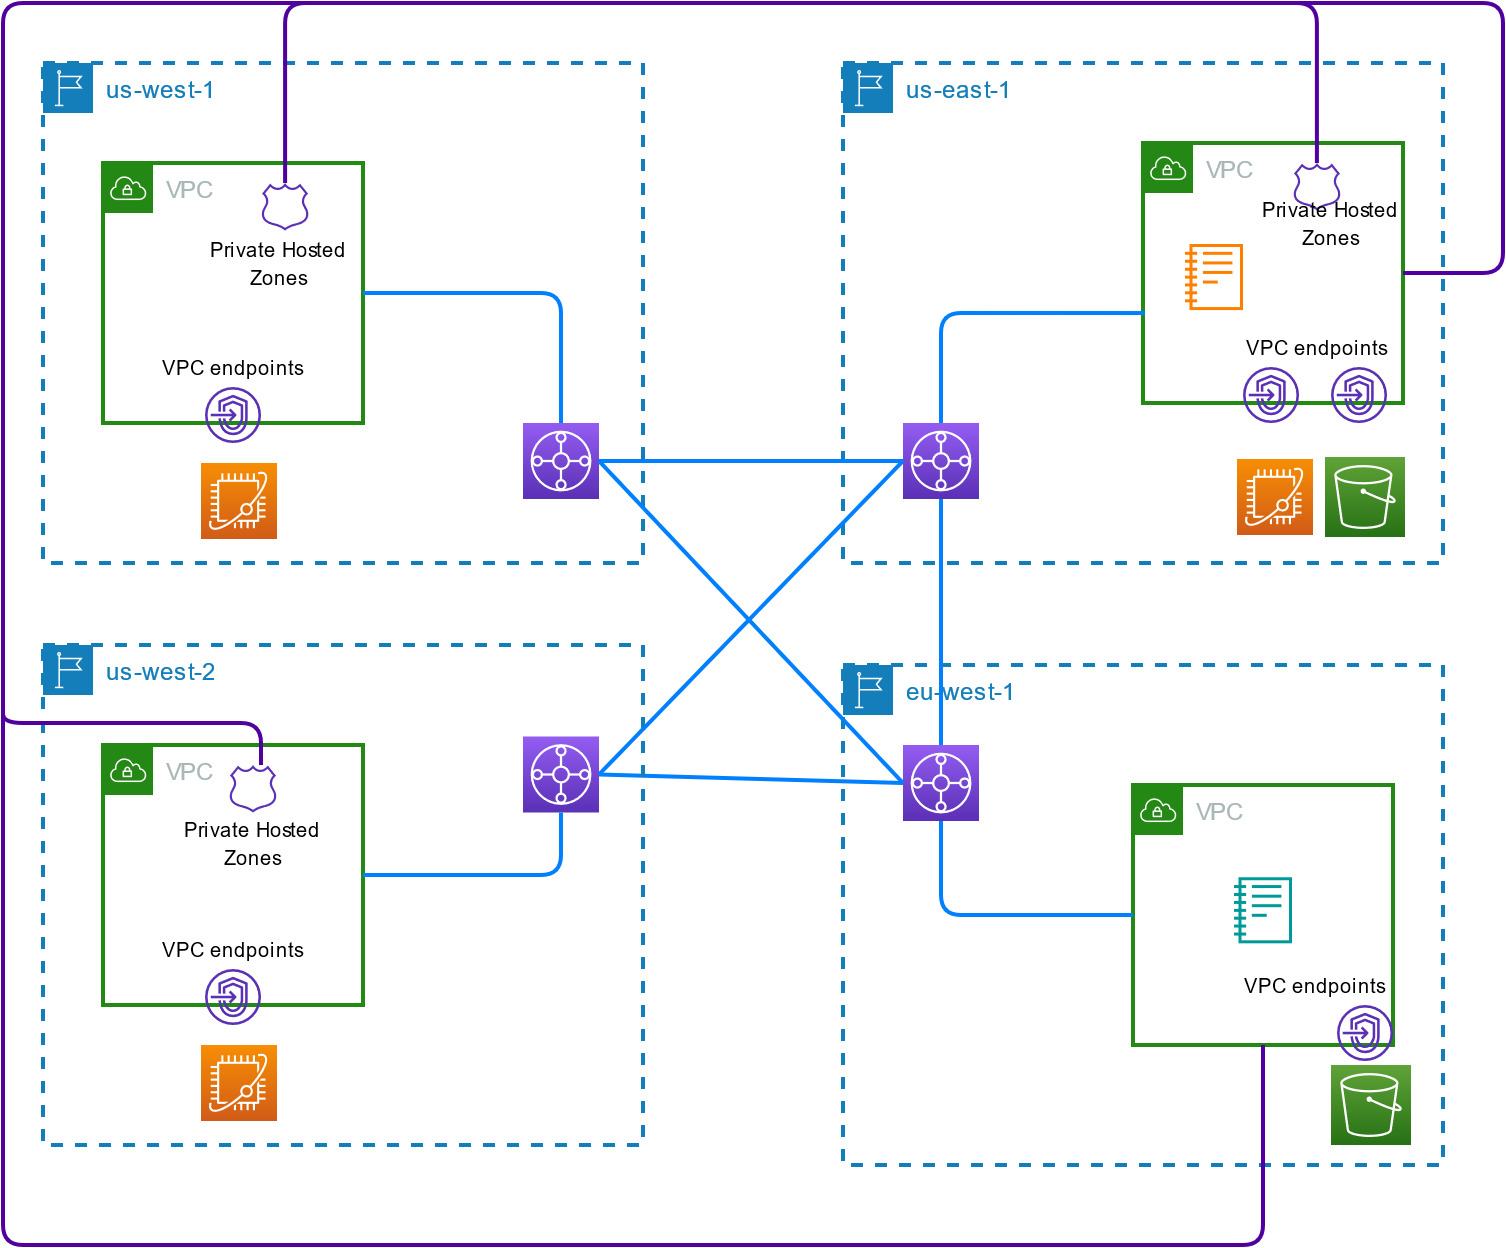
Figure 12: Fully connected Amazon Braket private environment, using Transit Gateway across 3 QPU Regions and 1 local Region.