AWS Security Blog
How to improve your security incident response processes with Jupyter notebooks
Customers face a number of challenges to quickly and effectively respond to a security event. To start, it can be difficult to standardize how to respond to a particular security event, such as an Amazon GuardDuty finding. Additionally, silos can form with reliance on one security analyst who is designated to perform certain tasks, such as investigate all GuardDuty findings. Jupyter notebooks can help you address these challenges by simplifying both standardization and collaboration.
Jupyter Notebook is an open-source, web-based application to run and document code. Although Jupyter notebooks are most frequently used for data science and machine learning, you can also use them to more efficiently and effectively investigate and respond to security events.
In this blog post, we will show you how to use Jupyter Notebook to investigate a security event. With this solution, you can automate the tasks of gathering data, presenting the data, and providing procedures and next steps for the findings.
Benefits of using Jupyter notebooks for security incident response
The following are some ways that you can use Jupyter notebooks for security incident response:
- Develop readable code for analysts – Within a notebook, you can combine markdown text and code cells to improve readability. Analysts can read context around the code cell, run the code cell, and analyze the results within the notebook.
- Standardize analysis and response – You can reuse notebooks after the initial creation. This makes it simpler for you to standardize your incident response processes for how to respond to a certain type of security event. Additionally, you can use notebooks to achieve repeatable responses. You can rerun an entire notebook or a specific cell.
- Collaborate and share incident response knowledge – After you create a Jupyter notebook, you can share it with peers to more seamlessly collaborate and share knowledge, which helps reduce silos and reliance on certain analysts.
- Iterate on your incident response playbooks – Developing a security incident response program involves continuous iteration. With Jupyter notebooks, you can start small and iterate on what you have developed. You can keep Jupyter notebooks under source code control by using services such as AWS CodeCommit. This allows you to approve and track changes to your notebooks.
Architecture overview
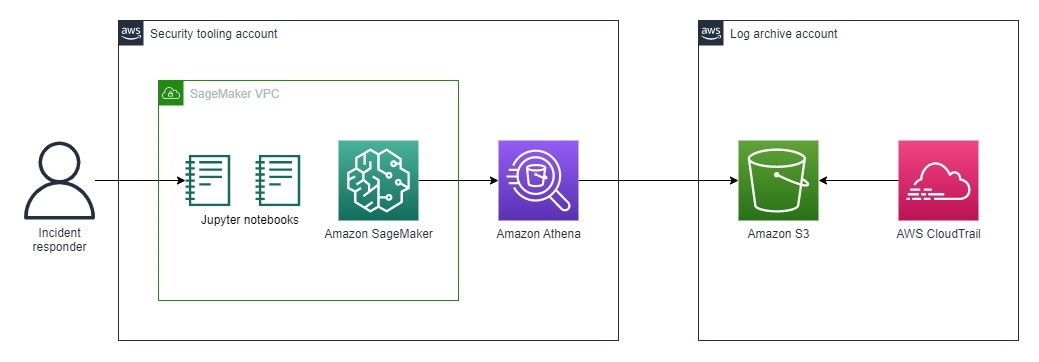
Figure 1: Architecture for incident response analysis
The architecture shown in Figure 1 consists of the foundational services required to analyze and contain security incidents on AWS. You create and access the playbooks through the Jupyter console that is hosted on Amazon SageMaker. Within the playbooks, you run several Amazon Athena queries against AWS CloudTrail logs hosted in Amazon Simple Storage Service (Amazon S3).
Solution implementation
To deploy the solution, you will complete the following steps:
- Deploy a SageMaker notebook instance
- Create an Athena table for your CloudTrail trail
- Grant AWS Lake Formation access
- Access the Credential Compromise playbooks by using JupyterLab
Step 1: Deploy a SageMaker notebook instance
You will host your Jupyter notebooks on a SageMaker notebook instance. We chose to use SageMaker instead of running the notebooks locally because SageMaker provides flexible compute, seamless integration with CodeCommit and GitHub, temporary credentials through AWS Identity and Access Management (IAM) roles, and lower latency for Athena queries.
You can deploy the SageMaker notebook instance by using the AWS CloudFormation template from our jupyter-notebook-for-incident-response GitHub repository. We recommend that you deploy SageMaker in your security tooling account or an equivalent.
The CloudFormation template deploys the following resources:
- A SageMaker notebook instance to run the analysis notebooks. Because this is a proof of concept (POC), the deployed SageMaker instance is the smallest instance type available. However, within an enterprise environment, you will likely need a larger instance type.
- An AWS Key Management Service (AWS KMS) key to encrypt the SageMaker notebook instance and protect sensitive data.
- An IAM role that grants the SageMaker notebook permissions to query CloudTrail, VPC Flow Logs, and other log sources.
- An IAM role that allows access to the pre-signed URL of the SageMaker notebook from only an allowlisted IP range.
- A VPC configured for SageMaker with an internet gateway, NAT gateway, and VPC endpoints to access required AWS services securely. The internet gateway and NAT gateway provide internet access to install external packages.
- An S3 bucket to store results for your Athena log queries—you will reference the S3 bucket in the next step.
Step 2: Create an Athena table for your CloudTrail trail
The solution uses Athena to query CloudTrail logs, so you need to create an Athena table for CloudTrail.
There are two main ways to create an Athena table for CloudTrail:
- Use the AWS Security Analytics Bootstrap – We highly recommend that you use the AWS Security Analytics Bootstrap because you can use it to perform security investigations on different types of AWS service logs. Additionally, if you are using AWS Organizations and have a log archive account, then you can use the bootstrap to create a table so that you can query logs from your AWS accounts. To get the CloudFormation template for the bootstrap, see Athena_infra_setup.yml.
- Use the CloudTrail console – For instructions, see Using the CloudTrail console to create an Athena table for CloudTrail logs. One advantage of this approach is that it is quicker to set up.
For either of these methods to create an Athena table, you need to provide the URI of an S3 bucket. For this blog post, use the URI of the S3 bucket that the CloudFormation template created in Step 1. To find the URI of the S3 bucket, see the Output section of the CloudFormation stack.
Step 3: Grant AWS Lake Formation access
If you don’t use AWS Lake Formation in your AWS environment, skip to Step 4. Otherwise, continue with the following instructions. Lake Formation is how data access control for your Athena tables is managed.
To grant permission to the Security Log database
- Open the Lake Formation console.
- Select the database that you created in Step 2 for your security logs. If you used the Security Analytics Bootstrap, then the table name is either security_analysis or a custom name that you provided—you can find the name in the CloudFormation stack. If you created the Athena table by using the CloudTrail console, then the database is named default.
- From the Actions dropdown, select Grant.
- In Grant data permissions, select IAM users and roles.
- Find the IAM role used by the SageMaker Notebook instance.
- In Database permissions, select Describe and then Grant.
To grant permission to the Security Log CloudTrail table
- Open the Lake Formation console.
- Select the database that you created in Step 2.
- Choose View Tables.
- Select CloudTrail. If you created VPC flow log and DNS log tables, select those, too.
- From the Actions dropdown, select Grant.
- In Grant data permissions, select IAM users and roles.
- Find the IAM role used by the SageMaker notebook instance.
- In Table permissions, select Describe and then Grant.
Step 4: Access the Credential Compromise playbooks by using JupyterLab
The CloudFormation template clones the jupyter-notebook-for-incident-response GitHub repo into your Jupyter workspace.
You can access JupyterLab hosted on your SageMaker notebook instance by following the steps in the Access Notebook Instances documentation.
Your folder structure should match that shown in Figure 2. The parent folder should be jupyter-notebook-for-incident-response, and the child folders should be playbooks and cfn-templates.
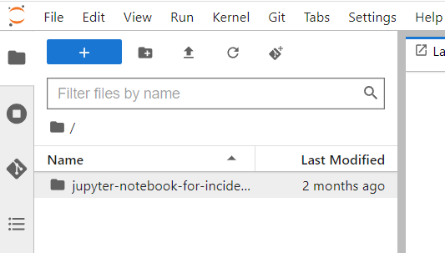
Figure 2: Folder structure after GitHub repo is cloned to the environment
Sample investigation of a spike in failed login attempts
In the following sections, you will use the Jupyter notebook that we created to investigate a scenario where failed login attempts have spiked. We designed this notebook to guide you through the process of gathering more information about the spike.
We discuss the important components of these notebooks so that you can use the framework to create your own playbooks. We encourage you to build on top of the playbook, and add additional queries and steps in the playbook to customize it for your organization’s specific business and security goals.
For this blog post, we will focus primarily on the analysis phase of incident response and walk you through how you can use Jupyter notebooks to help with this phase.
Before you get started with the following steps, open the credential-compromise-analysis.ipynb notebook in your JupyterLab environment.
How to import Python libraries and set environment variables
The notebooks require that you have the following Python libraries:
- Boto3 – to interact with AWS services through API calls
- Pandas – to visualize the data
- PyAthena – to simplify the code to connect to Athena
To install the required Python libraries, in the Setup section of the notebook, under Load libraries, edit the variables in the two code cells as follows:
- region – specify the AWS Region that you want your AWS API commands to run in (for example, us-east-1).
- athena_bucket – specify the S3 bucket URI that is configured to store your Athena queries. You can find this information at Athena > Query Editor > Settings > Query result location.
- db_name – specify the database used by Athena that contains your Athena table for CloudTrail.
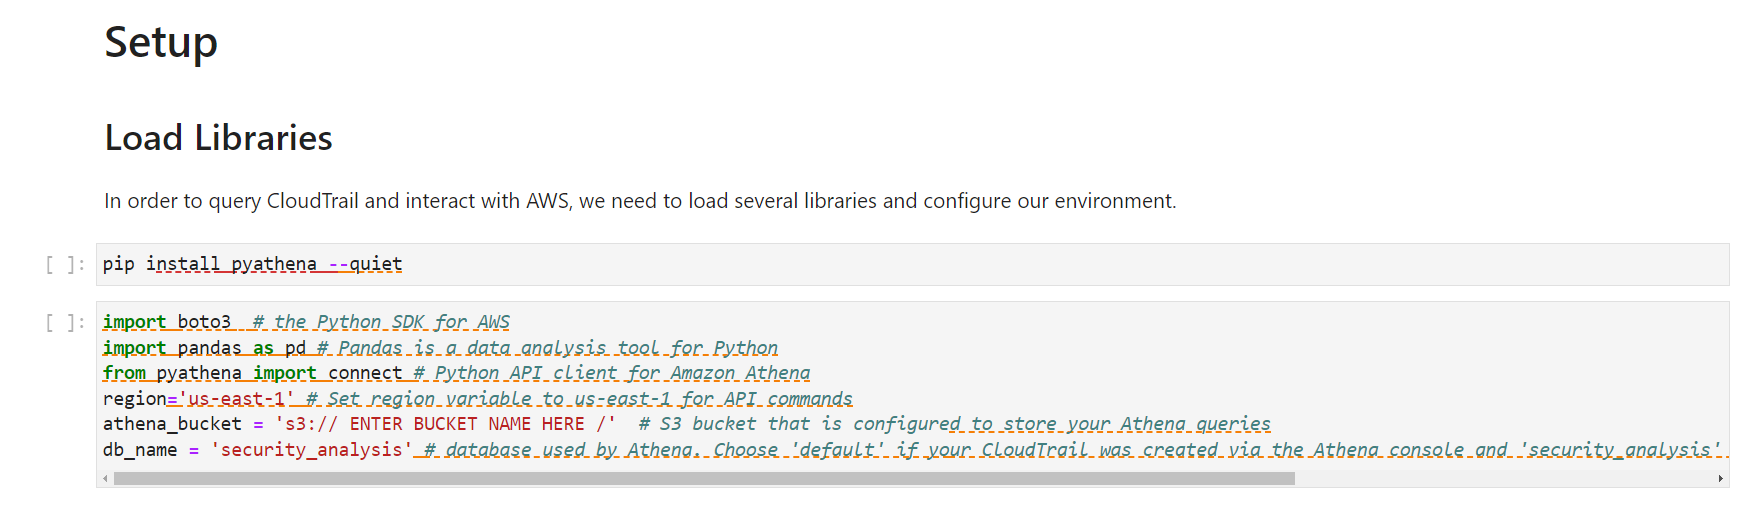
Figure 3: Load the Python libraries in the notebook
This helps ensure that subsequent code cells that run are configured to run in your environment.
Run each code cell by choosing the cell and pressing SHIFT+ENTER or by choosing the play button (▶) in the toolbar at the top of the console.
How to set up the helper function for Athena
The Python query_results function, shown in the following figure, helps you query Athena tables. Run this code cell. You will use the query_results function later in the 2.0 IAM Investigation section of the notebook.
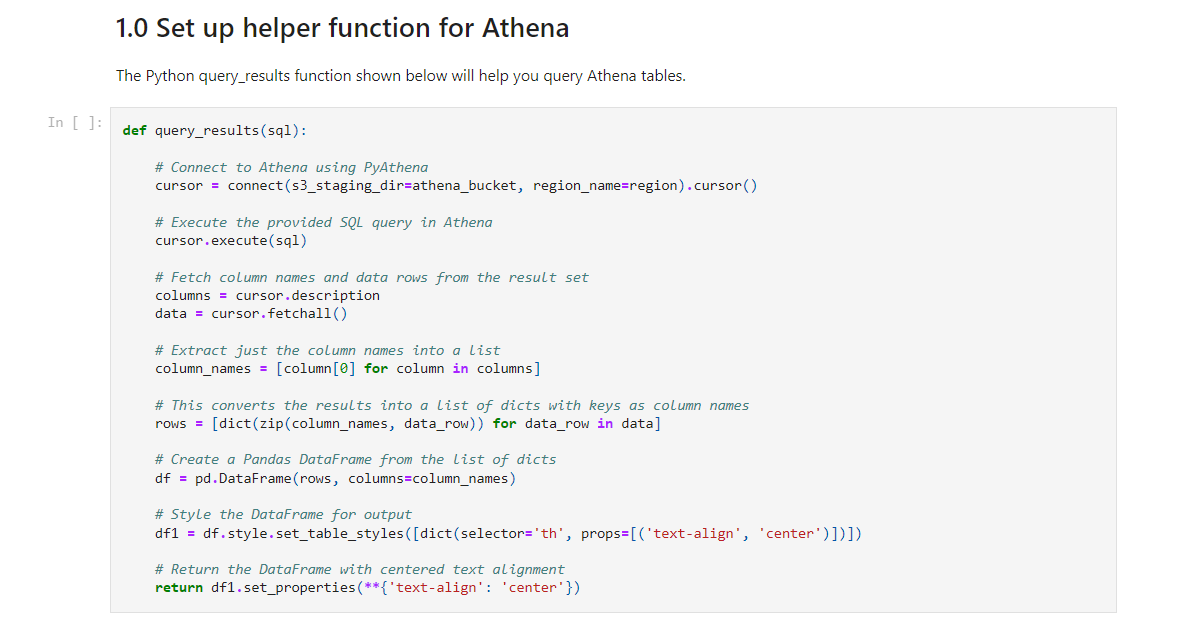
Figure 4: Code cell for the helper function to query with Athena
Credential Compromise Analysis Notebook
The credential-compromise-analysis.ipynb notebook includes several prebuilt queries to help you start your investigation of a potentially compromised credential. In this post, we discuss three of these queries:
- The first query provides a broad view by retrieving the CloudTrail events related to authorization failures. By reviewing these results, you get baseline information about where users and roles are attempting to access resources or take actions without having the proper permissions.
- The second query narrows the focus by identifying the top five IAM entities (such as users, roles, and identities) that are causing most of the authorization failures. Frequent failures from specific entities often indicate that their credentials are compromised.
- The third query zooms in on one of the suspicious entities from the previous query. It retrieves API activity and events initiated by that entity across AWS services or resource. Analyzing actions performed by a suspicious entity can reveal if valid permissions are being misused or if the entity is systematically trying to access resources it doesn’t have access to.
Investigate authorization failures
The notebook has markdown cells that provide a description of the expected result of the query. The next cell contains the query statement. The final cell calls the query_result function to run your query by using Athena and display your results in tabular format.
In query 2.1, you query for specific error codes such as AccessDenied, and filter for anything that is an IAM entity by looking for useridentity.arn like ‘%iam%’. The notebook orders the entries by eventTime. If you want to look for specific IAM Identity Center entities, update the query to filter by useridentity.sessioncontext.sessionissuer.arn like ‘%sso.amazonaws.com%’.
This query retrieves a list of failed API calls to AWS services. From this list, you can gain additional insight into the context surrounding the spike in failed login attempts.
When you investigate denied API access requests, carefully examine details such as the user identity, timestamp, source IP address, and other metadata. This information helps you determine if the event is a legitimate threat or a false positive. Here are some specific questions to ask:
- Does the IP address originate from within your network, or is it external? Internal addresses might be less concerning.
- Is the access attempt occurring during normal working hours for that user? Requests outside of normal times might warrant more scrutiny.
- What resources or changes is the user trying to access or make? Attempts to modify sensitive data or systems might indicate malicious intent.
By thoroughly evaluating the context around denied API calls, you can more accurately assess the risk they pose and whether you need to take further action. You can use the specifics in the logs to go beyond just the fact that access was denied, and learn the story of who, when, and why.
As shown in the following figure, the queries in the notebook use the following structure.
- Markdown cell to explain the purpose of the query (the query statement).
- Code cell to run the query and display the query results.
In the figure, the first code cell that runs stores the input for the query statement. After that finishes, the next code block displays the query results.
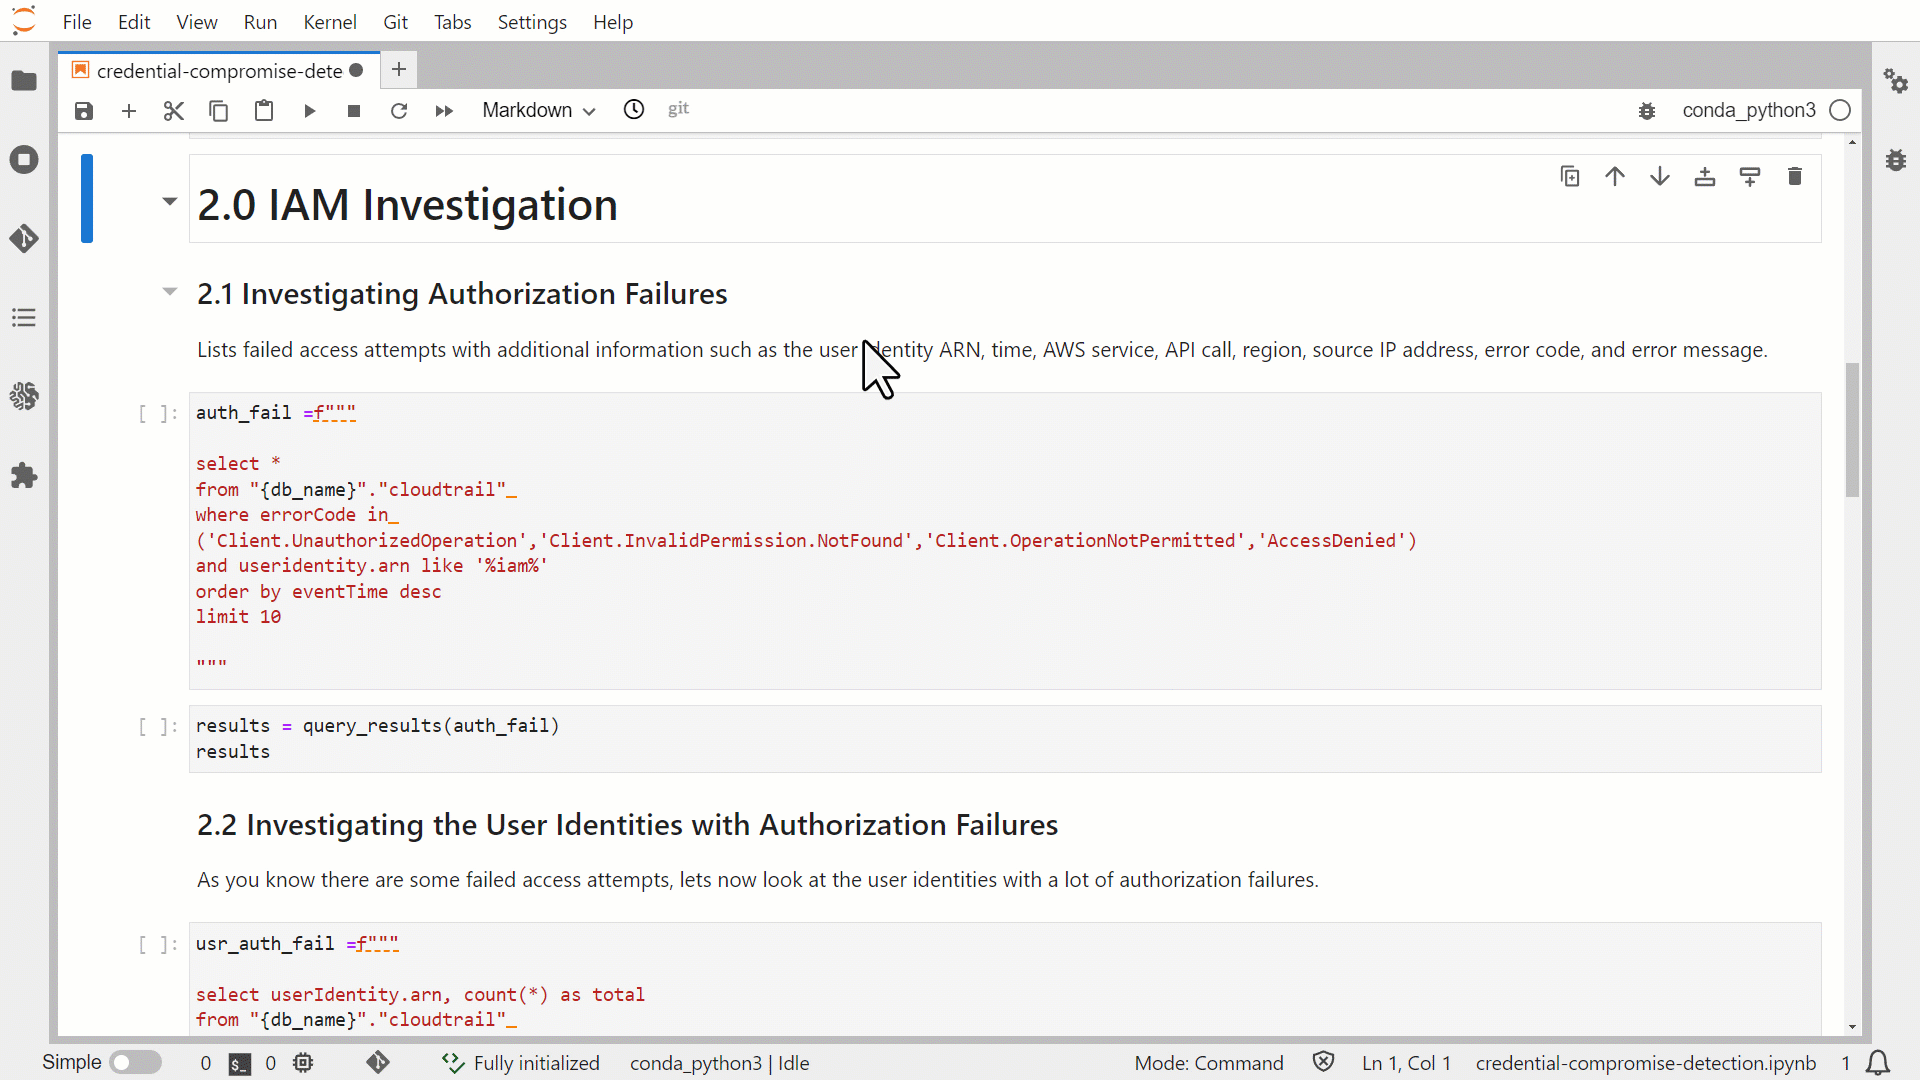
Figure 5: Run predefined Athena queries in JupyterLab
Figure 6 shows the output of the query that you ran in the 2.1 Investigation Authorization Failures section. It contains critical details for understanding the context around a denied API call:
- The eventtime field shows the date and time that the request was completed.
- The useridentity field reveals which IAM identity made a request.
- The sourceipddress provides the IP address that the request was made from.
- The useragent shows which client or app was used to make the call.
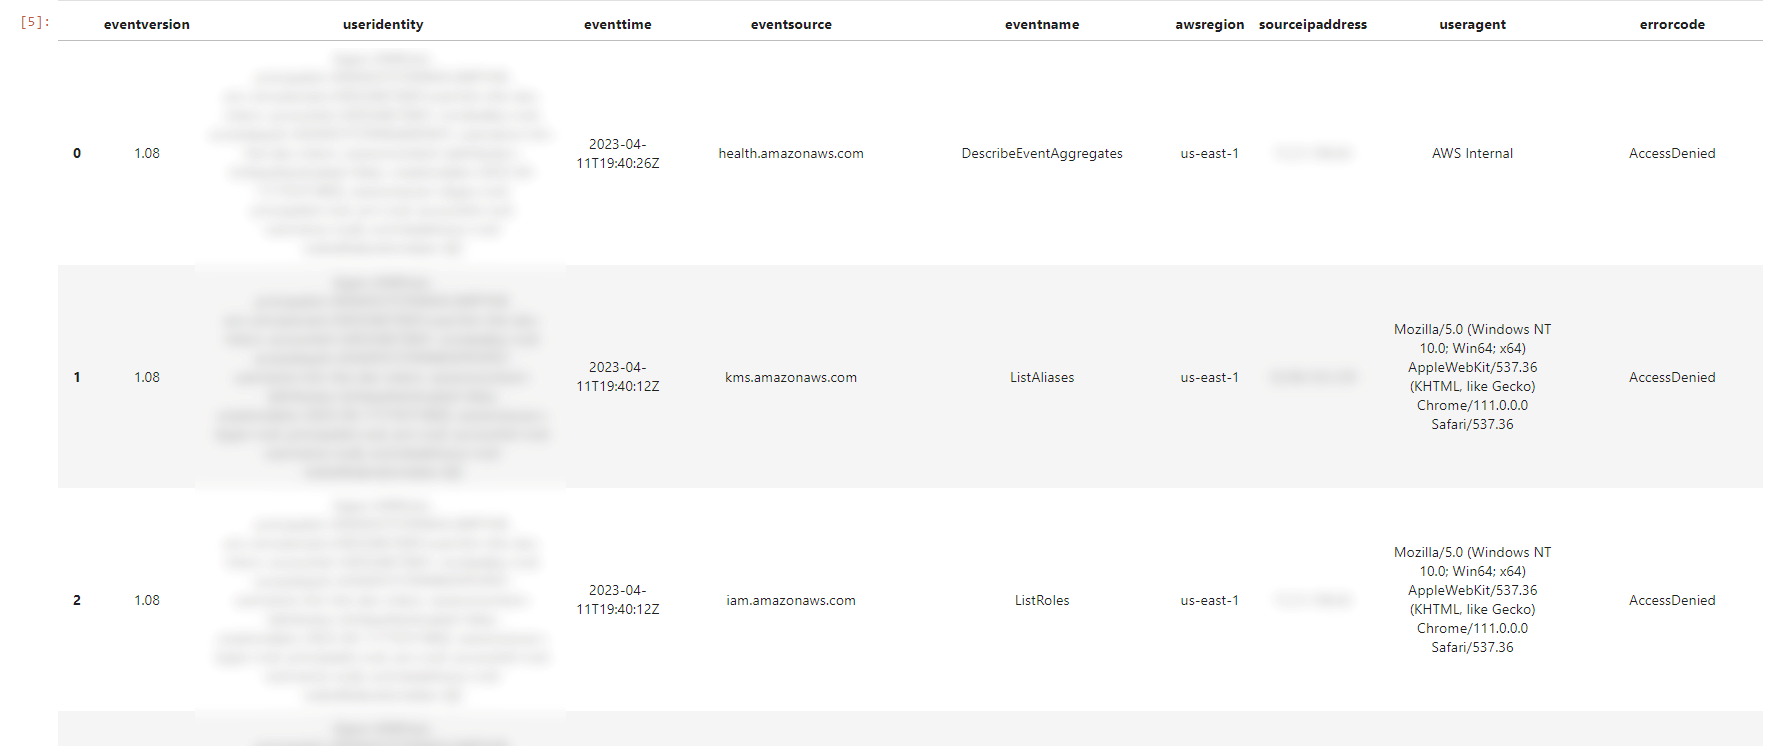
Figure 6: Results from the first investigative query
Figure 6 only shows a subset of the many details captured in CloudTrail logs. By scrolling to the right in the query output, you can view additional attributes that provide further context around the event. The CloudTrail record contents guide contains a comprehensive list of the fields included in the logs, along with descriptions of each attribute.
Often, you will need to search for more information to determine if remediation is necessary. For this reason, we have included additional queries to help you further examine the sequence of events leading up to the failed login attempt spike and after the spike occurred.
Triaging suspicious entities (Queries 2.2 and 2.3)
By running the second and third queries you can dig deeper into anomalous authorization failures. As shown in Figure 7, Query 2.2 provides the top five IAM entities with the most frequent access denials. This highlights the specific users, roles, and identities causing the most failures, which indicates potentially compromised credentials.
Query 2.3 takes the investigation further by isolating the activity from one suspicious entity. Retrieving the actions attempted by a single problematic user or role reveals useful context to determine if you need to revoke credentials. For example, is the entity probing resources that it shouldn’t have access to? Are there unusual API calls outside of normal hours? By scrutinizing an entity’s full history, you can make an informed decision on remediation.
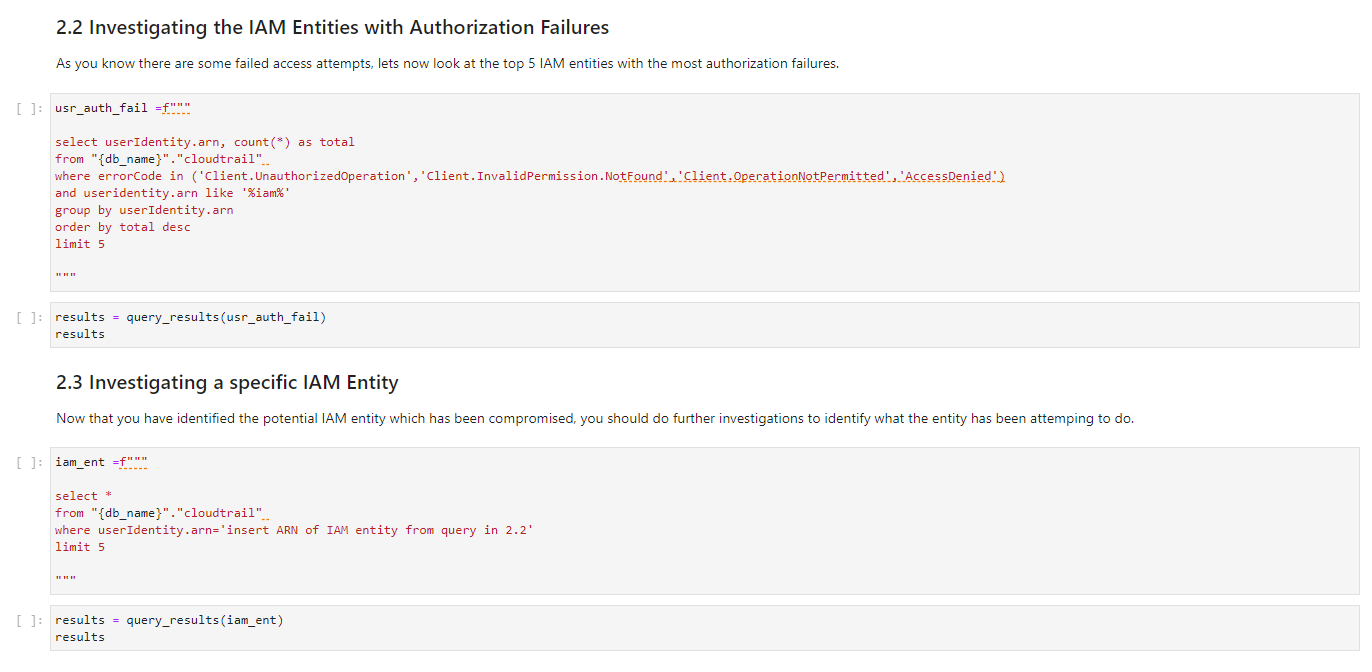
Figure 7: Overview of queries 2.2 and 2.3
You can use these two queries together to triage authorization failures: query 2 identifies high-risk entities, and query 3 gathers intelligence to drive your response. This progression from a macro view to a micro view is crucial for transforming signals into action.
Although log analysis relies on automation and queries to facilitate insights, human judgment is essential to interpret these signals and determine the appropriate response. You should discuss flagged events with stakeholders and resource owners to benefit from their domain expertise. You can export the results of your analysis by exporting your Jupyter notebook.
By collaborating with other people, you can gather contextual clues that might not be captured in the raw data. For example, an owner might confirm that a suspicious login time is expected for users in a certain time zone. By pairing automated detection with human perspectives, you can accurately assess risk and decide if credential revocation or other remediation is truly warranted. Uptime or downtime technical issues alone can’t dictate if remediation is necessary—the human element provides pivotal context.
Build your own queries
In addition to the existing queries, you can run your own queries and include them in your copy of the Credential-compromise-analysis.ipynb notebook. The AWS Security Analytics Bootstrap contains a library of common Athena queries for CloudTrail. We recommend that you review these queries before you start to build your own queries. The key takeaway is that these notebooks are highly customizable. You can use the Jupyter Notebook application to help meet the specific incident response requirements of your organization.
Contain compromised IAM entities
If the investigation reveals that a compromised IAM entity requires containment, follow these steps to revoke access:
- For federated users, revoke their active AWS sessions according to the guidance in How to revoke federated users’ active AWS sessions. This uses IAM policies and AWS Organizations service control policies (SCPs) to revoke access to assumed roles.
- Avoid using long-lived IAM credentials such as access keys. Instead, use temporary credentials through IAM roles. However, if you detect a compromised access key, immediately rotate or deactivate it by following the guidance in What to Do If You Inadvertently Expose an AWS Access Key. Review the permissions granted to the compromised IAM entity and consider if these permissions should be reduced after access is restored. Overly permissive policies might have enabled broader access for the threat actor.
Going forward, implement least privilege access and monitor authorization activity to detect suspicious behavior. By quickly containing compromised entities and proactively improving IAM hygiene, you can minimize the adversaries’ access duration and prevent further unauthorized access.
Additional considerations
In addition to querying CloudTrail, you can use Athena to query other logs, such as VPC Flow Logs and Amazon Route 53 DNS logs. You can also use Amazon Security Lake, which is generally available, to automatically centralize security data from AWS environments, SaaS providers, on-premises environments, and cloud sources into a purpose-built data lake stored in your account. To better understand which logs to collect and analyze as part of your incident response process, see Logging strategies for security incident response.
We recommended that you understand the playbook implementation described in this blog post before you expand the scope of your incident response solution. The running of queries and automation of containment are two elements to consider as you think about the next steps to evolve your incident response processes.
Conclusion
In this blog post, we showed how you can use Jupyter notebooks to simplify and standardize your incident response processes. You reviewed how to respond to a potential credential compromise incident using a Jupyter notebook style playbook. You also saw how this helps reduce the time to resolution and standardize the analysis and response. Finally, we presented several artifacts and recommendations showing how you can tailor this solution to meet your organization’s specific security needs. You can use this framework to evolve your incident response process.
Further resources
- AWS Security Incident Response Guide
- Jupyter-notebook-for-incident-response Github repo
- JupyterLab interface
- Jupyter Notebook cheat sheet
- Logging strategies for security incident response
- Generate machine learning insights for Amazon Security Lake data using Amazon SageMaker
If you have feedback about this post, submit comments in the Comments section below. If you have questions about this post, start a new thread on AWS re:Post or contact AWS Support.
Want more AWS Security how-to content, news, and feature announcements? Follow us on Twitter.