AWS Security Blog
Learn more about the new allow list feature in Macie
Updated on September 7, 2022: This post had been updated to correct the allow list in Macie.
Amazon Macie is a fully managed data security and data privacy service that uses machine learning and pattern matching to discover and help you protect your sensitive data in Amazon Web Services (AWS). The data that is available within your AWS account can grow rapidly, which increases your need to verify that all sensitive data is identified and protected. Macie provides you with the ability to use both managed data identifiers and custom data identifiers, but enabling these identifiers for every job could result in a large number of security findings that might not take into account how data is used within your AWS account. So that you can tailor the detection and creation of findings within Macie, Macie now has an allow list feature available for use with your scanning jobs.
In this blog post, we show you how to set up an allow list in Macie and run a Macie scan that uses the allow list to ignore the specified values when creating sensitive data findings. The allow list feature can help your sensitive data management team by reducing false positives due to data text or formats in your environment that do not require action. This makes it easier for your team to focus on Macie findings that need to be reviewed and remediated. By increasing the overall confidence in findings presented by Macie, you can improve the performance of automated workflows and solutions.
Prerequisites
To get started, you’ll need the following prerequisites:
- An active AWS account
- Amazon Macie enabled within your AWS account
- (Optional) Member AWS accounts are enabled using AWS Organizations and a delegated Macie administrator account
Create an allow list in Macie
You can configure allow lists with either regular expressions (regex) or predefined text. Use a predefined text allow list if you have a list of specific values you want to exclude, like a list of example fake names or employee IDs that are used in test data sets. Alternatively, if you don’t have the exact values but know the pattern to exclude, you can use a regex allow list. Some use cases for a regex allow list could be to exclude tracking IDs or public reference numbers that could resemble a Macie managed data identifier or custom data identifier.
It is important to note that allow lists, and S3 objects if using predefined text, must be created in the same AWS account where the Macie job is created.
- If Macie jobs are created from the Macie delegated administrator AWS account to scan member AWS accounts, then the allow lists must be centrally configured in the Macie delegated administrator account.
- If Macie jobs are created from the member AWS account to scan buckets within the same AWS account, then the allow lists must be configured in the same AWS account where the Macie job is created.
To create an allow list by using the Amazon Macie Console
- In the Amazon Macie Console, navigate to Macie.
- Under Settings, choose Allow lists.
- Choose Create.
- Choose a list type.
- If you’re creating a regex allow list, choose Regular expression. For List settings, enter the following settings for the allow list.
- For Name, enter the name of the list.
- For Description, enter a description (optional).
- For Regular expression, enter the regular expression. Macie will not create findings for any matches on the allow list regex.
- Evaluate with sample data if needed to test your regex. Macie provides an Evaluate option so you can test your regex against sample data sets to make sure it’s working as expected.
- If you’re creating a predefined text allow list, choose Predefined text. For this option, you will need to create a plaintext file and upload the file to an Amazon Simple Storage Service (Amazon S3) bucket. Once you upload the file, you can then reference the Amazon S3 object in the allow list.
- Enter the name of the list.
- Enter a description for the list (optional).
- Enter the S3 bucket name.
- Enter the S3 object name of the plaintext file.
Note: The Macie service-linked role must have the ability to read the S3 object for the predefined text. When you run Macie jobs that use allow lists with predefined text, the Macie service-linked role will read the S3 object. If there is any error reading the S3 object, the Macie job will continue to run without using the predefined text allow list. You will need to periodically check your allow lists to make sure they are in an OK status. You can check the status of each allow list in the Amazon Macie console or via the AWS CLI using the get-allow-list API.
More information and explanation for status of allow list can be found in the Amazon Macie User Guide.
- If you’re creating a regex allow list, choose Regular expression. For List settings, enter the following settings for the allow list.
- Choose Create to create the allow list.
Note: An allow list must be stored in an S3 bucket in the same AWS account and AWS Region as your Macie account. Macie cannot access an allow list if it is stored in a different Region or account.
You can also create and manage allow lists by using the Amazon Macie console, AWS Command Line Interface (AWS CLI) or AWS CloudFormation.
To create or manage an allow list by using the AWS CloudFormation
Below is an example enabling Amazon Macie for an account. The session resource configures Macie to publish updated policy findings for the account.
Below is an example of creating an allow list that uses a regular expression to specify a text pattern to ignore. Like other Macie resources, the DependsOn attribute is a required dependency for creating a Macie allow list.
Below is an example creating an allow list that specifies a list of predefined text to ignore.
To create or manage an allow list by using the AWS CLI
- In the AWS CLI, run the following commands to create an allow list with a regular expression.
aws macie2 create-allow-list \

 --criteria '{"regex":"<insert-regex-expression>"}' \

 --name "<insert-allow-list-name>" \

--description "<insert-allow-list-description>" - In the AWS CLI, run the following commands to create an allow list with predefined text.
aws macie2 create-allow-list \

 --criteria '{"s3WordsList":{"bucketName":"<DOC-EXAMPLE-BUCKET>","objectKey":"<OBJECT-EXAMPLE-KEY>"}}' \

 --name "<insert-allow-list-name>" \

--description "<insert-allow-list-description>" - In the AWS CLI, run the following commands to update an existing allow list.
aws macie2 update-allow-list --id <GUID-for-Macie-allow-list> example --description <insert-new-description> - In the AWS CLI, run the following commands to delete an existing allow list.
aws macie2 delete-allow-list --id <GUID-for-Macie-allow-list> example --ignoreJobChecks false - In the AWS CLI, run the following commands to get existing allow lists.
aws macie2 get-allow-list –id <GUID-for-Macie-allow-list>
For a detailed list of available AWS CLI commands, refer to the AWS CLI documentation for Amazon Macie.
Use the allow list in a Macie scan
After you create allow lists, you can create and run sensitive data discovery jobs in Macie. This will enable you to review, analyze, and compare findings about the affected resources in Amazon S3 buckets with or without allow lists.
Option 1: Create a Macie job with the allow list by using the console
- Go to the Amazon Macie Console and navigate to Macie.
- In the navigation pane, choose Jobs, and then choose Create job.
- On the Choose Amazon S3 buckets page, choose Select specific buckets.
Note: Macie displays a list of all the buckets managed by your AWS account, including members if configured, in the current Region.
- Under Select Amazon S3 buckets, optionally choose Refresh to retrieve the latest bucket metadata from Amazon S3.
- In the table, select each bucket you want the job to analyze, and then choose Next.
- Review and optionally adjust the list of S3 buckets that you selected for the job, and then choose Next.
- Refine the scope of the job, if needed. Use these settings to specify how often you want the job to run and the depth and scope of the job’s analysis, and then choose Next.
- Select any managed data identifiers you want to use, and then choose Next.
- Select any custom data identifiers that you want to use, and then choose Next.
- Select the allow lists that you created to ignore either predefined text or regular expression patterns for any objects in the job, and then choose Next.

Figure 1: Selecting allow lists for a Macie job
- In General settings, enter a name for the job. You can also enter a description and assign tags to the job. Choose Next.
- Review and create the job, and then choose Submit.
Option 2: Create a Macie job with the allow list by using the AWS CLI
- In the AWS CLI, run the following command.
aws macie2 create-classification-job \

--generate-cli-skeleton > <insert-macie-job-input-json> - Input the GUID for the Macie allow list as part of the Macie job input in the JSON file.
- Run the following command.
aws macie2 create-classification-job \

 --cli-input-json file://<insert-macie-job-input-json>
Review Macie findings before and after allow lists
It is important to note that for any existing jobs you configured in your AWS account or organization prior to the Macie allow list feature being released, you will need to recreate those Macie jobs and reference the allow lists you want the job to use. This is only required if you want to have existing jobs use allow lists.
Before you run a Macie job that uses predefined text allow lists, verify that existing Amazon Key Management Service (AWS KMS) keys that are used to encrypt buckets and S3 bucket policy grant the Macie service-linked role the necessary permissions to decrypt the S3 objects.
Figure 2 shows an example of predefined text allow lists for sensitive data discovery jobs, that include credit card numbers, Social Security Numbers (SSNs), and first and last names. The values in the S3 object allow lists will not create Macie findings when the sensitive data discovery job inspects S3 objects.
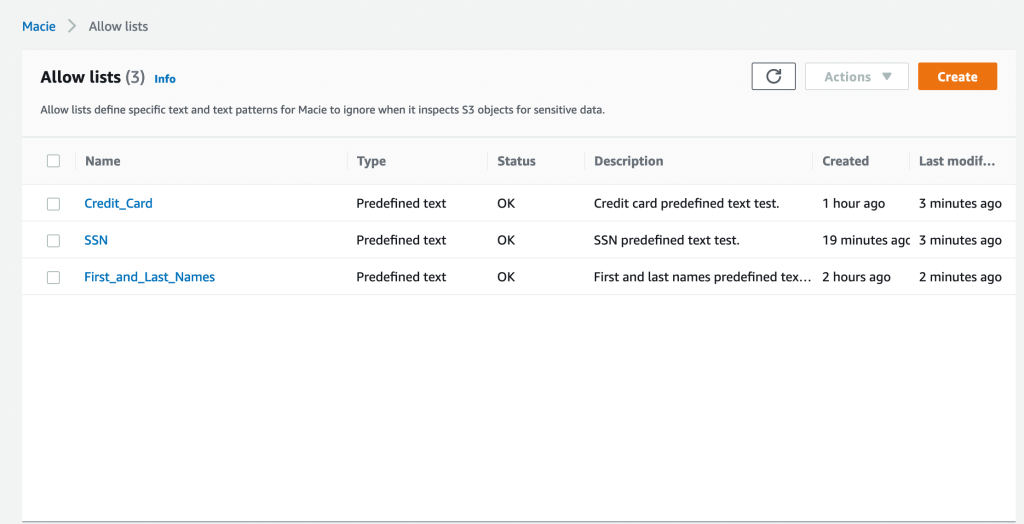
Figure 2: Example list of existing allow lists
Figure 3 shows a sensitive data discovery job that does not include the predefined text allow lists.
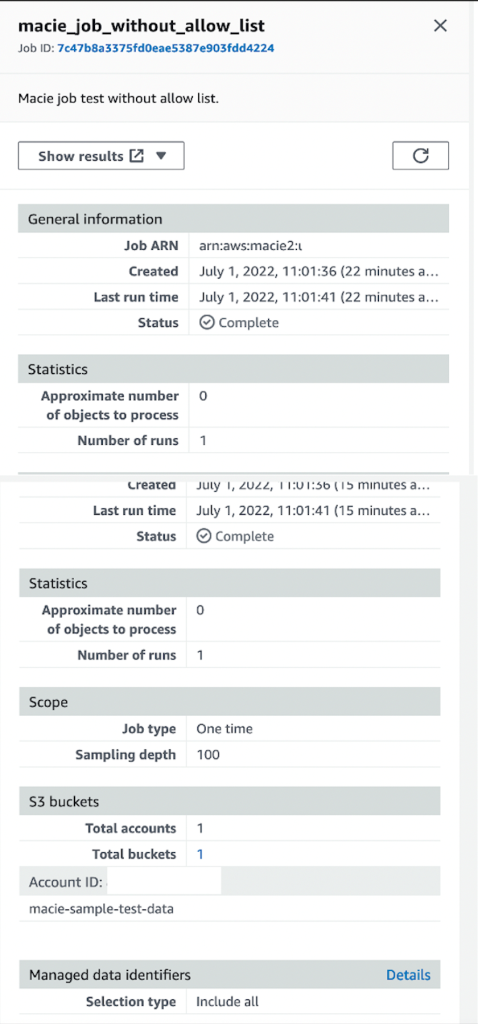
Figure 3: Macie job example without allow list configured
Since there are no allow lists configured, Macie creates findings for credit card numbers, United States SSNs, and names, as shown in Figure 4.

Figure 4: Macie job scan without allow list results
Figure 5 shows a sensitive data discovery job that does include the use of a predefined text allow lists.
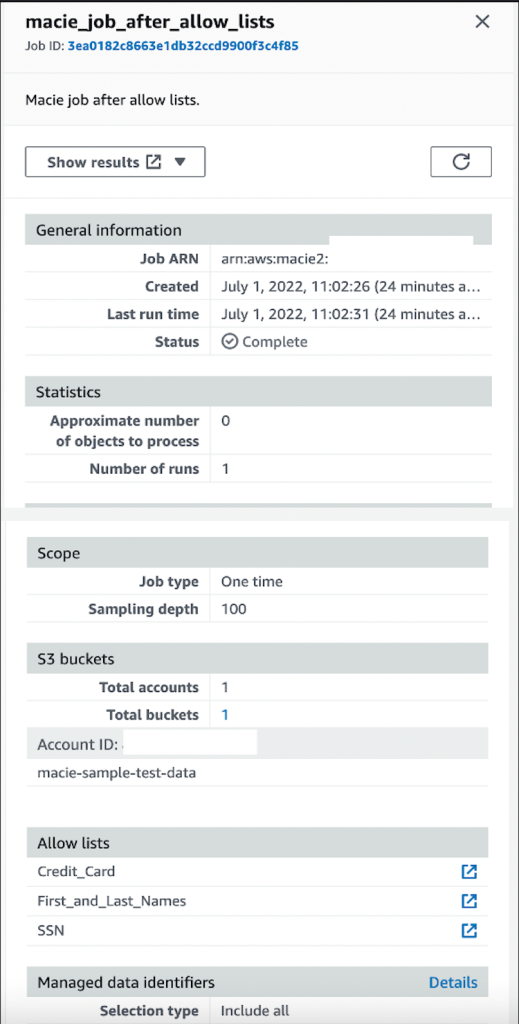
Figure 5: Macie job example with allow list configured
Because we have configured an allow list for this job, Macie creates no findings for credit card numbers, United States SSNs, and names. Figure 6 shows the lack of findings.
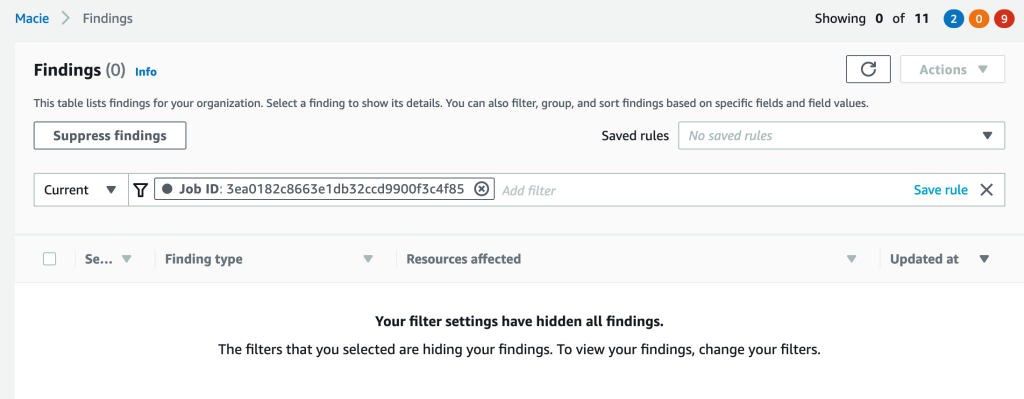
Figure 6: Macie job results with allow list configured
Conclusion
In this post, we walked through how to create, manage, and use Macie allow lists with your Macie jobs. Reducing Macie false-positive findings can help your security team to efficiently identify and protect sensitive data within your AWS environment.
Now that we’ve showed you how to create an allow list in Macie, you can use this feature to tailor Macie in your AWS environment, based on your use cases and workloads. After you’ve reduced the false positives in your environment, you can start looking at how to add in automation to respond to Macie findings with allow lists configured.
Try implementing the solution in this blog post for auto-remediation behavior based on finding type and finding severity. Alternatively, since Macie is automatically integrated with AWS Security Hub, you could implement this automated solution to respond to Macie findings by using by Security Hub custom actions.
If you have feedback about this post, submit comments in the Comments section below. If you have questions about this post, contact AWS Support.
Want more AWS Security news? Follow us on Twitter.