AWS Storage Blog
Failover Microsoft Azure workloads to AWS using AWS Elastic Disaster Recovery
Enterprises strive to make sure that business critical applications, workloads, and data remain available during planned and unplanned downtime. When using the cloud, organizations must make sure to apply the same approach to business continuity and disaster recovery as they would with on-premises infrastructure.
Customers on the cloud can leverage AWS Elastic Disaster Recovery (AWS DRS) to recover applications across AWS Regions or Availability Zones (AZs) and also to recover applications running on other clouds using AWS as a disaster recovery site. Elastic Disaster Recovery offers low recovery time objectives (RTOs) measured in minutes, and low recovery point objectives (RPOs) measured in seconds, to support business-critical workloads.
In this post, we demonstrate how you can use Elastic Disaster Recover to protect business-critical applications hosted on Microsoft Azure. Elastic Disaster Recovery lets you test failover from Azure to AWS in a manner that doesn’t impact production workloads.
Some of the key benefits of the solution are as follows.
- Recover your applications within minutes, at their most up-to-date state or from a previous point in time
- Use a unified process to test, recover, and fail back a wide range of applications, without specialized skillsets
- Gain flexibility using AWS as your elastic recovery site, with the ability to add or remove replicating servers as needed
- Save costs by removing idle recovery site resources, and pay for your full disaster recovery site only when needed
Prerequisites
The following prerequisites are necessary for this solution:
- AWS
-
- You have an active AWS account
- You have Amazon Virtual Private Cloud (Amazon VPC)
- You have a dedicated Subnet to host the replication server of Elastic Disaster Recovery
- Azure
- You have an active Azure subscription
- You have a virtual network with required subnets on Azure
- You have a VM available on Azure for testing
Solution overview and walkthrough
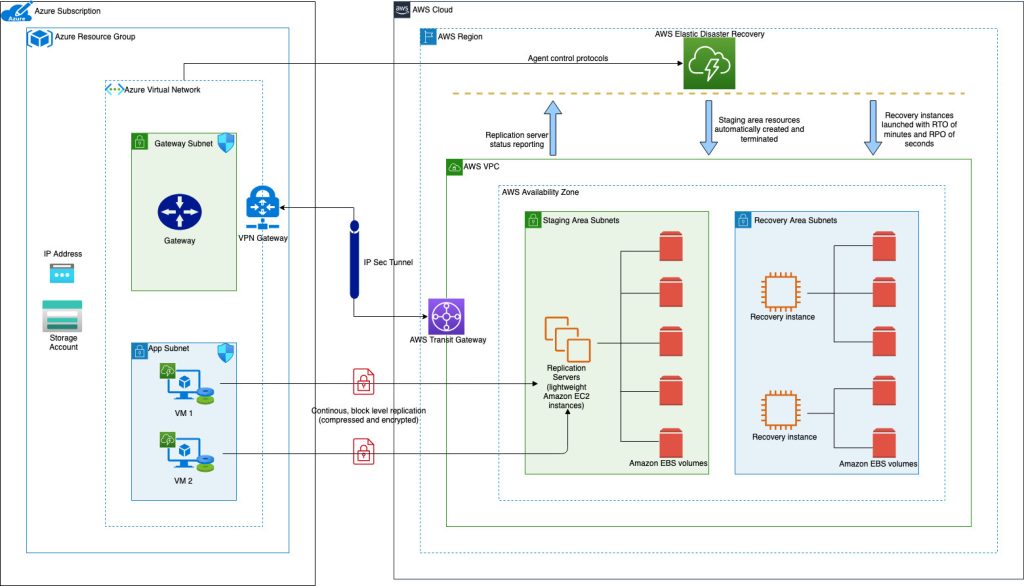
The following diagram represents the architecture for a disaster recovery solution from Azure to AWS.
In this solution, we cover the following steps:
- Configuring the landing zones
- Configuring Elastic Disaster Recovery
- Performing initial replication sync
- Initiating failover from Elastic Disaster Recovery
- Update DNS to direct traffic to the Recovery Subnet and Recovered Instance
1. Configure landing zones
We start by building connectivity from Azure to AWS to allow block-level replication of our source servers on Azure to the staging subnet on AWS. The connectivity is represented in the following diagram.

1.1 Create networking components on Azure
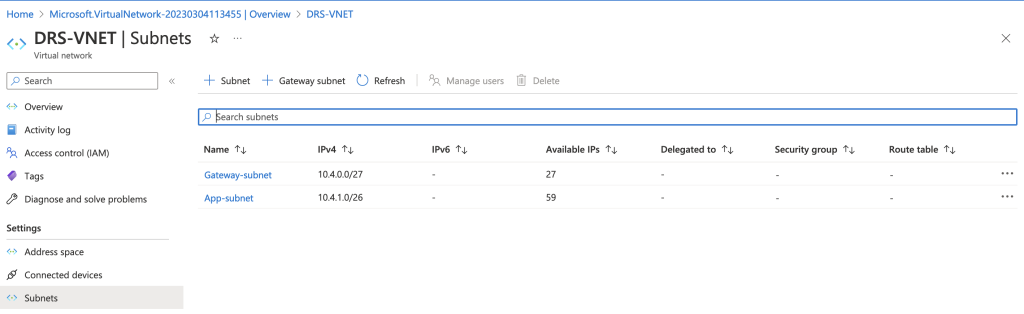
As part of the prerequisites, we created a VNET named DRS-VNET on Azure as follows:
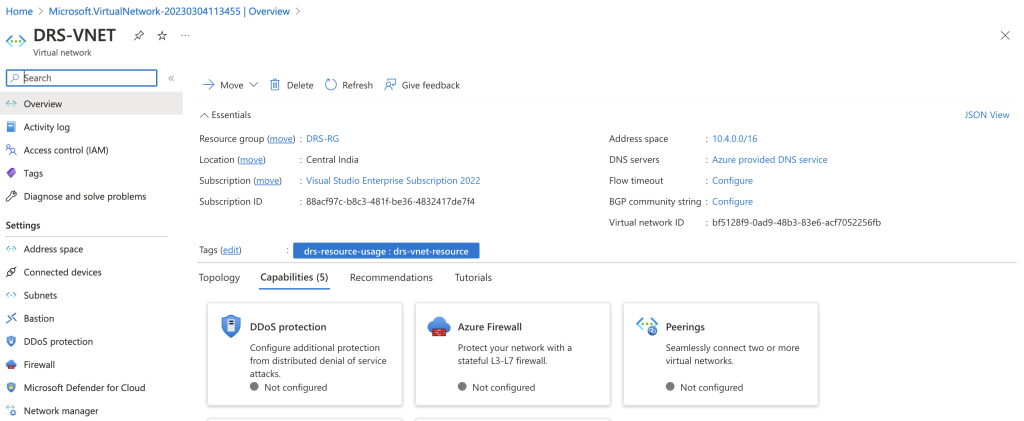
Under DRS-VNET, we have created two Subnets, which we namedGateway-subnet and App-subnet. We use Gateway-subnet for establishing site-to-site connectivity between AWS and Azure networks. We use App-subnet for hosting the source server to replicate it as part of replication process.
1.1.2. Create VPN gateway
In this step, we create the virtual private network gateway (VPN gateway) for the VNet. Creating a VPN gateway can often take 45 minutes or more, depending on the selected gateway SKU.
Create a virtual network gateway using the following values:
-
- Name: DRSVPNGW
- Region: Central India
- Gateway type: VPN
- VPN type: Route-based
- SKU: VpnGw1
- Generation: Generation 1
- Virtual network: DRS-VNET
- Gateway subnet address range: Gateway Subnet (10.4.0.0/27)
- Public IP address: Create new
- Public IP address name: drsvpngwPIP
- Enable active-active mode: Disabled
- Configure BGP: Disabled

1.2. Create networking components on AWS
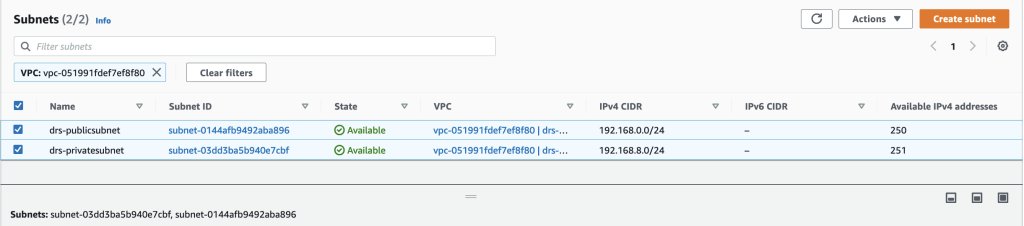
As part of the prerequisites, we created a VPC named drs-vpc on AWS.

Under drs-vpc, we created two Subnets (a public subnet and a private subnet). We use the public subnet for establishing site-to-site connectivity with Azure and for hosting the Elastic Disaster Recovery replication server, and we use the private subnet for hosting the failover server.
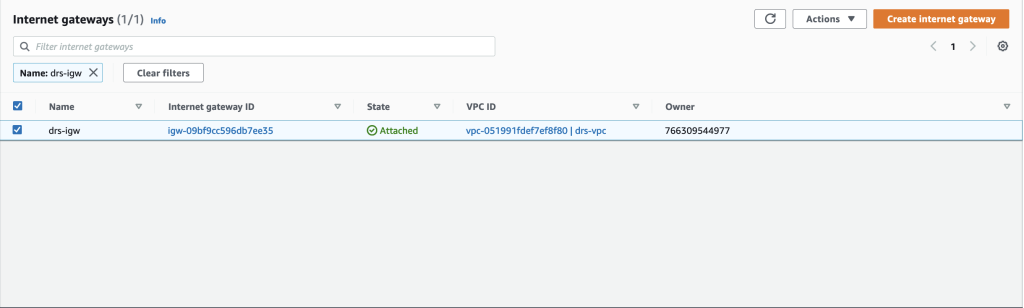
Then, we create an Internet Gateway named drs-igw and attach it to our VPC (drs-vpc). Refer to steps in the Amazon VPC User Guide for instructions on how to do this.
We then Create a virtual private gateway named drs-vpgw, with Amazon default ASN on the AWS side for site-to-site connectivity.
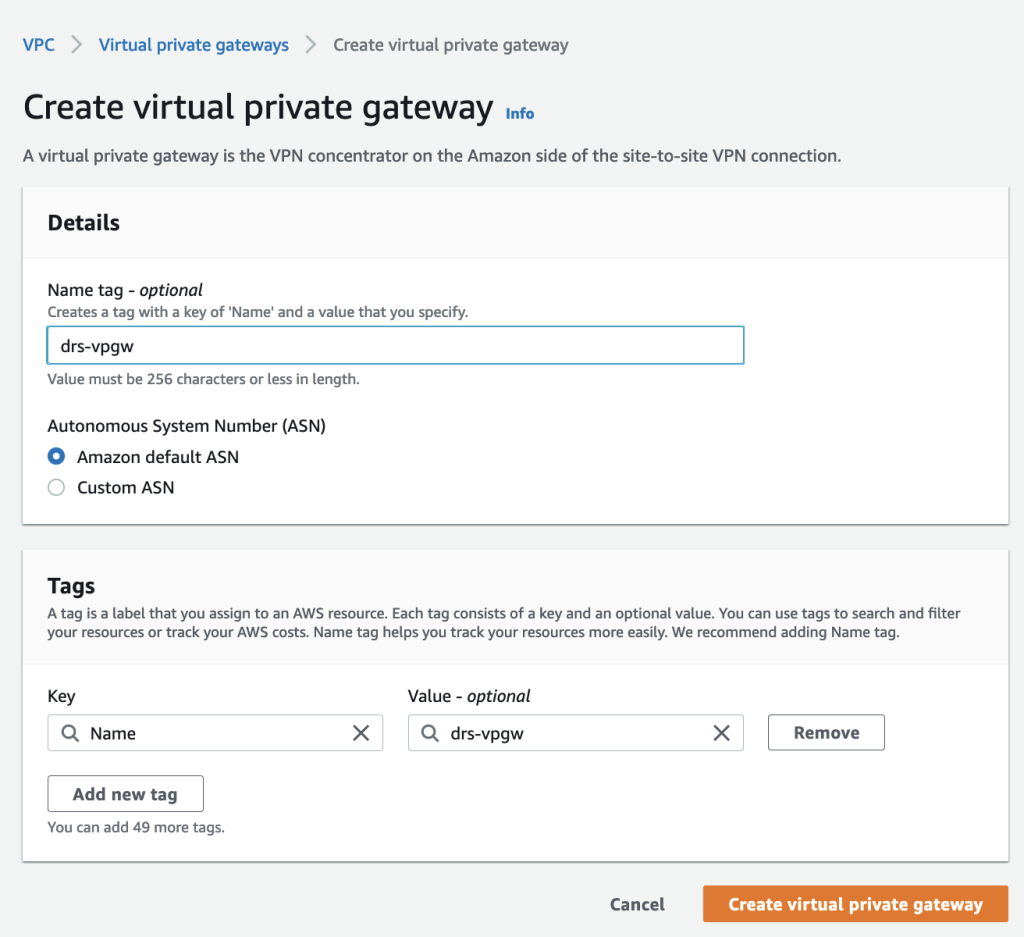
On the Attach to VPC page, attach the newly created drs-vpgw to the VPC (drs-vpc). Then select Attach to VPC.

After you select Attach to VPC, the state changes to “Attached” as shown in the following screenshot:

Now we Create customer gateway named drs-cgw, with BGP ASN value of 65000. We also provide the public IP address of the Azure side, in our case the IP address is 20.204.67.28.

After you select Create customer gateway, the state changes to “Available” as shown in the following screenshot.

1.3. Establish site-to-site connection between Azure and AWS
As part of the site-to-site connection, we now create a VPN connection on AWS from the Create VPN connection page by selecting the target gateway type as Virtual private gateway, and select existing Virtual private gateway “drs-vpgw”. Similarly, we select the Customer gateway as Existing “drs-cgw”. Routing options should be Static, with the Static IP prefix set to 10.4.0.0/16 (Azure vnet range).
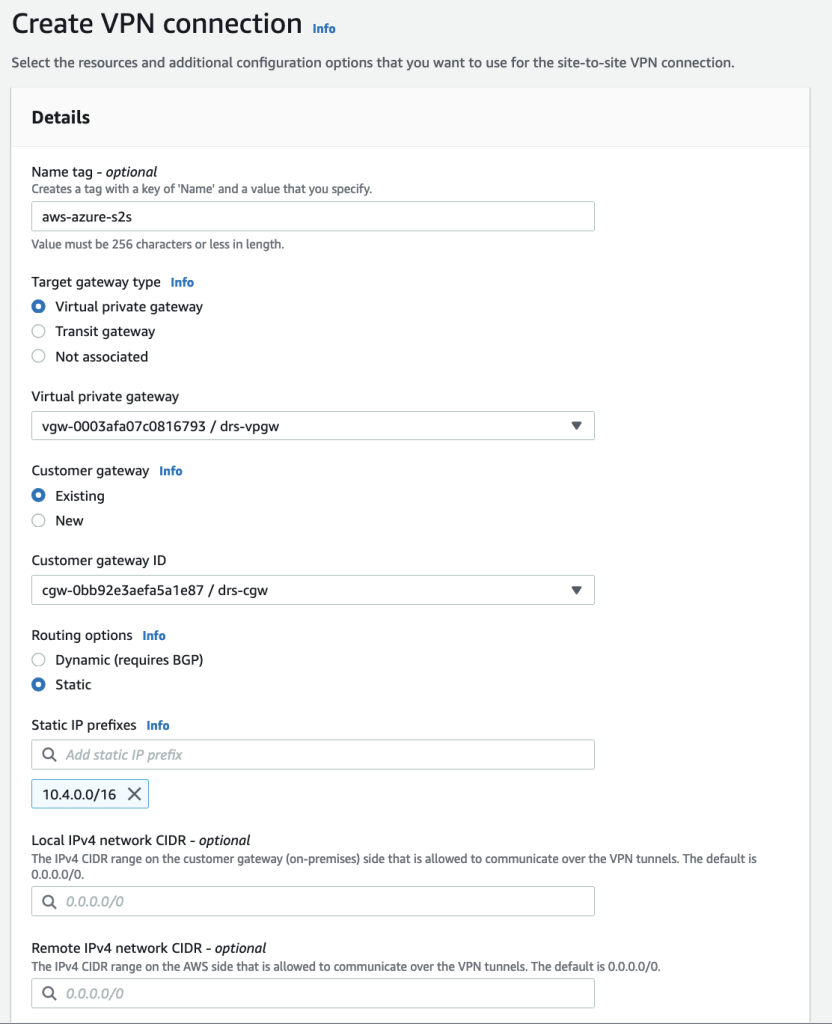
As part of this exercise, we create only one tunnel. In this example, we select Use default options for Advanced options for tunnel 1. However, for production usage, we recommend establishing redundant tunnels for High Availability

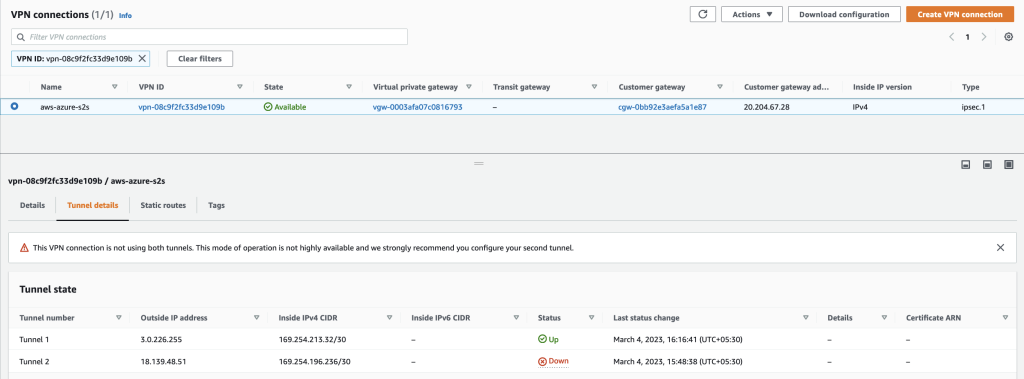
Select Create VPN connection, and you should see the state as Available, as shown in the following screenshot of the VPN connections page.

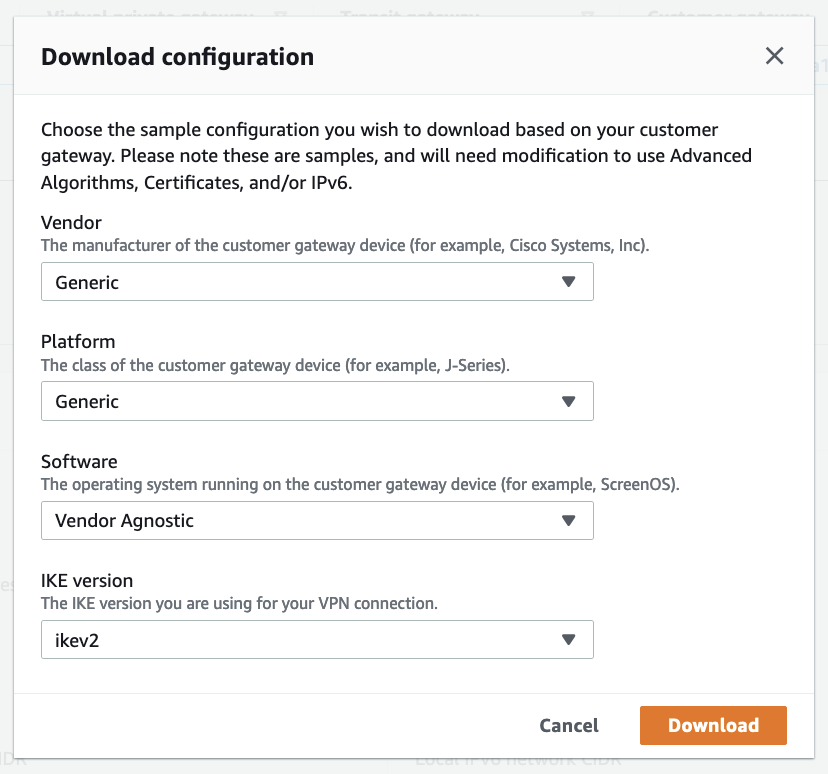
Select Actions and navigate to Download configuration. For Vendor select Generic, for Platform select Generic, for Software select Vendor Agnostic), and for IKE version select ikev2.
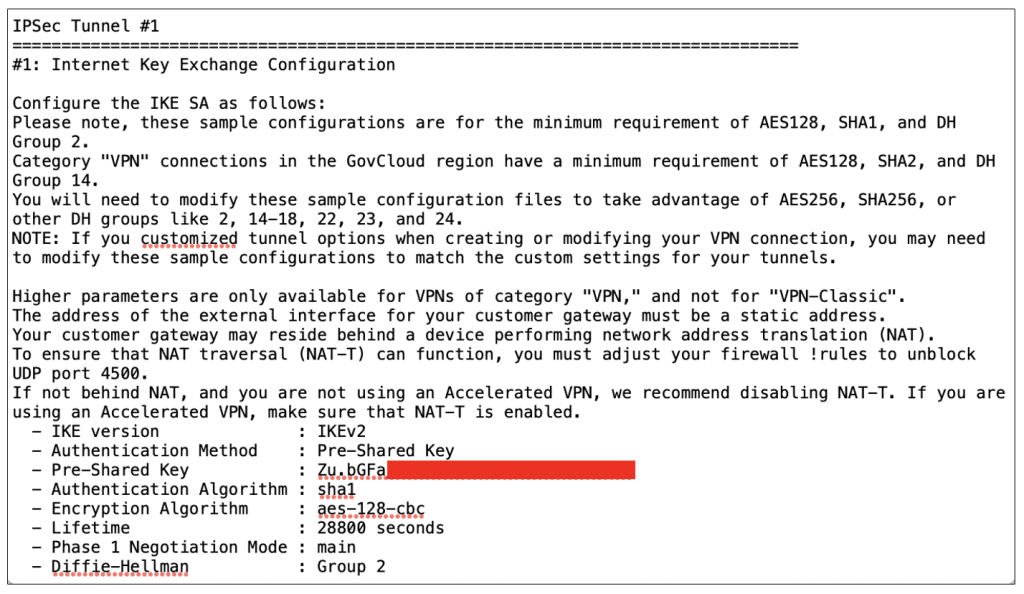
Select Download, open the file in a text editor, navigate to IPsec Tunnel #1, and copy the Pre-Shared Key. In the following screenshot, we masked the pre-shared key for security and privacy.
Navigate to the outside IP addresses and copy the Virtual Private Gateway IP address as highlighted in the following screenshot.

Go to the Azure portal, navigate to the local network gateway, and create one with the IP address 3.0.226.255 – this is the AWS virtual private gateway IP address. Then, provide the AWS VPC range under Address space(s) as 192.168.0.0/20 – this is the AWS VPC range (drs-vpc).

In the newly created local network gateway (awsazure-lng), navigate to connections, select Add provide connection type as site-to-site connection, select virtual network gateway (drsvpngw) and local network gateway (awsazure-lng). These are the existing resources which we created in the previous steps. Paste the pre-shared key that we copied previously from the configuration file and select OK.
The connection status is Connected as shown in the following screenshot:

VPN tunnel1 is up on AWS.
The Azure side tunnel is also up.

2. Configuring Elastic Disaster Recovery
The following are step-by-step guidelines to configure Elastic Disaster Recovery.
2.1. Accomplish the Elastic Disaster Recovery prerequisites
Elastic Disaster Recovery must be initialized upon first use from within the Elastic Disaster Recovery console. The initialization process occurs automatically once a user accesses the Elastic Disaster Recovery console. The user is directed to create the default Replication Settings, and upon saving the template, the service is initialized by creating the IAM Roles which are required for the service to work.
AWS Replication Agent is used to replicate the source servers. For the said agent to communicate with Elastic Disaster Recovery, we allow two required TCP ports (1500 and 443) from Azure to AWS where TCP 443 is required to connect Azure source servers to the Elastic Disaster Recovery endpoint, and TCP 1500 is used for replicating data from Azure to AWS. Moreover, the servers on the Azure side must have access to Amazon Simple Storage Service (Amazon S3) URLs. These are required for downloading the Elastic Disaster Recovery Agent software.
The following diagram shows the networking requirements:

2.2. Create an AWS Identity and Access Management (IAM) user on AWS for Elastic Disaster Recovery
Once the Elastic Disaster Recovery service is initialized, it creates the IAM Roles that are required for the service to work.
-
-
- AWSServiceRoleForElasticDisasterRecovery
- AWSElasticDisasterRecoveryReplicationServerRole
- AWSElasticDisasterRecoveryConversionServerRole
- AWSElasticDisasterRecoveryRecoveryInstanceRole
- AWSElasticDisasterRecoveryAgentRole
- AWSElasticDisasterRecoveryFailbackRole
-
For more details, refer to the Elastic Disaster Recovery initialization and permissions.
3. Performing initial replication sync
3.1. Download and Install AWS Replication Agent on the source environment on Azure
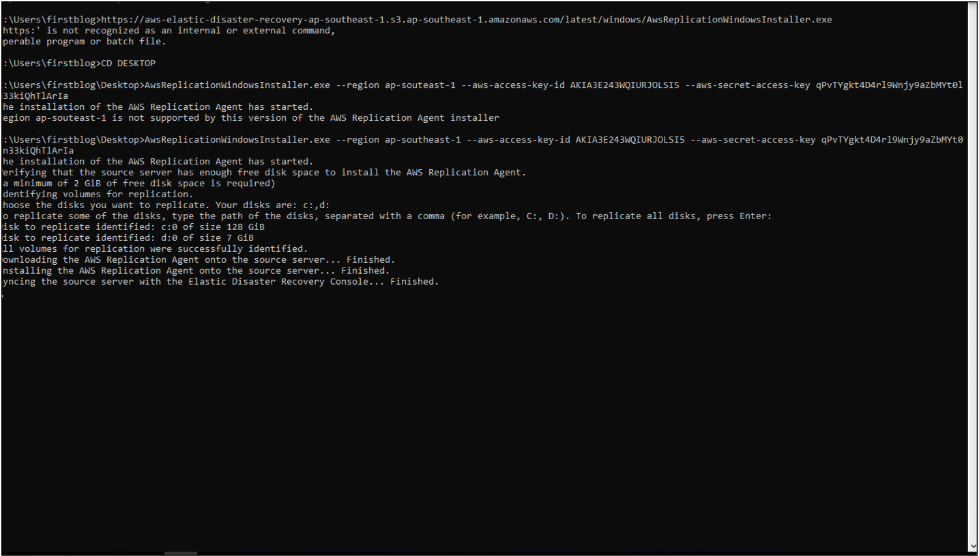
Before installing the AWS Replication Agent, AWSReplicationWindowsInstaller.exe, it must be downloaded.
The following is an example URL for downloading the installer file on the source server from the ap-southeast-1 region:
Install the AWS Replication Agent to start the replication to AWS. The following is an example for installation on a Windows server.
AwsReplicationWindowsInstaller.exe --region regionname --aws-access-key-id AKIAIOSFODNN7EXAMPLE --aws-secret-access-key wJalrXUtnFEMI/K7MDENG/bPxRfiCYEXAMPLEKEY)
IAM credentials having Elastic Disaster Recovery roles are used by the agent to authenticate with Elastic Disaster Recovery. If it succeeds, then it creates a source server on the Elastic Disaster Recovery console and returns a server ID. The replication starts soon after.
3.2. Configure/ customize default replication settings on Elastic Disaster Recovery
To edit the Replication Settings, you must edit your default Replication Settings. Choose Settings from the left-hand navigation menu from the Elastic Disaster Recovery console. This opens the default Replication Settings view. Choose Edit default to edit your account-wide replication settings. These settings changes are applied to each newly added server. However, they won’t affect servers that have already been added to Elastic Disaster Recovery.
4. Initiating failover from Elastic Disaster Recovery
4.1. Configure launch settings on Elastic Disaster Recovery
Prior to launching your instances, you must make sure that your environment is set up properly to make sure of successful launches.
Refer to the General launch settings for the DR drill. Elastic Disaster Recovery utilizes Amazon Elastic Compute Cloud (Amazon EC2) launch templates to launch Drill and Recovery EC2 instances for each source server. This is required to configure the target instance that we launch for a Drill/Disaster. Failure to select the right setup may cause the replication instance or the Drill/Recovery instances not to start properly on AWS. Therefore, you must make sure that you select the right combination. Refer to the Amazon EC2 Launch Template for a full example of setting up a launch template in Elastic Disaster Recovery.
4.2. Prepare and perform the test failover
Once replication is complete, the Recovery status should show the Ready state and the data replication status should also show healthy. We can proceed with testing of our recovery instances on AWS. To prepare for failover, conduct a failover test to make sure that all network and application settings are properly setup and configured. Performing frequent testing makes sure that your disaster recovery strategy is up-to-date, and provides the confidence that it can perform as expected when required.
Now you can initiate a drill using the initiate recovery job drop down shown in the following:

By default, Elastic Disaster Recovery retention is seven days. However, it supports up to 365 days. The cost varies as per the retention point set in the replication settings. As part of this post, we go with the most recent data point in time, which gives us the RPO of a few seconds. Therefore, select Use most recent data, and select Initiate drill.

The Last recovery result shows the status of the Recovery job and time of the instance launch. The last recovery result status shows in pending if it’s in progress. Otherwise, it shows as successful once it’s completed. Refer to the following screenshot for the successful drill launch.

A failover is the redirection of the traffic from a primary site to a secondary site. In our case, failover is from Azure to AWS. We proceed to initiate the actual recovery instance by selecting Initiate recovery from the Initiate recovery job drop-down menu.
5. Performing DNS cutover to replicated AWS instance
Once you initiate a failover and the instances are running on AWS, the traffic is still routing toward Azure. Therefore, we initiate the traffic failover from Azure to AWS by changing the DNS record to point to the new failover site, AWS.
The DNS cutover process depends on which DNS provider you’re using to host your primary site.
The following are the few examples for the DNS hosting and cutover:
Solution cost and pricing
Elastic Disaster Recovery has simple, predictable, and usage-based pricing. With Elastic Disaster Recovery, you pay only for the servers that you’re actively replicating to AWS. Your costs are based on a flat per-hour fee. There are no resources to manage, no upfront costs, and no minimum fee. This gives you the flexibility to easily use our recovery solution by paying on an hourly basis, rather than committing to a long-term contract or set number of servers.
You may also need to consider additional charges for the following components on AWS:
- Amazon Elastic Block Storage (Amazon EBS) volumes
- AWS snapshots
- AWS Site-to-Site VPN
- EC2 instances cost for replication servers
- EC2 instances cost for failover servers
You may also need to consider additional charges for the following components on Azure:
- Azure VM cost for the source server
- Azure Disks
- Azure VPN gateway
- Azure Bandwidth
Cleaning up
To avoid incurring unwanted costs after performing these steps, delete the AWS and Azure resources created for this demonstration, which include the compute, storage and networking components on Azure, the replication instances, EBS snapshots, and the Recovery Instance created by AWS DRS on AWS.
Conclusion
In this post, we presented a strategy for designing a resilient platform that makes sure of the availability of business-critical applications, workloads, and data during both planned and unplanned downtime. We showcased a simple DR solution for an Azure-hosted sample application and AWS serving as the DR site. The activities we implemented included establishing a network connection between AWS and Azure using an IP sec tunnel, configuring Elastic Disaster Recovery, the replication of a primary server hosted on Azure to AWS, performing failover from Azure to AWS, DNS failover, and pricing considerations for the Elastic Disaster Recovery solution. Customers using a multi-cloud environment can have a strategy to prepare for potential outages using Elastic Disaster Recovery as an AWS native DR solution.
Key takeaways and benefits for Organizations that protect their applications and databases with AWS Elastic disaster recovery to AWS
- Robustness in operations: Gain customer and end-user trust – you can be relied upon to run business as usual, using a secure, proven approach.
- Higher efficiency: Avoid purchasing duplicate software licenses for your standby DR site. With the cloud, you only pay for the fully provisioned resources you use during recovery or drills. This also frees up your IT resources to focus on activities that differentiate your business.
- Resilience peace of mind: It is easy to deploy periodic DR drills whenever you want, without disrupting your source environment, and with instant access to cloud resources. This gives you the peace of mind that you’ll be able to recover your applications if you need to.
In this other blog post covering failback to Azure , learn how to revert the replication back from AWS to Azure after completing a DR exercise or after the outage on the primary site is addressed. If you have any comments or questions, feel free to leave them in the comments section.