AWS Database Blog
How to work with Cluster Mode on Amazon ElastiCache for Redis
One of my favorite aspects of AWS is the large number of building blocks available to tackle a wide range of technical use cases. Amazon ElastiCache for Redis is one of those building blocks. While most often thought of for fast database caching needs, ElastiCache is quite flexible and fast (microseconds). In the past, I have discussed how to perform geospatial queries and build a real-time dashboard with ElastiCache.
In this post, I will describe how you can leverage ElastiCache for Redis with cluster mode enabled to enhance reliability and availability with little change to your existing workload. Cluster Mode comes with the primary benefit of horizontal scaling up and down of your Redis cluster, with almost zero impact on the performance of the cluster, as I will demonstrate later. If you have ever encountered a Redis cluster that is over or under-provisioned or just want to better understand its inner workings, please read on.
Before we dive into the details, let’s briefly review the configuration options when launching an ElastiCache for Redis cluster. As shown in the following diagram, you have the option to use one of three cluster configurations: (1) single node, (2) cluster mode disabled, and (3) cluster mode enabled. No matter the mode, all nodes within a given cluster are designed to be of the same node type (in terms of underlying EC2 instance) and configuration.

The three modes differ primarily in reliability, availability, and scaling behavior. For a production workload, consider using a configuration that includes replication to enhance protection of your data. With the exception of the primary node, if a node fails for any reason, you do not lose data as it has been replicated to other nodes. If the primary node fails, you may lose some data due to replication latency. The following table reviews the key differences between ElastiCache for Redis configurations:
| Single Node | Cluster Mode Disabled | Cluster Mode Enabled | |
| Replication? | No | Yes
(up to 5 replicas per node) |
Yes
(up to 5 replicas per node) |
| Data Partitioning? | Yes | No
(single shard) |
Yes
(up to 90 shards) |
| Scaling | Change node type
(vertical scaling) |
Change node type
(vertical scaling) |
Add/remove shards and rebalance
(horizontal scaling) |
| Multi-AZ? | No | Optional with at least 1 replica | Required |
Working with Cluster Mode
As noted above, when building production workloads, you should consider using a configuration with replication, unless you can easily recreate your data. Enabling Cluster Mode provides a number of additional benefits in scaling your cluster. In short, it allows you to scale in or out the number of shards (horizontal scaling) versus scaling up or down the node type (vertical scaling). This means that Cluster Mode can scale to very large amounts of storage (potentially 100s of terabytes) across up to 90 shards, whereas a single node can only store as much data in memory as the instance type has capacity for.
Cluster Mode also allows for more flexibility when designing new workloads with unknown storage requirements or heavy write activity. In a read-heavy workload, we can scale a single shard by adding read replicas, up to five, but a write-heavy workload can benefit from additional write endpoints when cluster mode is enabled. [source]
ElastiCache for Redis with Cluster Mode Enabled works by spreading the cache key space across multiple shards. This means that your data and read/write access to that data is spread across multiple Redis nodes. By spreading the load over a greater number of nodes, we can both enhance availability and reduce bottlenecks during periods of peak demand, while providing more memory space than a single node could offer. As we’ll discuss shortly, Redis clients that support clustering allow you to specify a single endpoint and then internally map to the nodes in the cluster transparently.
Data Sharding
Redis leverages a form of sharding in which every cache key is mapped to a “hash slot.” Within the cluster, there are 16,384 hash slots available. Those slots are divided amongst the total number of shards in the cluster. By default, ElastiCache will equally distribute slots across shards, though you can also customize the distribution scheme if required.
When writing or reading data to the cluster, the client will calculate which hash slot to use via a simple algorithm: CRC16(key) mod 16384. In the case of ElastiCache for Redis, the client itself determines which shard to use based on the key space. By pushing more work to the client, we alleviate potential single points of failure by allowing the client to reach any shard in the cluster. As we will see shortly, on initial connection to the Redis cluster, the client will resolve and manage a key space mapping that can be used to identify on which node a particular hash key can be found.
The following diagram depicts how the Redis key space is distributed across the desired number of shards and how a client application determines which shard the data should be stored on. In the next section, we will explore how to configure Cluster Mode on ElastiCache.

Launching an ElastiCache for Redis Cluster
ElastiCache allows you to quickly and easily launch a new Redis cluster using the AWS Management Console, CLI, or SDKs. Here, we’ll launch a new cluster, enabling cluster mode, using the Management Console:
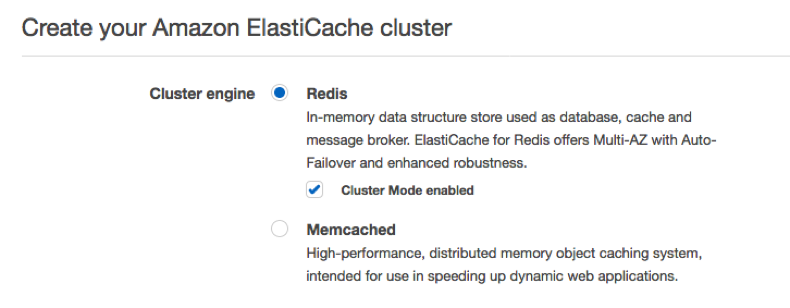
Open the AWS Management Console in your favorite browser and navigate to ElastiCache. Click the blue “Create” button towards the middle of the page. For this cluster, we will select the Redis engine and enable Cluster Mode.
Next, provide your cluster with a name and description. You can also select an engine version, though we generally recommend using the latest available version of the Redis engine. We can also specify the number of shards and replicas per shard. Our cluster will be composed of the number of shards specified (again, up to 90), each with the specified number of replicas. Here, three shards, each with two replicas, leads to a total of nine nodes in our cluster (three primary + two replicas of each).

ElastiCache provides a variety of cache instance types to choose from, based on your storage and performance needs. Choosing different node types allow us to vertically scale the capacity of the nodes in each shard as well as the overall capacity of the cluster. By using Cluster Mode as opposed to scaling a single node, we reduce the number of disruptions due to scaling and can better fit the changing needs of our workload, potentially saving cost. All nodes within your cluster will be composed of the same node type.

Under “Advanced Redis settings,” we can control the distribution of the key space in our cluster. By default, ElastiCache will equally distribute keys across shards, though you can specify a custom distribution if desired. A custom distribution may be useful if you anticipate a small number of key-value pairs in your cluster that will be relatively larger than others. By customizing the distribution, we could push one or more of those larger objects to its own shard.

After configuring the networking, backup, and security for your cluster, click “Create” at the bottom of the page to begin creation of the new cluster. The cluster will be available to you within a few minutes:

Connecting to your Cluster
Once your cluster is “available,” it is ready for use. You can connect to the cluster using the Configuration Endpoint listed in the AWS Management Console. For example, we can use the Redis CLI to connect to the cluster and query for information about the key space / slots in the cluster:
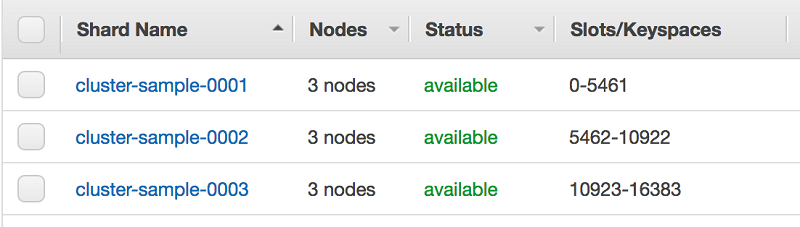
From the response above, we know that keys with hash slots ranging from 0 to 5461 are stored on a Redis node available at IP address 172.31.26.164 (the subsequent entries are the port and unique identifier for that node). Replicas of that node are at IP addresses 172.31.49.34 and 172.31.8.200. Similar data is returned for the other two shards in our cluster. We can also find the slot ranges in the Management Console:
While you will typically not need to directly work with this information, it provides vital information to the Redis client: a map between hash slots and nodes. Like the Redis CLI, any Redis SDK you use will need to support clustering. Not all SDKs support clustering, though the Amazon ElastiCache team is working to expand support. In particular, an SDK needs to implement two features: (1) support for the key hashing algorithm and (2) be capable of maintaining the slot to node mapping. Today, you can find support for clustering in Java, Ruby, Go, Python, and other programming languages.
In Python, connecting to ElastiCache for Redis in Cluster Mode is simple:
Scaling the Cluster
As your application grows or gains in popularity, you may need to grow the capacity of your ElastiCache cluster. Cluster Mode allows you to scale horizontally by adding or removing shards as opposed to vertically scaling a single node. This approach improves the availability of your cluster as a restart is not required, though you may see some impact on performance during the process.
Conceptually, horizontal scaling of the cluster is easy to understand on the server-side — a shard is simply added or removed. Once the new node is ready, the cluster will need to reallocate or balance the key space across the nodes as configured. When using ElastiCache for Redis, the re-balance is automatic.
As noted earlier, the client is responsible for maintaining its own mapping of key space to node. How clients deal with the re-balance is somewhat different in that there is no notification that the key mapping has changed. Instead, on the next operation performed by the client, the cluster will notify it that the key has moved:
While the operation itself is a two-step process in this case and may incur some additional latency to complete the entire operation, the client is now aware of the updated key mapping. Going forward, the client can operate as it did earlier, now fully utilizing the available shards in the cluster.
Test Run: Scaling the Cluster, before and after
ElastiCache publishes a number of metrics to Amazon CloudWatch that can help you monitor the usage of your cluster. Among these are a handful that offer good insight into ElastiCache performance and, with an understanding of your workload, can be useful in pinpointing when the cluster would benefit from scaling.
To demonstrate scaling in practice, we have created the simple test harness shown in the diagram below. The test harness includes a new ElastiCache for Redis cluster with Cluster Mode enabled. The new cluster will start with one shard and a node type of cache.r5.large. We’ll use an AWS Lambda function to read and write data to the cluster. The function will capture response times for those operations and write results to Amazon CloudWatch. A popular load testing tool, Artillery, running in an AWS Fargate Task will be used to drive traffic to an Application Load Balancer, invoking the function. Note that each function invocation opens a new connection to ElastiCache in this test; the Lambda best practice is to reuse that connection when the executive environment is reused across invocations.

Our test harness allows us to simulate load on a website that, for example, stores session data in ElastiCache. Using Artillery, we will run several scenarios that generate varying degrees of load, writing and reading session data from ElastiCache. As our website grows wildly popular (at least in simulation), we may find that we need to scale the cluster to improve performance.

The results of one such simulation are shown in the CloudWatch Dashboard above. After approximately fifteen minutes, with usage climbing (although the cluster was not showing performance challenges), we added a new shard to our cluster, while continuing to record latency metrics. After the new shard was created, ElastiCache automatically rebalanced the keyspace across the two shards, displaying progress in the Management Console…

…until the rebalance was complete:

As noted above, we captured the response time for both reads and writes to ElastiCache in a Lambda function that then wrote this data to CloudWatch Logs. Using CloudWatch Logs Insights, we grouped data in 30 second increments and then calculated percentiles to understand latency of these operations.
Percentiles are more useful than averages in evaluating metrics such as latency as there may be one or two outliers that change an average or a wide distribution of data. In the charts below, we include p50, p90, and p95. These metrics mean, for example, that 95% of the requests within a particular time window were served in less time than the reported metric (e.g. in the 30 seconds starting at 10:06, 95% of reads were returned from Redis to the Lambda function in 1.2ms or less, including network latency).
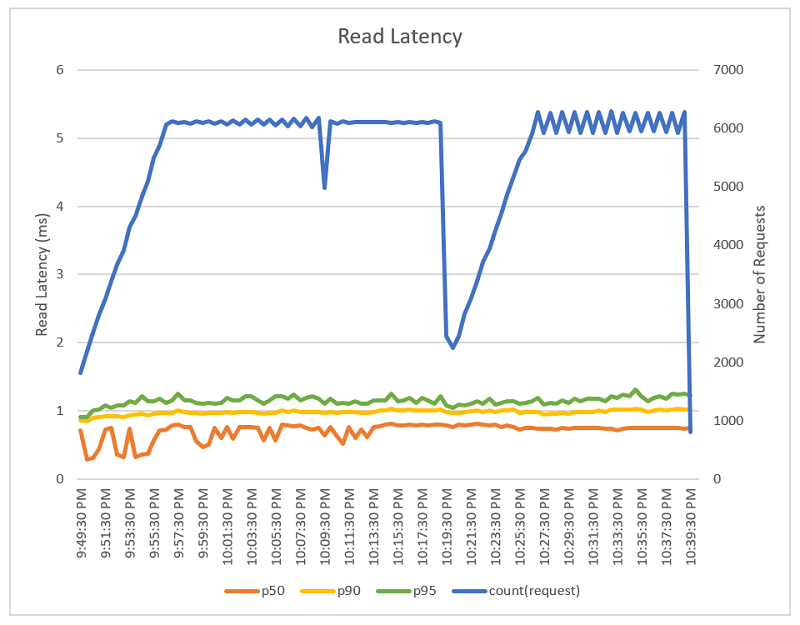

It’s important to note the general consistency across the p90 and p95 measurements for both reads (sub-2ms) and writes (sub-6ms). ElastiCache is not only fast, it is consistently fast in handling read and write operations. As noted earlier, this simulation was run using the cache.m5.large node type, results may vary for different node types. If you are interested in running the simulation yourself, you can find source code on Github.
Conclusion
Amazon ElastiCache for Redis makes it easy to deploy and run the popular in-memory data store. By using Cluster Mode Enabled, you can readily scale the capacity of your cache in or out without impacting the availability of the cluster or worrying about exceeding the maximum capacity of a single node.
As we discussed earlier, ElastiCache for Redis pushes management of the key space mapping to the client. This approach alleviates potential single points of failure while also allowing the server to focus on achieving high throughput with minimal latency. Any additional complexity in managing the key space is generally absorbed by the client and the AWS team is actively working to broaden compatible client SDKs.
ElastiCache can be useful in a variety of use cases beyond basic caching. With Cluster Mode, you can scale Redis to hundreds of TBs of capacity and high write levels. We’re eager to see how you take advantage of this capability. Please reach out to us on the AWS ElastiCache Forum with any feedback.
About the Author
 Josh Kahn is a solutions architect at Amazon Web Services. He works with the AWS customers to provide guidance and technical assistance on database projects, helping them improve the value of their solutions when using AWS.