AWS Database Blog
Mint and deploy NFTs to the Ethereum blockchain using Amazon Managed Blockchain
The commercialization of Web 3.0 protocols has led to an explosion of applications in the areas of decentralized finance (DeFi) and digital asset tokenization on blockchains, both public and private. Non-fungible tokens (NFTs) are an increasingly popular way of providing proof of ownership and authenticity of digital assets. Many large enterprises, in particular those with large intellectual property holdings, are seeking to build new customer experiences and product offerings with digital items, collectibles, content, and moments in the form of NFTs.
The concept of fungibility refers to the ability for an asset to be exchanged equivalently with another asset of like kind. A practical example of a fungible asset is the US dollar, where you can trade one dollar for another knowing the value is exactly the same regardless of which dollar you have. In contrast to fungible assets, non-fungible assets are valued differently based on their unique attributes and scarcity, for example, collectibles like baseball cards.
Developers who wish to create an NFT must do so by deploying a smart contract with the necessary functionality to a public blockchain like the Ethereum network. Today, there are multiple well-established NFT smart contract standards, including ERC-721, which you will learn how to deploy in this post. Using Amazon Managed Blockchain enables NFT developers to focus on their smart contract development without worrying about maintaining reliable Ethereum nodes for relaying blockchain transactions or querying the state of blockchain data.
Overview of NFTs
Before we demonstrate how to build and deploy an NFT using Managed Blockchain to Ethereum, we review some of the important concepts and applications of NFTs.
The most common standard for NFTs on the Ethereum blockchain is ERC-721. It prescribes an interface that allows wallet, broker, or auction applications to work with any NFT on the Ethereum blockchain. Other well-known standards include ERC-20 for fungible tokens and ERC-1155 for semi-fungible tokens. On Ethereum, tokens are smart contracts written in Solidity. NFT developers can customize the smart contracts that allow token owners to interact with the contract in different ways.
NFTs have a wide range of use cases:
- Digital art – The NFT art market has recorded sales of over 3.5 billion dollars by the third quarter of 2021. Auction houses like Sotheby’s have launched NFT-only marketplaces.
- Sporting memorabilia – NFTs can represent digital collectibles like physical card collections, but in a completely digital format. Sporting bodies can increase fan engagement by tokenizing iconic moments in the sport as NFTs.
- Gaming – Blockchain-based games and in-game purchases of collectibles is a growing source of revenues for gaming companies.
- Event ticketing – Artists and arenas can engage with fans by providing fraud-proof tickets and a single place to view memorable past concert experiences.
- Supply chain – Improved traceability, transparency, and proof of ownership along various touchpoints of a supply chain can help enterprises meet ESG reporting requirements.
- Patents – Illiquid intellectual property can be tokenized by patent owners and made available for trading with the guarantee of provenance and authenticity.
Overview of solution
The following reference architecture for our solution allows an NFT creator to deploy ERC-721 contracts to the public Ethereum Rinkeby testnet and mint NFTs.
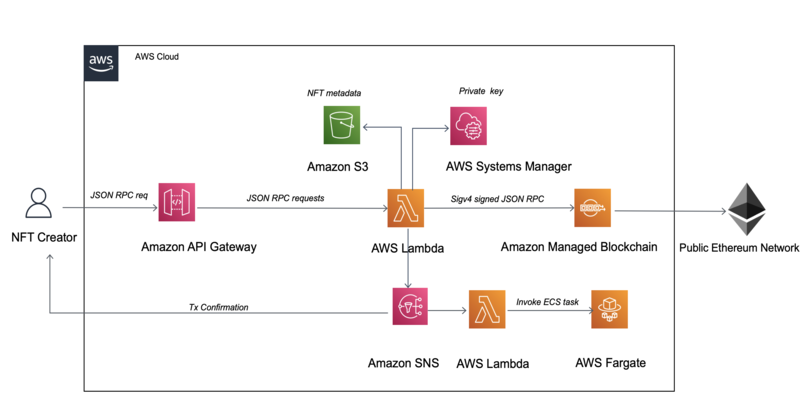
In this example, NFT creators can transact on the Rinkeby testnet on Ethereum via the Ethereum Geth node running on an instance of Managed Blockchain. To initiate NFT creation, a JSON RPC request is sent to an Amazon API Gateway REST API endpoint, which forwards the request to AWS Lambda.
Lambda, configured as a proxy integration, implements the logic to deploy, mint, and get ownership of a token. It forwards the request to a Managed Blockchain HTTP endpoint, which sends the signed transaction to the Ethereum blockchain. The transaction sent to the Ethereum network may require many minutes to be confirmed, depending on the network traffic and gas fees paid. We recommend waiting for a fixed minimum number of confirmations (a configurable parameter) to be completed on the blockchain so that there is no risk of the transaction being reversed. To avoid any possible timeout of Lambda, an AWS Fargate task polls the blockchain, checking for the number of required confirmations. When the required number of confirmations are complete, Fargate sends an Amazon Simple Notification Service (Amazon SNS) email message to the NFT creator.
We deploy the solution with the following steps:
- Set up the prerequisites.
- Deploy the NFT stack consisting of the Ethereum node, API Gateway, Lambda, Fargate, SNS topics, and Amazon Simple Storage Service (Amazon S3) bucket.
- Send a JSON RPC command to deploy a smart contract or mint a token.
The code repository is available on GitHub.
Prerequisites
For this walkthrough, you should have the following prerequisites:
- An AWS account with a VPC and a public subnet
- The AWS SAM CLI installed
- Node.js 14 installed, including the npm package management tool
- The Docker community edition installed
Start by cloning the GitHub repository:
Deploy the Ethereum node and serverless components
We use an AWS Serverless Application Model (AWS SAM) template to deploy the stack:
When the build is complete, deploy the stack:
Input the parameter values and confirm changes to deploy:
The AWS SAM deployment creates an AWS CloudFormation stack changeset, as shown in the following screenshot.

After deployment, the following resources are created:
- Ethereum node – A Managed Blockchain Ethereum node connected to the Rinkeby test network.
- nftMetadataBucket – An S3 bucket that stores the NFT metadata files.
- Nftmain – The Lambda function that provides APIs to deploy an ERC-721 contract to the Ethereum Rinkeby test network, mint a new token, and get the owner of a specified token minted. On successful deployment of a contract, an SNS message is published.
- invokeFargateTask – This Lambda function is triggered by the SNS message published by the nftmain Lambda function. It invokes a Fargate task that awaits until the Rinkeby blockchain has confirmed the contract deployment transaction a fixed, but configurable, number of times. The default number of confirmations is set to 50.
- ethTxnTopic – The SNS topic to which the
nftmainfunction publishes the transaction ID on successful deployment of a contract. - ethConfirmationTopic – The SNS topic to which the Fargate task publishes a message upon completing 50 confirmations on the Rinkeby network.
- cluster and taskDefinition – The Fargate cluster and task definition that provides the compute for the confirmation logic.
- Nftapi – The API Gateway REST API endpoint that allows the NFT creator to send JSON RPC requests.
- ecrRepository – The Amazon Elastic Container Registry (Amazon ECR) where the Docker image is stored.
Create a Docker image and push to Amazon ECR
To complete the deployment, create a Docker image and push to Amazon ECR by building, tagging, and pushing the following image:
Create a private key for signing transactions on the network
To create a transaction on the Ethereum Rinkeby network, a private-public key pair is required. You can
create your own Ethereum wallet programmatically using popular Ethereum libraries Web3 and Ethers.
Take special care to ensure that this wallet is not used for real funds.
Generate the private key and upload to AWS Systems Manager Parameter Store as an encrypted string under the name ethSystemKey. Make the secure string value excludes the first two characters, 0x, of the private key.

Add some Ethereum test tokens for the Rinkeby network by entering the public key https://faucet.rinkeby.io/ and requesting test tokens. Special care must be taken with spending keys (private keys), and AWS Systems Manager might not be adequate for wallets holding actual funds in some cases.
Note: If you are having trouble requesting testnet Ether from the Rinkeby faucet above, you may use the Chainlink Faucet to get small amounts of testnet Ether.
Deploy a test contract, mint an NFT, and check token ownership
Now we’re ready to deploy an ERC-721 smart contract to the network.
The contract to be deployed is stored in the nftmain directory under NFTSamples:
We use curl -X POST to deploy and mint the NFT. Obtain the API endpoint (InvokeURL) from the API Gateway console, under Stages on the APIs page.
- Edit the
deploy.jsonfile to input the NFT metadata values: - Deploy the contract to the Rinkeby network:
The deploy invocation returns a transaction ID hash and the contract address:
- Mint a token by interacting with the contract address returned by the deploy command.
The mintAddress is the public key/wallet address that the token ownership is transferred to.
The response contains the transaction ID hash:
- Retrieve the address of the owner of the token that was minted:
The response provides the address of the owner for whom the token was minted:
Clean up
On completion, to avoid incurring future charges, delete the resources deployed:
- Empty the
nftmetadataS3 bucket. - Delete all Docker images in the Amazon Elastic Container Service (Amazon ECS) repository created by the stack.
- Delete the
ethSystemKeyparameter from Parameter Store. - Finally, delete the deployed stack:
Conclusion
In this post, we walked you through the steps for deploying an ERC-721 smart contract for an NFT, on Ethereum blockchain using Managed Blockchain as the Ethereum node. The architecture addressed the mechanics of backend processing for an NFT creator.
In a future post, we will demonstrate how to set up a decentralized application and an NFT storefront to help the NFT creator interact with NFT customers. Please let us know in the comments, what other Web3.0 topics you would like us to cover in the future.
About the Authors
 Pravinchandra Varma is a Senior Customer Delivery architect with the AWS Professional Services team and has deep expertise in Data and Analytics. He is passionate about the potential of Web 3.0 and decentralized applications, and looks forward to the future of the metaverse.