AWS Machine Learning Blog
Build a serverless frontend for an Amazon SageMaker endpoint
Amazon SageMaker provides a powerful platform for building, training, and deploying machine learning models into a production environment on AWS. By combining this powerful platform with the serverless capabilities of Amazon Simple Storage Service (S3), Amazon API Gateway, and AWS Lambda, it’s possible to transform an Amazon SageMaker endpoint into a web application that accepts new input data, potentially from a variety of sources, and presents the resulting inferences to an end user.
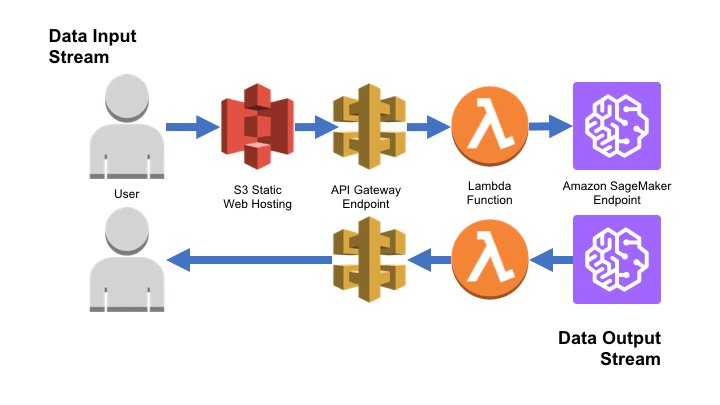
In this blog post, we will generate a simple SageMaker model using the famous Iris dataset, deploy it as an Amazon SageMaker endpoint. Then we’ll use the Chalice package to produce an API Gateway endpoint to trigger a Lambda function that will call our SageMaker endpoint producing a unique prediction. Finally, we’ll produce a static HTML form in Amazon S3 to serve as the user interface for our application. The end product will be a simple web app that can accept new user data and produce an on-demand prediction based on that data, which is returned to the user’s browser.
Although this is a version of the AWS Lambda architecture that is similar to the architecture suggested by the SageMaker documentation, this might not be the optimal architecture for all use cases. In cases where latency is a strong concern, it makes sense to build the data transforms directly into the hosted Docker container in the SageMaker endpoint. However, the introduction of API Gateway and Lambda makes the most sense when you have a complex application, with multiple potential frontends and/or data sources that are interacting with a single endpoint. This blog post provides you a great place to start for demos, proofs of concept, and prototypes. However, your production architecture might differ significantly from these examples.

Deploy a model on Amazon SageMaker
The first step to building our machine learning application is deploying a model. To get to our frontend efficiently, we’re going to deploy a pre-built and pre-trained model to Amazon SageMaker from a public Docker image, based on the sample notebook scikit_bring_your_own.ipynb, which is available on all SageMaker notebook instances. If you are curious about how this image was built, I highly recommend going through this notebook. If you are only interested in the serverless frontend, follow these instructions for setting up our pre-built model in your SageMaker endpoint.
Create a model
On the AWS Management Console, choose Services, and then, under Machine Learning, choose Amazon SageMaker. Just to make sure everything is in the same Region, in the upper right corner, select US East (N. Virginia) as your Region. Next, under Resources, select Models. Then choose the Create model button.

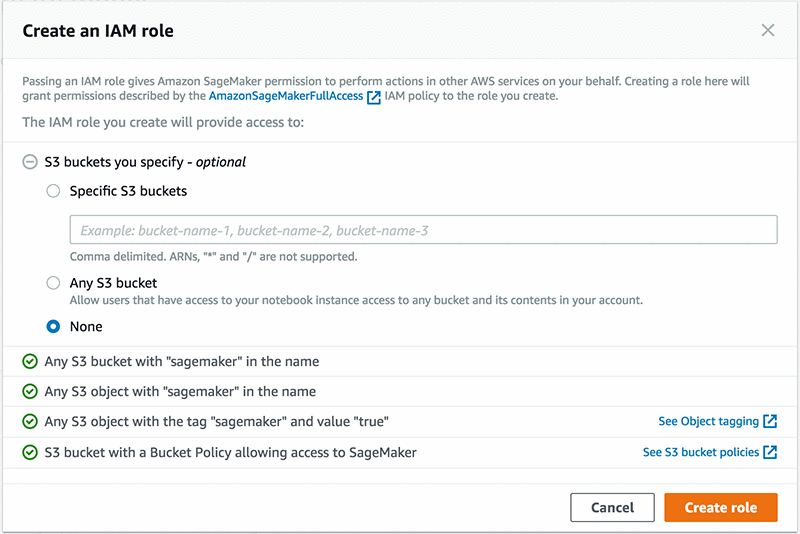
Set the Model name to decision-trees for this example, and then under IAM role, select Create a new role.
This role doesn’t need any special access to Amazon S3, so we can select None under S3 buckets you specify, and then choose Create role. We would need these permissions if we were building or training a model, but since we are using a pre-built model here, it is not necessary.

Now enter the following values for the Primary container:
Location of inference code image: 305705277353.dkr.ecr.us-east-1.amazonaws.com/decision-trees-sample:latest
Location of model artifacts: s3://aws-machine-learning-blog/artifacts/decision-trees/model.tar.gz
These locations are for the pre-built model and Docker container that we are using for this example. Choose Create model. This allows Amazon SageMaker to know how to make inferences, and where to find our specific model. In the future, you can use your own model.
Create an endpoint configuration
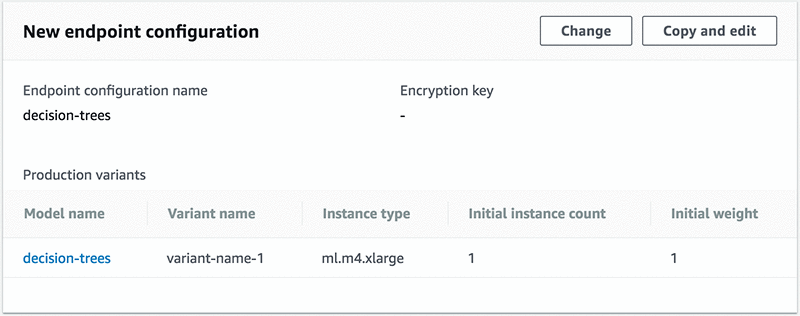
While still in the Amazon SageMaker console, in the left navigation pane, under Inference, select Endpoint configuration. Now choose the Create endpoint configuration button. Name the Endpoint configuration name “decision-trees”, and then choose Add model at the bottom of the New endpoint configuration block.
In this new Add model dialogue box, select the decision-trees model that we created in the previous step, and then choose Save.
Your new endpoint configuration should look like this:

Select the Create endpoint configuration button. An endpoint configuration lets Amazon SageMaker know what model to use, from the previous section, what kind of instance to use, and how many instances to initialize the endpoint with. In the next section, we’ll create the actual endpoint, which will spin up the instance.
Create an endpoint
While still in the SageMaker console, in the left navigation pane, under Inference, select Endpoints. Choose the Create endpoint button. Under Endpoint name, enter “decision-trees”. Under Attach endpoint configuration, leave the default value of Use an existing endpoint configuration.
Under Endpoint configuration, select the decision-trees endpoint we created in the last step, and then choose the Select endpoint configuration button. The result should look like this:

Now choose the Create endpoint button.
You’ve now deployed our pre-built Scikit model based on the Iris dataset! We can move on to building a serverless frontend for our endpoint.
Warning: Leaving a SageMaker endpoint running will cost you money. If you are following this blog as a learning experience, don’t forget to delete your endpoint when you’re done, so that you don’t incur further charges.
Create a serverless API action using Chalice
Now that our SageMaker endpoint is available, we need to create an API action that can access the endpoint in order to produce results that can be served to an end user. For this blog post, we use the Chalice framework to deploy a simple Flask-like application onto API Gateway to trigger a Lambda function which will interact with our SageMaker endpoint.
Chalice is a serverless microframework for AWS. It allows you to quickly create and deploy applications that use Amazon API Gateway and AWS Lambda. Because our current endpoint expects input in CSV format, we need to do some preprocessing to transform HTML form data into a CSV file that the endpoint is expecting. Chalice lets us do this quickly and efficiently, compared to building your own Lambda function.
If you have more questions about Chalice’s advantages and disadvantages, I recommend visiting the Chalice GitHub repository.
Development environment
So that we have a consistent environment, let’s use an Amazon EC2 instance for our development environment. On the AWS Management Console, select Services, and then, under Compute, select EC2. Now choose the Launch Instance button. The Amazon Linux AMI comes with most of the development tools we will need, so it will be a good environment for us. Choose Select.

We won’t be doing anything resource intensive, so I recommend selecting a t2.micro, and then choosing the Review and Launch button. Finally choose the Launch button one more time.
You will be prompted to Select an existing key pair or create a new key pair. Choose whichever is most convenient for you to be able to connect to your instance. If you are unfamiliar with connecting to an EC2 instance, instructions can be found in the documentation at Connect to Your Linux Instance.
Before you connect to your instance, you should give the instance some permissions, so that you don’t need to use any credentials to deploy your Chalice application. On the AWS Management Console, go to Services, and then, under Security, Identity & Compliance, select IAM. Select Roles on the left, and then choose Create role.
For Select type of trusted entity, select AWS service and then EC2. Under Choose the service that will use this role, select EC2 (Allows EC2 instances to call AWS services on your behalf). Choose Next: Permissions.
On this screen, select the following permissions: AmazonAPIGatewayAdministrator, AWSLambdaFullAccess, AmazonS3FullAccess and IAMFullAccess, before selecting Next: Review.
For Role name, type chalice-dev, and type a description similar to “Allows an EC2 instance to deploy a Chalice application.” Choose Create role.
Now we need to attach our new role to our running EC2 instance. Go back to the EC2 console by selecting Services, and then, under Compute, select EC2. Select Running instances. Select the instance you launched earlier, and choose Actions, Instance Settings, and then choose Attach/Replace IAM role.
Under IAM role, select “chalice-dev” and then choose Apply.
Now you can go ahead and connect to your EC2 instance.
Setting up Chalice
After you are connected to your EC2 instance, you need to install Chalice and the AWS SDK for Python (Boto3). Issue the following command:
To make sure that our application is deployed in the same Region as our model, we’ll set an environmental variable with the following command:
With Chalice now installed, we can create our new chalice project. Let’s download a sample application, and change into the project directory. You can do this with the following commands:
The app.py file in this package is specifically designed to interact with the pre-built model we deployed earlier. We also downloaded a requirements.txt file, to let Chalice know what dependencies our frontend will require, and some additional hidden configuration files in the “.chalice” folder, which help to manage policy permissions.
Let’s take a quick look at the source, to try to get an idea of how the app looks. Run the following command:
Feel free to use and modify these files own models in the future.
Now that you have the necessary Chalice project files, you can deploy the application. To do this, run the following command from your terminal:
After this is over, it will return a URI for your chalice endpoint. Save the Rest API URL for later because we will need to put it in our HTML file for our frontend.
You have now deployed a Lambda function attached to an API Gateway endpoint, which can talk to your SageMaker endpoint. All you need now is an HTML frontend to post data to your API Gateway. When a user submits a request using the frontend application, it goes to the API Gateway. This triggers the Lambda function, which executes based on the app.py file included in the Chalice application and sends data to the SageMaker endpoint you’ve created. Any necessary preprocessing can be done in a custom app.py file.
Generate an HTML user interface
We now have our model hosted in SageMaker, and an API Gateway interface for interacting with our endpoint. We still don’t have a proper user interface to make it possible for a user to submit new data to our model and generate live predictions. Fortunately, all we need is to serve a simple HTML form that will POST our data to our Chalice application’s endpoint.
Amazon S3 will make this easy for us.
Let’s use the command line tools to create a website bucket on Amazon S3. Select a bucket name and run the following commands:
Now we need to upload a sample HTML file to our bucket to serve as our frontend. Let’s download a sample HTML file and edit it for our purposes. The chalice endpoint here is the URI we saved above from the deploy command.
Let’s take a look at the index.html.
The important part of this file is the action on the form that points to your API Gateway endpoint. This allows the HTML file to POST the uploaded file to our Lambda function, which will communicate with our SageMaker endpoint.
Now that we have created our HTML frontend, we need to upload it to our Amazon S3 website. Run the following command:
Your new user interface will be available at a url similar to: http://<bucket_name>.s3.amazonaws.com/index.html
Conclusion
Congratulations! You now have a fully functional serverless frontend application for the model that you built, trained, and hosted on Amazon SageMaker! Using this address, you can now have users submit new data to your model and produce live predictions on the fly.
The user accesses the static HTML page from Amazon S3, which uses the POST method to transfer the form data to API Gateway, which triggers a Lambda function that transforms our data to a format Amazon SageMaker is expecting. Then Amazon SageMaker accepts this input, runs it through our pre-trained model, and produces a new prediction, which is returned to AWS Lambda. AWS Lambda then renders the result to the user.
While this will work well for prototyping, quick demos, and small-scale deployments, we recommend a more robust framework for production environments. To do this, you could forgo the serverless approach, and develop an AWS Elastic Beanstalk frontend for an always-on deployment environment. Alternatively, you could go completely serverless. Going serverless will involve packaging up the contents of your SageMaker endpoint inside of a Lambda function. This process will vary from ML framework to ML framework and is beyond the scope of this blog post. Which route you go will depend on your own production needs.
If you are not intending to leave this application running permanently, don’t forget to clean up the various resources that you have used on Amazon S3 and Amazon SageMaker. Especially make sure that you delete the endpoint so you aren’t changed for its use.
Feel free to use this general structure for building your own, more complex and interesting applications on top of Amazon SageMaker and AWS!
References
Dua, D. and Karra Taniskidou, E. (2017). UCI Machine Learning Repository. Irvine, CA: University of California, School of Information and Computer Science.
About the Author
 Thomas Hughes is a Data Scientist with AWS Professional Services. He has a PhD from UC Santa Barbara and has tackled problems in in the social sciences, education, and advertising. He is currently working on best practices for incorporating machine learning models into complex applications.