AWS Partner Network (APN) Blog
Building a Data Lake Foundation for Salesforce in AWS
 By Simon Ejsing, Director of Analytics at FinancialForce
At FinancialForce, a financial management solution on Salesforce, data plays a key role in how we make and inform our business.
We believe data is one of the most important assets our customers have, and business applications in particular hold an enormous amount of vital data. Tapping into this can mean the difference between a well-run and world-class business.
FinancialForce provides solutions on top of the Salesforce platform for core business functionalities, such as financial management and professional services automation.
In this post, I will explain our approach to unlocking the potential of data and how we integrate between Amazon Web Services (AWS) and Salesforce, an AWS Partner Network (APN) Advanced Technology Partner with the AWS DevOps Competency.
This blog draws inspiration from the article Build a Data Lake Foundation with AWS Glue and Amazon S3, but differs on some core concepts. It centers around Salesforce as the main data source and builds a complete time-series data lake.
Data Architecture Overview
The architecture in Figure 1 describes conceptually how we build our data transform pipelines. At the far left, we have the incoming data sources. From left to right, you can see that data flows from a Salesforce Org through a data pipeline that periodically snapshots the Objects from the Salesforce Org into a data lake built on Amazon Simple Storage Service (Amazon S3). The right side illustrates how the data lake can be read from Amazon Redshift Spectrum using external tables. In turn, Amazon Redshift data is consumed by a Salesforce Einstein Connector.
At the center of the architecture is the data lake built on Amazon S3 using Redshift as the data warehouse. These are connected using external tables.
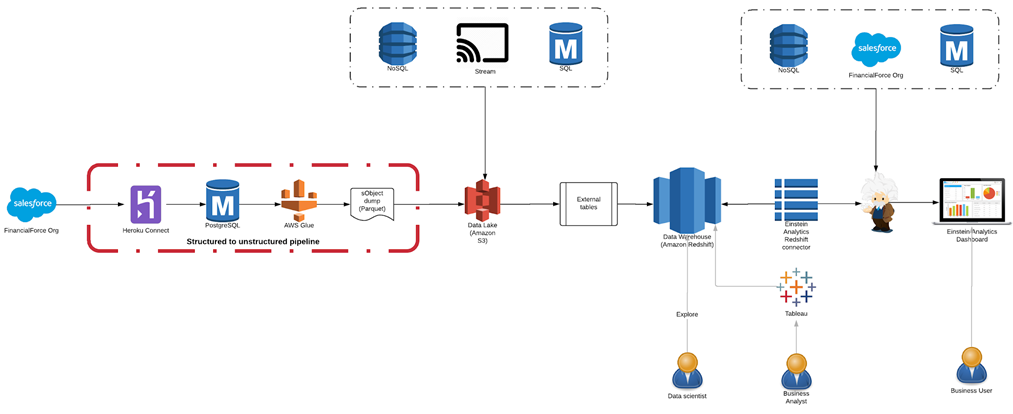
Figure 1 – Architecture for building a data lake foundation for Salesforce in AWS.
Our primary consumers of the data are Salesforce users, and they consume data through dashboards built in Einstein Analytics. These dashboards are powered by datasets that are replicated from Amazon Redshift to Einstein Analytics using the Einstein Analytics Redshift Connector.
Data Source: Salesforce Org
The primary data source in our architecture is our own Salesforce Org. The pipeline that ingests the data is highlighted in red in the above architecture diagram.
The pipeline connects our Salesforce Org into our centralized data lake and data warehouse architecture. A Salesforce Org is a tenant in the Salesforce platform. A number of technologies exist to replicate data out of the Salesforce Org, including Heroku Connect, which is easy to set up and maintain.
Heroku Connect allows mapping between Salesforce Objects and a target Postgres database. After the service is configured, it will mirror the Salesforce data on a periodic schedule.
In order to set up Heroku Connect, you need to have an existing Heroku App. From the Resources tab in the Heroku App, search for “Heroku Connect” under Add-Ons.

Figure 2 – Heroku Add-On page showing the Heroku Connect add-on.
Getting Started
To get started, pick your plan and choose Provision. Once you complete the setup, click on the Heroku Connect add-on link in the Resources section to go to the Heroku Connect user interface (UI).
After the target database is configured, go through the normal authorization flow for connecting to your Salesforce Org. Go to Settings > Manage Salesforce and click the Authorize Now button. This takes you through Salesforce’s authentication flow, and Heroku Connect will use the provided credentials to run the scheduled replication.
It’s important to select a user that has sufficient permissions to see all the data in the Salesforce Objects that you want to replicate.
Once Salesforce authentication has been configured, the next step is to set up the Object mappings.
Object Mappings
Object mappings specify which Salesforce Objects and which fields on these objects Heroku Connect should replicate to the target Postgres database.
One of the main benefits of using Heroku Connect is that it abstracts nitty-gritty details of consuming the Salesforce APIs. It also provides a solution that works for most types of Objects (with some limitations) and is scalable.
Heroku Connect will decide what Salesforce API to use based on the Object schema and number of rows. This enables seamless replication, even of Objects with millions of rows. It also enables reliable incremental replication using system fields in Salesforce Objects.
One downside to Heroku Connect’s flexible configuration mapping is that there is no way to select all fields in a mapping from the UI. This makes it tedious to configure replication for many Objects with lots of fields. Thankfully, there’s a workaround in the form of JSON mapping definition files, which can be imported.
A sample JSON mapping file for the Opportunity Object looks like this:
Understanding Heroku Connect’s underlying mapping definition is helpful, because it allows us to create these mappings files programatically.
Auto-Generate Heroku Connect Mapping Files
At FinancialForce, we have built a tool that can query a Salesforce Org and create a full mappings file based on the list of SObjects in the Org. The source code is available on GitHub here, and you can use it freely to create mappings files for your own Heroku Connect instance.
To run the tool, simply clone the Git repository and follow the instructions in the README.md file.
In order to generate the mappings files, the tool needs access to read the Salesforce metadata from your Org. Work with your Salesforce admin to provision an API user that has sufficient read access to your Org to be able to query the definition of all Salesforce SObjects and execute read-only SOQL queries against all SObjects.
Once you have successfully executed the tool, you should have a set of mappingX.json files that you can import in Heroku Connect. The tool splits the mappings in multiple files since it can take a long time to import large mappings. Each mappings file contains up to 100 mappings.
To upload a mappings file go to Settings > Import/Export Configuration.
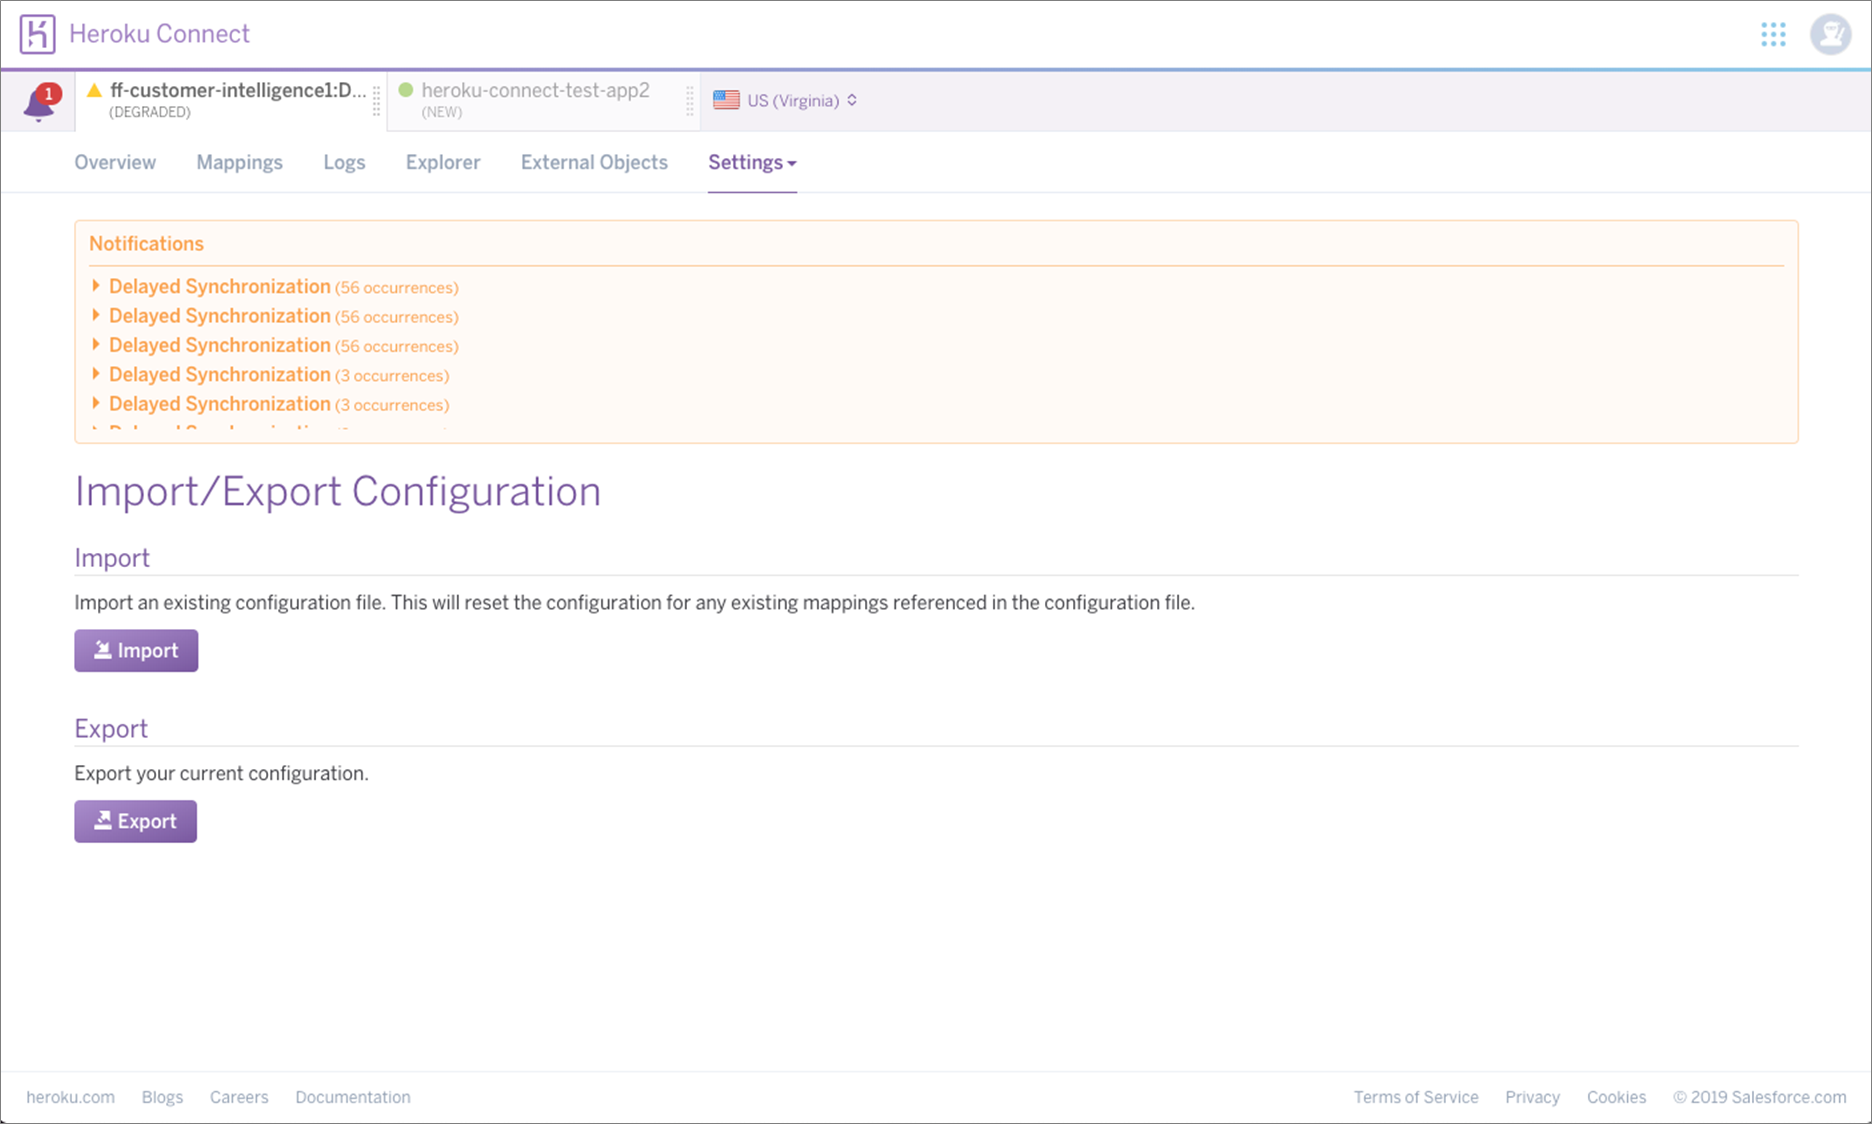
Figure 3 – Heroku Connect Import/Export configuration page.
This process can, at times, be cumbersome. If Heroku Connect for any reason encounters an error in the mappings, it will break the import of the mappings file and you have to resolve the mapping issue manually. For this reason, we recommend you import the mappings files in increasing order (because the SObjects in the mappings shift when you exclude an SObject).
The tool tries its best to filter down to only SObjects that can be replicated, but there are some SObjects that simply won’t work. If you encounter any of those, you need to add them to the blacklist found in the source code in sf2hc.ts on line 90 and then rerun the tool.
In order to find the offending SObject, go to the Mappings tab in Heroku Connect and filter the list of mappings to those in ‘Errored’ state. The status column will indicate that there is an error in the mapping definition.
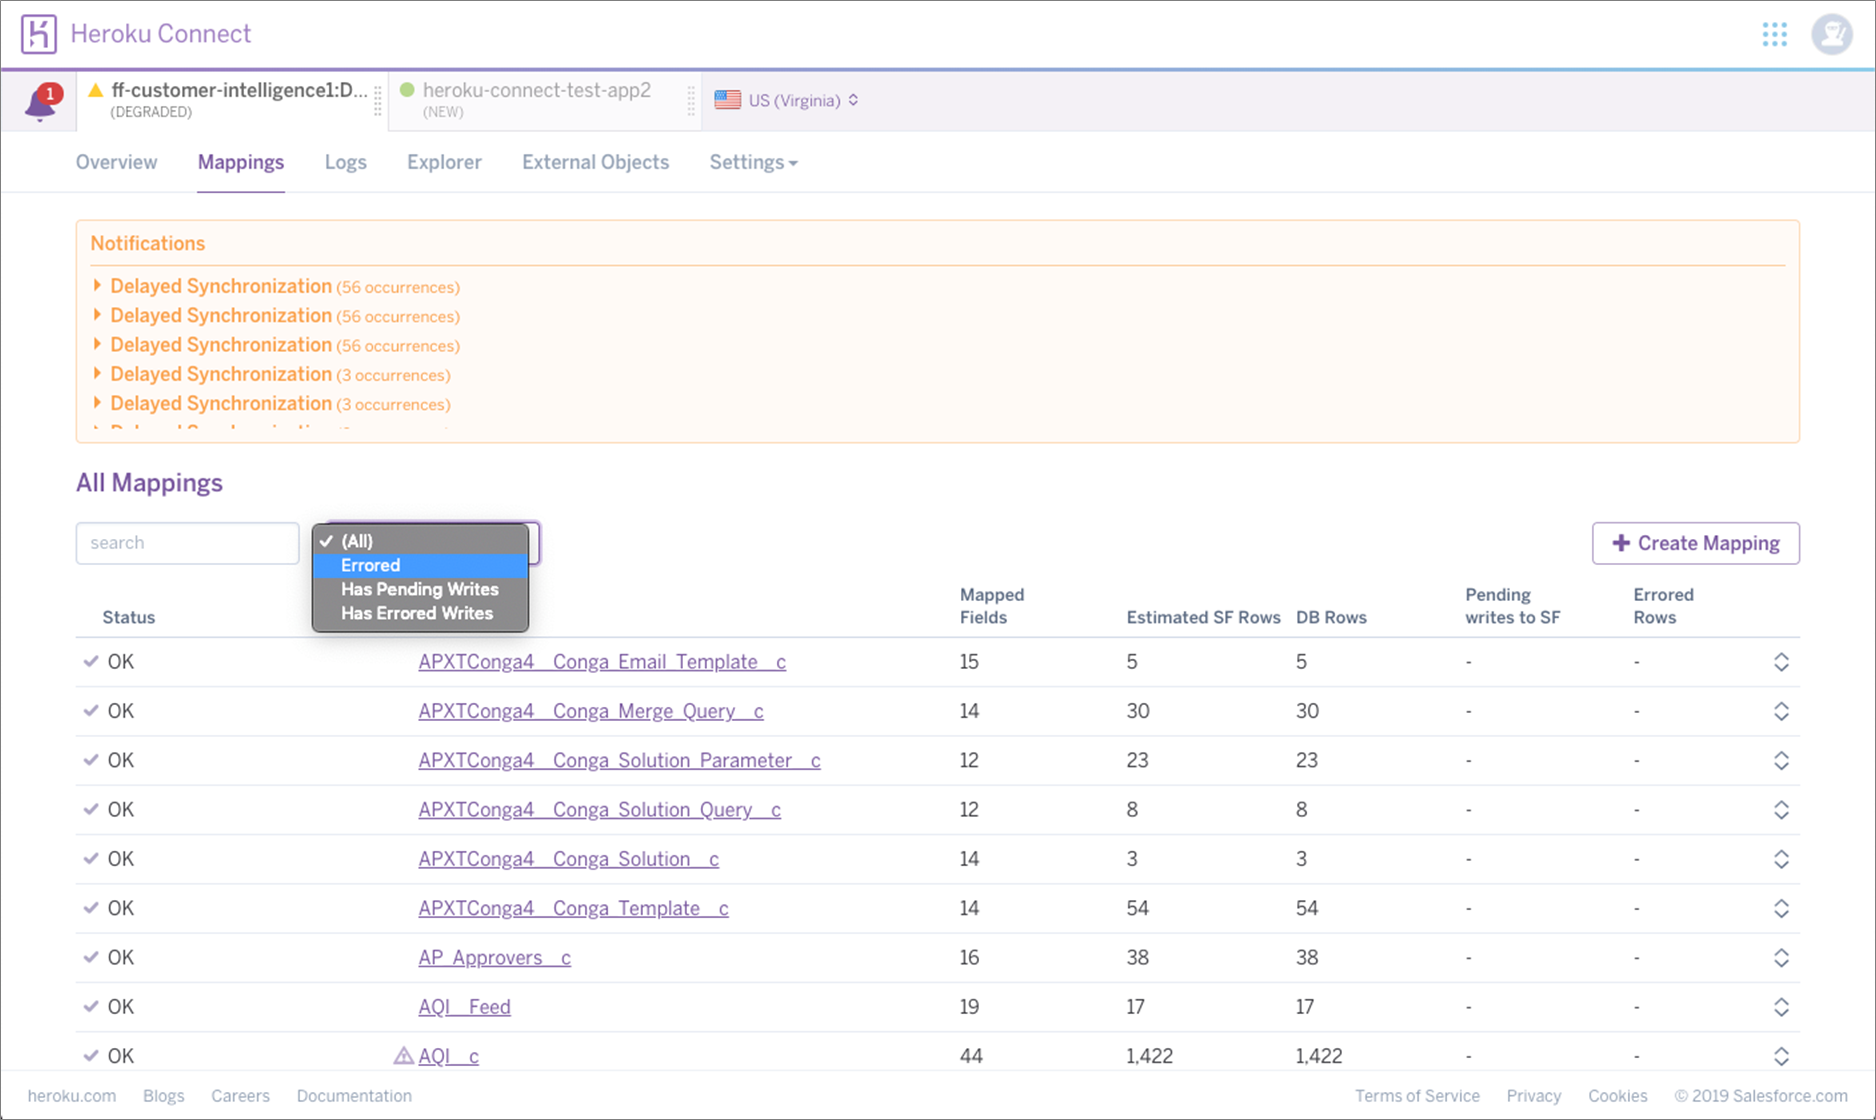
Figure 4 – Heroku Connect mappings page shows how to filter to mappings in error state.
You can also use this process to exclude well-known SObjects. For example, SObjects that contain Personally Identifiable Information (PII), sensitive information, or large SObjects that you are not interested in replicating—a typical example is History tables.
Once you have gone through configuring Heroku Connect, you will only have to go back and revise the configuration if new fields are added to existing SObjects that you also want replication enabled for.
Salesforce guarantees that managed SObject schema does not break between versions. However, if you have custom SObject deployed to your Org, there is no such guarantee. It’s worth noting that breaking changes to custom SObjects will cause Heroku Connect to pause synchronization for that SObject and your target database will be left in a stale state.
Unfortunately, Heroku Connect does not do a good job of alerting about this situation, so you have to periodically check your mappings to see if any of them are in an ‘Errored’ state, similar to the process when filtering out invalid mappings.
Connecting Postgres Database to AWS PrivateLink
In order to connect AWS services to the mirror Postgres database, the underlying database must be exposed to the Amazon Virtual Private Cloud (Amazon VPC) through AWS PrivateLink.
Detailed instructions for how to set this up can be found here. Once PrivateLink has been configured, you’ll be able to connect to the Postgres database using AWS Glue.
Snapshotting the Mirror Copy to Amazon S3
The next step in building up a data lake with snapshots of the Salesforce Org is to setup a periodic schedule that writes from the mirror database into Amazon S3 using AWS Glue, a fully managed extract, transform, and load (ETL) service that makes it easy to prepare and load data for analytics.
Some basic setup is required in order to create an Amazon S3 bucket and setup AWS Glue to be able to write to this bucket. In the following section, it’s assumed you have an existing Amazon S3 bucket and a path under which AWS Glue has write permissions.
Since the mirror database can contain many tables, the easiest way to snapshot all is by creating a view in the mirror database that can be used to enumerate all mirrored tables. This can be done by executing the following Postgres statements against the mirror database:
This creates a view that enumerates all standard tables in the target schema (set to ‘mirror’ here), excluding those that begin with an underscore character. The latter restriction prevents enumeration of certain system tables that Heroku Connect creates and manages to maintain the state of synchronization.
The first step is to create a ‘Database’ in AWS Glue. This is done from the Databases section in AWS Glue by clicking the Add Database button and filling in the name. The article assumes the AWS Glue database name is ‘mirror’.
Next, we need to configure a connection to the mirror database in AWS Glue. After the connection has been configured, create a crawler to discover all of the mirrored tables.
Configure the crawler by including only tables in your target schema name and exclude those that begin with an underscore (just like we did when creating the above view). This is done from the Data Store section during setup where you specify ‘mirror/%’ as include path and ‘mirror/_**’ as exclude path. Here, the keyword ‘mirror’ refers to the database name of the target database (the Amazon RDS database name, not the AWS Glue database).
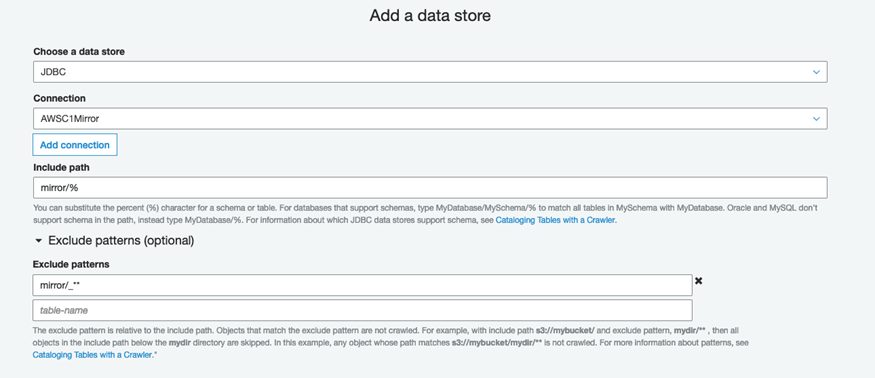
Figure 5 – AWS Glue add connection page data store section.
Once the crawler has been configured, ensure it runs correctly by manually scheduling a run. Once it completes successfully, you will see all the mirrored tables in the tables section in AWS Glue.
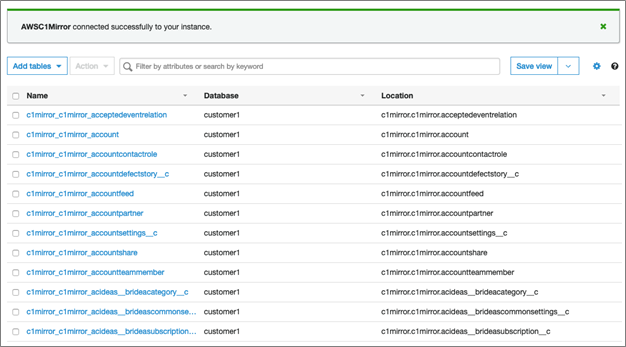
Figure 6 – AWS Glue tables page shows a list of crawled tables from the mirror database.
Now that the crawler has discovered all the tables, we’ll go ahead and create an AWS Glue job to periodically snapshot the data out of the mirror database into Amazon S3.
Next, we’ll create an AWS Glue job that takes snapshots of the mirrored tables and stores these in raw files in an Amazon S3 bucket.
Follow the documentation to create a new AWS Glue job and select ‘A new script to be authored by you’ and ‘Python’ as the language. You may also want to increase the ‘Job Timeout’ parameter if you have a lot of mirrored tables. Edit the job script and input the following Python code:
Replace ‘<S3 bucket name>’ and ‘<S3 path>’ with the name of your Amazon S3 bucket and the path you want to save the snapshots under. This script will enumerate all the tables in the ‘mirror’ schema in the mirror database and save the tables as a series of Parquet files under paths following this format:
s3://<S3 bucket name>/<S3 path>/<SObject name>/<YYYY>/<MM>/<DD>/
Where ‘<SObject name>’ is replaced with the actual name of the Salesforce Object (e.g. account, opportunity), ‘<YYYY>’, ‘<MM>’, and ‘<DD>’ is the year, month, and day of the date the snapshot was taken, respectively.
Assuming everything has been successfully setup, and the AWS Glue job has been running for a couple of days, you should start seeing snapshots accumulating in the Amazon S3 bucket, one new folder per day.
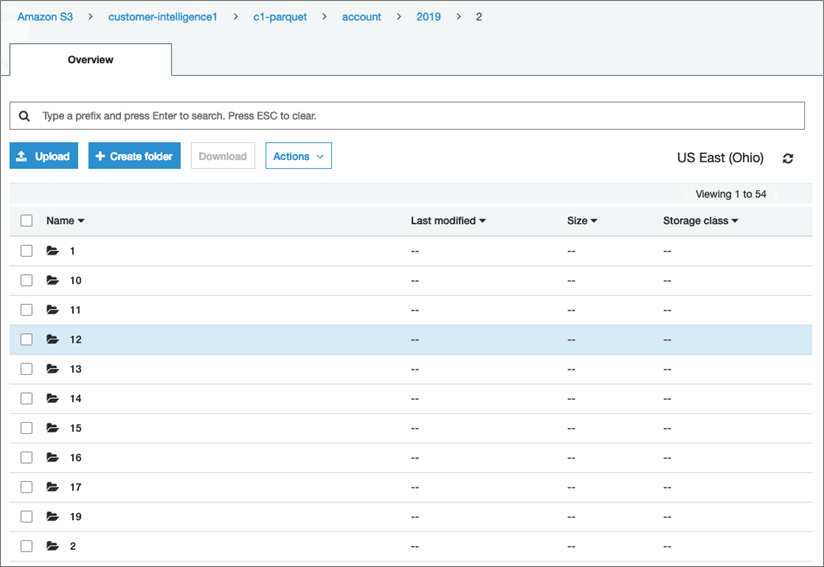
Figure 7 – Amazon S3 bucket showing daily snapshots for the ‘account’ Object from Salesforce.
Conclusion
This is the foundation for a data lake. From this starting point, it’s possible to read Salesforce data as it was exactly at any given day that has a snapshot. Python is capable of reading Parquet files into Pandas DataFrame using the package ‘fast-parquet’, and with a bit of helper code you can automate the download and reading of Parquet files into a Python command that allows reading the full state of a Salesforce Object into a Pandas DataFrame.
If you’re feeling more advanced, the data can also be exposed using Amazon Redshift Spectrum by creating external tables over the data lake.
At FinancialForce, we do both with great success and use partitions for external tables to efficiently query the data lake. Creating a partition for each day and storing files in columnar format (Parquet) allows for highly efficient queries over the data lake.
While Heroku Connect can be cumbersome to configure at first, it’s an effective and robust replication technology once it has been provisioned. The FinancialForce tool greatly speeds up configuring mappings in Heroku Connect.
We have been replicating our own Salesforce data using Heroku Connect for a long time, and the process works well. We’ve seen occasional breaking changes to custom sObject schema (which is a self-inflicted problem), but the Heroku Connect UI makes it simple to resolve these issues.
The content and opinions in this blog are those of the third party author and AWS is not responsible for the content or accuracy of this post.
.
 |
Salesforce – APN Partner Spotlight
Salesforce is an AWS DevOps Competency Partner. Its leading customer relationship management (CRM) platform helps enterprises get more out of their customer data.
Contact Salesforce | Solution Overview
*Already worked with Salesforce? Rate this Partner
*To review an APN Partner, you must be an AWS customer that has worked with them directly on a project.