AWS Partner Network (APN) Blog
Building a Scalable Machine Learning Model Monitoring System with DataRobot
By Shun Mao, Sr. Partner Solutions Architect – AWS
By Oleksandr Saienko, Solutions Consultant – DataRobot
 |
| DataRobot |
 |
From improving customer experiences to developing products, there is almost no area of the modern business untouched by artificial intelligence (AI) and machine learning (ML).
With the rise of generative AI, companies continue to invest more in their AI/ML strategies. However, many organizations struggle to work across the AI lifecycle, especially on the MLOps part. They often find it hard to build an easy-to-manage and scalable machine learning monitoring system that can work for different ML frameworks and environments.
Maintaining multiple ML models across different teams can be challenging. Having a centralized platform to monitor and manage them can significantly reduce operational overhead and improve efficiency.
DataRobot is an open, complete AI lifecycle platform that leverages machine learning and has broad interoperability with Amazon Web Services (AWS) and end-to-end capabilities for ML experimentation, ML production, and MLOps.
DataRobot is an AWS Partner and AWS Marketplace Seller that has achieved Competencies in Machine Learning, Data and Analytics, and Financial Services, and holds the Amazon SageMaker service ready specialization.
In this post, we will discuss how the models trained and deployed in Amazon SageMaker can be monitored in platform in a highly scalable fashion. In this way, together with a previously-published AWS blog post, customers can monitor both DataRobot-originated models and SageMaker-originated models under a single pane of glass in DataRobot.
Solution Overview
The following diagram illustrates a high-level architecture for monitoring Amazon SageMaker models in DataRobot.
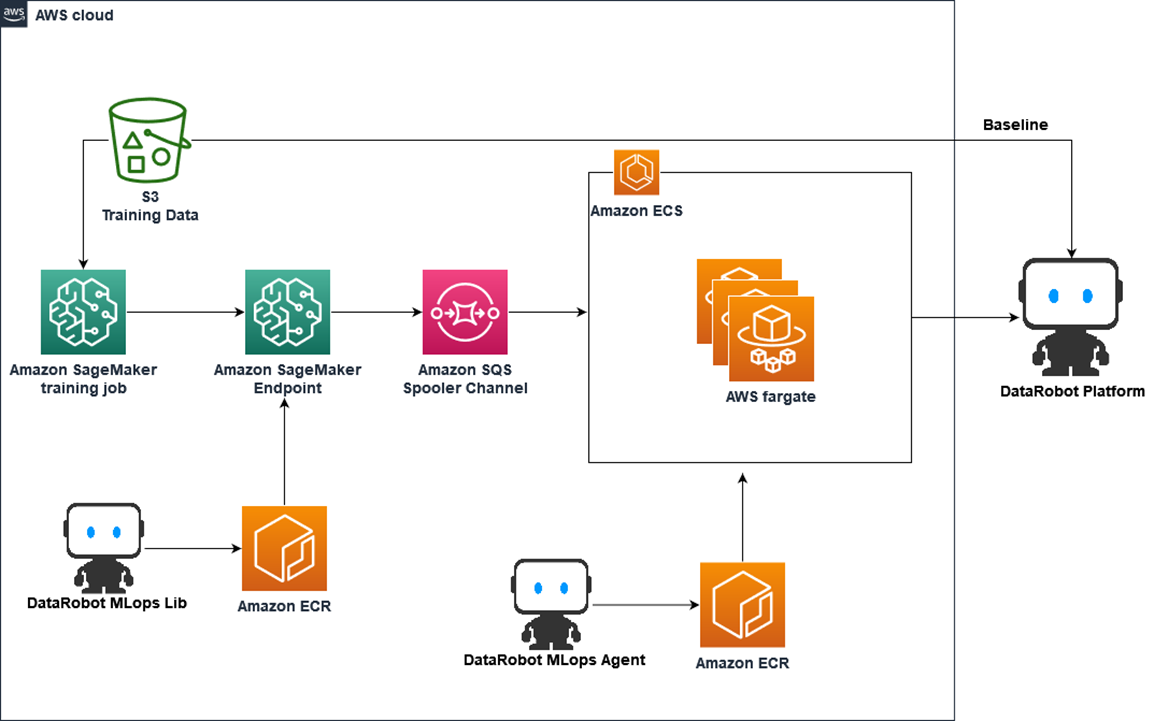
Figure 1 – Solution architecture diagram.
In this diagram, users can build their own custom SageMaker containers to train a machine learning model and host the model as a SageMaker endpoint. The inference container has DataRobot MLOps libraries installed and model monitoring code written so it can collect the inference metrics and statistics and send it to an Amazon Simple Queue Service (SQS) spooler channel.
The information queued in SQS is pulled by a DataRobot MLOps agent implemented by Amazon Elastic Container Service (Amazon ECS). Finally, the agent sends the message to the DataRobot environment and users can see the results in the DataRobot user interface (UI).
This architecture design is serverless and highly scalable, and it can be used to monitor a large number of models simultaneously. To monitor multiple models, the inference containers send messages to the SQS queue and the agent in ECS can be auto-scaled to accommodate the workload depending on the queue length, which reduces the operational overhead and increases cost efficiency.
Prerequisites
This post assumes you have access to Amazon SageMaker and also a DataRobot account. DataRobot comes with three deployment types: multi-tenant software as a service (SaaS), single-tenant SaaS, and virtual private cloud (VPC), depending on customers’ requirements. If you don’t have a DataRobot account, follow the instructions to create a trial SaaS account.
Create a DataRobot External Deployment to Monitor Models
To monitor models hosted in Amazon SageMaker, you need to create an external model deployment in DataRobot with the following steps. Each step generates some necessary information to be collected when deploying the endpoint in SageMaker.
- Register training data in the DataRobot AI catalog
- Create DataRobot model package
- Create DataRobot external prediction environment
- Create DataRobot deployment
These steps can be done manually from the DataRobot UI, or you can use the DataRobot MLOps command line interface (CLI) tool. The example we’re using here is the Iris flower species prediction.
To use the DataRobot MLOps CLI tool, you need to install datarobot-mlops-connected-client and set up the DataRobot API token (which you can find in your DataRobot UI) as environment variables.
DataRobot stores statistics about predictions to monitor how distributions and values of features change over time. As a baseline for comparing distributions of features, DataRobot uses the distribution of the training data, which needs to be uploaded to the DataRobot AI Catalog.
To register the training data in the DataRobot AI catalog, you can import a dataset through the AI catalog drop-down, which generates a dataset ID that will be used later. DataRobot supports a wide variety of data sources, including some of the most popular AWS services to allow easy data importing.
For DataRobot multi-tenant SaaS, DataRobot uses an Amazon Simple Storage Service (Amazon S3) bucket for storing imported data that’s managed by DataRobot. There is no direct access to this bucket, however, as data is secured at-rest using encryption and all data transferred to and from S3 is encrypted in transit using TLS 1.2.

Figure 2 – DataRobot AI Catalog and data connectors.
After the training dataset is uploaded, you need to create a model package. In the UI, you can create one under Model Registry > Model Packages.

Figure 3 – DataRobot model package UI.
.
Or, you can run the following CLI code and it returns a MODEL_PACKAGE_ID:
Next, we need to create a custom external prediction environment. Details can be found in the documentation for using the UI.
To use the CLI tool, run the following code and it generates a PREDICTION_ENVIRONMENT_ID:
Finally, you can create a DataRobot deployment associated with the SageMaker model. In the UI, this can be done under Model Registry > Model Package > Deployments.
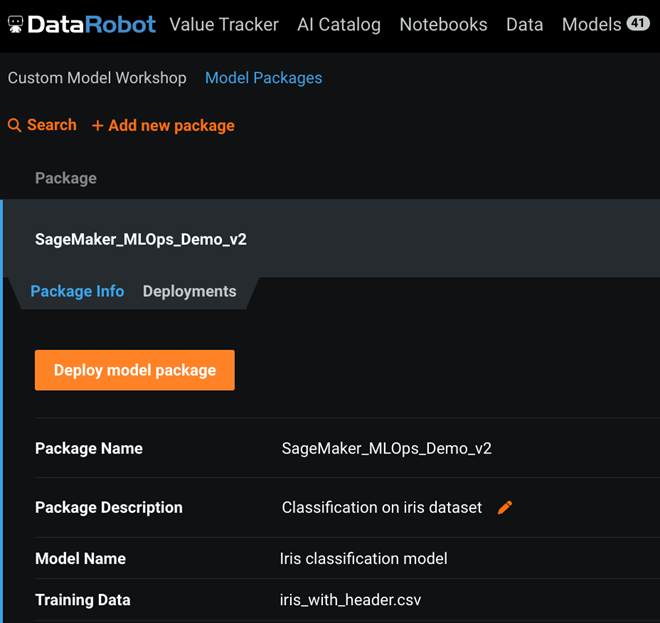
Figure 4 – DataRobot model deployment UI.
To use the CLI, run the following code with proper environment variable setup and it produces a DEPLOYMENT_ID:
Until now, we have finished all the preparations that are needed inside DataRobot. Next, we will train and host a SageMaker model in AWS.
Build a SageMaker Custom Container
To build an Amazon SageMaker custom container for training and inference, we are leveraging an existing SageMaker workshop on how to build a custom container; the code artifacts can be found in this GitHub repo. We will keep the original structure of code untouched, but with some key changes in the Dockerfile and predictor.py.
In the Dockerfile, we’ll need to add one line to install datarobot-mlops library, which is key for the SageMaker container to send monitoring data out. Add the following line of code right after installation of python in the original Dockerfile:
For predictor.py, the main changes are on the ScoringService object, where we need to call datarobot.mlops library to collect the metrics and send it to SQS spool channel.
Here, we do not modify the training code since the monitoring is mainly for the inference. With the above changes ready, we build a Docker image and push it to Amazon Elastic Container Registry (Amazon ECR) with the name sagemaker-datarobot-decision-trees:latest.
Deploy Amazon SQS and ECS to Receive Inference Monitoring Info
The main infrastructure we need here is Amazon SQS and Amazon ECS on AWS Fargate. SQS serves as a spool channel to receive monitoring data from the SageMaker inference container, and it’s highly scalable and flexible to adapt to a variety of scenarios. Create an SQS queue in your AWS account named aws-mlops-agent-demo by following the instructions and leave everything else as default.
The data in SQS will be picked up by the DataRobot agent deployed in ECS by a pre-built Docker image running on AWS Fargate. The steps to build the Docker image with the DataRobot MLOps agent are:
- Download the DataRobot MLOps package from your DataRobot UI in the Developer Tool tab. Unzip the package and navigate to the folder datarobot_mlops_package-8.2.13/tools/agent_docker. As of this writing, the latest version of this package is 8.2.13.
- Find the file mlops.agent.conf.yaml in the datarobot_mlops_package-8.2.13/tools/agent_docker/conf folder and edit the information in the following sections:
You can see that DataRobot supports several communication channels (spooler channels) to collect model monitoring statistics, and in this example we choose to use Amazon SQS.
With above edit in place, build the agent Docker image and push it to Amazon ECR.
The step of creating an Amazon ECS cluster with Fargate deployment can be found in the documentation. When selecting s container image, choose the DataRobot agent image we just built. You can keep everything else as default.
Train the Model and Deploy it as a SageMaker Endpoint
Running the following code in Amazon SageMaker Studio Notebook can train a simple decision tree model in SageMaker.
The following code will deploy the model as an endpoint with necessary DataRobot MLOps information that we generated in previous steps, such as “MLOPS_DEPLOYMENT_ID”, “MLOPS_MODEL_ID”, “MLOPS_SQS_QUEUE”, “prediction_type” and “CLASS_NAMES” in the inference container.
Now, this has completed all of the deployment and the endpoint is ready to serve inference request. Once the endpoint is called, the monitoring information will be seen in the DataRobot UI. For more details on the code, please refer to this GitHub repo.
Explore DataRobot’s Monitoring Capabilities
DataRobot offers a central hub for monitoring model health and accuracy for all deployed models with low latency. For each deployment, DataRobot provides a status banner with model-specific information.
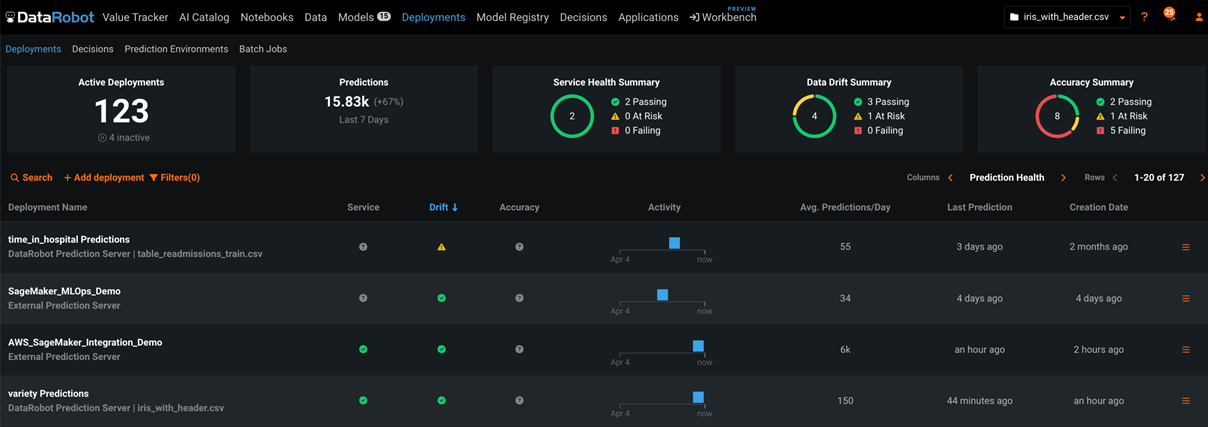
Figure 5 – DataRobot model monitoring main UI.
When you select a specific deployment, DataRobot opens an overview page for that deployment. The overview page provides a model and environment specific summary that describes the deployment, including the information you supplied when creating the deployment and any model replacement activity.
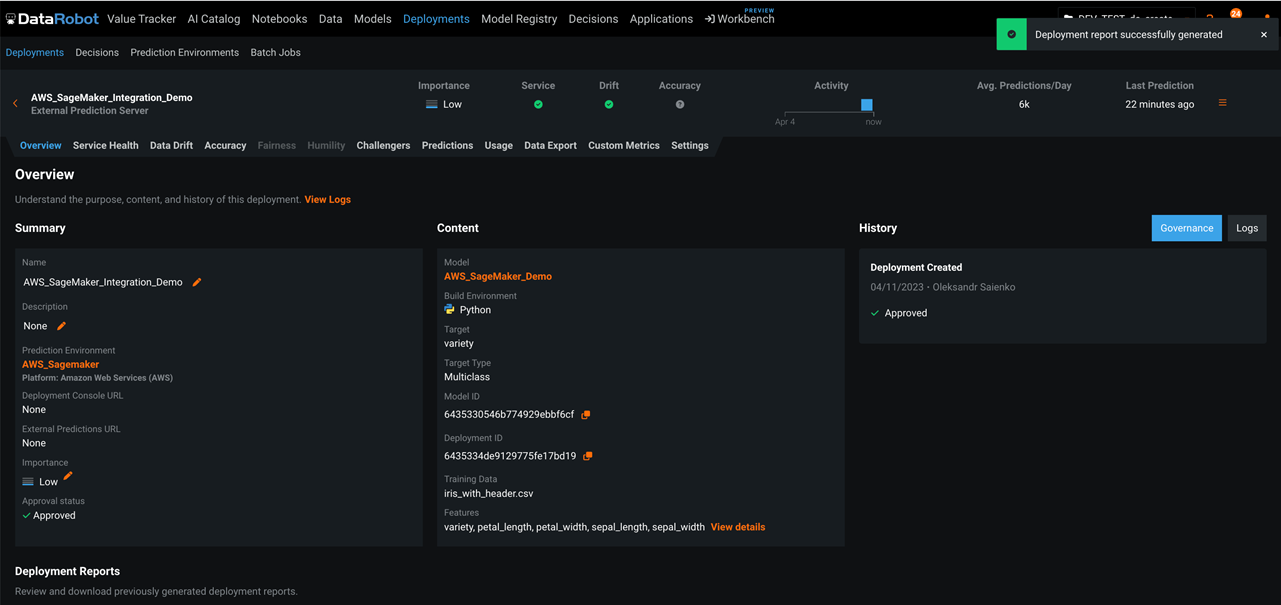
Figure 6 – DataRobot deployment options.
The Service Health tab tracks metrics about a deployment’s ability to respond to prediction requests quickly and reliably. This helps identify bottlenecks and assess capacity, which is critical to proper provisioning. The tab also provides informational tiles and a chart to help monitor the activity level and health of the deployment.

Figure 7 – DataRobot model health monitoring.
As training and production data change over time, a deployed model loses predictive power, and the data surrounding the model is said to be drifting. By leveraging the training data and prediction data that’s added to your deployment, the Data Drift dashboard helps you analyze a model’s performance after it has been deployed.
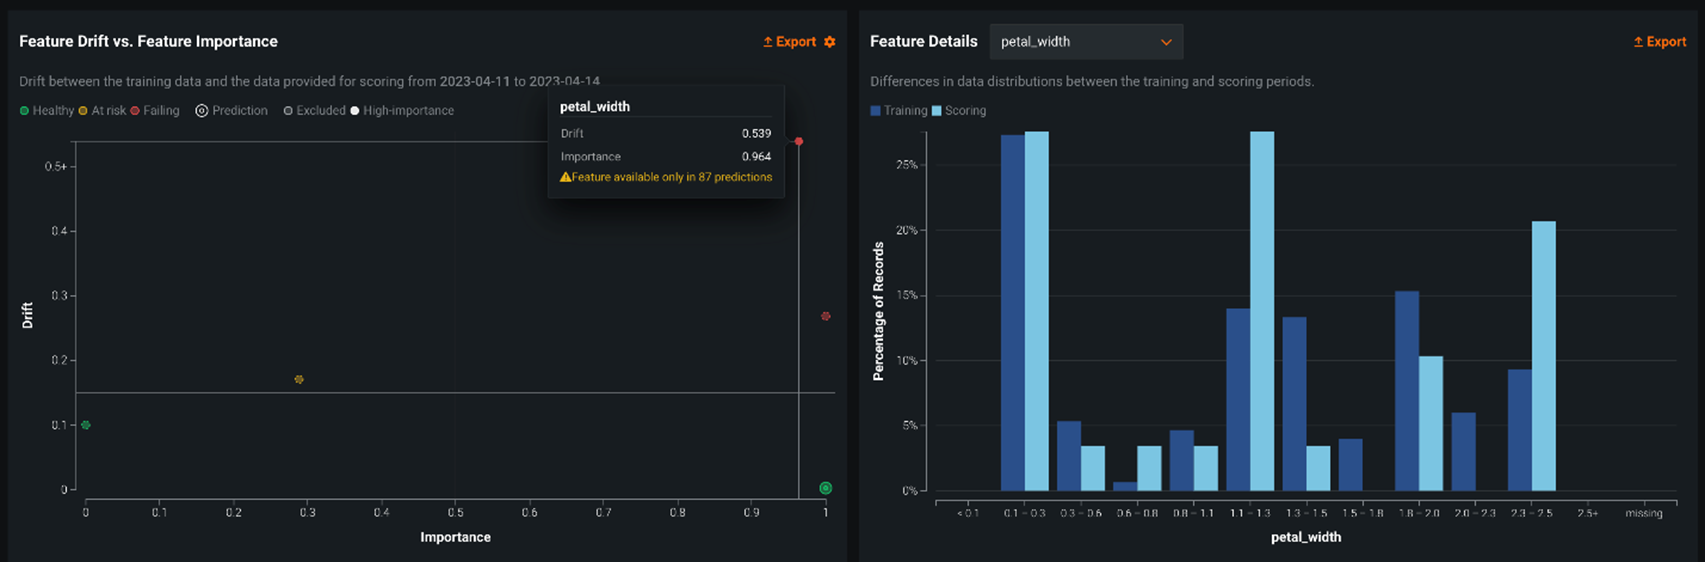
Figure 8 – DataRobot model drift monitoring.
There are several other tabs related to deployment (like Accuracy, Challenger Models, Usage, Custom Metrics, and Segmented Analysis) which are not in scope of this post but you can get more details in the DataRobot documentation.
Conclusion
In this post, you learned how to build a highly scalable machine learning model monitoring system using DataRobot for Amazon SageMaker hosted models.
DataRobot also has other features, such as automatic feature discovery, autoML, model deployment, and ML notebook development. To get started with DataRobot, visit the website to set up a personalized demo. DataRobot is also available in AWS Marketplace.
.

.
DataRobot – AWS Partner Spotlight
DataRobot is an AWS Partner and open, complete AI lifecycle platform that leverages machine learning and has broad interoperability with AWS and end-to-end capabilities for ML experimentation, ML production, and MLOps.
Contact DataRobot | Partner Overview | AWS Marketplace | Case Studies