AWS Partner Network (APN) Blog
How to Build Sparse EBS Volumes for Fun and Easy Snapshotting
By Ian Scofield, Partner Solutions Architects – AWS
By Mike Ruiz, Partner Solutions Architect – AWS
If you are familiar with Amazon Elastic Block Store (Amazon EBS) and the EBS volume snapshotting process, you may know that we recommend initializing – that is, reading every block – on volumes that have been created from snapshots in order to achieve maximum read performance.
In some cases, you can reduce initialization time by trimming volumes to discard unused blocks prior to snapshotting. This technique may be valuable if you plan to distribute snapshots or use a snapshot to build an Amazon Machine Image (AMI).
In this post, we’ll demonstrate a method to trim EBS volumes prior to snapshotting, with an eye toward optimizing the initialization process. While many SSD controllers support native TRIM operations, including Amazon EC2 Instance Store volumes, EBS does not. Instead, our method involves making, mounting, and trimming an intermediate volume image, and then copying the trimmed image to the new volume by using a tool that preserves sparseness.
We hope this method helps illuminate some factors affecting volume initialization performance and leads to insights you can use to optimize your own snapshotting and AMI creation workflows.
As a reminder, please note that new EBS volumes that are not built from a snapshot receive their maximum performance the moment that they are available and do not require initialization.
Amazon EBS
Amazon EBS is a block storage offering for Amazon Elastic Compute Cloud (Amazon EC2) that offers many benefits, including high availability, portability, and durability, with a variety of options to optimize storage performance and cost for your workload.
For more information on volume types and other EBS features, see Amazon EBS Product Details.
Amazon EBS Snapshots
All Amazon EBS volume types include the ability to take snapshots. A snapshot is a point-in-time copy of an EBS volume. It’s common practice to take snapshots of your EBS volumes for backup/archival purposes, and snapshots are also required when building an AMI.
All snapshots are stored in Amazon Simple Storage Service (Amazon S3) and can be used to build new volumes anywhere in the region. Volumes created from snapshots can be larger or of a different type than the original volume.
A volume created from a snapshot will be available for use immediately, and blocks in the snapshot will be copied to the volume from S3. This behavior results in a small penalty the first time a block stored in a snapshot is read.
For some environments, this behavior can result in unexpected or unpredictable performance for new volumes. To fully optimize read performance in these environments, we recommend initializing the volume. Initialization means preemptively reading every block on the volume, and there are a variety of techniques available to accomplish this.
Once the volume is initialized, all subsequent reads are made directly from the EBS volume and offer maximum read performance. We can optimize the initialization process by only storing allocated, not just modified, blocks in S3.
Again, it’s worth repeating that only volumes created from snapshots have this behavior; volumes not created from a snapshot do not need to be initialized as there is no data to be read from S3.
Snapshot Contents
The first snapshot taken of a volume contains a copy of all the blocks that have been modified since the volume was created. Blocks that were allocated to the volume but have never been modified are not stored in the snapshot.
Amazon EBS has no idea how the blocks are used by the instance, only that they were modified at least once. For example, if you create a file, all the blocks associated with that file are allocated and stored in every snapshot from that point forward.
A key point to note is that modified blocks are stored in the snapshot even if the file that was associated with them is eventually deleted. So, if you have a file system with lots of changes – for example, file systems found on long-running instances, that involve caching or processing large backups or log files, that are used during significant operating system upgrades, or that host compilation artifacts – the snapshot size may continue to increase even if the file system size stays relatively static.
This will result in more blocks needing to be restored the first time a restored volume is read, which will result in slower initial performance.
Finally, consider the use of a common block copy utility like dd to copy an image to an EBS volume. dd used in the default way will copy every block from the image to the volume, even if the source blocks are unallocated and contain no data. Of course, EBS will correctly write zeros to these blocks and mark them as modified, and subsequent snapshots of this volume will be of the maximum possible size.
Later in this post, we’ll discuss an alternate method to copy an image to a volume in a way that will preserve sparseness and avoid the allocation of empty blocks by using an updated version of dd called ddpt.
Snapshotting Examples
Let’s take a deeper look at how snapshotting might work in practice. Consider an example where you attach a new 25-GiB Amazon EBS volume to an instance, create a file system, and then write five 5-GiB files to it (see Figure A).
In all, 25 GiB worth of blocks – the entire volume – have been modified. A snapshot of this volume would comprise 25 GiB of modified blocks.

Figure A – All blocks modified.
Let’s imagine that you now remove three files from the file system. This leaves you with two 5-GiB files and 15 GiB of free space in the file system (see Figure B).
However, Amazon EBS only tracks the allocation of blocks and not the current state of the file system; even though the file system now has only 10 GiB allocated, a snapshot will still be 25 GiB in length.
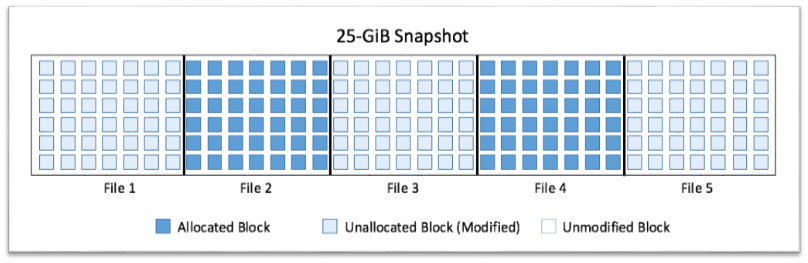
Figure B – Unoptimized snapshot.
If, at this point, you were to copy only the contents of the two remaining files (taking care not to copy the empty blocks) to a new volume, you would only be modifying the 10 GiB of blocks that make up the respective files (see Figure C).
The rest of the blocks would remain untouched, and the snapshot size would only be 10 GiB.
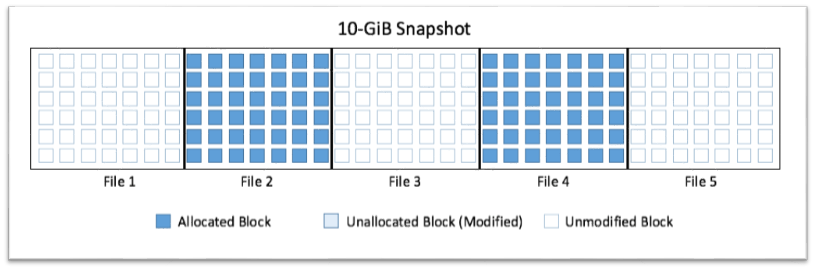
Figure C – Optimized snapshot.
Let’s apply these observations to a common use case. Consider an operating system where you have installed patches, made modifications, and removed temporary files – very typical steps in the creation of an AMI. While the size of the files remaining in the file system may only be 3 GiB, throughout that process there will be blocks that were modified but are no longer used.
This will result in a snapshot that is larger than the files actually present, and a volume created from this snapshot will take longer to initialize than strictly necessary, given the files that remain.
Exploring Initialization Performance
Let’s walk through a typical snapshotting scenario and see how we can create sparse snapshots and improve initialization performance. Please note that you are responsible for any AWS usage costs that may be incurred if you decide to follow the next steps.
Setup
You’ll start out by launching an Amazon EC2 t2.micro instance with an additional 25-GiB EBS General Purpose SSD (GP2) volume, and then manually creating a partition and file system after launch. Then, you will create five 5-GiB files of random data to write to the blocks to simulate normal usage of adding and removing packages, log files, etc.
In order to generate the test files, we used the following script:
#!/bin/bash
COUNTER=1
until [ $COUNTER -eq "6" ]; do
        echo COUNTER $COUNTER
        dd if=<(openssl enc -aes-256-ctr -pass pass:"$(dd if=/dev/urandom bs=128 count=1 2>/dev/null | base64)" -nosalt < /dev/zero) of=test$COUNTER bs=1M count=5120 iflag=fullblock status=progress
        let COUNTER+=1
done
The file system is now nearly full and has touched almost every single block on the EBS volume. A snapshot taken at this point in time would be 25 GiB in length.
The next step is to remove some of the files (test1, test3, and test5) to create the scenario where blocks have had data written to them and are modified in EBS, but are no longer allocated in the file system. A snapshot taken now would still be 25 GiB in length as those three files’ respective blocks were modified.
At this point, you will take a snapshot of this volume in its current state. This represents a “dirty” volume with all blocks modified, but only ~40% of the volume is actually allocated to files. We will refer to this as the standard snapshot going forward.
Optimization
This section outlines the steps for optimizing your snapshot for future restores. You will attach another 25-GiB volume to your instance in which you will create an image of /dev/xvdf1 (our source volume with the two remaining files).
Use dd to create an image of the volume that you want to optimize and prepare for a snapshot, and store this image on disk. As we mentioned, dd will copy all the blocks in the volume and will create a 25-GiB image.
# dd if=/dev/xvdf of=/image/sparse.img bs=512 status=progress
	5671469568 bytes (5.7 GB) copied, 126.964078 s, 44.7 MB/s…
Once the image creation is complete, you’ll have an image file that you can mount using the loopback option:
# mount -o loop,discard,offset=1048576 sparse.img /loop
The final step in optimizing the image is to clean up (trim) the unallocated blocks by running the fstrim command so you can avoid allocating them in your new volume.
# fstrim /loop
At this point, you have an image file comprising only blocks that actually contain data: a sparse image. The next step is to create an EBS volume using this image. For this, you will use a modified version of dd called ddpt (ddpt). By using ddpt you are able to specify the oflag=sparse option, which respects sparseness and results in a copy that skips unallocated blocks.
Mount another 25-GiB EBS volume to receive your optimized image. Copy the optimized image to the new EBS volume, and take your final snapshot. This copy operation will result in a volume that is structurally identical to the original, but with unallocated blocks removed.
# ddpt of=/dev/xvdg if=/image/sparse.img bs=512 oflag=sparse
52428800+0 records in
20989696+0 records out
31439104 bypassed records out
time to transfer data: 2742.145369 secs at 9.79 MB/sec
You now have two snapshots: the standard snapshot that incorporates all the blocks that were touched in the initial file creation (Figure B), and the optimized snapshot that only incorporates the blocks that are used for the files that are actually present (Figure C).
Performance Test
In order to test your two snapshots and their relative performance, create a new volume from each snapshot, using a t2.micro instance for each to ensure they both have the same initial CPU credit balance. To test the performance, read the entire volume and time the total read operation by using:
# time dd if=/dev/xvdf1 of=/dev/null bs=1024k status=progress
You will immediately see the volume created from the trimmed image is moving significantly faster because it doesn’t have to read unallocated blocks from S3.
Analysis
Both file systems contain only two files (test2 and test4 — 10 GiB of data). But as you can see in the screenshots below, there was a significant performance difference when initializing the two restored volumes. The volume that was optimized was 2.2x faster!
Unoptimized Snapshot:
# time dd if=/dev/xvdf1 of=/dev/null bs=1024k status=progress
	26836205568 bytes (27GB) copied, 5948.419841 s, 4.5 MB/s
	25599+0 records in
	25599+0 records out
	26842497024 bytes (27GB) copied, 5948.94 s, 4.5MB/s

	real 99m8.943s
	user 0m2.024s
	sys	0m10.636s

Optimized Snapshot:
# time dd if=/dev/xvdf1 of=/dev/null bs=1024k status=progress
	26828865536 bytes (27GB) copied, 2563.828358 s, 10.5 MB/s
	25599+0 records in
	25599+0 records out
	26842497024 bytes (27GB) copied, 2564.13 s, 10.5MB/s

	real 42m44.135s
        user 0m0.964s
	sys  0m10.524s
Now let’s take a look at system performance during the actual operation as reported by Amazon CloudWatch (Figure D).
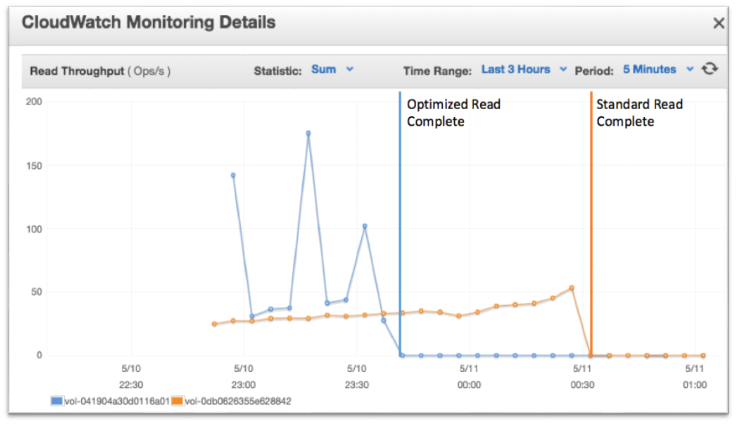
Figure D – Read throughput comparison.
In Figure D, you can see the throughput during the dd operation. The standard snapshot (orange) shows consistent performance while initializing the entire 25-GiB volume, even though only ~40% of the volume contained file system data. The optimized snapshot (blue) shows a different story.
Recall that we created five files across the volume, and then removed files 1, 3, and 5, leaving those blocks unallocated. The three peaks represent the period where EBS is no longer reading the data from S3 and is instead reading directly from the EBS volume, reducing latency and increasing speed.
Figure D also clearly indicates the initialization performance for the optimized volume is twice that of the standard volume.
This next graph shows a comparison of the read latency between the two volumes (Figure E):
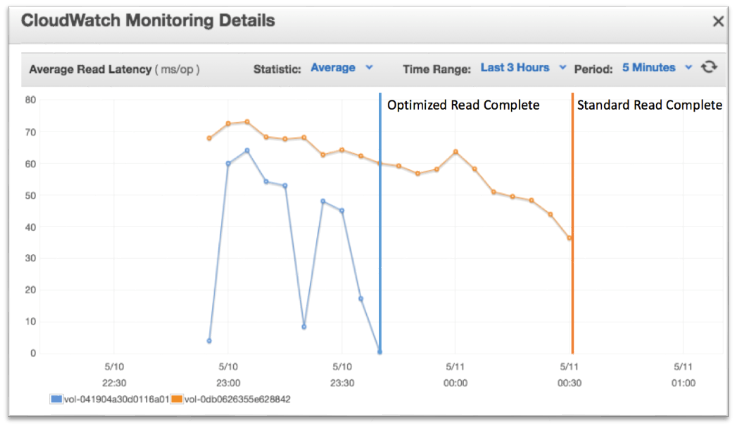
Figure E: Read Latency Comparison
Latency increases when restoring the blocks from S3 to the EBS volume. As you can see in Figure E, when reading where files 1, 3, and 5 were on the volume, the average is 5 ms/op for the optimized snapshot (blue) vs. 55 ms/op (orange) for the standard snapshot due to retrieving from S3.
Summary
Snapshots are an excellent tool to back up and distribute your Amazon EBS volumes, as well as an essential step in the creation of AMIs.
If you have been using an EBS volume for an extended period of time or have made significant modifications since its creation, you may be paying an unnecessary penalty on the first read from the volume upon initialization.
Optimizing your snapshot by trimming the file system will enable you to drastically reduce the data that is fetched by Amazon S3, which, in turn, will increase the initial performance of your volume and will help reduce storage costs.
We hope you’ll examine your snapshotting process and look for opportunities to use these techniques to improve initialization performance, reduce snapshot costs, and improve the launch time for your custom AMIs.