AWS Partner Network (APN) Blog
How to Use Amazon Rekognition on Cloudinary to Auto-Tag Faces with Names
By Amit Khanal, Solutions Architect at Cloudinary
 |
 |
Over the last decade, the number of photos our society has taken and stored is absolutely mind-blowing. Estimates suggest that more than 1 trillion photos were taken in 2018.
The shift to digital photography, combined with the availability of smartphone cameras, has made it easy for photographers of all skill levels to take and upload an enormous amount of content every year.
These massive image collections can be difficult to manage and organize, let alone a brand that’s trying to manage and deliver tens of thousands to even millions of images on a monthly basis.
Consider a large business that wants to automatically connect each employee’s headshot to their profile. An ideal solution offers businesses the ability to identify people’s faces in pictures and automatically tag those photos with names.
The solution would also give users the ability to search for people by name, and further enhancements could include the creation of albums and face recognition for security purposes.
In this post, I will describe how to seamlessly integrate Amazon Rekognition with the Cloudinary platform, and build an application that automatically tags people in images with names.
Our solution learns people’s faces from photos uploaded to a “training” folder in Cloudinary. In many cases, a single photo of someone is enough for Amazon Rekognition to learn and then, later on, identify and tag that person. This works in most photograph scenes and even pictures with many other people in them.
The complete code of the Cloudinary face recognition app is on GitHub. Your feedback, suggestions for enhancements, or pull requests are always welcome. It’s important to note that indexing and labeling faces is a private process for your organization. Each image’s index data is stored in your Amazon Web Services (AWS) account only.
Get to Know Cloudinary
Before delving into the details of our solution, let me briefly introduce Cloudinary, an AWS Partner Network (APN) Advanced Technology Partner with the AWS Digital Customer Experience Competency.
Cloudinary is a cloud-based, media full-stack platform for the world’s top brands. Developers and marketers use Cloudinary for managing rich media, including images and videos, and to deliver an optimal end-user experience.
Among Cloudinary’s many automated capabilities are on-the-fly manipulations, optimizations, and responsive delivery of visual media across devices.
Understanding the Solution
The solution described in this post leverages the following services for auto-tagging images:
- Cloudinary: For uploading, tagging, and managing images.
- Amazon Rekognition: For indexing facial images and searching them for facial matches.
- AWS Lambda: For calling Amazon Rekognition APIs for indexing and searching.
- Amazon API Gateway: For exposing the Lambda function through an API, which Cloudinary then registers as a web hook.
Two workflows are involved in this solution:
Creation of a training collection: This flow takes images uploaded to a Cloudinary “training” folder and invokes Amazon Rekognition, which indexes the faces and stores them in a private collection in your AWS account. This is a private collection stored on your AWS account only.

Figure 1 – Indexing flow.
Search of images in the trained collection: This flow takes new images uploaded to Cloudinary, invokes Amazon Rekognition, and finds faces in those images that match the indexed faces from the trained collection.
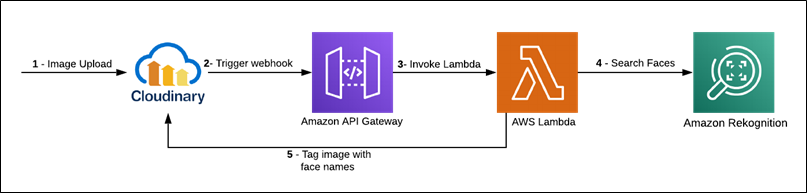
Figure 2 – Search flow.
Building the Solution
As a preliminary step, register for an AWS account and free Cloudinary account. Now, you can set up the AWS environment.
Step 1: Configuring AWS Lambda
You must deploy the app as an AWS Lambda function following these steps:
- Clone the project from GitHub and deploy the project on your AWS environment as a Lambda function.
- Ensure that Execution Role on the Lambda function has the ‘AmazonRekognitionFullAccess’ policy attached.
The Lambda function requires the following environment variables:
- CLOUDINARY_URL: The URL that’s required for making API calls to Cloudinary. To look up that URL, log into the Cloudinary console for the value.
- trainingFolder: The name of the Cloudinary folder (e.g. training) where you will upload the single-faced images from which Amazon Rekognition will learn to associate the name you provide with the corresponding face.
- faceRecognitionFolder: The name of the Cloudinary folder (e.g. assets) where you will upload all of the images you want this solution to tag with recognized names.
- rekognitionCollection: The name of the collection in Amazon Rekognition (e.g. cld-rekog) which contains the indexed faces to be used for face searches.
- confidenceThreshold: The minimum confidence-score of face matches (e.g. 80). The app considers a match successful if the score returned by Amazon Rekognition is at or higher than this level.
- faceLabelTagPrefix: The prefix that precedes the names of the tagged images in the “training” folder. The tagging syntax is `faceLabelTagPrefix:< Name>`.
- transformationParams: The parameters that specify the transformations to apply when requesting images from Cloudinary for indexing or searching. Because original-sized images are not required, I recommend you apply, at a minimum, `q_auto` to reduce the image size and save bandwidth.

Figure 3 – AWS Lambda environment variables.
Step 2: Configuring Amazon API Gateway
Cloudinary integrates with Amazon Rekognition through Amazon API Gateway. To get started, go to the Amazon API Gateway console and import the Swagger file from Github, and then set up your API by following the documentation.
Next, associate the Lambda function created in Step 1 with your API, as shown below.
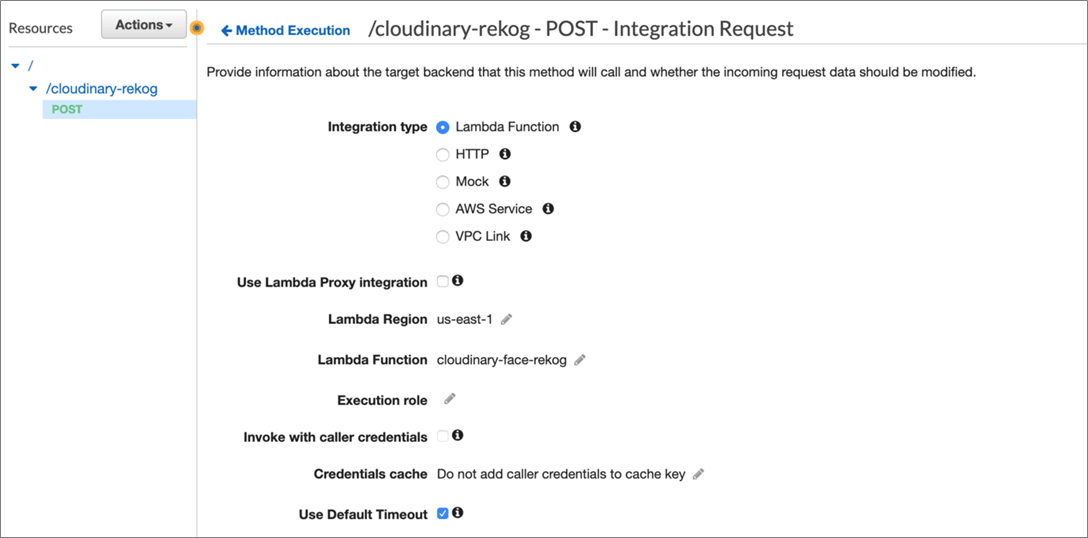
Figure 4 – Amazon API Gateway setup.
Step 3: Setting Up the Cloudinary Environment
To set up your Cloudinary environment, log into your Cloudinary account and go to your Media Library. In the root folder, create two folders called ‘training’ and `assets`.
Next, go to Upload Settings and enter in the Notification URL field the Amazon API Gateway endpoint you configured in Step 2. Cloudinary sends upload and tagging notifications to this endpoint, which is a requirement for this app.

Figure 5 – Cloudinary settings.
Creating a Trained Collection
Now that all of the components are in place, you can start using the app. First, set up a trained collection by indexing your facial images with Amazon Rekognition. All you have to do is upload them to the “training” folder.
To create a trained collection, upload single-face images only to the “training” folder. Multiple-face images do not work in this app.
You can upload images to Cloudinary in several ways. For the purpose of this post, do that with the upload widget in the Cloudinary console, as follows:
- Go to your Cloudinary Media Library.
- Navigate to the “training” folder.
- Click Upload on the top right-hand corner.
- Click the Advanced link at the bottom of the upload widget that’s displayed.
- Enter a tag according to the syntax `faceLabel:<Name>’.
- Click to select an image to upload from any of the sources available on the widget.

Figure 6 – Uploading an image with custom tag.
You’ve now uploaded the selected image, tagged by you as `faceLabel:<Name>` to Cloudinary. Now, ensure the image resides in the “training” folder.
Repeat the above procedure to train all of the images you’re targeting for facial recognition.
Alternatively, you can upload training images in bulk through Cloudinary’s Software Developer Kit (SDK). This doesn’t require an AWS Lambda function and can be done from any NodeJS environment. Just ensure the node modules are installed and the environment variables as stated above are defined.
If your trainable images that are tagged with `faceLabel:<name>` are already in a “training” folder, call the `indexFaces` function on index.js. That function accepts the “training” folder name, retrieves all the images from the folder, and indexes the ones with the `faceLabel` tag.
As in this `faceLabel` tag code:
If you have a list of the URLs and tags for your images, call the `uploadAndIndex` function on index.js. That function uploads the images one by one to Cloudinary, and tags and indexes them during the process.
See this code:
Amazon Rekognition Results
Amazon Rekognition yields fairly good results with one trained image per person. By indexing different images of the same person, however, you can grow your collection and make it robust. This enables you to search for different images of people at a certain angle, of a certain pose, with a certain expression, and so forth.
Additionally, Amazon Rekognition returns many details that pertain to indexed faces, such as facial coordinates and poses that you could use in apps. To learn more, see the documentation.
Subsequent to an image upload, the following steps take place:
- Cloudinary invokes the Amazon API Gateway endpoint defined in the Notification URL field in the Upload Settings screen of your Cloudinary Media Library.
- Amazon API Gateway invokes the Lambda function with image-upload data from Cloudinary.
- The Lambda function checks the upload response and, if it verifies the image has been uploaded to the “training” folder with a `faceLabel` tag, indexes the image via Amazon Rekognition.
Once indexing is complete, `faceId` is displayed as an image tag, such as the one below. Refresh the page to see `faceId`.
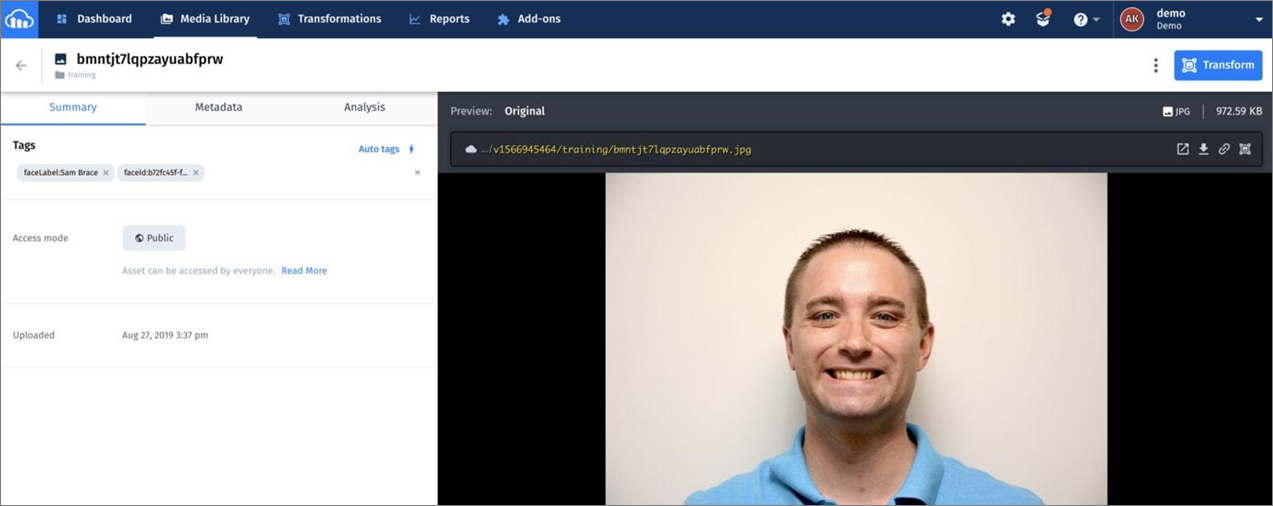
Figure 7 – Image uploaded and indexed.
Testing the Application
Finally, let’s test the application. Start by uploading images into the `assets` folder. Feel free to upload multi-face images in addition to single-face ones.
If face matches are found, the app shows the related names as tags on the images. The entire process usually takes several seconds for images with a few faces and up to 25-30 seconds for images that contain many faces.
Refresh the page to see the facial tags, as in these examples:
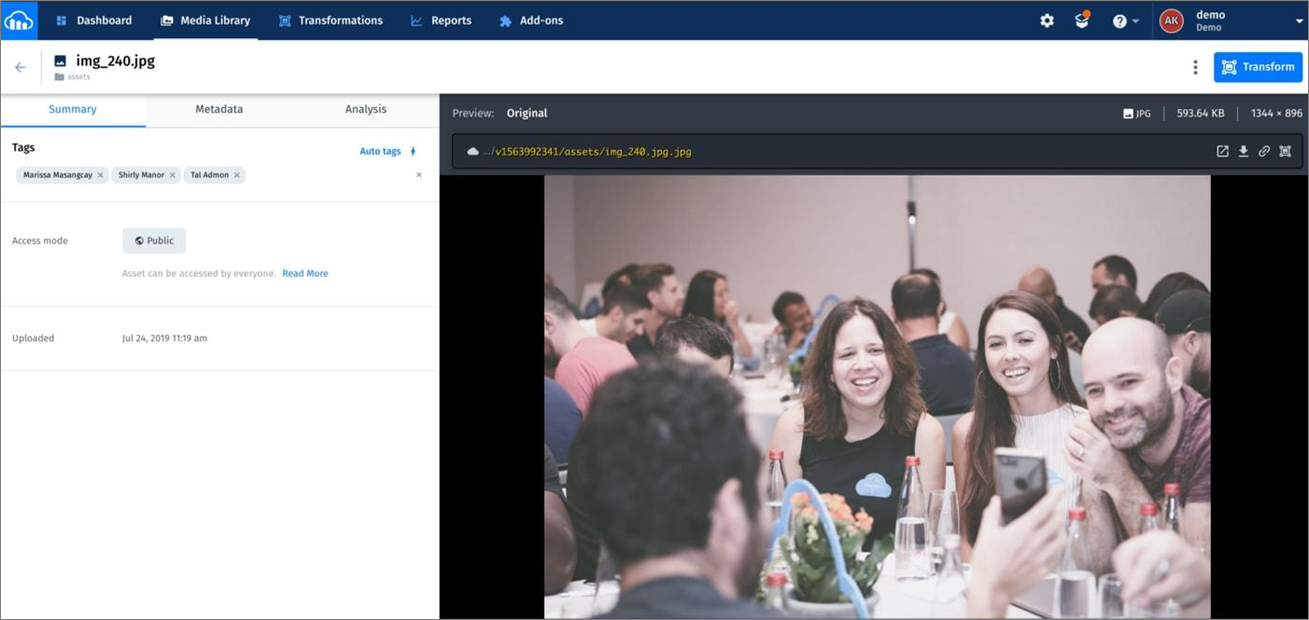
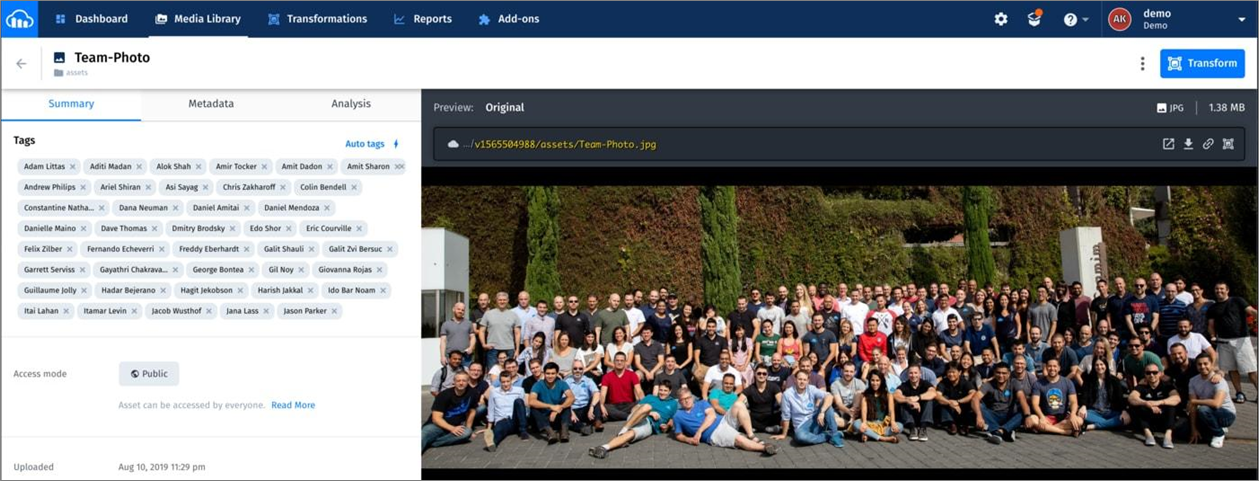
Figure 8 – Tagged images of employees.
Amazon Rekognition can detect up to 100 of the largest faces in an image. If there are more, the service skips detecting some faces. See the details in the Amazon Rekognition Developer Guide.
Summary
In this post, I have demonstrated how to upload images to Cloudinary, create a customized and trained collection of people faces with Amazon Rekognition, upload images of people to Cloudinary, and have them auto-tagged with names.
With those auto-populated tags, you can search for any indexed person’s name in the Cloudinary Media Library, which returns all of the images tagged with that name.
By slightly tweaking the code, you can create multiple Amazon Rekognition collections to index different groups of faces per collection, categorized by, for example, department, demographics, and so forth.
The content and opinions in this blog are those of the third party author and AWS is not responsible for the content or accuracy of this post.
.

Cloudinary – APN Partner Spotlight
Cloudinary is an AWS Competency Partner and media full-stack platform for the world’s top brands. Developers and marketers use Cloudinary for managing rich media, including images and videos, and to deliver an optimal end-user experience.
Contact Cloudinary | Solution Overview | AWS Marketplace
*Already worked with Cloudinary? Rate this Partner
*To review an APN Partner, you must be an AWS customer that has worked with them directly on a project.