AWS Architecture Blog
Field Notes: Integrating HTTP APIs with AWS Cloud Map and Amazon ECS Services
This post was cowritten with Preeti Pragya Jha, a senior software developer in Tata Consultancy Services (TCS).
Companies are continually looking for ways to optimize cost. This is true of RS Components, a global trading brand of Electrocomponents plc, a global omni-channel provider of industrial and electronic products and solutions. RS Components set out to build an efficient container-based platform on AWS to underpin their RS Industrial IoT Application. This formed part of their Connected Factories program to develop a customer solution for industrial data.
The recent announcements of HTTP APIs for API Gateway, and that of private integrations with AWS Elastic Load Balancing (ELB) and AWS Cloud Map soon after, demonstrated the security governance and possible cost savings potential for RS Components.
The team at RS had initially built their container solution on AWS Fargate for Amazon Elastic Container Service (ECS) with Amazon API Gateway. The HTTP Endpoints front the Application Load Balancers and target groups with AWS Fargate Launch type.
HTTP API private integrations with ELB and Cloud Map meant that the team at RS could replace the Application Load Balancers with an AWS Cloud Map private integration for AWS API Gateway HTTP endpoints. This integration also meant that RS Components could leverage API Gateway as a single-entry point for their API’s from an authentication perspective.
In this post, we walk you through the steps required to provision an Amazon API Gateway with AWS Cloud Map to integrate Amazon Elastic Container Service for HTTP API endpoints.
The Technology Components
Amazon API Gateway helps developers easily create, publish, and maintain secure APIs at any scale. API Gateway handles all the heavy lifting of managing thousands of API calls. There are no minimum fees and you only pay for the API calls you receive.
AWS Cloud Map provides cloud resource discovery services, keeping track of application components in your microservices architecture. Your applications simply query AWS Cloud Map using the AWS SDK, API or even DNS to discover the locations of dependencies.
Amazon Elastic Container Service (Amazon ECS) provided orchestration services for your docker containers and AWS Fargate provides a serverless option to consume container compute without the need to manage actual servers.
The Implementation
This post assumes the AWS London Region but you could use any region which includes the services listed as per the AWS Region Table.
Pre-requisite Steps
We perform two tasks as pre-requisites for the Cloud Map implementation:
- Create an Amazon Elastic Container Registry repository with an example Docker image
- Create the base components for the Cloud Map Implementation upon which our Cloud Map integration will be based with a Cloudformation Template
Step 1: Set up Amazon ECR and create an Image
a. Download the following example Flask container configuration file and unzip: https://cloudmap-shared.s3.eu-central-1.amazonaws.com/ExampleFlask.zip
b. Navigate to the unzipped Example Flask directory from your local console and proceed to C.
c. Create the Docker image locally and test locally running the following commands:
docker build -t flask-app-fargate-fargate .
docker run -p 80:80 flask-app-fargate-fargate
curl localhost:80

If you navigate to http://0.0.0.0:80 you should see:

d. Now we need to create an ECR repository and push out image to it by running the following AWS CLI commands. Remember to replace the variables in brackets:
aws ecr create-repository –repository-name flask-app-fargate-fargate –region <region>
$(aws ecr get-login –region <region> –no-include-email)
This should log you in to the Elastic Container Registry for the relevant region.

docker tag flask-app-fargate-fargate:latest <account number>.dkr.ecr.<region>.amazonaws.com/flask-app-fargate-fargate:latest
docker push <account number>.dkr.ecr.<region>.amazonaws.com/flask-app-fargate-fargate:latest
e. In the AWS Management Console open up Amazon Elastic Container Registry (ECR)
- Check you are in the right region
- Open up the repository and make a note of the image URI. You will need this for the next step.

Step 2: Build from AWS CloudFormation Base Template
A. Open up the AWS CloudFormation Console and create a stack using the following template: https://cloudmap-shared.s3.eu-central-1.amazonaws.com/MasterTemplate3.yaml
B. You have the option to modify the parameters but one parameter you need to include is the Image parameter. Paste the Image URI previously noted: <account number>.dkr.ecr.<region>.amazonaws.com/flask-app-fargate-fargate:latest
The following components will be created:
- An Amazon Virtual Private Cloud (VPC) configured with two private subnets to host the Amazon ECS tasks – this post assumes 10.0.0.0/16 VPC with 10.0.0.0/24 and 10.0.1.0/24 subnets.
- A Security Group within your VPC with the following inbound rules:
- HTTP from 0.0.0.0/0 source
- All traffic from source 10.0.0.0/16
- An Amazon Elastic Container Service (Amazon ECS) cluster
- An Amazon Elastic Container Service (ECS) task definition configured as Fargate Launch Type with a Container Definition referencing your Amazon ECR container.
Three Amazon Virtual Private Cloud (VPC) Interface Endpoints configured against your VPC and Subnet – one for each of these:
1. Fargate cluster service access to Amazon CloudWatch for logging – com.amazonaws.<region>.logs
2. For Fargate cluster service access to the Amazon Elastic Container Registry (ECR) – two endpoints.
a. com.amazonaws.<region>.ecr.dkr
b. com.amazonaws.<region>.ecr.api
3. An Amazon Virtual Private Cloud (VPC) Gateway Endpoint configured against your VPC and relevant Route Table with your Subnets associated for:
a. Fargate cluster access to Amazon S3 where ECR container images are hosted – com.amazonaws.<region>.s3
Fargate Service and Cloud Map name space
The CloudFormation build should complete in 5-10 minutes. Next we will walk you through the creation of the ECS Fargate service to be referenced by the Amazon API Gateway HTTP Endpoint.
1. Open Amazon ECS in the Console
a. Access your cluster
b. Open the Services tab
c. Click the Create button.
2. Create a service referencing your ECS task definition and revision (your ECS cluster)
a. Provide a service name
b. Provide the number of tasks (in this instance 1)
c. Leave Deployments as default
d. Choose Next Step:
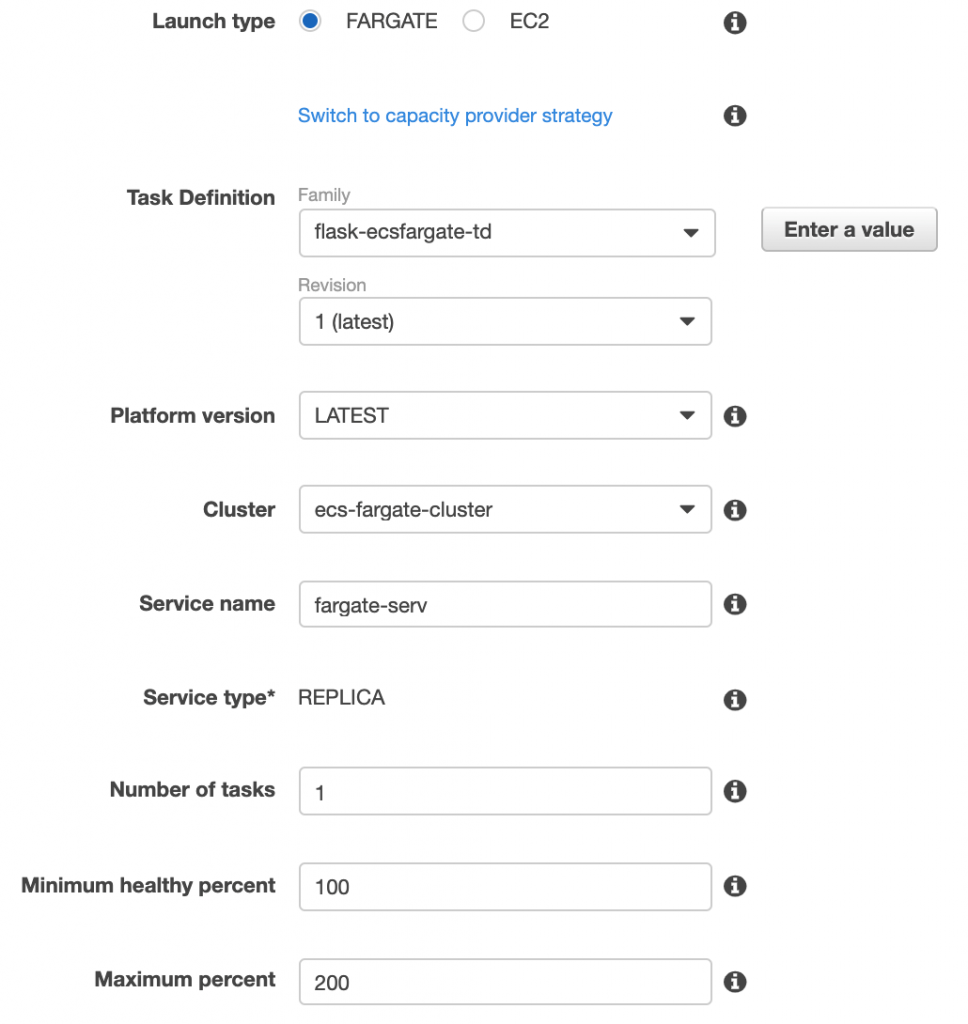
3. Choose the VPC, Subnets and Security Group previously created and set Auto-assign public IP to Disabled:

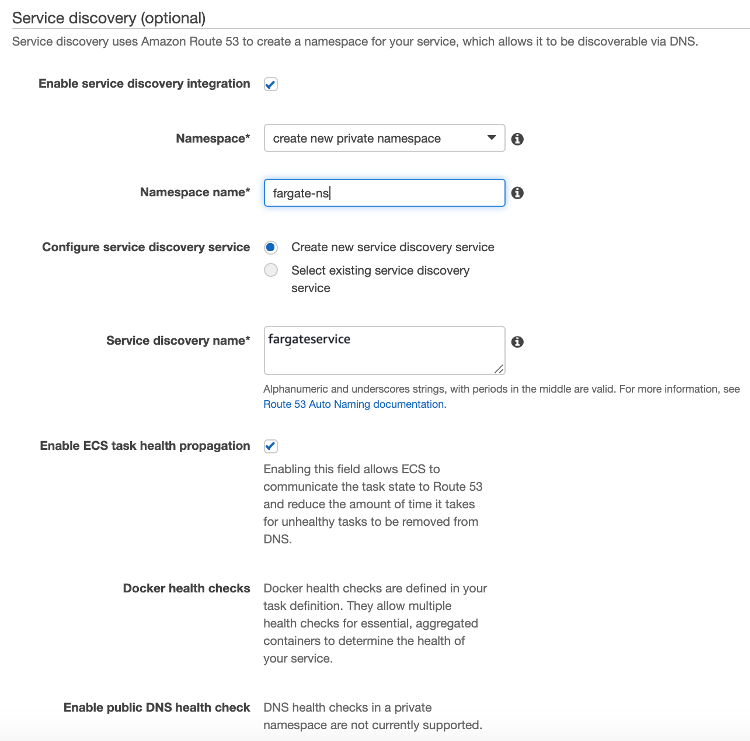
4. Leave Load Balancer type as None and scroll down to Service Discovery:
a. Check the enable service discovery integration box
b. Create new private namespace
c. Provide a Namespace name
d. Provide a Service discovery name (should be auto populated).
e. For DNS Records and Service Discovery – DNS Record Type choose SRV and port 80, choose Next Step:

5. Click Next Step again, review the configuration and Create.
You have now created an Amazon ECS Fargate service in your Amazon ECS Fargate cluster referencing your previously created task definition. You have also created an AWS Cloud Map namespace as part of the service setup. Additional evidence of the namespace is the creation of an Amazon Route 53 private hosted zone for the namespace.
The process should complete in 5-10 minutes. Review the Tasks tab for your cluster and you should see a task in a RUNNING state.
HTTP API and AWS Cloud Map Integrations
API Gateway VPC Links need to be created to enable AWS API Gateway to access the VPC in which the Amazon ECS environment is deployed.
1. Open the Amazon API Gateway console and click on VPC Links in the left hand—side menu and choose Create
2. Choose VPC link for HTTP APIs
a. Give the VPC Link a Name
b. Choose the VPC, Subnets and Security Group previously defined
c. Choose Create.

Now that we have an access mechanism for API to interface with the ECS environment in the VPC, let’s create the API itself.
3. Click on APIs on the left pane and select to build a HTTP API type, and give it a name and choose Next:
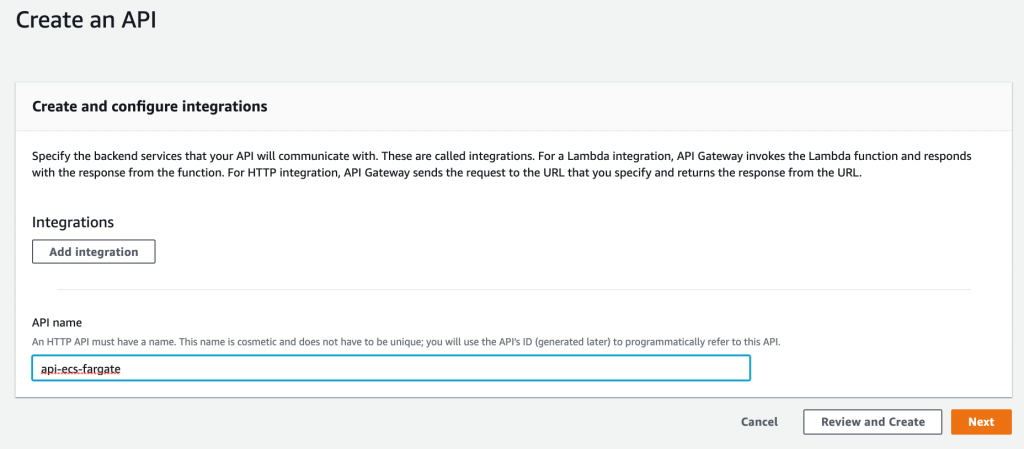
4. Choose Next on the Configure Routes step – we will configure a route in a subsequent step.
5. On the Define Stages step leave the Stage Name as $default – in this post I have turned off Auto-deploy. This is not mandatory, if it is enabled, API is ready to serve content immediately using the $default stage. Any changes you make to the API are also reflected immediately.
6. Choose Next.
7. Review the configuration and choose Create.
We have now created a basic unconfigured HTTP API. Next, we need to configure a route and in this case we are creating a route to ANY destination, in reality you may have many different routes in your API.
8. Form the landing page of the HTTP API you have just created – choose Routes from the left pane.
9. Choose Create, leave the route as ANY on the Create a Route page
10. Choose Create.
We now have a route configured. The next step is adding an integration with the AWS Cloud Map namespace and service created when we defined the Amazon ECS service previously.
11. Form the landing page of the HTTP API you have just created – click on Integrations from the left pane.
12. On the Integrations page, click on Manage Integrations and then click Create
13. On the Create an Integration page Attach this integration to the ANY/ route previously created.
a. Integrate with a Private Resource
b. Choose Cloud Map as the integration target
c. Choose your Namespace and Service previously created
d. Choose the VPCLink previously created
e. Choose Create.

Lastly, we need to deploy the API we have just configured and test.
14. Click Deploy on the upper right of the page.
15. Choose the $default stage and choose Deploy to Stage.
16. Select your HTTP API on the left-hand pane and test clicking on the Invoke URL. If you used the code snippet for your container provided earlier you should see the following:

Pricing
Initial estimates for RS Component’ configuration based on a single instance Application Load Balancer based environment would cost approximately $25, a AWS Cloud Map equivalent would be under $5 per month.
The full understanding of cost savings with this configuration will become apparent over time as customers and load ramp up on their platform over time but comparisons can be made by referring to the AWS Cloud Map Pricing and Elastic Load Balancing pricing pages.
RS Components preferred API Gateway to be a single point of entry from an authentication perspective – this configuration has enabled this for them and based on initial analysis, this configuration for them could potentially optimize cost.
If you use this guide to modify existing HTTP APIs to integrate with Cloud Map, you can leverage your existing API configuration, with minimal disruption.
Field Notes provides hands-on technical guidance from AWS Solutions Architects, consultants, and technical account managers, based on their experiences in the field solving real-world business problems for customers.

Preeti Pragya Jha is currently working with RS Components Ltd, part of ElectroComponents plc to design, develop and deploy their Industrial IoT Applications. She also loves to spend time with her family (husband and her little Angel) and to write in her personal blog in her spare time.