AWS Marketplace
Creating web access control lists using Fortinet Managed Rules set from AWS Marketplace
Firewalls provide a security layer by giving you control over which traffic you allow to access your web applications. Web Appliction Firewalls such as AWS Web Application Firewall (AWS WAF) do this by allowing you to customize web security rules to define which traffic can access your applications and which traffic should be blocked. While AWS provides the scalable infrastructure you need to run AWS WAF, you need to supply and manage your own security rules. One of the quickest ways of making sure your applications are protected against the latest security threats is to use a set of managed rules, which are rules written, curated, and managed by AWS Marketplace Sellers that can be easily deployed in front of your web applications running on AWS Application Load Balancers or Amazon CloudFront.
Managed rules can protect your web applications against common threats such as the Open Web Application Security Project (OWASP) Top 10 Security risks, specific Content Management System (CMS) threats, or emerging Common Vulnerabilities and Exposures (CVE). Using managed rules frees you up to work on other tasks, since AWS manages the AWS WAF infrastructure, and your security seller from AWS Marketplace manages the security rules.
How to use Fortinet’s Managed Rules set to create web Access Control Lists
In this post, I will show how to launch the Fortinet Managed Rules set solution from AWS Marketplace to create web Access Control Lists (ACLs). A web ACL gives you fine-grained control over the web requests that your Amazon API Gateway API, Amazon CloudFront distribution or Application Load Balancer respond to.
Prerequisites
To implement Fortinet Managed Rules set, go to the product detail page in AWS Marketplace, where you’ll find a product overview, pricing and usage information, support information, and customer reviews. Click Continue to Subscribe in the upper right corner, choose Subscribe. You should see a message saying Congratulations! You are now subscribed!.
Creating web ACLs
To set up your access control list in your AWS dashboard, go to the https://console.aws.amazon.com/waf/home?#/wafhome console, click Create web ACL. Choose Next. Then complete the following four steps:
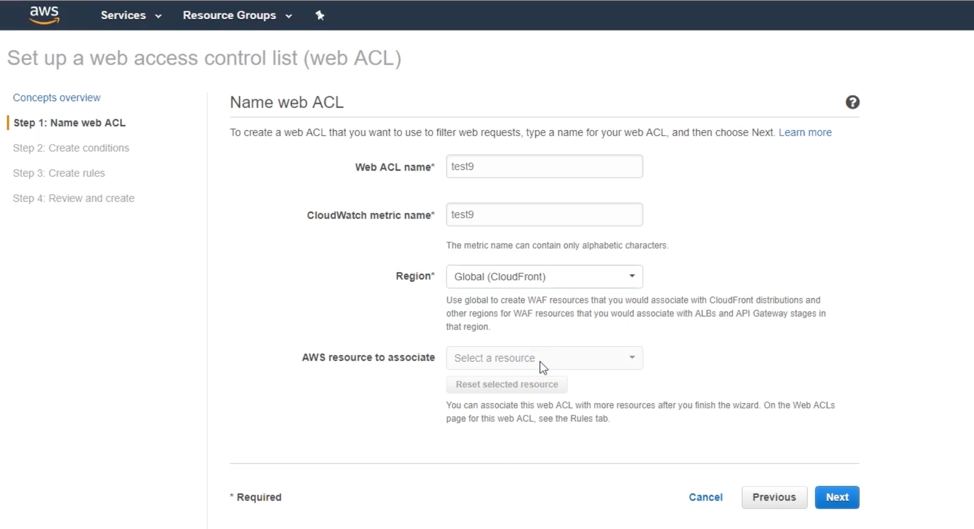
- Name your web ACL. Name your ACL and select your region. I left mine as Global (Cloud Front) to set up a single access control list for all my resources. However, you may select any region and then set access control lists for any associated AWS resources. Click Next. The image below shows a sample completed Name web ACL screen.
- Create conditions. Select your conditions, such as cross-site scripting. Since I didn’t need any additional conditions, I clicked Next.
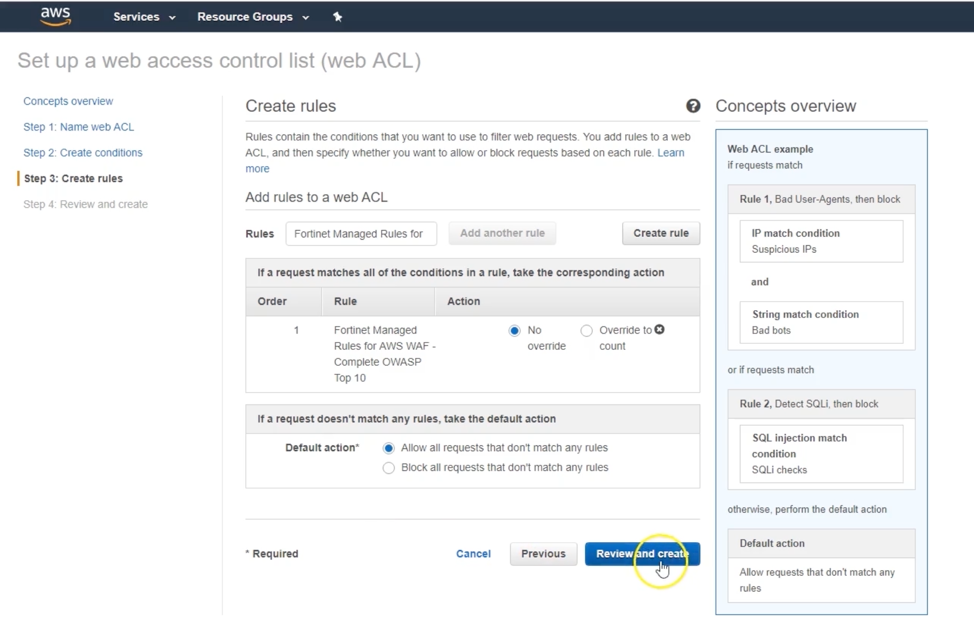
- Create rules. In the Rules field, click the drop-down menu and select your Fortinet Managed Rules Set solution. Click Add rule to web ACL. You’ll see the rule appear below. For each rule, you have the option to override it. If you don’t want a particular rule set to be active or if you want to allow certain traffic through, click Override. In my demo, I left it at the default No override. Then select the default action if a request doesn’t match any rules. If you want to allow all requests that don’t match any of these rules to come through, select Allow all requests that don’t match any rules. Otherwise, select Block all requests that don’t match any rules. If you chose the latter option, you can use customized rule sets in addition to using this solution. Click Review and create. The image below shows a completed example Create rules page.
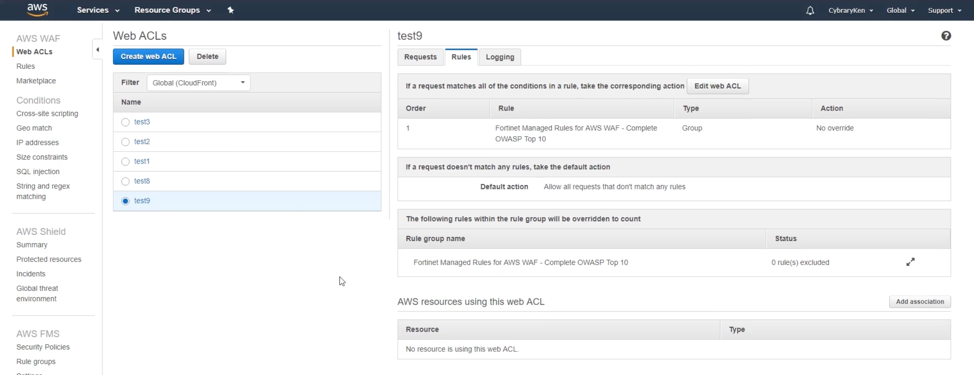
- Review and create. Review your choices, make any adjustments, and click Confirm and create. Your new web ACL will now appear in your Web ACL list. The image below shows my example (test9) in the list under Web ACLs.
Editing web ACLs
If you want to edit after creation, select the web ACL from your list, click Edit web ACL (as seen in the right pane of the image above), and specify your changes. For example, if you wanted to create an override, you would click on the rule set under Rule group name and add a rule identifier. That rule identifier will be found in the log, so as you start monitoring traffic and see something that should or should not be blocked, you can grab that rule identifier and paste it there to create an override.
Conclusion
In this post, I showed you how to use the Fortinet Managed Rules set from AWS Marketplace to create web ACLs to customize and control access to your web applications.
Next steps
For more information, view the webinar, watch a tutorial video and download the detailed seller guide, and explore Fortinet’s Managed Rules products in AWS Marketplace.