AWS Big Data Blog
Deploy DataHub using AWS managed services and ingest metadata from AWS Glue and Amazon Redshift – Part 1
Many organizations are establishing enterprise data warehouses, data lakes, or a modern data architecture on AWS to build data-driven products. As the organization grows, the number of publishers and subscribers to data and the volume of data keeps increasing. Additionally, different varieties of datasets are introduced (structured, semistructured, and unstructured). This can lead to metadata management issues, and the following questions:
- “Can I trust this data?”
- “Where does this data (lineage) come from?”
- “How accurate is this data?”
- “What does this column mean in my business terminology?”
- “Who is the owner of this data?”
- “When was the data last refreshed?”
- “How can I classify the data (PII, non-PII, and so on) and build data governance?”
Metadata conveys both technical and business context to help you understand your data better and use it appropriately. It provides two primary types of information about data assets:
- Technical metadata – Information about the structure of the data, such as schema and how the data is populated
- Business metadata – Information in business terms, such as table and column description, owner, and data profile
Metadata management becomes a key element to allow users (data analysts, data scientists, data engineers, and data owners) to discover and locate the right data assets to address business requirements and perform data governance. Some common features of metadata management are:
- Search and discovery – Data schemas, fields, tags, usage information
- Access control – Access control, groups, users, policies
- Data lineage – Pipeline runs, queries, transformation logic
- Compliance – Taxonomy of data privacy, compliance annotation types
- Classification – Classify different datasets and data elements
- Data quality – Data quality rule definitions, run results, data profiles
These features can help organizations build standard metadata management processes, which can help remove redundancy and inconsistency in data assets, and allow users to collaborate and build richer data products quickly.
In this two-part series, we discuss how to deploy DataHub on AWS using managed services with the AWS Cloud Development Kit (AWS CDK), populate technical metadata from the AWS Glue Data Catalog and Amazon Redshift into DataHub, and augment data with a business glossary and visualize data lineage of AWS Glue jobs.
In this post, we focus on the first step: deploying DataHub on AWS using managed services with the AWS CDK. This will allow organizations to launch DataHub using AWS managed services and begin the journey of metadata management.
Deploy DataHub using AWS managed services and ingest metadata from AWS Glue and Amazon Redshift:
|
Why DataHub?
DataHub is one of the most popular open-source metadata management platforms. It enables end-to-end discovery, data observability, and data governance. It has a rich set of features, including metadata ingestion (automated or programmatic), search and discovery, data lineage, data governance, and many more. It provides an extensible framework and supports federated data governance.
DataHub offers out-of-the-box support to ingest metadata from different sources like Amazon Redshift, the AWS Glue Data Catalog, Snowflake, and many more.
Overview of solution
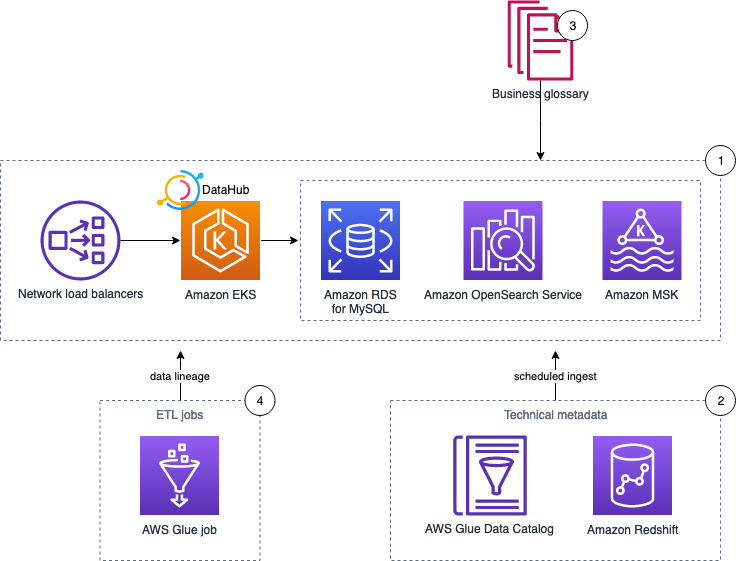
The following diagram illustrates the solution architecture and its components:
- DataHub runs on an Amazon Elastic Kubernetes Service (Amazon EKS) cluster, using Amazon OpenSearch Service, Amazon Managed Streaming for Apache Kafka (Amazon MSK), and Amazon RDS for MySQL as the storage layer for the underlying data model and indexes.
- The solution pulls technical metadata from AWS Glue and Amazon Redshift to DataHub.
- We enrich the technical metadata with a business glossary.
- Finally, we run an AWS Glue job to transform the data and observe the data lineage in DataHub.
In the following sections, we demonstrate how to deploy DataHub and provision different AWS managed services.
Prerequisites
We need kubectl, Helm, and the AWS Command Line Interface (AWS CLI) to set up DataHub in an AWS environment. We can complete all the steps either from a local desktop or using AWS Cloud9. If you’re using AWS Cloud9, follow the instructions in the next section to spin up an AWS Cloud9 environment, otherwise skip to the next step.
Set up AWS Cloud9
To get started, you need an AWS account, preferably free from any production workloads. AWS Cloud9 is a cloud-based IDE that lets you write, run, and debug your code with just a browser. AWS Cloud9 comes preconfigured with many of the dependencies we require for this post, such as git, npm, and the AWS CDK.
Create an AWS Cloud9 environment from the AWS Management Console with an instance type of t3.small or larger. Provide the required name, and leave the remaining default values. After your environment is created, you should have access to a terminal window.
You must increase the size of the Amazon Elastic Block Store (Amazon EBS) volume attached to your AWS Cloud9 instance to at least 50 GB, because the default size (10 GB) is not enough. For instructions, refer to Resize an Amazon EBS volume used by an environment.
Set up kubectl, Helm, and the AWS CLI
This post requires the following CLI tools to be installed:
- kubectl to manage the Kubernetes resources deployed to the EKS cluster
- Helm to deploy the resources based on Helm charts (note that we only support Helm 3)
- The AWS CLI to manage AWS resources
Complete the following steps:
- Download kubectl (version 1.21.x) and make the file executable:
To install kubectl in AWS Cloud9, use the following instructions. AWS Cloud9 normally manages AWS Identity and Access Management (IAM) credentials dynamically. This isn’t currently compatible with Amazon EKS IAM authentication, so we disable it and rely on the IAM role instead.
- Install Kubernetes Tools
- Create an IAM Role for Your Workspace
- Attach the IAM Role to Your Workspace
- Update IAM Settings for Your Workspace
- Download Helm (version 3.9.3):
- Install the AWS CLI (version 2.x.x) or migrate AWS CLI version 1 to version 2.
After installation, make sure aws --version is pointing to version 2, or close the terminal and create a new terminal session.
Create a service-linked role
OpenSearch Service uses IAM service-linked roles. A service-linked role is a unique type of IAM role that is linked directly to OpenSearch Service. Service-linked roles are predefined by OpenSearch Service and include all the permissions that the service requires to call other AWS services on your behalf. To create a service-linked role for OpenSearch Service, issue the following command:
Install the AWS CDK Toolkit v2
Install AWS CDK v2 with the following code:
In case of any error, use the following code:
Provision different AWS managed services
In this section, we walk through the steps to provision different AWS managed services.
Clone the GitHub repository
Clone the GitHub repo with the following code:
Initialize the AWS CDK stack
To initialize the AWS CDK stack, change the ACCOUNT_ID and REGION values in the cdk.json file.
Then run the following code, providing your account ID and Region:
Deploy the AWS CDK stack
Deploy the AWS CDK stack with the following code:
Now that the deployment is complete, we need to assemble all the credentials and hostnames for different components.
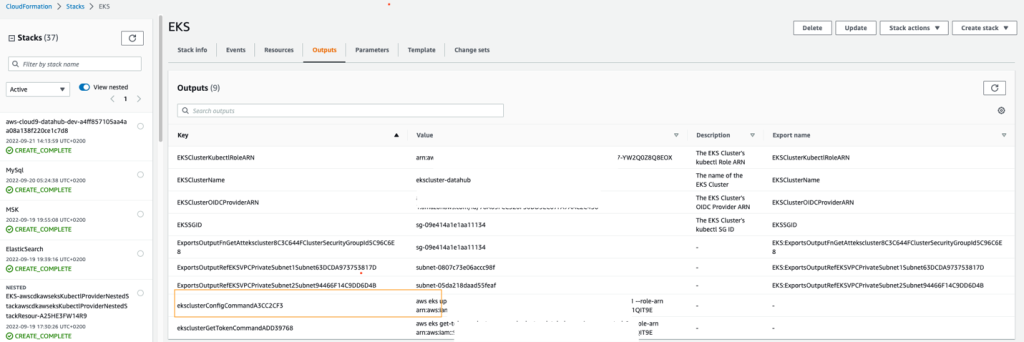
Check AWS CloudFormation output
We created different AWS CloudFormation stacks when we ran the AWS CDK stack. We need the values from the stack outputs to use in the next steps.
- On the AWS CloudFormation console, navigate to the EKS stack.
- Get the following command on the Outputs tab(
key:eksclusterConfigCommandXXX), and then run it:
- Similarly, navigate to the ElasticSearch stack and get the following key:

CDK stack also created an AWS Secrets Manager secret.
- On the Secrets Manager console, navigate to the secret with the name
MySqlInstanceDataHubSecret****. - In the Secret value section, choose Retrieve secret value to get the following:

- On the OpenSearch Service console, get the domain endpoint for the cluster
opensearch-domain-datahub, which is in the following format:

- On the Amazon MSK console, navigate to your cluster (
MSK-DataHub). - Choose View client information and copy both the plaintext Kafka bootstrap server and Apache ZooKeeper connection,which is in the following format:

Install DataHub containers to the provisioned EKS cluster
To install the DataHub containers, complete the following steps:
- Create Kubernetes secrets using the following kubectl command, using the MySQL and OpenSearch Service passwords what we collected earlier:
- Add the DataHub Helm repo by running the following Helm command:
- Modify the following config files and replace the value of the MSK broker, MySQL hostname, and OpenSearch Service domain:
- Edit the values for
values.yaml(in thecharts/datahubfolder on GitHub):
- Edit the values for

-
- Edit the values for
values.yaml(incharts/prerequisites folderon GitHub):
- Edit the values for
- Now you can deploy the following two Helm charts to spin up the DataHub front end and backend components to the EKS cluster:
If you want to use a newer Helm chart, replace the following chart values from your existing values.yaml:
- elasticsearchSetupJob
- global : graph_service_impl
- global : elasticsearch
- global :kafka
- global :sql
- If the installation fails, debug with the following commands to check the status of the different pods:
- After you identify the issue from the log and fix it manually, set up DataHub with following Helm upgrade command:
- After the DataHub setup is successful, run the following command to get DataHub’s front end URL that uses port 9002:

- Access the DataHub URL in a browser with HTTP and use the default user name and password as datahub to log in to the
URL http://<id>.<region>.elb.amazonaws.com:9002/.
Note that this isn’t recommended for production deployment. We strongly recommend changing the default user name and password or configuring single sign-on (SSO) via OpenID Connect. For more information, refer to Adding Users to DataHub. Additionally, expose the endpoint by setting up an ingress controller with a custom domain name. Follow the instructions in AWS setup guide to meet your networking requirements.
Clean up
The clean-up instructions are provided in the Part 2 of this series.
Conclusion
In this post, we demonstrated how to deploy DataHub using AWS managed services. Part 2 of this series will focus on search and discover of data assets stored in your data lake (via the AWS Glue Data Catalog) and data warehouse in Amazon Redshift.
About the Authors
 Debadatta Mohapatra is an AWS Data Lab Architect. He has extensive experience across big data, data science, and IoT, across consulting and industrials. He is an advocate of cloud-native data platforms and the value they can drive for customers across industries.
 Corvus Lee is a Solutions Architect for AWS Data Lab. He enjoys all kinds of data-related discussions, and helps customers build MVPs using AWS databases, analytics, and machine learning services.
 Suraj Bang is a Sr Solutions Architect at AWS. Suraj helps AWS customers in this role on their Analytics, Database and Machine Learning use cases, architects a solution to solve their business problems and helps them build a scalable prototype.