AWS Compute Blog
Building a Pulse Oximetry tracker using AWS Amplify and AWS serverless
This guide demonstrates an example solution for collecting, tracking, and sharing pulse oximetry data for multiple users. It’s built using AWS serverless technologies, enabling reliable scalability and security. The frontend application is written in VueJS and uses the Amplify Framework. It takes oxygen saturation measurements as manual input or a BerryMed pulse oximeter connected to a browser using Web Bluetooth.
The serverless backend that handles user data and shared access management is deployed using the AWS Serverless Application Model (AWS SAM). The backend application consists of an Amazon API Gateway REST API, which invokes AWS Lambda functions. The code is written in Python to handle the business logic of interacting with an Amazon DynamoDB database. Authentication is managed by Amazon Cognito.

A screenshot of the frontend application running in a desktop browser.
Prerequisites
You need the following to complete the project:
- Node.js and npm installed on a computer.
- BerryMed Finger Pulse Oximeter BM1000C.
- An AWS account. This project can be completed using the AWS Free Tier.
Deploy the application
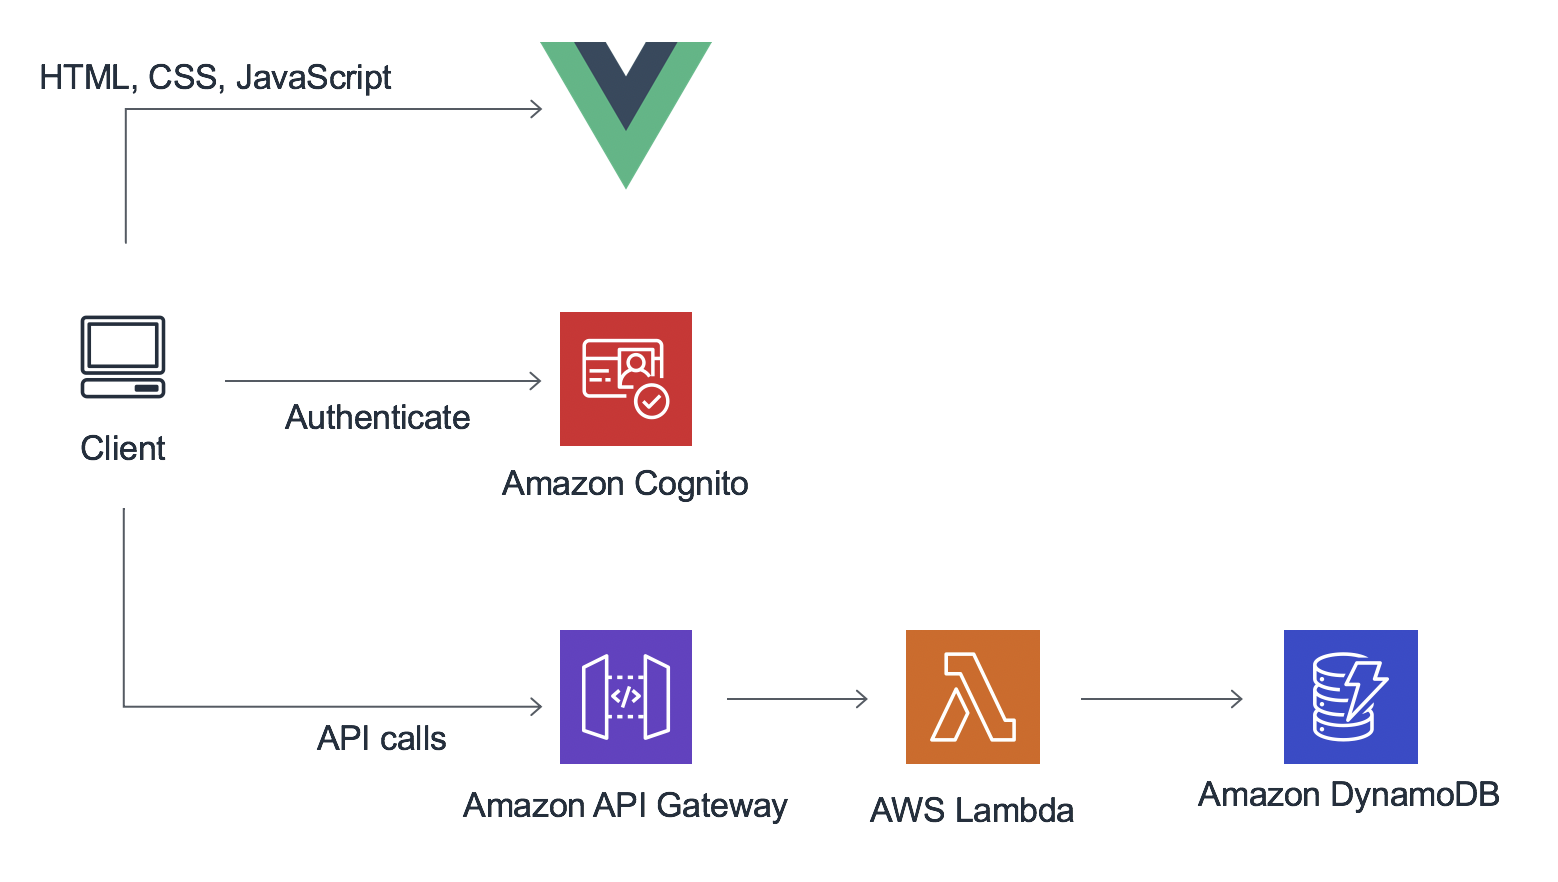
A high-level diagram of the full oxygen monitor application.
The solution consists of two parts, the frontend application and the serverless backend. The Amplify CLI deploys all the Amazon Cognito authentication and hosting resources for the frontend. The backend requires the Amazon Cognito user pool identifier to configure an authorizer on the API. This enables an authorization workflow, as shown in the following image.
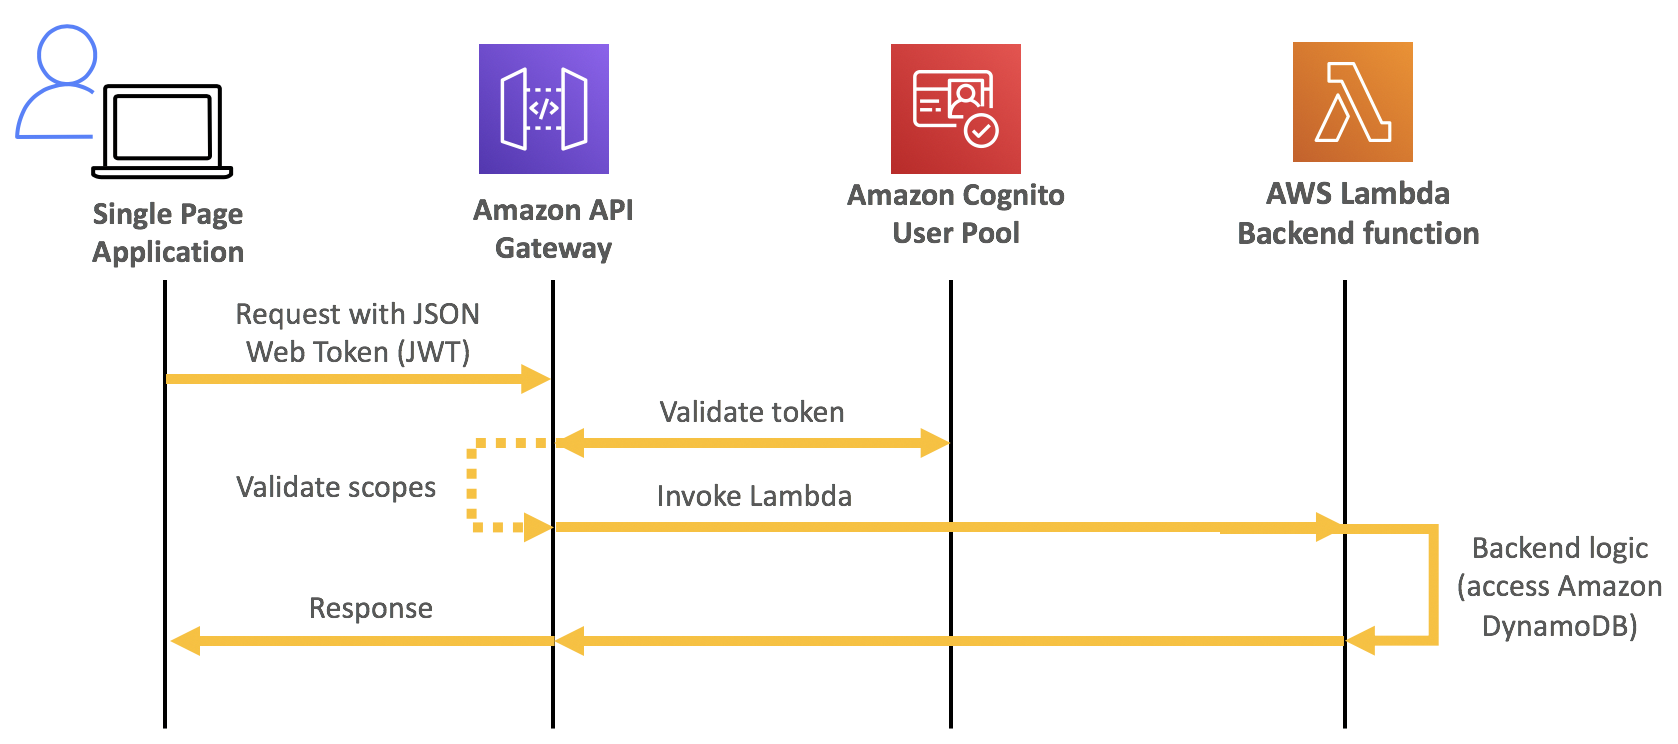
A diagram showing how an Amazon Cognito authorization workflow works
First, configure the frontend. Complete the following steps using a terminal running on a computer or by using the AWS Cloud9 IDE. If using AWS Cloud9, create an instance using the default options.
From the terminal:
- Install the Amplify CLI by running this command.
npm install -g @aws-amplify/cli - Configure the Amplify CLI using this command. Follow the guided process to completion.
amplify configure - Clone the project from GitHub.
git clone https://github.com/aws-samples/aws-serverless-oxygen-monitor-web-bluetooth.git - Navigate to the amplify-frontend directory and initialize the project using the Amplify CLI command. Follow the guided process to completion.
cd aws-serverless-oxygen-monitor-web-bluetooth/amplify-frontend amplify init - Deploy all the frontend resources to the AWS Cloud using the Amplify CLI command.
amplify push - After the resources have finishing deploying, make note of the aws_user_pools_id property in the src/aws-exports.js file. This is required when deploying the serverless backend.


Next, deploy the serverless backend. While it can be deployed using the AWS SAM CLI, you can also deploy from the AWS Management Console:
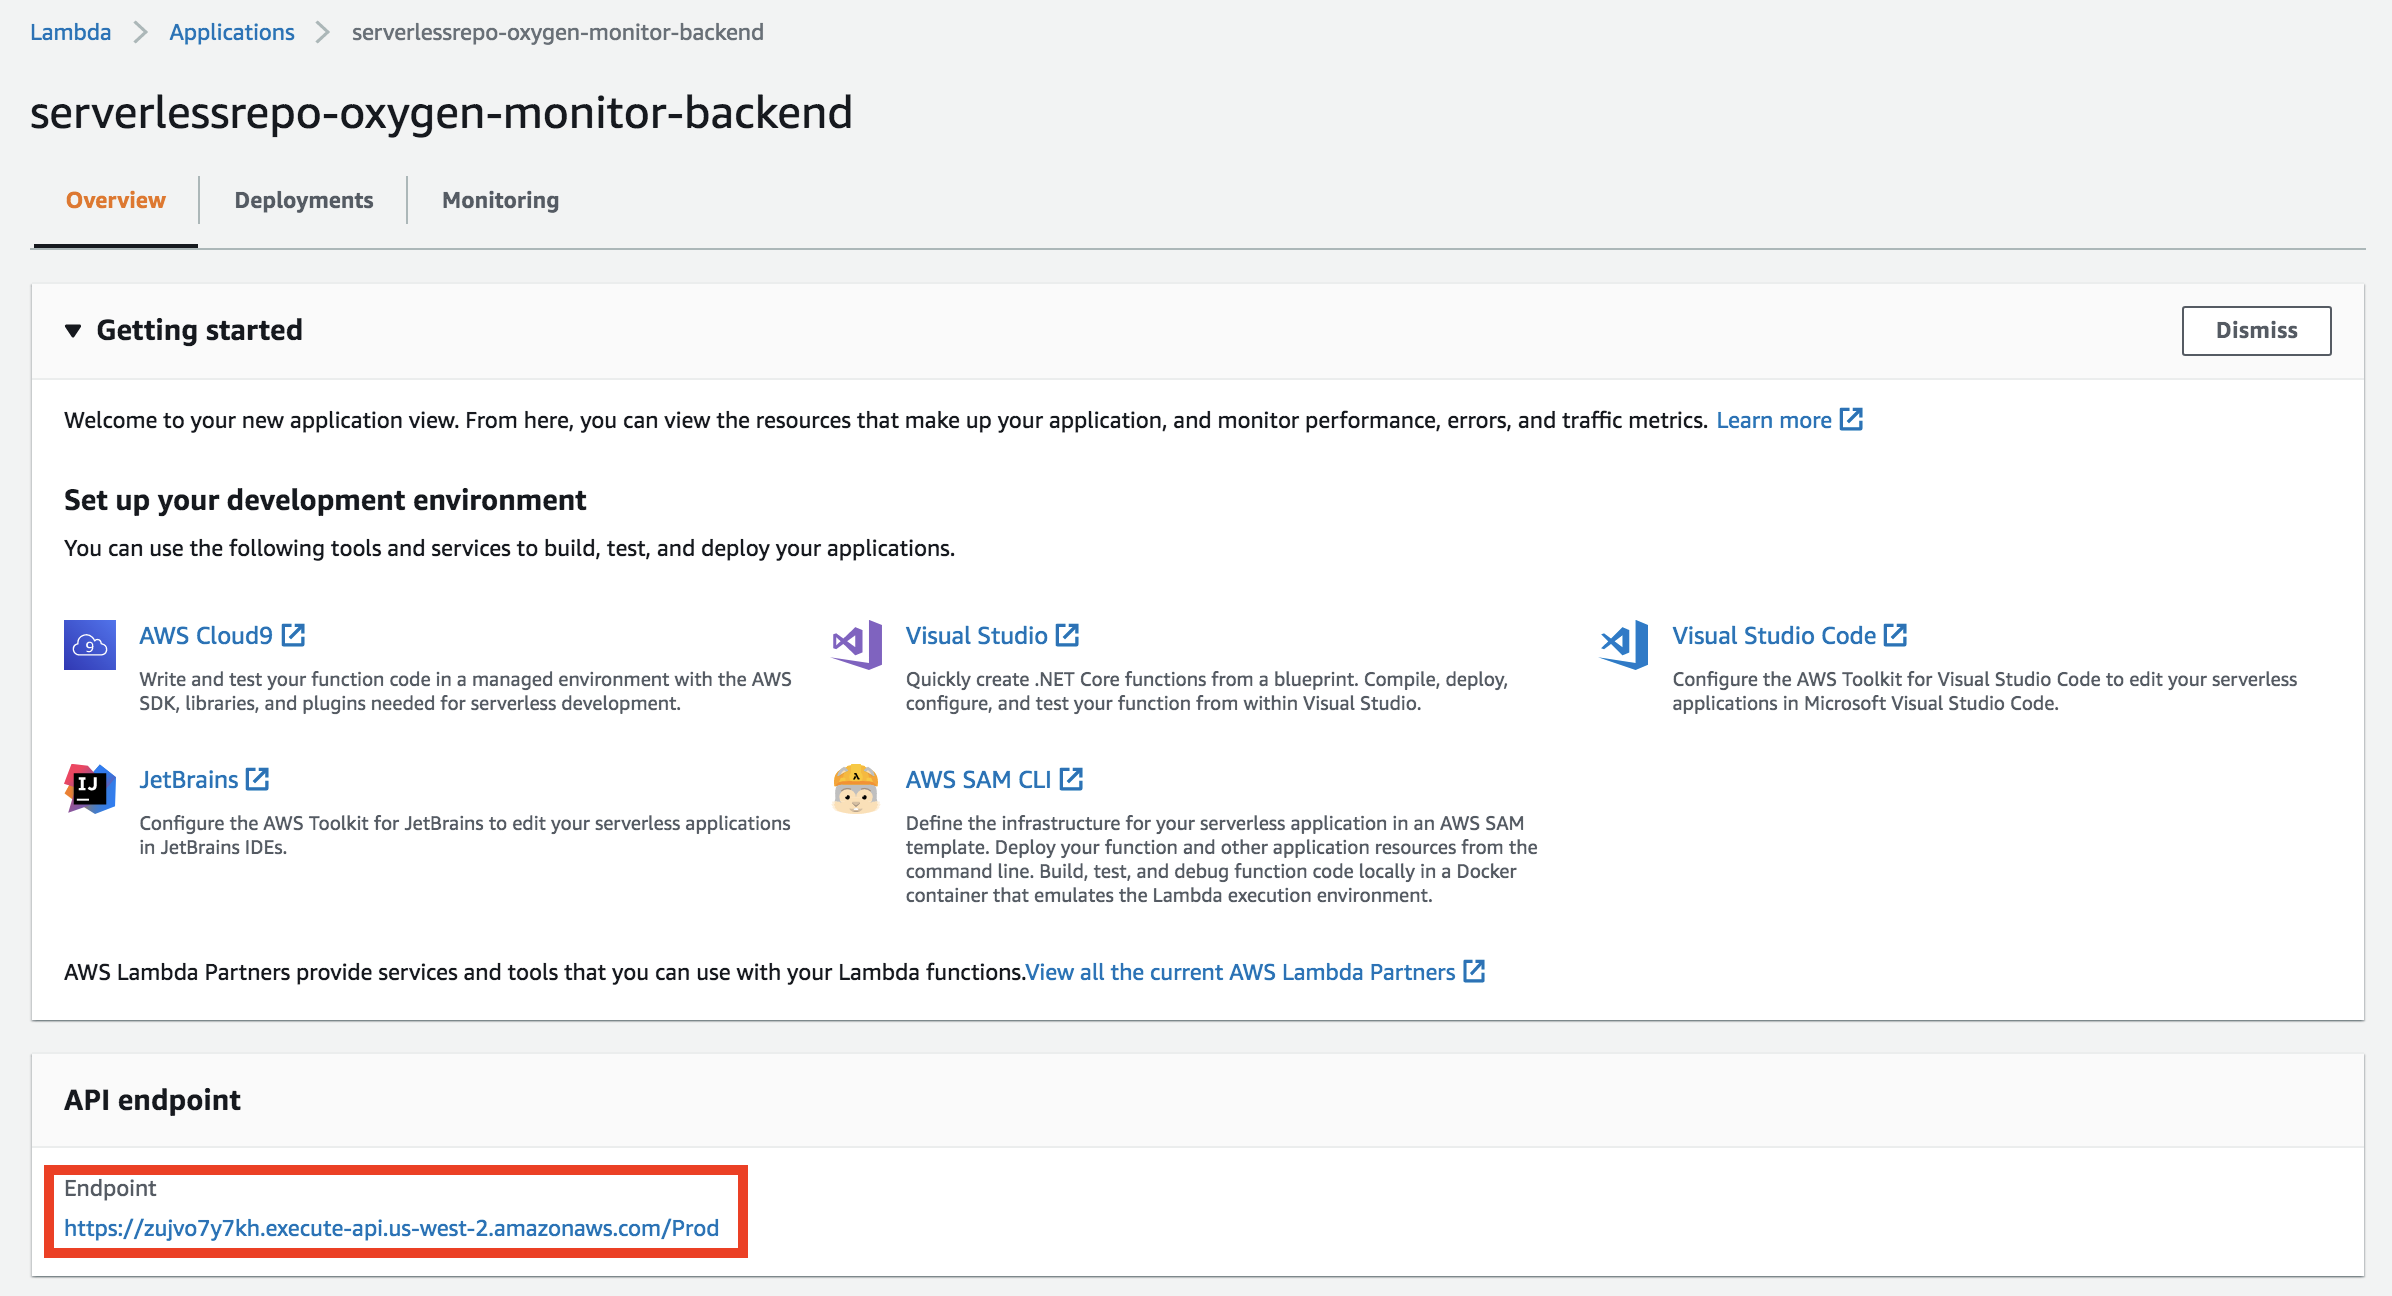
- Navigate to the oxygen-monitor-backend application in the AWS Serverless Application Repository.
- In Application settings, name the application and provide the aws_user_pools_id from the frontend application for the UserPoolID parameter.

- Choose Deploy.
- Once complete, copy the API endpoint so that it can be configured on the frontend application in the next step.


Configure and run the frontend application
- Create a file, amplify-frontend/src/api-config.js, in the frontend application with the following content. Include the API endpoint from the previous step.
const apiConfig = { “endpoint”: “<API ENDPOINT>” }; export default apiConfig; - In a terminal, navigate to the root directory of the frontend application and run it locally for testing.
cd aws-serverless-oxygen-monitor-web-bluetooth/amplify-frontend

npm install

npm run serve
You should see an output like this:

- To publish the frontend application to cloud hosting, run the following command.
amplify publishOnce complete, a URL to the hosted application is provided.


Using the frontend application
Once the application is running locally or hosted in the cloud, navigating to it presents a user login interface with an option to register.

The registration flow requires a code sent to the provided email for verification. Once verified you’re presented with the main application interface. A sample value is displayed when the account has no oxygen saturation or pulse rate history.
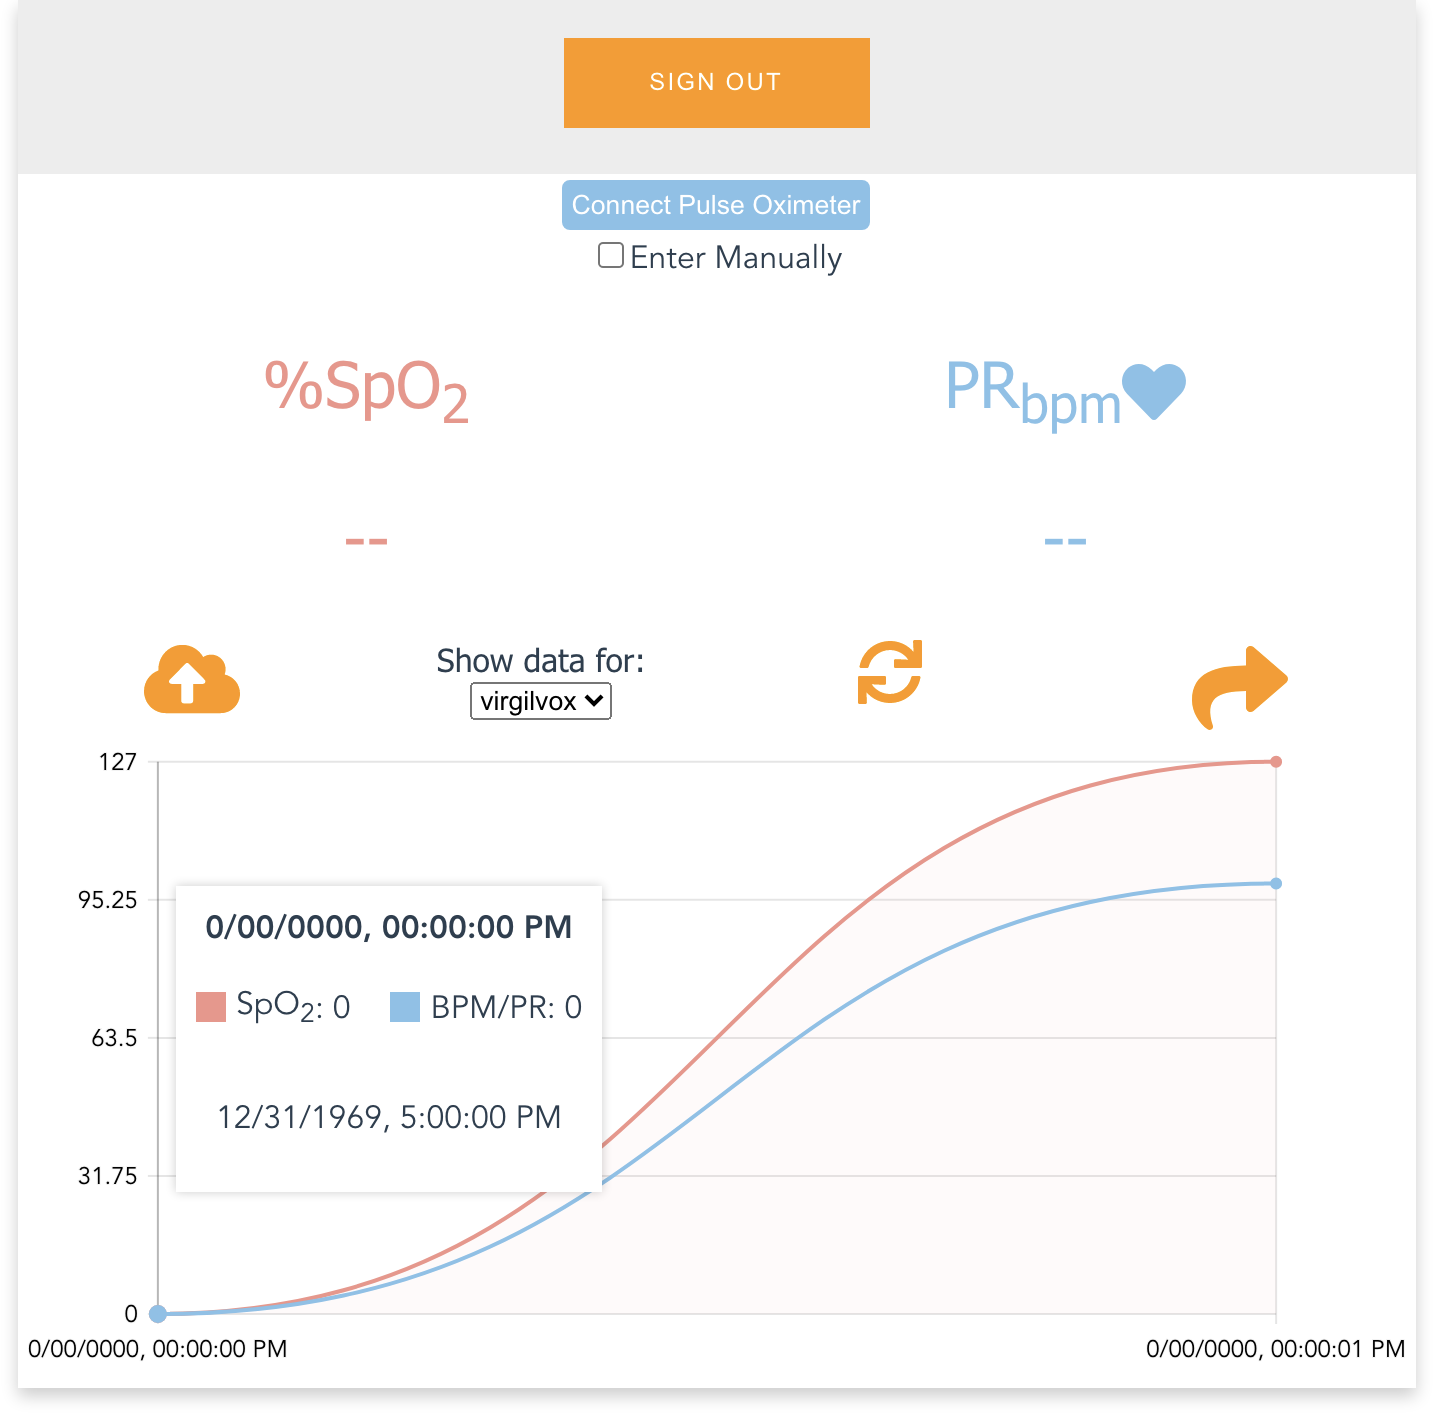
To connect a BerryMed pulse oximeter to begin reading measurements, turn on the device. Choose the Connect Pulse Oximeter button and then select it from the list. A Chrome browser on a desktop or Android mobile device is required to use the Web Bluetooth feature.

If you do not have a compatible Bluetooth pulse oximeter or access to Web Bluetooth, checking the Enter Manually check box presents direct input boxes.

Once oxygen saturation and pulse rate values are available, choose the cloud upload icon. This publishes the values to the serverless backend, where they are stored in a DynamoDB table. The trend chart then updates to reflect the new data.

Access to your historical data can be shared to another user, for example a healthcare professional. Choose the share icon on the right to open sharing options. From here, you can add or remove access to others by user name.

To view data shared with you, select the user name from the drop-down and choose the refresh icon.

Understanding the serverless backend
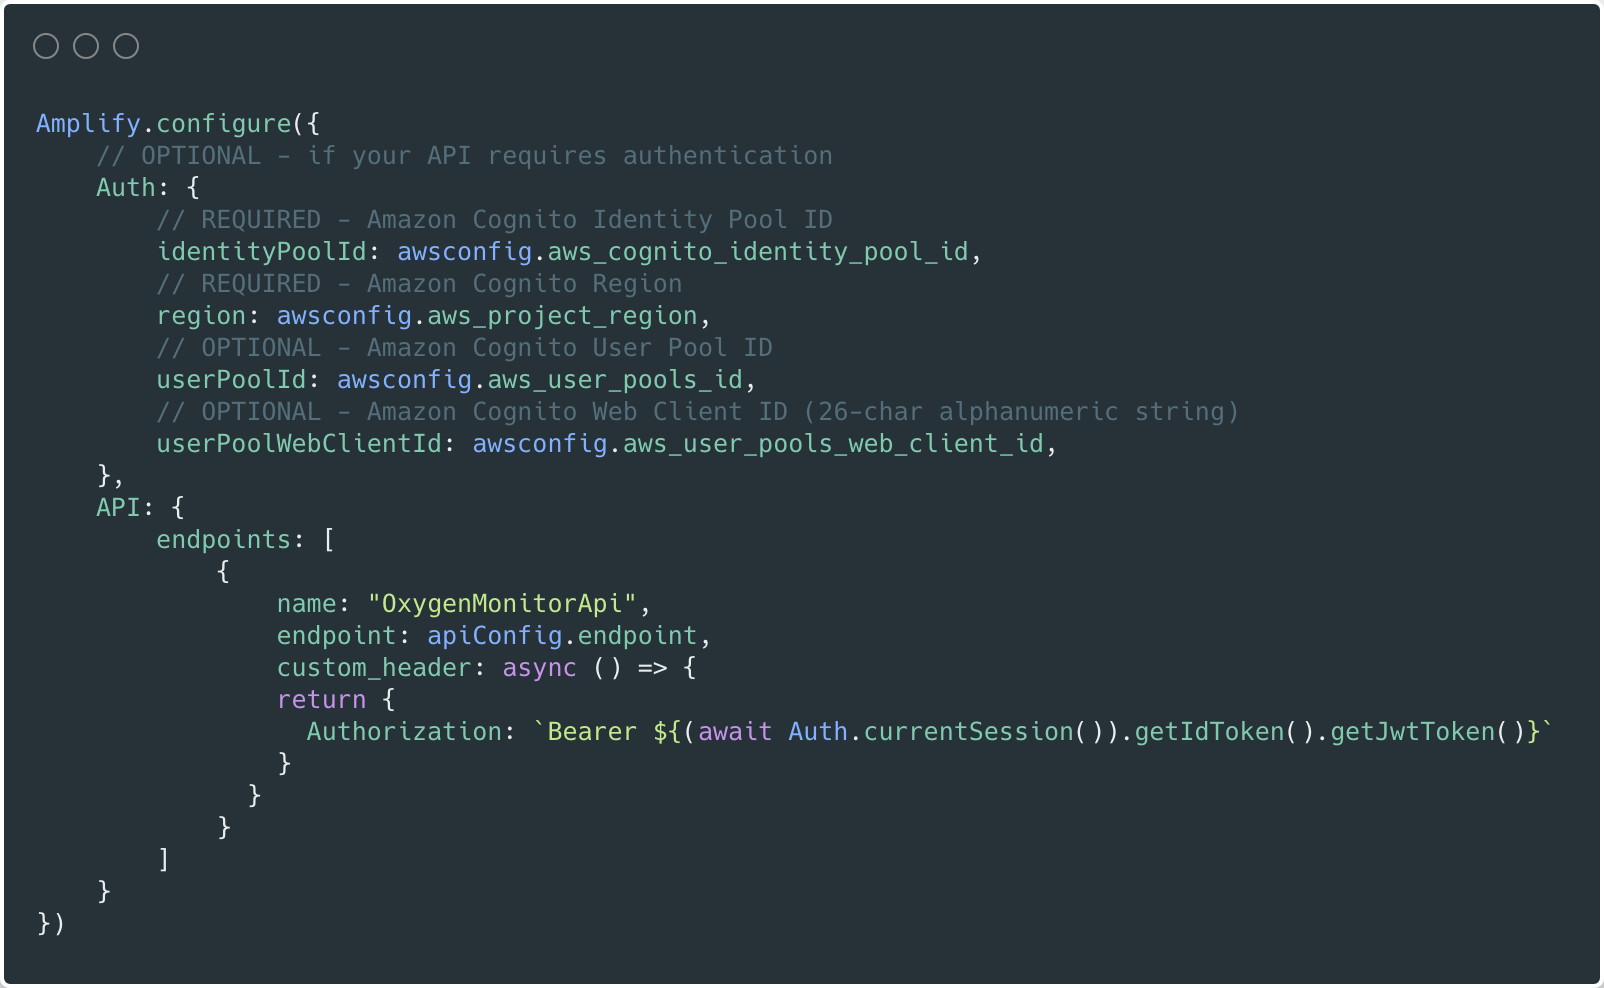
In the GitHub project, the folder serverless-backend/ contains the AWS SAM template file and the Lambda functions. It creates an API Gateway endpoint, six Lambda functions, and two DynamoDB tables. The template also defines an Amazon Cognito authorizer for the API using the UserPoolID passed in as a parameter:

This only allows authenticated users of the frontend application to make requests with a JWT token containing their user name and email. The backend uses that information to fetch and store data in DynamoDB that corresponds to the user making the request.

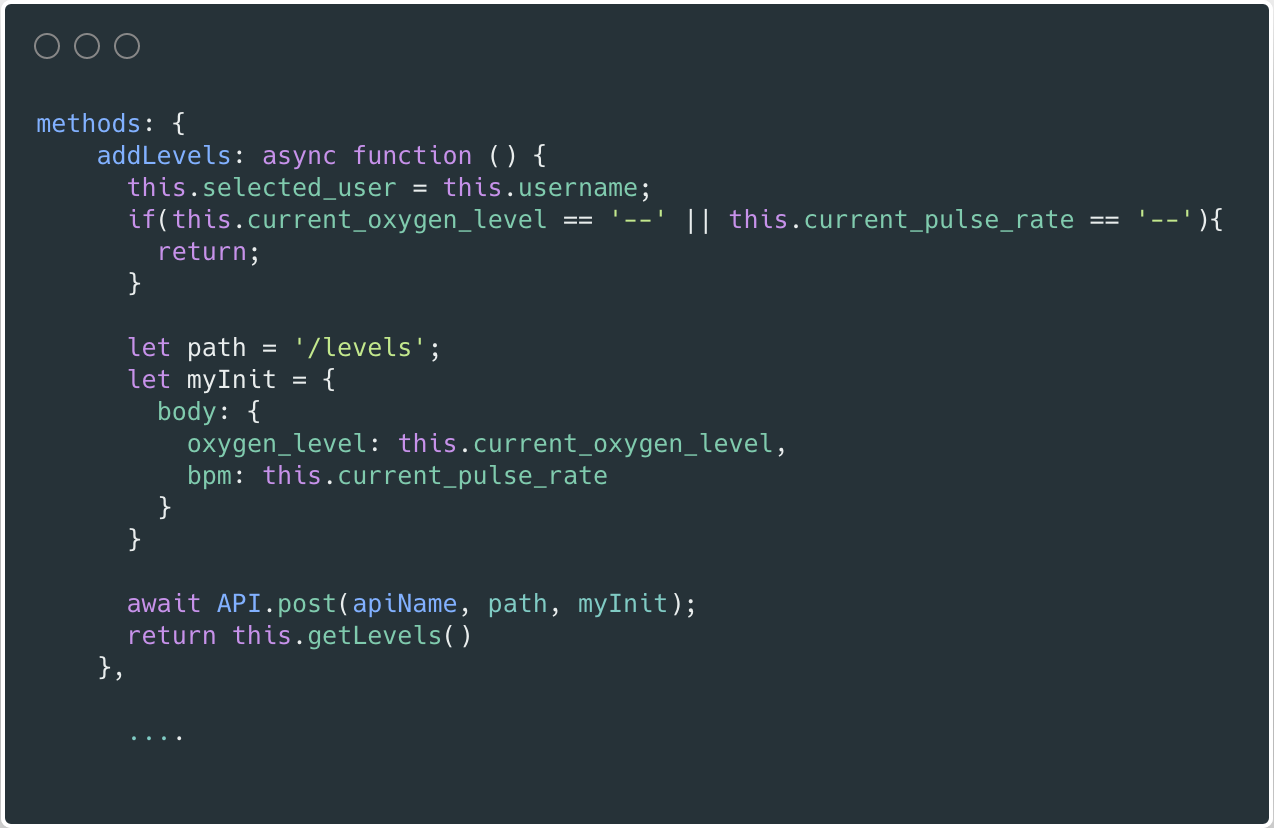
The first three endpoints handle updating and retrieving oxygen and pulse rate levels. When a user publishes a new measurement, the AddLevels function is invoked which creates a new item in the DynamoDB “Levels” table.
The FetchLevels function retrieves the user’s personal history. The FetchSharedUserLevels function checks the Access Table to see if the requesting user has shared access rights.

The remaining endpoints handle access management. When you add a shared user, this invokes the ManageAccess function with a user name and an action, such as share or revoke. If sharing, the item is added to the Access Table that enables the relationship. If revoking, the item is removed from the table.
The GetSharedUsers function fetches the list of shared with the user making the request. This populates the drop-down of accessible users. FetchUsersWithAccess fetches all users that have access to the user making the request, this populates the list of users in the sharing options.
The DynamoDB tables are created by the AWS SAM template with the partition key and range key defined for each table. These are used by the Lambda functions to query and sort items. See the documentation to learn more about DynamoDB table key schema.
LevelsTable:
    Type: AWS::DynamoDB::Table
    Properties:
      AttributeDefinitions:
        -
          AttributeName: "username"
          AttributeType: "S"
        -
          AttributeName: "timestamp"
          AttributeType: "N"
      KeySchema:
        - AttributeName: username
          KeyType: HASH
        - AttributeName: timestamp
          KeyType: RANGE
      ProvisionedThroughput:
        ReadCapacityUnits: "5"
        WriteCapacityUnits: "5"

  SharedAccessTable:
    Type: AWS::DynamoDB::Table
    Properties:
      AttributeDefinitions:
        -
          AttributeName: "username"
          AttributeType: "S"
        -
          AttributeName: "shared_user"
          AttributeType: "S"
      KeySchema:
        - AttributeName: username
          KeyType: HASH
        - AttributeName: shared_user
          KeyType: RANGE
      ProvisionedThroughput:
        ReadCapacityUnits: "5"
        WriteCapacityUnits: "5"
Understanding the frontend
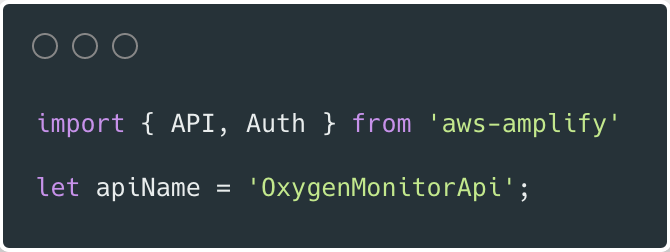
In the GitHub project, the folder amplify-frontend/src/ contains all the code for the frontend application. In main.js, the Amplify VueJS modules are configured to use the resources defined in aws-exports.js. It also configures the endpoint of the serverless backend, defined in api-config.js.
In the file, components/OxygenMonitor.vue, the API module is imported and the desired API is defined.
API calls are defined as Vue methods that can be called by various other components and elements of the application.
In components/ConnectDevice.vue, the connect method initializes a Web Bluetooth connection to the pulse oximeter. It searches for a Bluetooth service UUID and device name specific to BerryMed pulse oximeters. On a successful connection it creates an event listener on the Bluetooth characteristic that notifies changes on measurements.

The handleData method parses notification events. It emits on any changes to oxygen saturation or pulse rate.
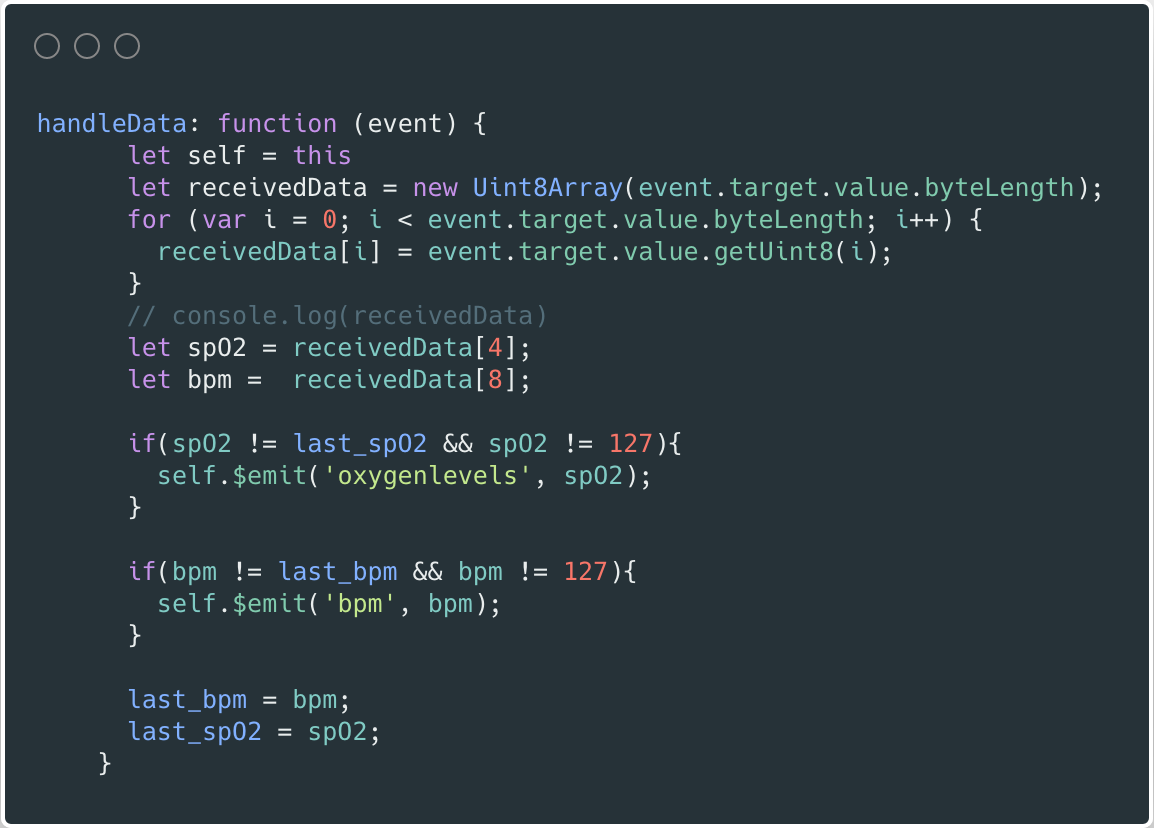
The OxygenMonitor component defines the ConnectDevice component in its template. It binds handlers on emitted events.
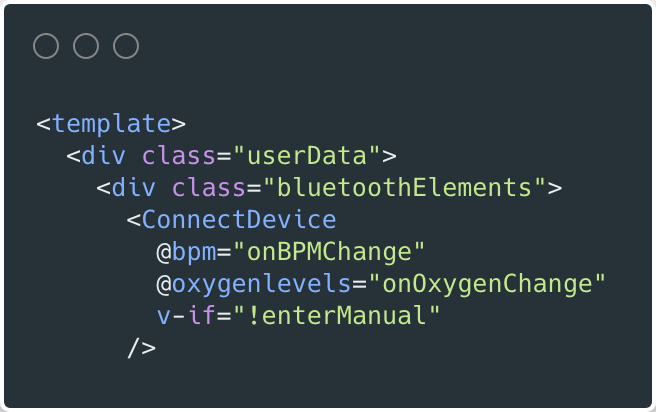
The handlers assign the values to the Vue data object for use throughout the application.

Further explore the project code to see how the Amplify Framework and the serverless backend are used to make a practical application.
Conclusion
Tracking patient vitals remotely has become more relevant than ever. This guide demonstrates a solution for a personal health and telemedicine application. The full solution includes multiuser functionality and a secure and scalable serverless backend. The application uses a browser to interact with a physical device to measure oxygen saturation and pulse rate. It publishes measurements to a database using a serverless API. The historical data can be displayed as a trend chart and can also be shared with other users.
Once more familiarized with the sample project you may want to begin developing an application with your team. The Amplify Framework has support for team environments, allowing all your developers to work together seamlessly.
To learn more about AWS serverless and keep up to date on the latest features, subscribe to the YouTube channel.