AWS Compute Blog
Building an electronic security lock using serverless

In this guide I show how to build an electronic security lock for package delivery, securing physical documents, or granting access to a secret lab. This project uses AWS Serverless to create a touchscreen keypad lock that uses SMS to alert a recipient with a custom message and unlock code. Files are included for the lockbox shown, but the system can be installed in anything with a door.
CircuitPython is a lightweight version of Python that works on embedded hardware. It runs on an Adafruit PyPortal open-source IoT touch display. A relay wired to the PyPortal acts as an electronic switch to bridge power to an electronic solenoid lock.
I deploy the backend to the AWS Cloud using the AWS Serverless Application Repository. The code on the PyPortal makes REST calls to the backend to send a random four-digit code as a text message using Amazon Pinpoint. It also stores the lock state in AWS System Manager Parameter Store, a secure service for storing and retrieving sensitive information.
Prerequisites
You need the following to complete the project:
- An Adafruit PyPortal.
- 3-Pin JST connectors.
- 3-Pin relay module.
- Jumper wires.
- Solenoid lock.
- An AWS account. This project can be completed using the AWS Free Tier.
Deploy the backend application
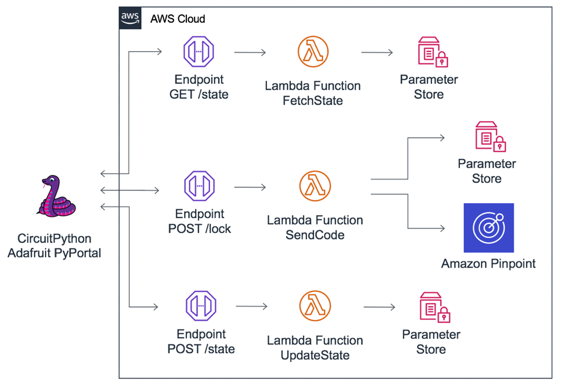
An architecture diagram of the serverless backend.
The serverless backend consists of three Amazon API Gateway endpoints that invoke AWS Lambda functions. At boot, the PyPortal calls the FetchState function to access the lock state from a Parameter Store in AWS Systems Manager. For example, if the returned state is:
{ “locked”: True, “code”: “1234” }

the PyPortal leaves the relay open so that the solenoid lock remains locked. Once the matching “1234” code is entered, the relay circuit is closed and the solenoid lock is opened. When unlocked the PyPortal calls the UpdateState function to update the state to:
{ “locked”: False, “code”: “ ” }

In an unlocked state, the PyPortal requests a ten-digit phone number to be entered in order to lock. The SendCode function is called with the phone number so that it can generate a random four-digit code. A message is then sent to the recipient using Amazon Pinpoint, and the Parameter Store state is updated to “locked”. The state is returned in the response and the PyPortal opens the relay again and stores the unlock code locally.
Before deploying the backend, create an Amazon Pinpoint Project and request a long code. A long code is a dedicated phone number required for sending SMS.
- Navigate to the Amazon Pinpoint console.
- Ensure that you are in a Region where Amazon Pinpoint is supported. For the most up-to-date list, see AWS Service Endpoints.
- Choose Create Project.
- Name your project and choose Create.
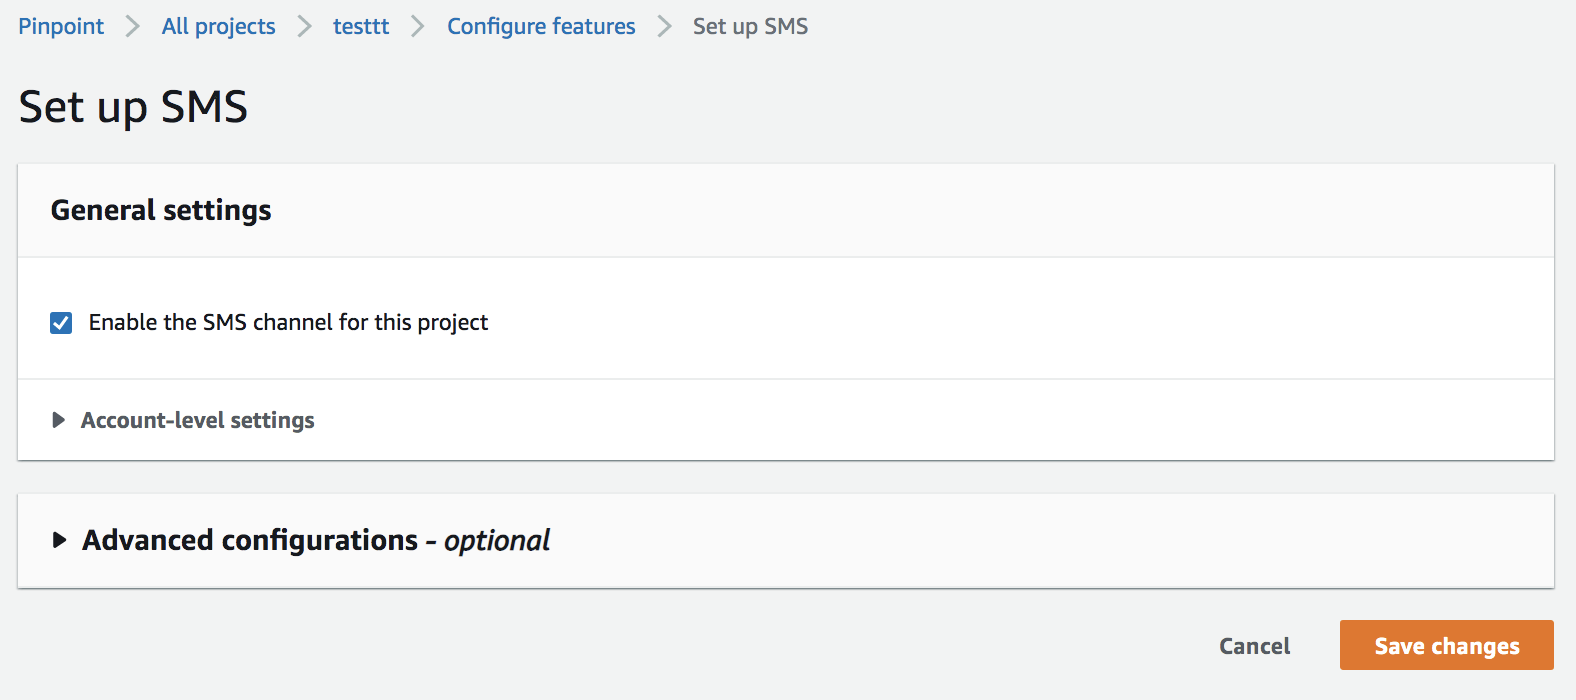
- Choose Configure under SMS and Voice.

- Select Enable the SMS channel for this project and choose Save changes.

- Under Settings, SMS and Voice choose Request long codes.

- Enter the target country and select Transactional for Default call type. Choose Request long codes. This incurs a monthly cost of one dollar and can be canceled anytime. For a breakdown of costs, check out current pricing.

- Under Settings, General settings make a note of the Project ID.


I use the AWS Serverless Application Model (AWS SAM) to create the backend template. While it can be deployed using the AWS SAM CLI, you can also deploy from the AWS Management Console:
- Navigate to the aws-serverless-pyportal-lock application in the AWS Serverless Application Repository.
- Under Application settings, fill the parameters PinpointApplicationID and LockboxCustomMessage.

- Choose Deploy.
- Once complete, choose View CloudFormation Stack.

- Select the Outputs tab and make a note of the LockboxBaseApiUrl. This is required for configuring the PyPortal.

- Navigate to the URL listed as LockboxApiKey in the Outputs tab.

- Choose Show to reveal the API key. Make a note of this. This is required for authenticating requests from the PyPortal to the backend.


PyPortal setup
The following instructions walk through installing the latest version of the Adafruit CircuityPython libraries and firmware.
- Follow these instructions from Adafruit to install the latest version of the CircuitPython bootloader. At the time of writing, the latest version is 5.3.0.
- Follow these instructions to install the latest Adafruit CircuitPython library bundle. I use bundle version 5.x.
- Optionally install the Mu Editor, a multi-platform code editor and serial debugger compatible with Adafruit CircuitPython boards. This can help with troubleshooting issues.
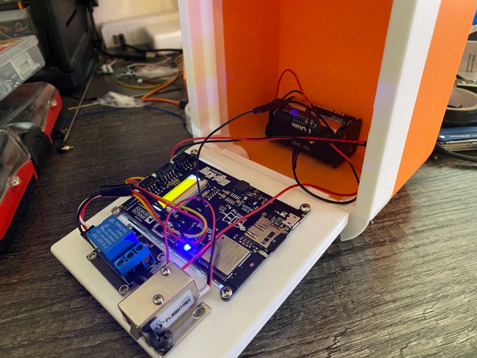
Wiring
Electronic solenoid locks come in varying shapes, sizes, and voltages. Choose one that works for your needs and wire it according to the following instructions for the PyPortal.
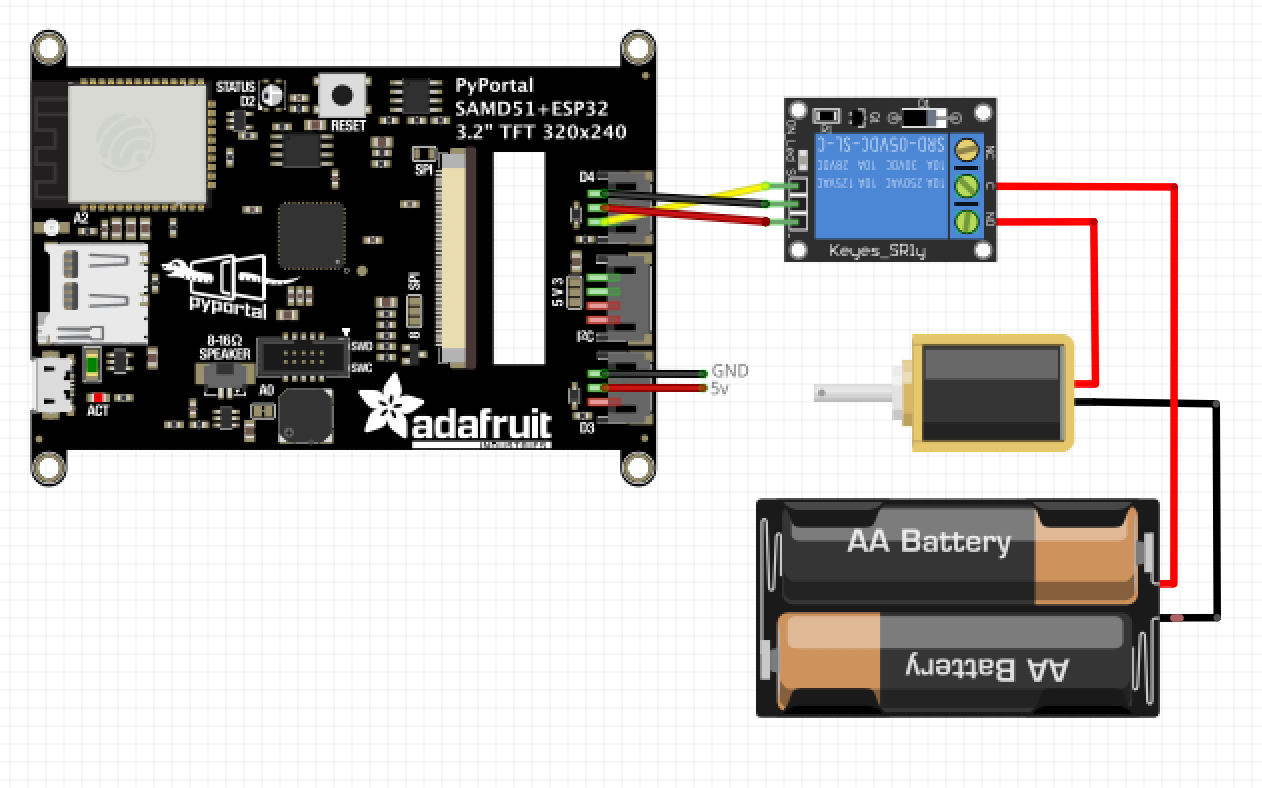
- Gather the PyPortal, a solenoid lock, relay module, JST connectors, jumper wire, and a power source that matches the solenoid being used. For this project, a six-volt solenoid is used with a four AA battery holder.

- Wire the system following this diagram.

- Splice female jumper wires to the exposed leads of a JST connector to connect the relay module.

- Insert the JST connector end to the port labeled D4 on the PyPortal.
- Power the PyPortal using USB or by feeding a five-volt supply to the port labeled D3.
Code PyPortal
As with regular Python, CircuitPython does not need to be compiled to execute. You can flash new firmware on the PyPortal by copying a Python file and necessary assets to a mounted volume. The bootloader runs code.py anytime the device starts or any files are updated.
- Use a USB cable to plug the PyPortal into your computer and wait until a new mounted volume CIRCUITPY is available.
- Download the project from GitHub. Inside the project, copy the contents of /circuit-python on to the CIRCUITPY volume.

- Inside the volume, open and edit the secrets.py file. Include your Wi-Fi credentials along with the LockboxApiKey and LockboxBaseApiURL API Gateway endpoint. These can be found under Outputs in the AWS CloudFormation stack created by the AWS Serverless Application Repository.

- Save the file, and the device restarts. It takes a moment to connect to Wi-Fi and make the first request to the FetchState function.
- Test the system works by entering in a phone number when prompted. An SMS message with the unlock code is sent to the provided number.
- Mount the system to the desired door or container, such as a 3D printed safe (files included in the GitHub project).
Optionally , if you installed the Mu Editor, you can choose “Serial” to follow along the device log.
Understanding the code
See circuit-python/code.py from the GitHub project, this is the main code for the PyPortal. When the PyPortal connects to Wi-Fi, the first thing it does is make a GET request to the API Gateway endpoint for the FetchState function.

def getState():
    endpoint = secrets['base-api'] + "/state"
    headers = {"x-api-key": secrets['x-api-key']}
    response = wifi.get(endpoint, headers=headers, timeout=30)
    handleState(response.json())
    response.close()
The FetchState Lambda function code, written in Python, gets the state from the Parameter Store and returns it in the response to the PyPortal.
import os
import json
import boto3

client = boto3.client('ssm')
parameterName = os.environ.get('PARAMETER_NAME')

def lambda_handler(event, context):
    response = client.get_parameter(
        Name=parameterName,
        WithDecryption=False
    )

    state = json.loads(response['Parameter']['Value'])

    return {
        "statusCode": 200,
        "body": json.dumps(state)
    }
The getState function in the CircuitPython code passes the returned state to the handleState function, which determines whether to physically lock or unlock the device.
def handleState(newState):
    print(state)
    state['code'] = newState['code']
    state['locked'] = newState['locked']
    print(state)
    if state['locked'] == True:
        lock()
    if state['locked'] == False:
        unlock()
When the device is unlocked, and a phone number is entered to lock the device, the CircuitPython command function is called.
def command(action, num):
    if action == "unlock":
        if num == state["code"]:
            unlock()
        else:
            number_label.text = "Wrong code!"
            playBeep()
    if action == "lock":
        if validate(num) == True:
            data = sendCode(num)
            handleState(data)
The CircuitPython sendCode function makes a POST request with the entered phone number to the API Gateway endpoint for the SendCode Lambda function
def sendCode(num):
    endpoint = secrets['base-api'] + "/lock"
    headers = {"x-api-key": secrets['x-api-key']}
    data = { "number": num }
    response = wifi.post(endpoint, json=data, headers=headers, timeout=30)
    data = response.json()
    print("Code received: ", data)
    response.close()
    return data
This Lambda function generates a random four-digit number and adds it to the custom message stored as an environment variable. It then sends a text message to the provided phone number using Amazon Pinpoint, and saves the new state in the Parameter Store. The new state is returned in the response and is used by the handleState function in the CircuitPython code.
import os
import json
import boto3
import random

pinpoint = boto3.client('pinpoint')
ssm = boto3.client('ssm')

applicationId = os.environ.get('APPLICATION_ID')
parameterName = os.environ.get('PARAMETER_NAME')
message = os.environ.get('MESSAGE')

def lambda_handler(event, context):
    print(event)
    body = json.loads(event['body'])

    number = "+1" + str(body['number'])
    code = str(random.randint(1111,9999))

    addresses = {}
    addresses[number] = {'ChannelType': 'SMS'}
    pinpoint.send_messages(
        ApplicationId=applicationId,
        MessageRequest={
            'Addresses': addresses,
            'MessageConfiguration': {
                'SMSMessage': {
                    'Body': message + code,
                    'MessageType': 'TRANSACTIONAL'
                }
            }
        }
    )

    state = { "locked": True, "code": code }

    response = ssm.put_parameter(
        Name=parameterName,
        Value=json.dumps(state),
        Type='String',
        Overwrite=True
    )

    return {
        "statusCode": 200,
        "body": json.dumps(state)
    }
Entering the correct unlock code from the SMS message calls the unlock function. The unlock function closes the relay circuit to open the solenoid lock. It plays a beep sound and then calls the updateState function, which makes a POST request to the API Gateway endpoint for the UpdateState Lambda function.
def updateState(newState):
    endpoint = secrets['base-api'] + "/state"
    headers = {"x-api-key": secrets['x-api-key']}
    response = wifi.post(endpoint, json=newState, headers=headers, timeout=30)
    data = response.json()
    print("Updated state to: ", data)
    response.close()
    return data

def unlock():
    print("Unlocked!")
    number_label.text = "Enter Phone# to Lock"
    time.sleep(1)
    btn = find_button("Unlock")
    if btn is not None:
        btn.selected = True
        btn.label = "Lock"
    lock_relay.value = True
    playBeep()
    updateState({"locked": False, "code": ""})
The UpdateState Lambda function updates the Parameter Store whenever the state is changed. When the PyPortal loses power or restarts, the last known state is fetched, preventing a false lock/unlocked position.
import os
import json
import boto3

client = boto3.client('ssm')
parameterName = os.environ.get('PARAMETER_NAME')

def lambda_handler(event, context):
    state = json.loads(event['body'])

    response = client.put_parameter(
        Name=parameterName,
        Value=json.dumps(state),
        Type='String',
        Overwrite=True
    )

    return {
        "statusCode": 200,
        "body": json.dumps(state)
    }
Conclusion
I show how to build an electronic keypad lock system using a basic relay circuit and a microcontroller. The system is managed by a serverless backend API deployed using the AWS Serverless Application Repository. The backend uses API Gateway to provide a REST API for Lambda functions that handle fetching lock state, updating lock state, and sending a random four-digit code via SMS using Amazon Pinpoint. Language consistency is achieved by using CircuitPython on the PyPortal and Python 3.8 in the Lambda function code.
Use this project as a template to build out any solution that requires secure physical access control. It can be embedded in cabinet drawers to protect documents or can be used with a door solenoid to control room access. Try combining it with a serverless geohashing app to develop a treasure hunting experience. Explore how to further modify the serverless application in the GitHub project by learning about the AWS Serverless Application Model. Read my previous guide to learn how you can add voice to a CircuitPython project on a PyPortal.