AWS Compute Blog
Visualize user behavior with Auth0 and Amazon EventBridge
In this post, I show how to capture user events and monitor user behavior by using the Amazon EventBridge partner integration with Auth0. This enables you to gain insights to help deliver a more customized application experience for your users.
Auth0 is a flexible, drop-in solution that adds authentication and authorization services to your applications. The EventBridge integration automatically and continuously pushes Auth0 log events your AWS account via a custom SaaS event bus.
The examples used in this post are implemented in a custom-built serverless application called FreshTracks. This is a demo application built in Vue.js, which I will use to demonstrate multiple SaaS integrations into AWS with EventBridge in this and future blog posts.
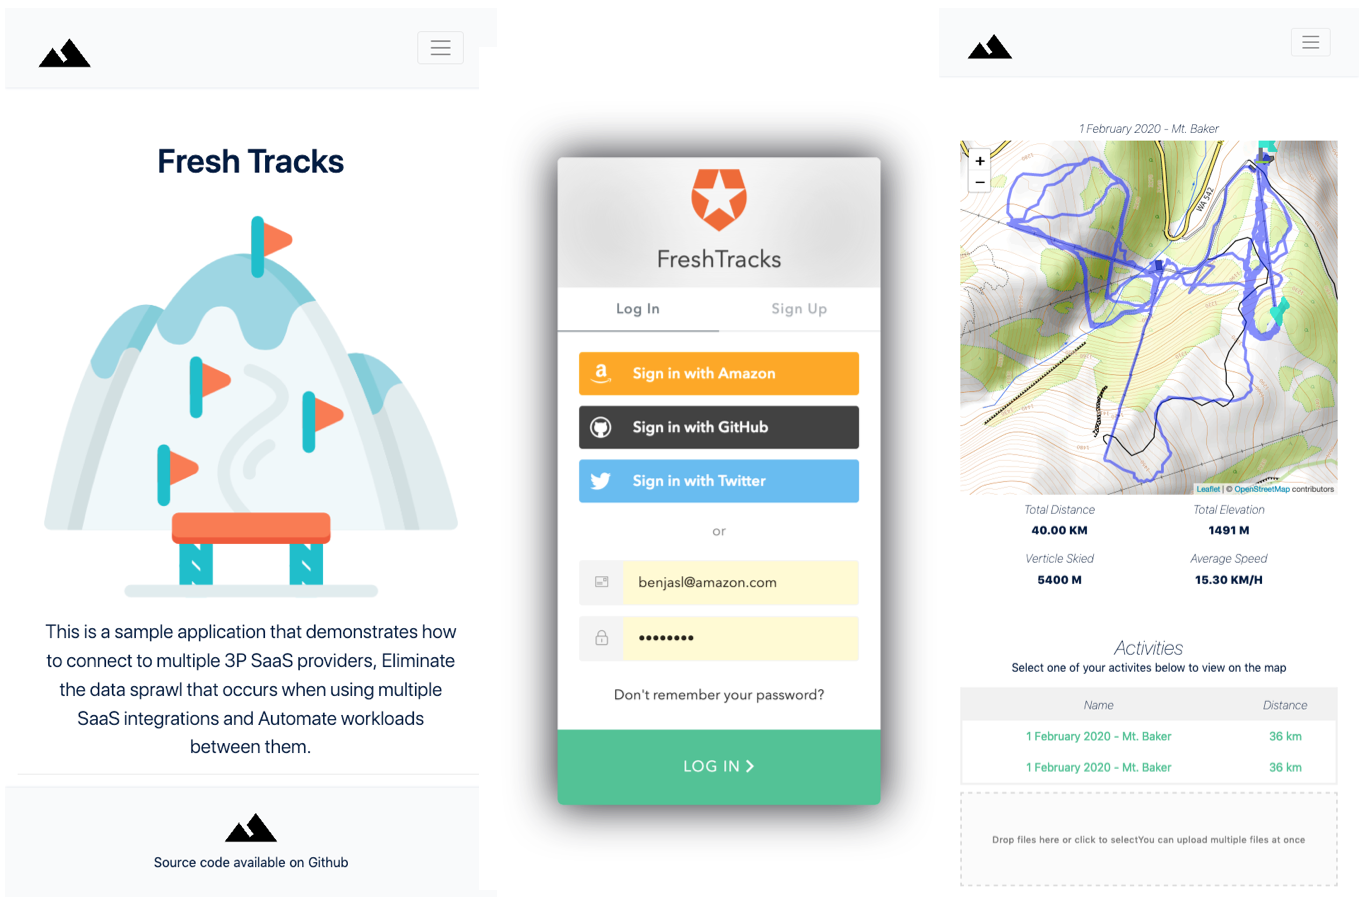
FreshTracks – a demo serverless web application with multiple SaaS Integrations.
The components for this EventBridge integration with Auth0 have been extracted into a separate example application in this GitHub repo.
How the application works
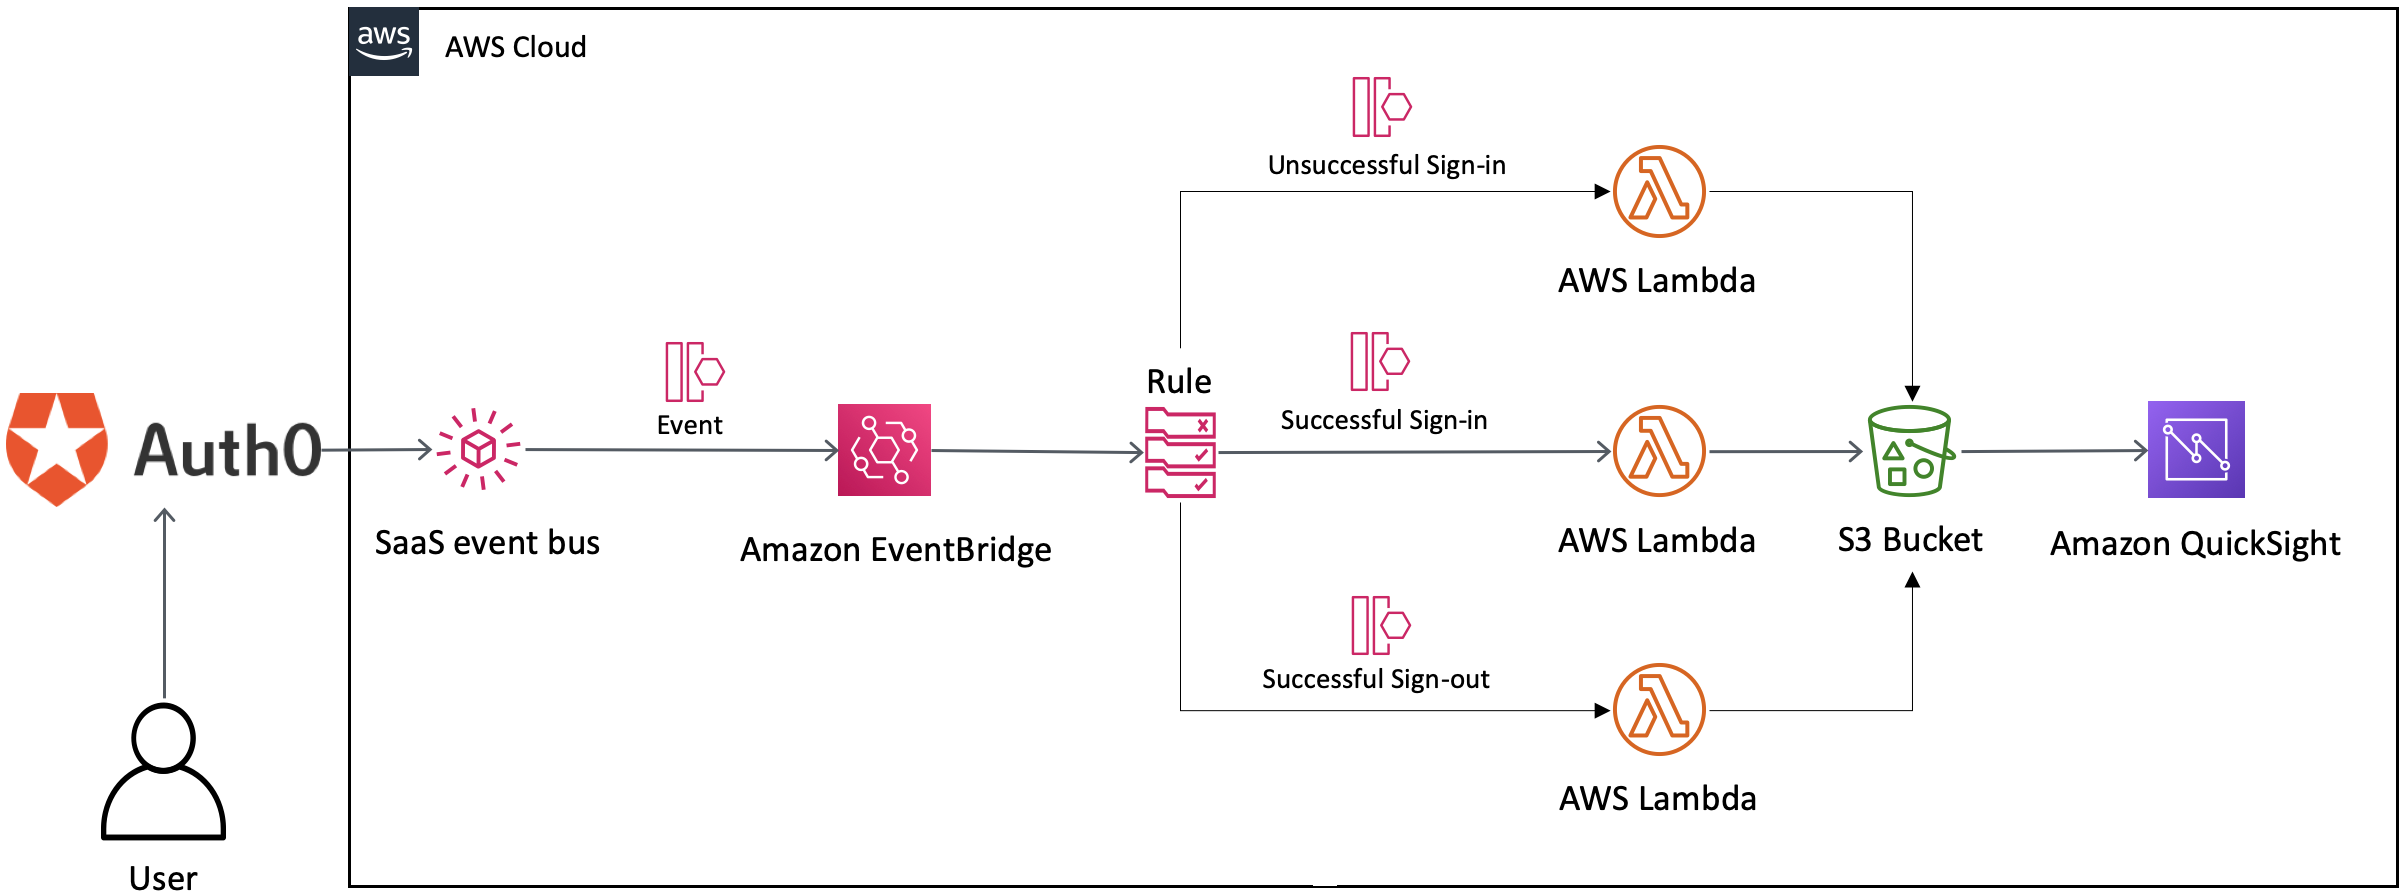
Routing Auth0 Events with Amazon EventBridge.
- Events are emitted from Auth0 when a user interacts with the login service on the front-end application.
- These events are streamed into a custom SaaS event bus in EventBridge.
- Event rules match events and send them downstream to a Lambda function target.
- The receiving Lambda function performs some data transformation before writing an object to S3.
- These objects are made available by a QuickSight data source manifest file and used as datapoints for QuickSight visuals.
Configuring the Auth0 EventBridge integration
To capture Auth0 emitted events in EventBridge, you must first configure Auth0 for use as the Event Source on your Auth0 Dashboard.
- Log in to the Auth0 Dashboard.
- Choose to Logs > Streams.
- Choose + Create Stream.
- Choose Amazon EventBridge and enter a unique name for the new Amazon EventBridge Event Stream.
- Create the Event Source by providing your AWS Account ID and AWS Region. The Region you select must match the Region of the Amazon EventBridge bus.
- Choose Save.
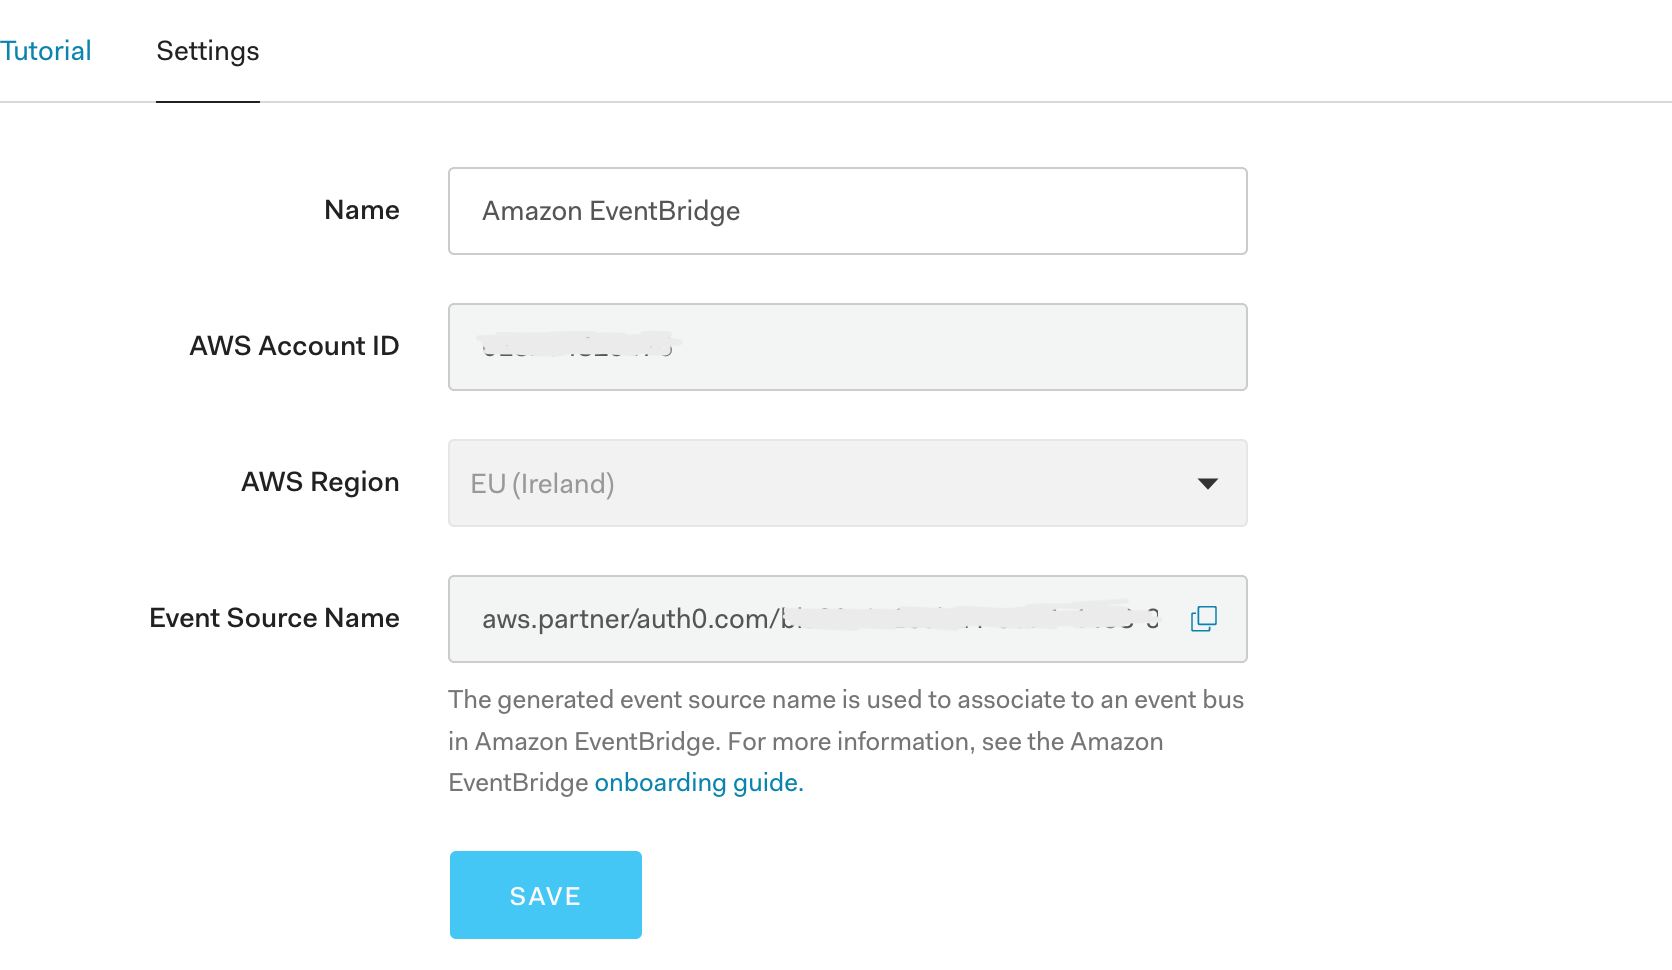
Event Source Configuration on Auth0 dashboard
Auth0 provides you with an Event Source Name. Make sure to save your Event Source Name value since you need this at a later point to complete the integration.
Creating a custom event bus
- Go to the EventBridge partners tab in your AWS Management Console. Ensure the AWS Region matches where the Event Source was created.
- Paste the Event Source Name in the Partner event sources search box to find and choose the new Auth0 event source.Note: The Event Source remains in a pending state until it is associated with an event bus.

Partner event source
- Choose the event source, then choose Associate with Event Bus.
- Choose Associate.
Deploying the application
Once you have associated the Event Source with a new partner event bus, you are ready to deploy backend services to receive and respond to these events.
To set up the example application, visit the GitHub repo and follow the instructions in the README.md file.
When deploying the application stack, make sure to provide the custom event bus name with –parameter-overrides.
sam deploy --parameter-overrides Auth0EventBusName=aws.partner/auth0.com/auth0username-0123344567-e5d2-4514-84f2-97dd4ff8aad0/auth0.logsYou can find the name of the new Auth0 custom event bus in the custom event bus section of the EventBridge console:

Custom event bus name
Routing events with rules
The AWS Serverless Application Model (SAM) template in the example application creates four event rules:
- Successful sign-in
- Successful signup
- Successful log-out
- Unsuccessful signup
These are defined with the `AWS::Events::Rule` resource type. Each of these rules is routed to a single target Lambda function. For a successful sign-in, the rule event pattern is matched with detail:data:type:s. This refers to the Auth0 event type code for a successful sign-in. Every Auth0 event code is listed here.
SuccessfullSignIn:
    Type: AWS::Events::Rule
    Properties:
      Description: "Auth0 User Successfully signed in"
      EventBusName:
         Ref: Auth0EventBusName
      EventPattern:
        account:
        - !Sub '${AWS::AccountId}'
        detail:
          data:
            type:
            - s
      Targets:
        -
          Arn:
            Fn::GetAtt:
              - "SaveAuth0EventToS3"
              - "Arn"
          Id: "SignInSuccessV1"
To respond to additional events, copy this event rule pattern and change the event code string for the event you want to match.
Writing events to S3 with Lambda
The application routes events to a Lambda function, which performs some data transformation before writing an object to S3. The function code uses an environment variable named AuthLogsBucket to store the S3 bucket name. The permissions to write to S3 are granted by policy defined within the SAM template:
  SaveAuth0EventToS3:
    Type: AWS::Serverless::Function
    Properties:
      CodeUri: src/
      Handler: saveAuth0EventToS3.handler
      Runtime: nodejs12.x
      MemorySize: 128
      Environment:
        Variables:
          AuthLogBucket: !Ref AuthZeroToEventBridgeUserActivitylogs
      Policies:
        - S3CrudPolicy:
            BucketName: !Ref AuthZeroToEventBridgeUserActivitylogs
The S3 object is a CSV file with context about each event. Each of the Auth0 event schemas is different. To maintain a consistent CSV file structure across different event types, this Lambda function explicitly defines each of the header and row values. An output string is constructed from the Auth0 event:
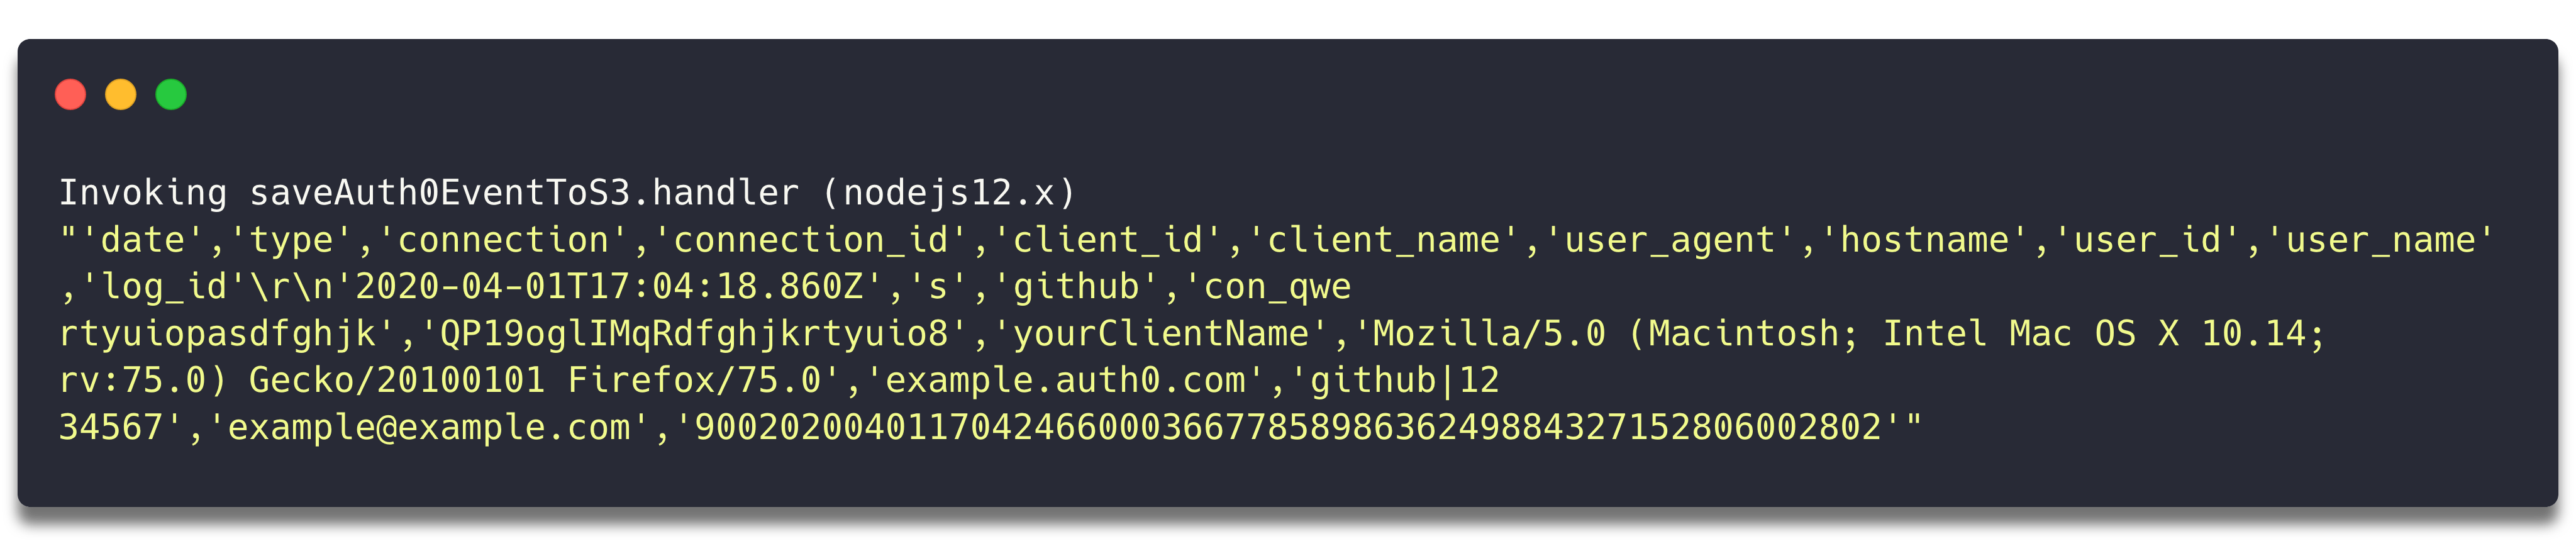
Lambda function output string
This string is placed into a new buffer and written to S3 with the AWS SDK for Javascript as referenced in GitHub here
Sending events to the application
There is a test event in the /event directory of the example application. This contains an example of a successful sign-in event emitted from Auth0.

Sending a test Auth0 event to Lambda
Send a test event to the Lambda function using the AWS Command Line Interface.
Run the following command in the root directory of the example application, replacing {function-name} with the full name of your Lambda function.
aws lambda invoke --function-name {function-name} --invocation-type Event --payload file://events/event.json events/response.json --log-type TailResponse:
{
 "StatusCode": 202
}
The response output appears in the output terminal window. To confirm that an object is stored in S3, navigate to the S3 Console. Choose the AuthZeroToEventBridgeUserActivityLogs bucket. You see a new auth0 directory and can open the CSV file that holds context about the event.

Object written to S3
Sending real Auth0 events from a front-end application
Follow the instructions in the Fresh Tracks repo on GitHub to deploy the front-end application. This application includes Auth0’s authentication flow. You can connect to your Auth0 application by entering your credentials in the `auth0_config.json` file:
{
  "domain": "<YOUR AUTH0 DOMAIN>",
  "clientId": "<YOUR AUTH0 CLIENT ID>"
}
The example backend application starts receiving Auth0 emitted events immediately.
To see the full Fresh Tracks application continue to the backend deployment instructions. This is not required for the examples in this blog post.
Building a QuickSight dashboard
You can visualize these Auth0 user events with an Amazon QuickSight dashboard. This provides a snapshot analysis that you can share with other QuickSight users for reporting purposes.
To use Auth0 events as metrics, create a separate calculated field for each event (for example, successful signup and successful login). For example, an analysis could include multiple visuals, custom fields, conditional formatting, and events. This gives a snapshot of user interaction with the front-end application at any given time.
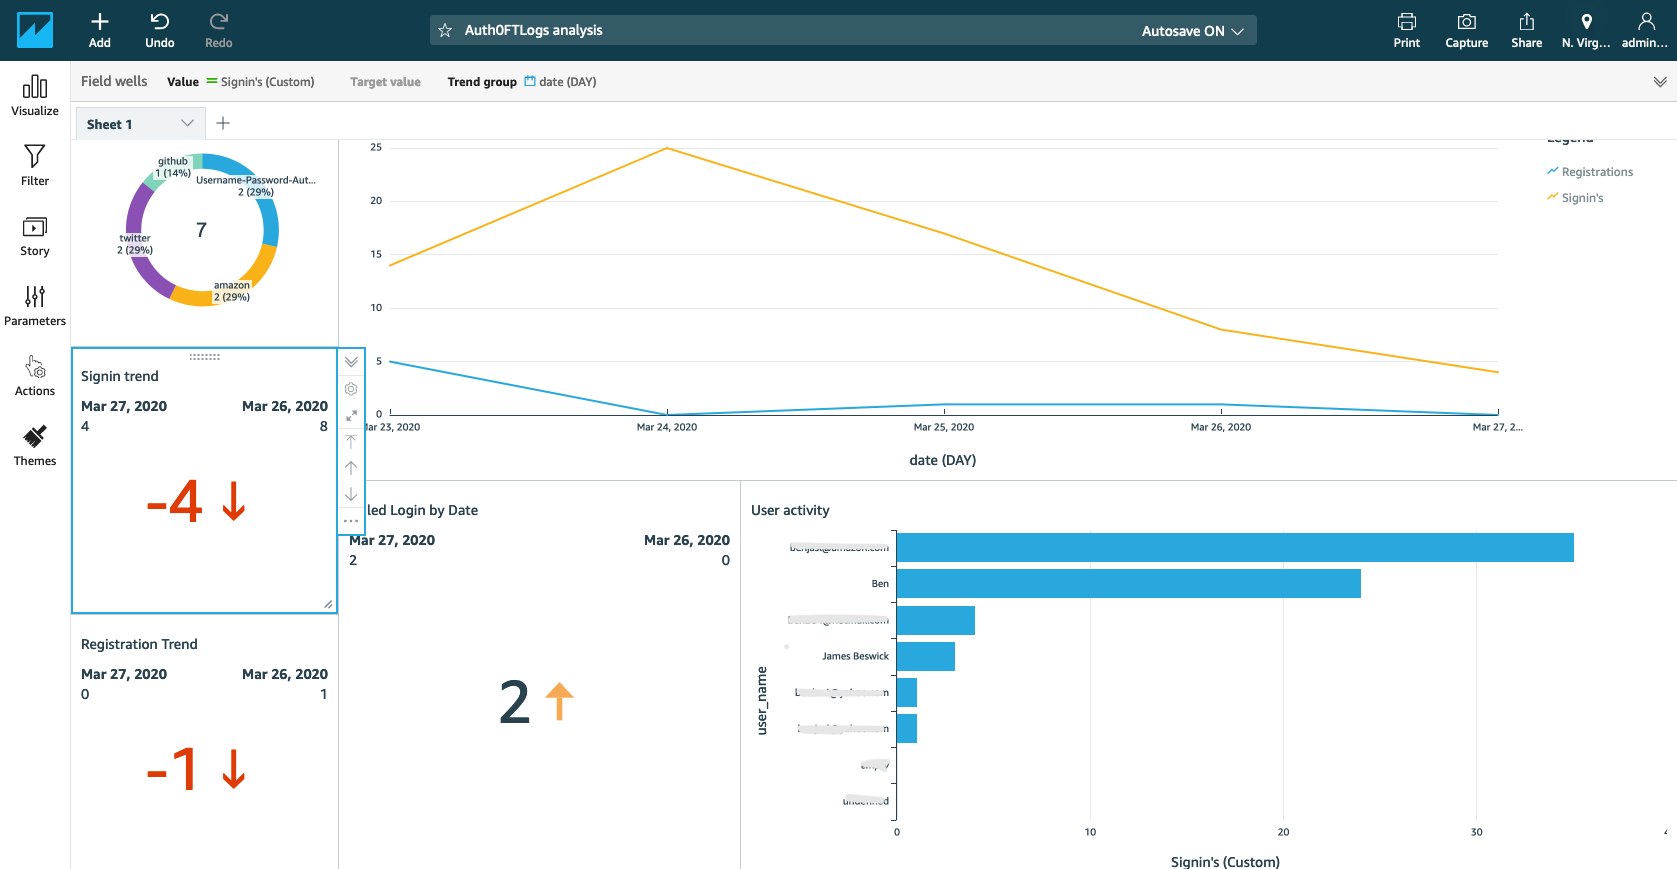
FreshTracks final dashboard example
The example application in the GitHub repo provides instructions on how to create a dashboard.
Conclusion
This post explains how to set up EventBridge’s third-party integration with Auth0 to capture events. The example backend application demonstrates how to filter these events, perform computations on them, save as S3 objects, and send to a downstream service.
The ability to build QuickSight story boards from these events and share visuals with key business stakeholders can provide a narrative about the analysis data. This is implemented with minimal code to provide near real-time streaming of events and without adding latency to your application.
The possibilities are vast. I am excited to see how builders use this serverless pattern to create their own visuals to build a better, more customized application experience for their users.
Start here to learn about other SaaS integrations with Amazon EventBridge.