AWS Database Blog
Amazon RDS for Oracle Transportable Tablespaces using RMAN
Customers are migrating their on-premises Oracle databases to Amazon Relational Database Service (Amazon RDS) for Oracle using logical replication, such as Oracle GoldenGate or AWS Database Management Service (AWS DMS) or using Oracle Data Pump. Logical replication may be complicated to set up, leading to potential configuration errors, data integrity errors, or even data corruption. This is especially true for large database workloads.
Amazon RDS for Oracle now offers physical data migration via Oracle Recovery Manager cross-platform Transportable Tablespaces (RMAN XTTS). The new feature reduces the migration burden for large databases and datasets that present difficulties for logical migration, including large object (LOB) data, usually associated with the logical migration solutions. This new capability allows you to perform data ingestion to RDS for Oracle databases faster, with less effort, and with less application downtime than the native Oracle Data Pump import/export functionality. Oracle Database Enterprise Edition (EE) is required in order to use the RMAN XTTS feature in Amazon RDS.
The downtime required for migration can be significantly reduced when you need to migrate one or more large tablespaces. With the use of RMAN incremental backups, the downtime can be further reduced. There are several advantages of using this method over logical migration methods:
- Reduced downtime – Transportable tablespaces offer lower downtime compared to Oracle Data Pump by using RMAN incremental backup.
- Data integrity – Because the transportable tablespace feature only copies physical files, it reduces the risk of data integrity errors and logical corruption that can occur during logical migration.
- Platform flexibility – You can migrate tablespaces across different platforms and endianness types, such as migrating from an Oracle Solaris platform to Linux. However, note that transporting tablespaces to and from Windows servers is not supported.
In this post, we show you how you can use the RMAN XTTS functionality to migrate from an Oracle database hosted on Amazon Elastic Compute CLoud (Amazon EC2) to Amazon RDS for Oracle. Combined with Amazon Elastic File System (Amazon EFS) integration, XTTS can help reduce the complexity of your migration strategy, reduce the number and copies of data and backups required (as well as associated storage space consumption), and reduce the application downtime associated with completing the migration of your data.
Solution overview
This post provides the detailed steps involved in transporting tablespaces from an Oracle database hosted on Amazon EC2 to Amazon RDS for Oracle.
In order to perform the RMAN XTTS migration using incremental backups, several phases are involved:
- Initial setup phase:
- Copy the transport tablespaces script provided by Oracle in the following Oracle Support note (2471245.1) and set up configuration files.
- Prepare phase:
- Mount the EFS file system on the source.
- Perform the full backup (level 0) of tablespaces to be transported on the source system.
- Mount the EFS file system to the target (via Amazon EFS integration) and restore the first full (level 0) backup.
- Import tablespace and roll forward phase:
- Perform the incremental backup of tablespaces on the source system.
- Mount the EFS file system to the target (via Amazon EFS integration) and restore the incremental backup. This phase can be run multiple times as needed and allows you to perform the cutover during your preferred application maintenance window.
- Transport the tablespace phase:
- Perform a final incremental backup on the source system, mount the EFS file system to the target (via Amazon EFS integration), and perform the last incremental backup restore with or without endianness migration on the target.
- Export the metadata of objects inside the transported tablespaces from the source system via Oracle Data Pump.
- Transfer the backup and export files to your target DB instance
- Import the metadata on the target database. After completion of this phase, the tablespaces on the target system will be available in read-only mode.
- Validation phase:
- Check the integrity of the tablespaces and put the tablespace in read/write mode.
- Cleanup phase:
- Clean up all backup and configuration files.
In this post, we use the Oracle 19c database hosted on Amazon EC2 to RDS for Oracle 19c. The following diagram illustrates our solution workflow.
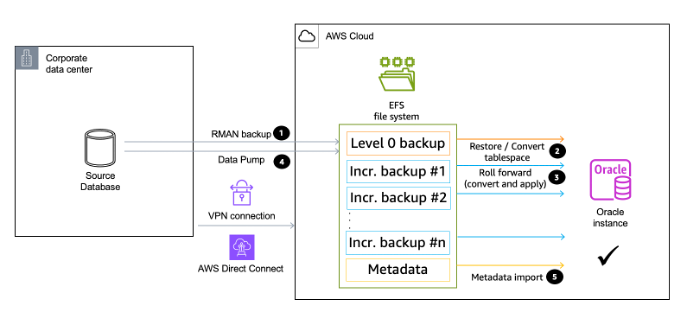
Transportable tablespace architecture diagram
Prerequisites
The following prerequisites must be completed before you start:
- Review the requirements for transportable tablespaces described in the following documents in My Oracle Support:
- Reduce Transportable Tablespace Downtime using Cross Platform Incremental Backup (Doc ID 2471245.1)
- Transportable Tablespace (TTS) Restrictions and Limitations: Details, Reference, and Version Where Applicable (Doc ID 1454872.1)
- Primary Note for Transportable Tablespaces (TTS) — Common Questions and Issues (Doc ID 1166564.1)
- You can mount Amazon EFS to both Amazon EC2 as well as your on-premises Oracle databases, provided you are able to connect to your target VPC via VPN connection or AWS Direct Connect.
- Download and set up the required script from the Oracle Support note (2471245.1) on your source database server.
- Review the to limitations for transportable tables.
- Create an RDS for Oracle DB instance in the AWS Cloud running the same or higher Oracle version as the source. For details, refer to Compatibility Considerations for Transporting Data. The data transport operation fails if the compatibility level of the source database is higher than the compatibility level of the target database.
- Verify that the transportable tablespace feature is enabled on your target RDS for Oracle instance. The feature is enabled only if you don’t get an ORA-20304 error when you run the following query. Log in to the database using SQL Plus or SQL Developer and run the following command:
If the preceding command runs successfully, the transportable tablespace feature is enabled. If you receive an error ORA-00904, then the transportable tablespace feature isn’t enabled. In this case, reboot your DB instance to enable it. For more information, see Rebooting a DB instance.
- Mount the EFS file system on the source and the target.
If you are using transportable tablespaces, you can move the data between source and target using either Amazon Simple Storage Service (Amazon S3) or Amazon EFS:
- When you use Amazon S3, upload the data to your S3 bucket and then download them to Amazon Elastic Block Store (Amazon EBS) storage attached to your DB instance. The files remain in your Amazon EBS storage during the import. After the import, you can free up this space, which remains allocated to your DB instance. For more information, see Amazon S3 integration.
- When you use Amazon EFS, your backups remain in the EFS file system for the duration of the import. You mount the same Amazon EFS on the source and the target to share the EFS file system. Amazon EFS makes sharing the files easy and you don’t need to add additional EBS storage on the DB instance to hold these temporary files. For this reason, we recommend using Amazon EFS instead of Amazon S3. For more information, see Amazon EFS integration.
Initial setup
For the initial setup, complete the following steps:
- Log in to your source database host as the owner of your Oracle home. Make sure that your
ORACLE_HOMEandORACLE_SIDenvironment variables point to your source database. - Copy the transport tablespaces script provided by Oracle in the following Oracle Support note (2471245.1) to the source system.
- Make sure the source tablespaces are self-contained. To determine whether a set of tablespaces is self-contained, log in to your source database and invoke the
TRANSPORT_SET_CHECKprocedure in the Oracle-supplied package DBMS_TTS. You must have been granted theEXECUTE_CATALOG_ROLErole (initially granted to SYS user) to run this procedure. - After invoking this PL/SQL procedure, you can see any violations by selecting from the
TRANSPORT_SET_VIOLATIONSview. If the set of tablespaces is self-contained, this view is empty. Refer to the Oracle document for more details. - Verify that the time zone version, DB character set, and national character set are the same or a subset of the target. For conditions that need to be met for the character set, refer to General Limitations on Transporting Data.
- Find the Platform_id using the following SQL (this is needed in later steps when running the XTTS):
Prepare the full tablespace backup on the source
In this phase, we perform the full backup (level 0) of the tablespaces to be transported on the source system. We copy the backups and the configuration files directly to the EFS file system.
Configure the xtt.properties file
We first mount Amazon EFS to transfer the files between the source and target in this post. We are using /home/ssm-user/efs-mount-point as the EFS mount point.
In the following step, we unzip the tablespaces script provided by Oracle to the EFS mountpoint and create the directories required for scratch_location and TMPDIR.
We recommend backing up directly to Amazon EFS; you can modify the following paths to point to your EFS mount point:
- Backup path –
src_scratch_location=/home/ssm-user/efs-mount-point/xtts/xtts_scratch - Temp path –
TMPDIR=/home/ssm-user/efs-mount-point/xtts/xtts_tmp
Log in to your source database host as the owner of your Oracle home:
Edit the properties file with your source database settings:
- Platformid – Use the source database platform ID, obtained from
V$DATABASE.PLATFORM_ID. - Tablespaces – Use a comma-separated list of tablespaces to transport from the source database to the destination database. This must be a single line; any subsequent lines will not be read.
- Src_scratch_location – Specify the location where the backup will be generated.
- Usermantransport – Set this to 1 if using 12c or higher.
For a complete list of properties that you can set, refer to the Oracle document Description of Parameters in Configuration File xtt.properties.
Back up the tablespaces on your source host
In this step, you use the xttdriver.pl script to make a full backup of your tablespaces. The output of xttdriver.pl is stored in the TMPDIR environment variable.
The tablespaces that you want to transport should be in read/write mode. Log in to your source database as a user with the ALTER TABLESPACE privilege, and ensure they’re in read/write mode first; no need to alter them if they’re already in read-write.
- The following example places tablespaces HR and CO in read/write mode:
- If the status column in the preceding query shows ONLINE, then the tablespaces are already in read/write mode and the following commands can be ignored:
- Back up your tablespaces using the
xttdriver.plscript. Optionally, you can specify--debugto run the script in debug mode:
When it’s complete, you will see the backup files created in the scratch location, and res.txt in the tmp location:
Transfer the backup files to your target DB instance
Because we’re using EFS mount points for the data transfer, all we need to do is mount the same EFS mount point that we used on the source and mount that to the RDS for Oracle DB instance on the target. For instructions, refer to Amazon EFS integration.
If you need to stage your backups to an S3 bucket, complete the following steps. For more information, see Uploading objects.
After you have mounted Amazon EFS on the RDS for Oracle DB instance, to transfer files between an RDS for Oracle instance and an EFS file system, create at least one Oracle directory and configure EFS file system permissions to control DB instance access. For instructions, refer to Transferring files between RDS for Oracle and an Amazon EFS file system.
In the following example, we create an Oracle directory DATA_PUMP_DIR that points to the /xtts_scratch directory on the EFS file system. The file system path value for the p_path_on_efs parameter is prefixed with the string /rdsefs-.
Import the tablespace and roll forward
In this step, you import the transportable tablespace into your RDS for Oracle DB instance using the procedure rdsadmin.rdsadmin_transport_util.import_xtts_tablespaces. For cross-platform migration, make sure you provide the p_platform_id value that you collected earlier in the import_xtts_tablespaces procedure. During the operation, the status of the import is shown in the table rdsadmin.rds_xtts_operation_info.
Import the tablespaces on your target DB instance
To import the tablespaces on your target DB instance, log in to your target RDS for Oracle DB instance as ADMIN using SQL Plus or SQL Developer:
Optionally, monitor progress by querying the table rdsadmin.rds_xtts_operation_info. The xtts_operation_state column shows the value EXECUTING, COMPLETED, or FAILED.
Apply incremental changes
In this step, you make and transfer incremental backups periodically while the source database is active. This helps reduce the downtime by reducing the size of your final tablespace backup. If you take multiple incremental backups, you must copy the res.txt file after the last incremental backup before you can apply it on the target instance.
If you activate the BLOCK CHANGE TRACKING feature on the source system, you can greatly reduce the time of the incremental backup.
Follow the steps from Phase 1 to back up the tablespaces on your source host.
Transport the tablespace
During this phase, you make the source data read-only and make the destination data files consistent with the source database by creating and applying a final incremental backup. After the destination data files are consistent, you perform the normal transportable tablespace steps to export object metadata from the source database and import it into the destination database. The data being transported is accessible only in read-only mode until the end of this procedure.
Perform a final incremental backup
Put the transportable tablespaces in read-only mode on the source and perform the last incremental backup on the source:
- Log in to your source Oracle DB instance using SQL Plus or SQL Developer:
- Repeat the steps to back up the tablespaces in the source.
There is one key difference: you place your tablespaces in read-only mode before backing up your tablespaces for the final incremental backup.
- Log in to your source host as the owner of your Oracle home.
- Make sure that your
ORACLE_HOMEandORACLE_SIDenvironment variables point to your source database:
NOTE: As the tablespaces are in READ ONLY mode, the following warning received can be ignored:
Prepare newscn for Tablespaces: ‘HR’
The file incrbackups.txt in the tmp location provides the file names of the incremental backup files that are required as the last backup set:
Export your tablespace metadata from the source Oracle DB instance
Perform the tablespace transport by running transportable mode Data Pump export on the source database to export the object metadata being transported into a dump file:
Transfer the backup and export files to your target DB instance
The following are the list of files that are required for this final step. These can be exported directly to Amazon EFS, or you can follow steps for Amazon S3.
In case of Amazon S3 integration, download the files from Amazon S3 to the RDS for Oracle data_pump_dir location.
Import the final backup and tablespace metadata to your target DB instance
Before you import metadata, we strongly recommend that you confirm that a manual DB snapshot was successfully created after you imported your tablespaces. The snapshot will contain all imported tablespaces, so if the import fails, you don’t need to repeat the backup and import process.
- To import the Data Pump metadata into your RDS for Oracle DB instance, you first apply the last incremental backup to the destination data files. Verify that you have all the files on the data_pump_directory location in your target Oracle instance. You can use the following command to check the list of files in the data_pump_dir location:
Now you can run Data Pump import using the export file on the destination to plug in the tablespaces.
- Start SQL*Plus or Oracle SQL Developer and log in to your target Oracle DB instance.
- Create the users that own schemas in your transported tablespaces, if these users don’t already exist:
- Import metadata from your source database:
–Check the name of the logfile with the format import_xtts_metadata*log
–sample output
–optionally you can also check status using
Validate the transported data
In this step, the transported tablespaces are read-only in the destination database. Logically validate the transported tablespaces using the following Amazon RDS procedure:
–Sample output
In this phase, you need to pre-create the users and other metadata objects, such as procedure, function, and sequence, from the source database.
- Run Data Pump export on the source database to export the object metadata into a dump file:
- Transfer the dump file created in the source database and import it to the target database. For instructions, refer to Integrate Amazon RDS for Oracle with Amazon EFS.
- In addition, you can check the count of the objects, such as the table, index, synonym, view, and package objects.
- Place your tablespaces read/write mode:
Clean up leftover files
In this step, you remove any unneeded files.
- Clean up old backups from
DATA_PUMP_DIRusingUTL_FILE.FREMOVE. - Drop any unused tablespaces and the data files associated with the tablespaces.
- Remove the log files that are not required.
- Get a list of orphaned data files by running the procedure rdsadmin.rdsadmin_transport_util.list_xtts_orphan_files and delete the orphaned files by running the procedure
rdsadmin.rdsadmin_transport_util.cleanup_incomplete_xtts_import.
Limitations
The use of transportable tablespaces in Amazon RDS for Oracle is subject to certain limitations imposed by Oracle Database. To obtain more detailed information, refer to the Limitations on Transportable Tablespaces and General Limitations on Transporting Data sections in Transporting Data. In addition to these limitations, take note of the following restrictions specific to transportable tablespaces in Amazon RDS for Oracle:
- Edition limitation – Only Enterprise Edition (EE) is supported; Standard Edition 2 (SE2) can’t be used as either the source or target database.
- Source database restriction – Migration of data from an RDS for Oracle DB instance using transportable tablespaces is not supported. Transportable tablespaces can only be used to migrate data to an RDS for Oracle DB instance.
- Release level compatibility – Transporting tablespaces into a database with a lower release level is not allowed. The target database must be at the same or later release level compared to the source database.
- Supported file size – If you transfer files using Amazon S3, the maximum supported file size is 5 TiB.
- Oracle option compatibility – If the source database employs Oracle options such as Spatial, transportable tablespaces can’t be utilized unless the same options are configured on the target database.
- Amazon RDS for Oracle replica configuration – Transporting tablespaces into an RDS for Oracle DB instance in an Oracle replica configuration is not possible. As a workaround, you can delete all replicas, transport the tablespaces, and then recreate the replicas.
Conclusion
In this post, we demonstrated how you can use the Oracle transportable tablespaces feature to copy a set of tablespaces from an Oracle database hosted on Amazon EC2 or an on-premises Oracle database to an RDS for Oracle DB instance. The migration downtime can be significantly reduced with the use of RMAN incremental backups.
If you have questions or suggestions, leave a comment.
About the authors
 Vineet Agarwal is a Senior Database Specialist Solutions Architect with AWS. Prior to AWS, Vineet worked for large enterprises in financial, retail, and healthcare verticals, helping them with database and solution architectures. In his spare time, you’ll find him playing poker, trying a new activity, or working on a DIY project.
 Manash Kalita is an AWS Senior Database Specialist Solutions Architect for APJ, with extensive experience in enterprise cloud architecture.