AWS Database Blog
Migrate from Azure Cosmos DB to Amazon DynamoDB using AWS Glue
To take advantage of the performance, security, and scale of Amazon DynamoDB, customers want to migrate their data from their existing NoSQL databases in a way that is cost-optimized and performant. In this post, we show you how to migrate data from Azure Cosmos DB to Amazon DynamoDB through an offline migration approach using AWS Glue.
AWS Glue is a serverless data integration service that makes it easy to discover, prepare, and combine data for analytics, machine learning (ML), and application development. AWS Glue provides all the capabilities needed for data integration, allowing you to analyze your data in minutes instead of weeks or months.
DynamoDB is a fast, flexible, scalable, highly available, and fully managed non-relational database service. It’s a multi-Region, multi-active database that provides consistent single-digit millisecond latency, built-in security, backup and restore, and in-memory caching.
Solution overview
Figure 1 shows a high-level diagram of the solution. The solution uses AWS Glue to move data from Azure Cosmos DB to an Amazon Simple Storage Service (Amazon S3) bucket and then to a DynamoDB table.
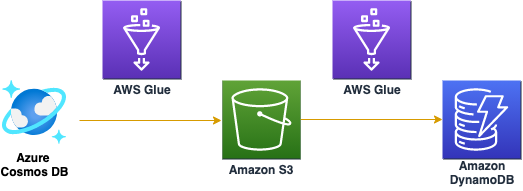
Figure 1: Using AWS Glue to migrate data from Azure Cosmos DB to DynamoDB
This solution uses the following services:
- Amazon DynamoDB – Stores the data migrated from Azure Cosmos DB.
- AWS Glue – Extracts, transforms, and loads the data into DynamoDB.
- AWS Secrets Manager – Stores the Azure Cosmos DB database credentials.
- Amazon S3 – Stores the data from Azure Cosmos DB in JSON format. With your data in S3, you can use native AWS services to run big data analytics, artificial intelligence, machine learning, and media data processing applications to gain insights from your data sets.
- Amazon Athena – Queries the data in S3.
The migration process
The migration process includes the following steps:
- Verify the prerequisites.
- Configure access from AWS Glue to Azure Cosmos DB.
- Stage the
azure-cosmosdb-sparkJAR file in Amazon S3. - Configure, run, and validate the results of an AWS Glue job to migrate data from Azure Cosmos DB to Amazon S3.
- Configure, run, and validate the results from the AWS Glue job to migrate data from S3 to DynamoDB.
Prerequisites
You must have the following prerequisites in place before you start:
- An Azure Cosmos DB source container with data.
- An AWS account with a DynamoDB target table and an S3 bucket.
- An AWS Identity and Access Management (IAM) role named
CosmostoDynamoGlueServiceRolewith an attached AWS managed policy namedAWSGlueServiceRolethat has access to use S3 and AWS Glue.
There are costs associated with this solution. Before you get started, review the pricing of the following services:
Note: As you migrate data from S3 to DynamoDB, you can choose either an on-demand mode or a provisioned mode (with auto-scaling enabled) for your DynamoDB table to avoid throttling and improve the speed of the migration. The mode can also affect the cost of this solution.
Allow network access to Azure Cosmos DB
Azure Cosmos DB supports IP-based access control as well as secret key authentication for inbound connections. You can also set up a NAT gateway using Amazon Virtual Private Cloud (Amazon VPC) to get a fixed public elastic IP address and add that to the Cosmos allowed IP list. You must configure the network and keys required for this and also note the parameters that you will use later for the AWS Glue job.
To allow access over the internet to Azure Cosmos DB
Log in to the Azure Cosmos DB portal and select Firewall, and then select All networks.
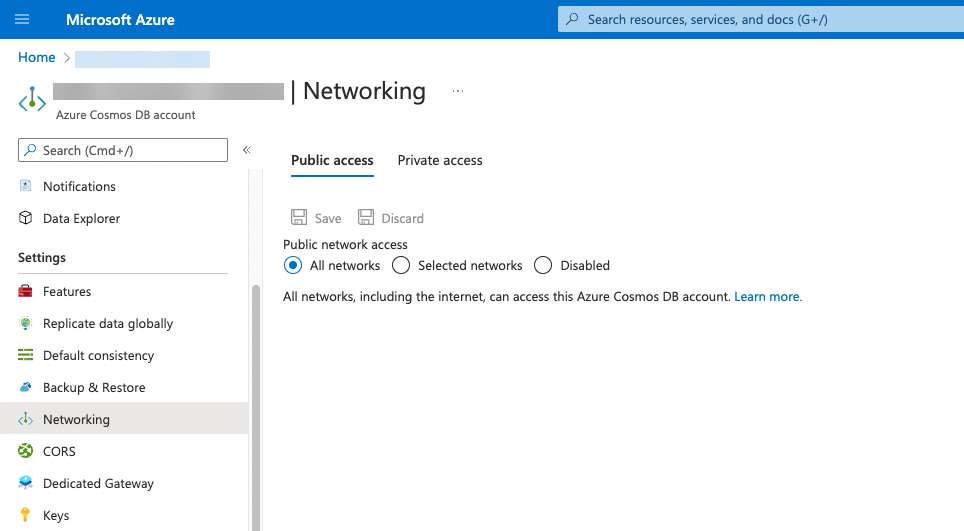
Figure 2: Azure console networking settings
To get the information needed to create the AWS Glue job
From the Azure Cosmos DB portal, select Keys and take note of the endpoint URI, access key, database, and container from Azure Cosmos DB.

Figure 3: Azure console keys settings
Stage azure-cosmosdb-spark JAR file in Amazon S3
In order for AWS Glue to use the official Azure Cosmos DB Spark connector, you must stage the Azure Cosmos DB Spark connector JAR file in Amazon S3. AWS Glue uses S3 to store the custom connector’s code. Visit the official GitHub repo to learn more.
To stage the JAR file
- Download the Spark 3.2 connector JAR file.
- Open the S3 console.
- Upload the JAR file to an S3 bucket that the AWS Glue job can access using the IAM role mentioned in the prerequisites section.
Migrate data from Azure Cosmos DB to Amazon S3
In this section, you configure an AWS Glue custom connector in AWS Glue Studio to migrate data from Azure Cosmos DB to S3. The custom connector is a code package that assists with accessing data stores in AWS Glue Studio.
To create the connector
- From AWS Glue Studio, create a new AWS Glue Studio Connector by selecting Connectors from the left navigation pane and choosing Create custom connector.
- Configure the connector properties as follows:
- Under Connector S3 URL, choose Browse S3 and select the
azure-cosmos-spark_3-1_2-12-4.17.2.jarfile you uploaded to S3 and select Choose. - For connector name enter
gluestudio-connector-to-migrate-cosmos-to-s3. - For Connector type select Spark.
- For Class name enter
cosmos.oltp. - Choose Save.
- Under Connector S3 URL, choose Browse S3 and select the
- Choose Create connection.
- Configure the connection properties as follows:
- For Name enter cosmos-connection.
- Under Connection access, create a new secret by choosing AWS Secrets Manager and selecting Other type of secret. Enter
spark.cosmos.accountkeyas the key andcosmosconnectionas the key value. - Choose the Refresh icon and then select the secret you just created.
- Choose Create connection.

Figure 4: Create a connection
To create the AWS Glue job
- From left navigation pane, choose Jobs, then choose Visual with a source and a target.
- For Source, select the connector you created in the preceding procedure, and for Target select Amazon S3, and then choose Create.

Figure 5: Create an AWS Glue job
- In the visual editor, select the Data source box labeled Connection, and then select the connection you just created.
- Add the connection options using the information from the Azure Cosmos DB console:
Key Value spark.cosmos.accountEndpoint Endpoint URI spark.cosmos.database Database name spark.cosmos.container Container name 
Figure 6: Add key-value pairs to the connection properties
- In the visual editor, select the Data target box labeled S3 bucket. Set the options on the Data target properties page as follows:
- Under Format, select JSON
- For the S3 Target Location find and select your S3 bucket by choosing Browse S3
- Choose Create a table…
- For the Database name, enter
cosmos - For the TableName, enter
volcanowrite_path
Note: You can open the Script tab to review the code that AWS Glue generates.
Figure 7: Configure the data target properties
- Select the Job Details tab. Under IAM Role, select the role named
CosmostoDynamoGlueServiceRole(as mentioned in the prerequisites).
Figure 8: Assign an IAM Role to the AWS Glue job
To run the AWS Glue job and validate the results
- Choose Run to run the job you just created. Wait for the task status to show as Completed.
- Open the Amazon Athena Query editor.
- Enter the query:
SELECT * FROM “cosmos”.”volcanodatawrite_path” limit 10; - Choose Run and validate that the results are populated.

Figure 9: Visual editor showing the results of the query
Now you have the JSON data in S3 and you can use Athena and other AWS services to access the data.
Migrate data from Amazon S3 to DynamoDB
At this point, you’re ready to load the data into a DynamoDB table from the S3 bucket. You use an AWS Glue crawler to populate metadata about the table in the AWS Glue Data Catalog. A crawler connects to a data store and progresses through a prioritized list of classifiers to extract the schema of your data and other statistics. Finally, the AWS Glue crawler populates the Data Catalog with this metadata.
Note: If you don’t need to transform the data and will create a new DynamoDB table, you can use the DynamoDB import from S3 feature.
To configure and run the AWS Glue crawler
- Open the AWS Glue console.
- Choose Crawlers in the navigation pane, and then choose Add crawler.
- Enter a name for your crawler for example,
dynamodb table crawlerand choose Next. - In the Choose a data store list, select DynamoDB.
- Choose the folder icon next to the Table name box, and select the DynamoDB table you created as part of the prerequisites.
- On the Add another data store page, leave the default setting as No, and then choose Next.
- On the Choose an IAM role page, under Choose an existing IAM role, select CosmostoDynamoGlueServiceRole (created as part of the prerequisites).
- On the Create a schedule for this crawler page, leave the default setting as Run on demand, and choose Next.
- You should now be on the Configure the crawler’s output page. In the Database list, select Add database and enter
sampledbfor the Database name, and then choose Next. - Verify the above values on the Crawler info page, and then choose Finish to create the crawler.

Figure 10: AWS Glue crawler info page
- Return to the Crawlers page, select the crawler that you just created, and then choose Run crawler.
In a few minutes, the Status column for this table should change to Ready and you should see 1 in the Tables added column. At this point, the AWS Glue crawler has automatically populated the Data Catalog with the metadata from the DynamoDB table. You can proceed to the next step, or you can take a few minutes to investigate the newly added table by choosing Tables in the navigation pane.
To migrate data from Amazon S3 to DynamoDB
- Open the AWS Glue Studio and create a new AWS Glue job..
- In the visual editor, select the Data Source box labeled S3 Bucket, and then select the S3 bucket that was used to create the AWS Glue job to migrate the data from Azure Cosmos DB to S3.
- In the visual editor, select the Data Target box labeled Data Catalog, and then select the DynamoDB database that was crawled in the previous procedure and choose Create.
- In visual editor, select the Job Details tab and enter IAM role named
CosmostoDynamoGlueServiceRole. - Choose Save, and then choose Run to run the job.
To validate the results
- Open Amazon DynamoDB tables.
- Select the table VolcanoData and choose Explore table items.
- Verify the data was moved from S3 to DynamoDB.

Figure 11: VolcanoData data moved to DynamoDB
Congratulations, you’ve successfully migrated your data from Azure Cosmos DB to DynamoDB.
Cleanup
To avoid incurring future charges, delete the resources you created for this solution.
- AWS Glue database
- On the AWS Glue console, choose the database you created.
- From the actions drop-down menu, choose Delete database.
- Choose Delete.
- On the AWS Glue console choose AWS Glue Studio.
- Select the jobs you created.
- From the actions drop-down menu, select Delete jobs.
- Choose Delete.
- Amazon S3
- On the S3 console, choose Buckets.
- Select the bucket you created.
- Choose Empty and enter the bucket name.
- Choose Confirm.
- Choose Delete and enter the bucket name.
- Choose Delete bucket.
- DynamoDB
- On the DynamoDB console, choose Tables.
- Select the table you created.
- Choose Delete.
- To confirm deletion of the table, enter Delete in the box.
- Choose Delete table.
- IAM
- On the IAM console, choose Roles.
- Select the role you attached to the
AWSGlueServiceRolepolicy. - Choose Delete.
- Enter the name of the role.
- Choose Delete.
- Azure Cosmos DB Allow IP List
- Log in to the Azure Cosmos DB portal..
- Choose Firewall.
- Remove the IP address you added to allow access to Azure Cosmos DB.
Conclusion
In this post, you learned a way that you can use AWS Glue and Amazon S3 to migrate a key-value pair database from Azure Cosmos DB to DynamoDB. You can learn more about migration and optimization with DynamoDB in the following blog posts:
- Accelerate Amazon DynamoDB data access in AWS Glue jobs using the new AWS Glue DynamoDB Export connector
- How to determine if Amazon DynamoDB is appropriate for your needs, and then plan your migration
- Amazon DynamoDB auto scaling: Performance and cost optimization at any scale
- Amazon DynamoDB can now import Amazon S3 data into a new table
Share your feedback or questions on the comments section.
About the author
 Hanish Garg is a Senior Solutions Architect for the US State, Local Government, and Education team at Amazon Web Services. He’s passionate about helping customers achieve their business objectives with database and serverless technologies.
 Phani Karne is a Solutions Architect focused on Public Sector solutions in the US. He loves helping customers along their migration, modernization, security and compliance journeys in the AWS cloud.