AWS Database Blog
Use Amazon RDS Proxy to provide access to RDS databases across AWS accounts
Amazon RDS Proxy is a fully managed, highly available database proxy for Amazon Relational Database Service (Amazon RDS) that makes applications more scalable, more resilient to database failures, and more secure. With RDS Proxy, you can handle unpredictable surges in database traffic that might otherwise cause issues due to oversubscribing connections or creating new connections at a fast rate.
In this post, we show how to securely and efficiently connect multiple applications in different AWS accounts to a single RDS instance or Amazon Aurora cluster using Amazon RDS Proxy.
Cross-account database connectivity
When talking to customers, we often encounter situations where multiple applications need to connect to the same RDS instance or Aurora clusters. In many organizations, development teams of different applications or services may need access to the same underlying data. Or the services need to talk to the same RDS databases where their private database or schema is hosted. AWS best practices state that building each application or service out in a separate account ensures that they have room to scale within service quotas. For more details, refer to AWS multi-account strategy: Best practices guidance. Therefore, connecting to the RDS instance or Aurora cluster across different accounts than the applications becomes a common architecture pattern.
There are a few options to enable this pattern. You can use VPC peering, AWS Transit Gateway, or an AWS PrivateLink custom solution. Each of these options has potential drawbacks. First, you may want to limit exposure to your entire VPC, instead wanting to scope connectivity down to your RDS database. Second, both VPC peering and AWS Transit Gateway don’t work for customers with overlapping CIDR blocks. Lastly, using AWS PrivateLink requires the use of Network Load Balancer plus an AWS Lambda function to make sure the database IP is kept up to date within the load balancer. This adds additional operational overhead and may increase failover times.
By default, the components of your Amazon RDS and Aurora technology stack are all in the same VPC. For example, suppose that an application running on an Amazon Elastic Compute Cloud (Amazon EC2) instance connects to an RDS DB instance or an Aurora DB cluster. In this case, the application server and database must both be within the same VPC.
With RDS Proxy, you can set up access to your RDS databases in one VPC from resources such as EC2 instances or an AWS Lambda function in another VPC. For example, your organization might have multiple applications that access the same database resources and each application might be in its own VPC.
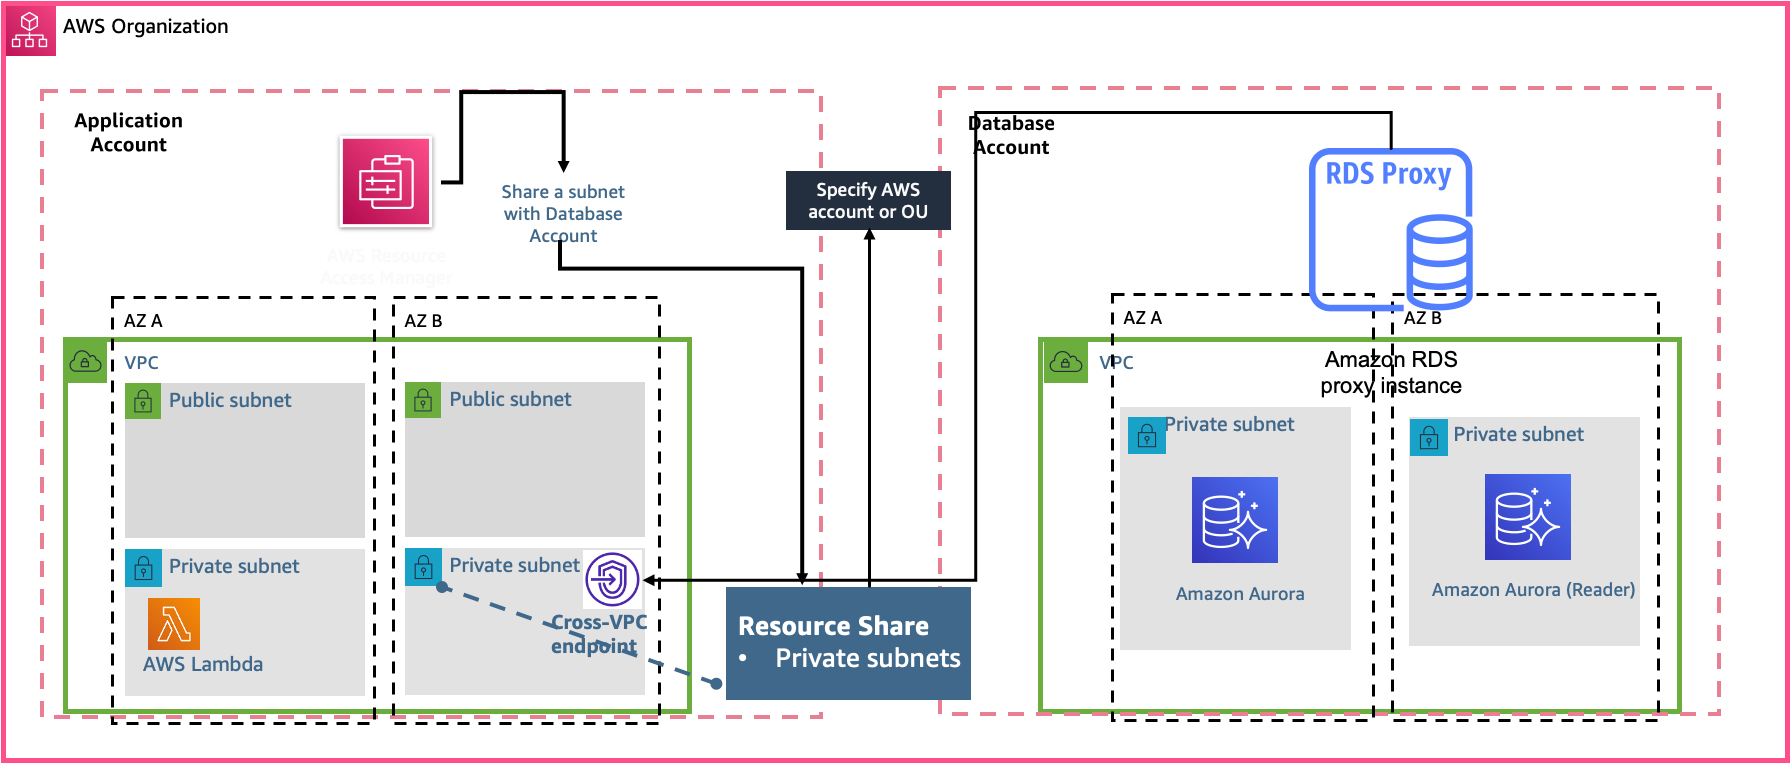
RDS Proxy makes it easy to address this pattern by sharing the VPC subnet as a resource using AWS Resource Access Manager (RAM). You create a new endpoint for the proxy using the subnet resource shared with the account where the RDS instance or Aurora clusters resides. The proxy itself resides in the same VPC as the Aurora DB cluster or RDS instance. However, the VPC endpoint resides in the other VPC, along with the other resources such as EC2 instances. The VPC endpoint is associated with subnets and security groups from the same VPC as the EC2 instance and other resources. These associations let you connect to the endpoint from the applications that otherwise can’t access the database due to the VPC restrictions.
Let’s dive into the steps to set this configuration up.
Solution overview
In this post, we refer to “application” and “database” accounts to demonstrate the cross-VPC capabilities of RDS Proxy. The database account owns the Aurora database and RDS Proxy, while the application account owns the applications, for example microservices running on Lambda that need access to the database resources.
For this post, we created multiple AWS accounts to isolate and manage business applications and data using AWS Organizations, enabled resource sharing within Organizations, and configured a multi-VPC account architecture.
When resource sharing is enabled, you can use AWS RAM to securely share AWS resources that you create in one AWS account with other AWS accounts. In this post, we use AWS RAM to share a private subnet from the database account with the application account. You can monitor RDS Proxy by using Amazon CloudWatch. CloudWatch collects and processes raw data such as DatabaseConnections, QueryRequests, and QueryResponseLatency from the proxies into readable, near-real-time metrics giving you continuous visibility into your proxy. Application teams are responsible for monitoring their proxy and taking actions based on the metrics.
The following diagram illustrates the architecture.
Prerequisites
Before getting started, make sure to complete the following prerequisites:
- Create an organization with all features enabled. With all features enabled, you can share resources at the organization, organizational unit, and account level, and use the advanced account management features available in Organizations such as integration with supported AWS services and organization management policies.
- Enable resource sharing within Organizations.
- Set up the network. RDS Proxy requires you to have a common VPC between your Aurora DB cluster or RDS DB instance and RDS Proxy. This VPC should have a minimum of two subnets that are in different Availability Zones. Your account can either own these subnets or share them with other accounts.
Configure the database
For this post, we use Amazon Aurora PostgreSQL-Compatible Edition. However, RDS Proxy also supports Amazon Aurora MySQL-Compatible Edition, Amazon RDS for PostgreSQL, and Amazon RDS for MySQL.
To create an Aurora PostgreSQL database, complete the following steps:
- Create an Aurora DB cluster with PostgreSQL compatibility.
- For Capacity type, choose Provisioned.
- For Version, choose the latest available version.
- For Templates, choose your production template.
- In the Settings section, under Credential Settings, enter a primary user name and password.
- For Connectivity, choose the VPC that you created earlier.
- Choose the default subnet group.
- Create a VPC security group for your DB instances to be in, following security best practices.
- Create custom rules in the security group for your DB instances that allow connections from the security group of your application instances.
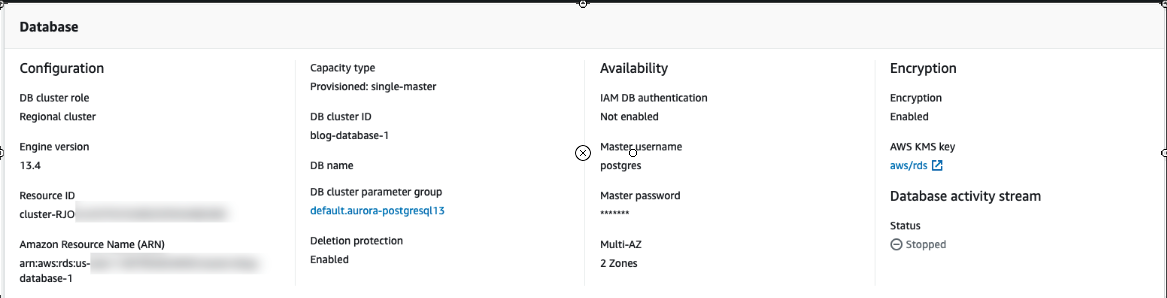
- Leave the other settings as default.For this post, we created the
Multi-AZ Aurora DB cluster blog-database-1with a reader instance.The following screenshot shows the database details.

For each proxy that you create, you first use AWS Secrets Manager to store sets of user name and password credentials. You create a separate Secrets Manager secret for each database user account that the proxy connects to on the RDS DB instance or Aurora DB cluster. - For this post, we create the customer managed AWS Key Management Service (AWS KMS) key
rd-blog-keys, which we use to store credentials for the Aurora database in Secrets Manager.
- After you create the secrets in Secrets Manager, create an IAM policy that can access those secrets.
The resource policy is also configured to access secrets across accounts. For this post, we allow access to the application account.
For more information, see Set up shared database connections with Amazon RDS Proxy.
Configure AWS RAM
If you have multiple AWS accounts, you can create a resource one time and use AWS RAM to make that resource usable by those other accounts. If your account is managed by Organizations, you can share resources with all the other accounts in the organization, or only those accounts contained by one or more specified organizational units (OUs). You can also share with specific AWS accounts by account ID, regardless of whether the account is part of an organization.
We use AWS RAM to share the subnet from application account with the database account.
To create the share using AWS RAM console:
- Enable sharing with AWS Organizations, open the settings page in the console from management accounts in an organization.
- Add the resources that you want to share, in our case we added subnet.
- For each resource type that you include in the share, specify the permission to use for that resource type.
- If only the default permission is available for a resource type, then AWS RAM automatically associates that permission with the resource type and there is no action for you.
- If more than the default AWS RAM managed permission is available for a resource type, then you must choose the permission to associate with that resource type.
- Specify the principals that you want to have access to the resources. In this case we have selected the application account.
The following screenshot shows our resource share.
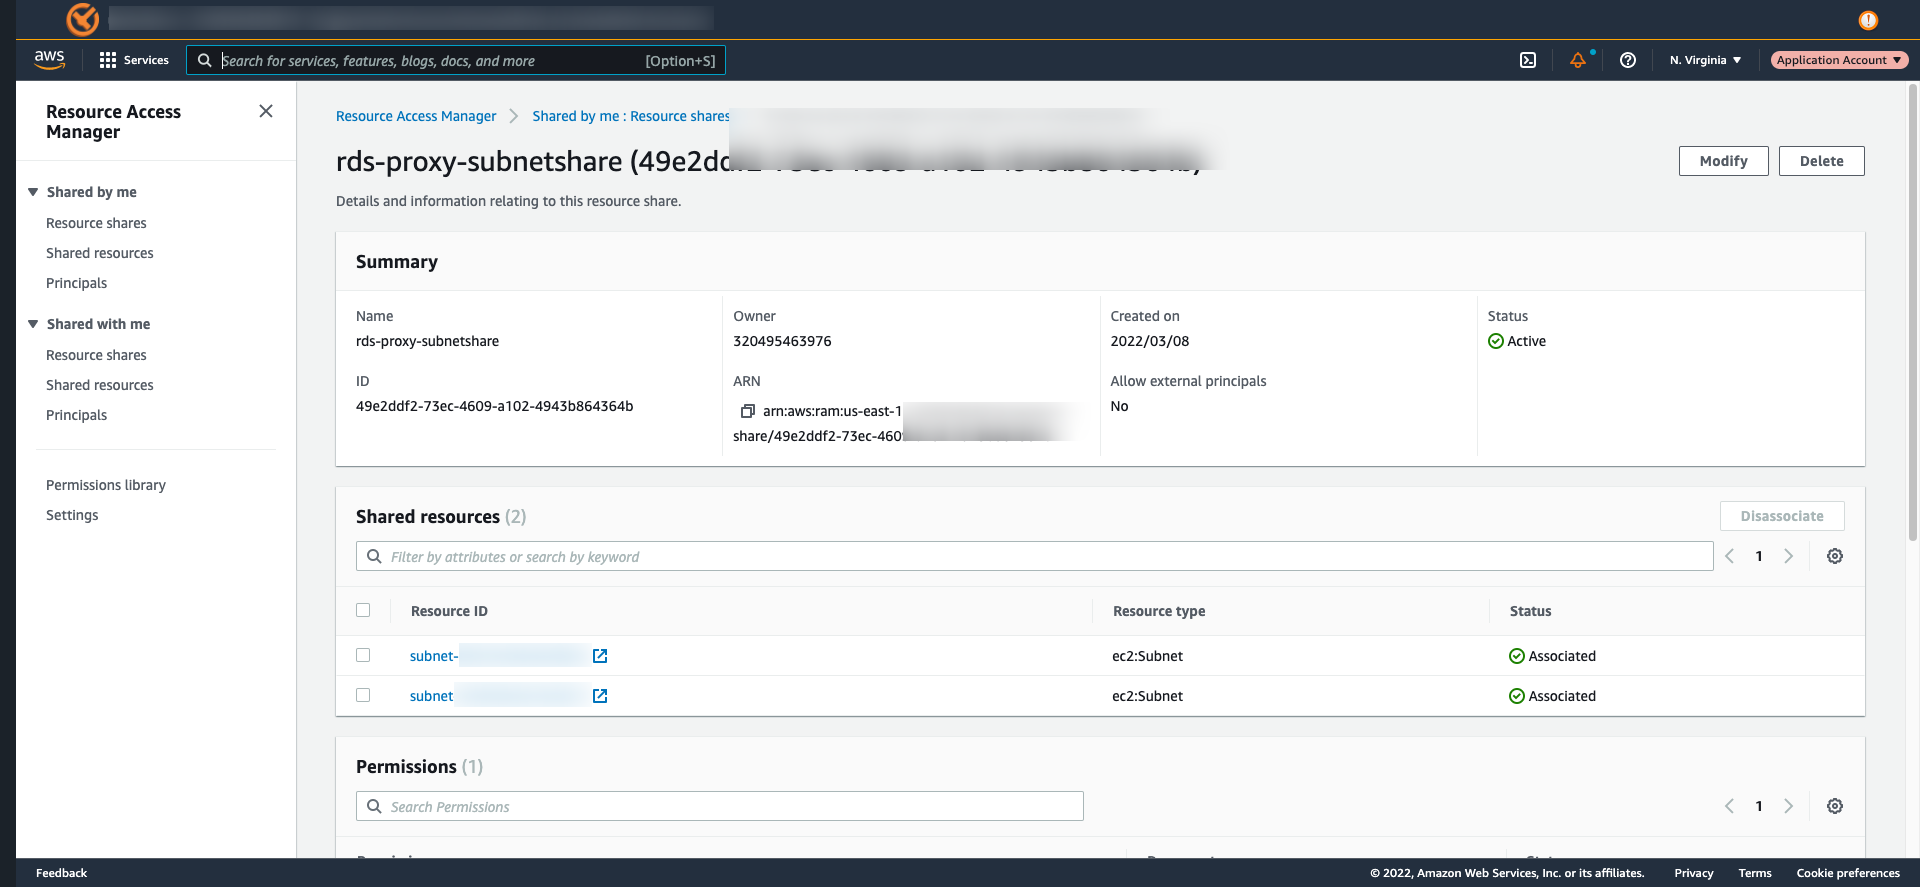
To access the shared subnet from database account, we accept the invitation sent from the application account after the subnet resources were shared using AWS RAM. You can verify the resource shares on the AWS RAM console in the database account.
To respond to the invitations:
- Open the Shared with me: Resource shares page in the AWS RAM console.
- Review the list of resources.
- Select the resource share ID and accept resource share to accept the invitation.
Configure RDS Proxy in the database account
To manage connections for a specified set of DB instances, you can create a proxy. For instructions, refer to Getting started with RDS Proxy.
After you successfully configure RDS Proxy with your local database account, you have to create a proxy endpoint for the application account. This step is only needed for cross account access. We created an RDS Proxy endpoint that the application account can use by specifying the VPC and the subnets shared by the application account in the Connectivity settings.
To create a proxy endpoint for application account to connect to database account:
- Open the Amazon RDS console in the database account, and in the navigation pane, choose Proxies.
- Click the name of the proxy that you want to create a new endpoint for.
- In the Proxy endpoints section, choose Create proxy endpoint, enter a descriptive name.
- Select a Target role from the drop down, in our case Read/write.
- For VPC choose the application account VPC, and the subnets (these are visible after RAM share steps are completed).
- For VPC security group, you can choose an existing one or create a new one.
- Choose Create proxy endpoint.

We followed the best practices for VPC security groups to allow access to the proxy.

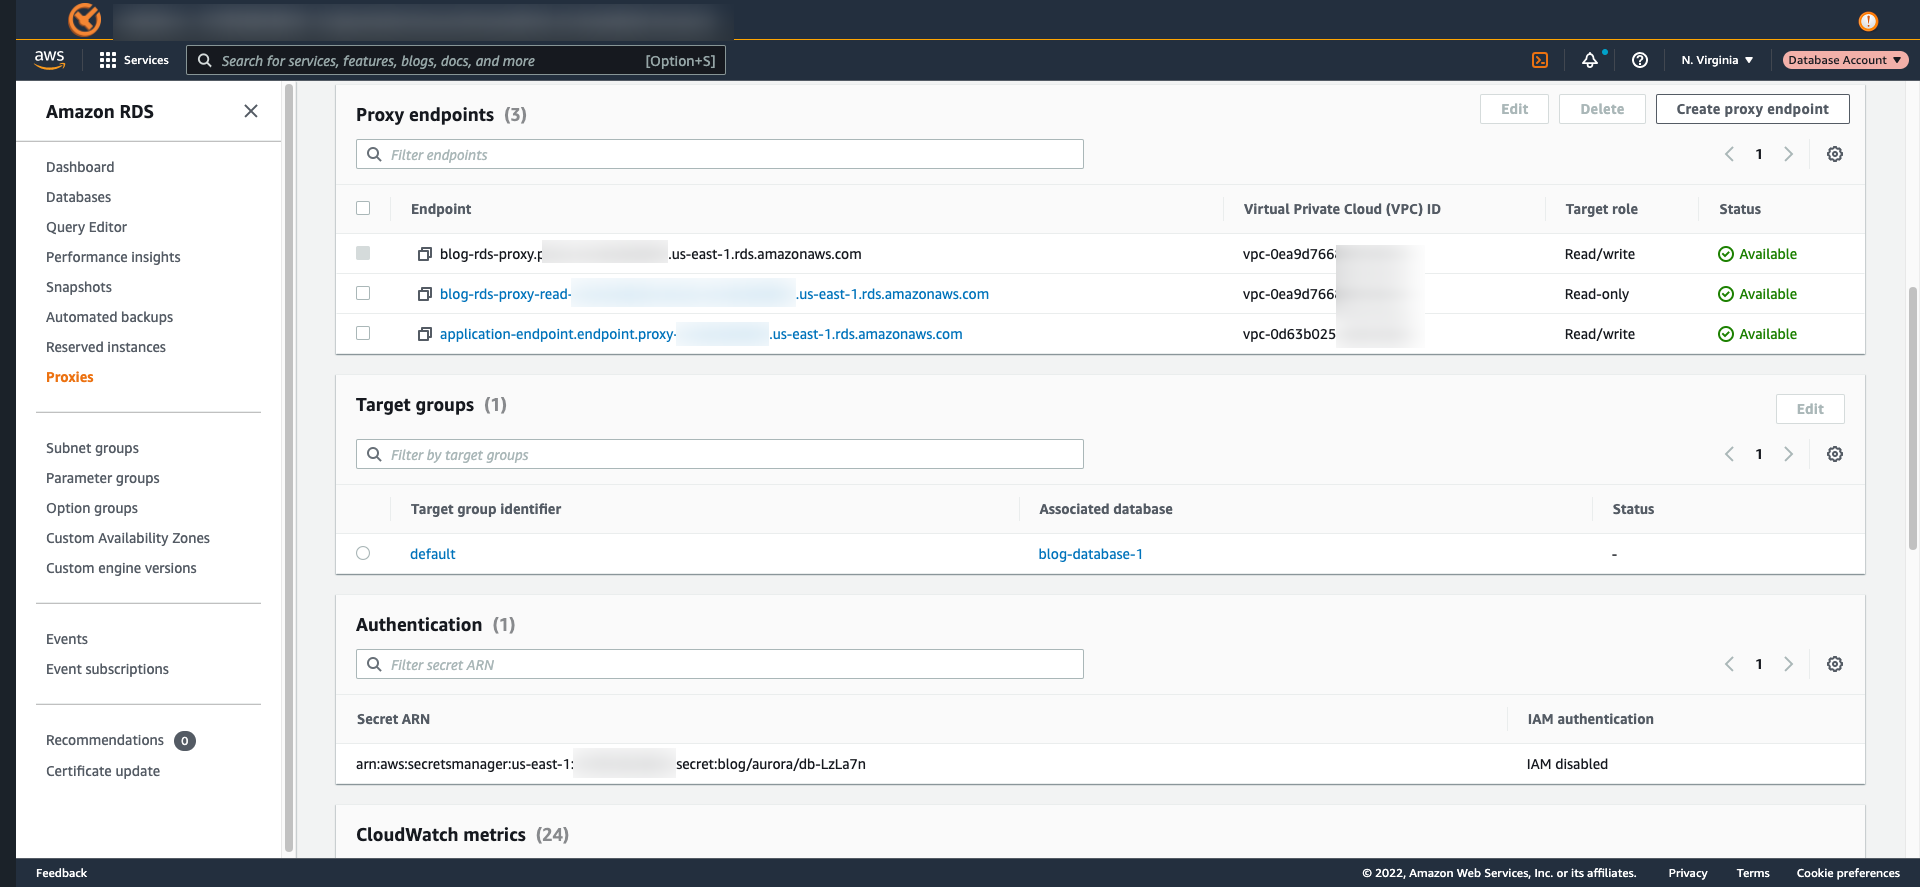
The following RDS Proxy configuration shows the endpoints from the database account, which is local, and the endpoint from the application account, which we created in the preceding steps.
After successful configuration, we use the AWS Cloud9 IDE to test the connectivity to the Aurora database from the application account.
We need the following prerequisites in AWS Cloud9:
- In the terminal session in the AWS Cloud9 IDE, run the following commands to install the prerequisites. For more information on AWS Cloud9 setup guide, refer to this document.
sudo yum install -y jqsudo amazon-linux-extras install -y postgresql11sudo yum install -y postgresql-contrib sysbench
Verify that you are able to connect to Secrets Manager in the database account, and then use the secrets to connect to the RDS Proxy endpoint from the application account. We have tested the connectivity as shown below from the application account using psql command.

You can now access your database using the RDS proxy endpoint that was provisioned in the application account. After you have tested this connectivity successfully, you can configure your application to use this endpoint for connecting to the database server.
Cleanup
After following along, if the resources you created are no longer needed, please delete them to prevent incurring additional charges.
Conclusion
In this post we walked through how to create an RDS Proxy endpoint in a cross-account VPC to connect applications to a shared database. Also, follow the best practices with RDS Proxy to avoid any potential misconfiguration issues. This solution is applicable with the Amazon RDS and Aurora engines and versions supported by RDS Proxy.
Give it a try and let us know your feedback in the comments section.
About the authors
 Ryan Shevchik is a Database Specialist Solutions Architect with Amazon Web Services.
 Sukhomoy Basak is a Solutions Architect at Amazon Web Services, with a passion for Data and Analytics solutions. Sukhomoy works with enterprise customers to help them architect, build, and scale applications to achieve their business outcomes.
 Saikat Banerjee is a Database Specialist Solutions Architect with Amazon Web Services.