Desktop and Application Streaming
Automating AWS Systems Manager activation for Amazon WorkSpaces
July 2025 Update – This approach is no longer recommended for WorkSpaces Personal patch management.
Customers want real-time visibility of their deployed configuration and logs for Amazon WorkSpaces. They want to fully automate patch management and enable application delivery. The core ask is to automate operational tasks for maintaining Amazon WorkSpaces using a service, rather than have to build, and maintain, an operational support infrastructure.
AWS Systems Manager is the operations hub for AWS. Systems Manager provides a unified user interface so you can track and resolve operational issues across your AWS applications and resources from a central place. With Systems Manager, you can automate operational tasks for resources such as Amazon WorkSpaces. You can also group resources using tagging, view operational data for monitoring and troubleshooting, implement pre-approved change work flows, and audit operational changes for your WorkSpaces. Systems Manager simplifies resource and application management, shortens the time to detect and resolve operational problems, and makes it easier to operate and manage your Amazon WorkSpaces deployment at scale.
This blog builds on previous posts on software deployment to Amazon WorkSpaces using AWS Systems Manager and using Amazon API Gateway with Amazon WorkSpaces to interact with AWS Resources. Amazon WorkSpaces are managed as hybrid instances in AWS Systems Manager. Learn how Amazon WorkSpaces can request a valid Systems Manager activation code through API Gateway. Using this activation code, you can automate registration of the AWS Systems Manager Agent (SSM Agent) to reduce administrator overhead to manage Amazon WorkSpace resources using AWS Systems Manager. This functionality can be incorporated into a WorkSpaces bundle launch process, or an Active Directory Group policy script as part of the WorkSpaces provisioning process.
| Time to read | 15 minutes |
| Time to complete | 30 minutes |
| Cost to complete (estimated) | ~ $5 (at publication time) |
| Learning Level | (300) |
| Services used | Amazon API Gateway
Amazon Simple Storage Service Amazon WorkSpaces AWS CloudFormation AWS Lambda AWS Systems Manager |
Overview of solution
This solution automates registration of Amazon WorkSpaces with AWS Systems Manager. The solution is enabled using four AWS CloudFormation stacks.
You create a VPC Endpoint for the API Gateway, Systems Manager and a gateway endpoint to Amazon S3 to enable private connections between your VPC and supported AWS services. You also create two S3 buckets for the configuration and distribution of code for the solution. If you don’t have Systems Manager enabled already, you can run a CloudFormation stack to enable it, or you can run through the documentation guidance. You create an AWS Lambda function to enable the creation of activation codes for WorkSpaces. You use that function to in creating an API Gateway. You can then deploy template scripts that use the API Gateway you have created to automate Systems Manager activation of your Amazon WorkSpaces.
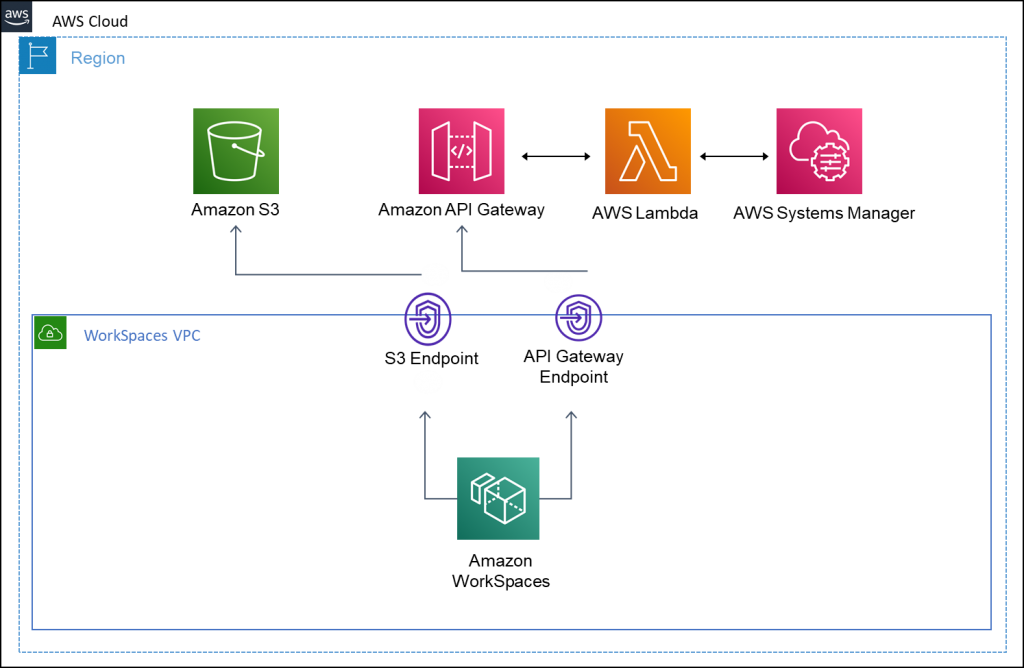
Solution Overview
Walkthrough
You will perform following steps:
- Create VPC Endpoints
- Create IAM roles with trust policy
- Create a private API in API Gateway
- Configure a startup script in Group Policy
- Test with WorkSpaces
Prerequisites
For this walkthrough, you should have the following:
- An AWS account
- An IAM user who can:
- Create a private API, create a method, and deploy it in API Gateway. Read more about IAM policy examples for managing API Gateway APIs.
- Administer WorkSpaces in Amazon WorkSpaces. Read more about administering WorkSpaces.
- Create a new IAM role with a trust policy.
- An Amazon WorkSpaces environment.
- The VPC you are deploying to must have both enableDnsSupport and enableDnsHostnames VPC attributes set to true.
- Basic familiarity with AWS CloudFormation, AWS Systems Manager, and Amazon API Gateway, Amazon WorkSpaces.
- If you are configuring Windows WorkSpaces, familiarity with configuring Active Directory Group Policies.
- If you are configuring Amazon Linux WorkSpaces, familiarity with configuring startup scripts in for Amazon Linux, and creating and deploying Custom Bundles.
Step1: Create VPC endpoint for API Gateway
In the first step you create VPC endpoints for the Amazon S3, Systems Manager and API Gateway in your Amazon WorkSpaces VPC. You also create a security group attached to the endpoint must allow a TCP port 443 from within your VPC. There is an AWS CloudFormation template to automate this configuration.
- Download the SSM VPC Endpoints Setup CloudFormation template.
- Visit the AWS CloudFormation console in your WorkSpaces region.
- Choose Create stack, and then choose With new resources (standard).
- On the Create stack page, select Upload a template. Choose the template you downloaded in preceding step. Select Next.
- Provide a Stack name. For example, ssm-vpcendpoint-setup.
- Provide the information for the CloudFormation template
- The VPC Id for the WorkSpaces VPC
- The two Subnet Ids for the WorkSpaces VPC. Separate the Subnet Ids with a comma.
- The CIDR range for the WorkSpaces VPC
- Choose Next on the Configure stack options page.
- Review the configuration options and choose Create stack. The stack deploys in approximately 4 minutes and creates the following resources:
- Endpoint Security Groups for API Gateway, Group for Systems Manager and for S3
- VPC Endpoints for Systems Manager, S3, and API Gateway
- Verify that the stack has a status of CREATE_COMPLETE.
Step 2: Create Amazon S3 buckets
Creates an S3 bucket for the Systems Manager inventory information for your Amazon WorkSpaces. A bucket policy is also created restricting bucket access to the S3 VPC endpoint created in Step 1.
- Download the SSM S3 buckets setup CloudFormation template.
- Visit the AWS CloudFormation console in your WorkSpaces region
- Choose Create stack.
- On the Create stack page, select Upload a template. Choose the template you downloaded in step 1. Choose Next.
- Provide a Stack name. For example, ssm-S3-setup.
- Choose Next on the Configure stack options page.
- Review the configuration options and choose Create stack. The stack deploys in approximately 2 minutes and creates the following resources:
- An SSM Inventory bucket for WorkSpaces
- Verify that the stack has a status of CREATE_COMPLETE. Note the Output from the CloudFormation Stack build. The output value of oSSMWorkSpacesServerlessBucket is required in Step 4.
Step 3: Configure AWS Systems Manager for first time use
This step creates an initial Systems Manager setup in your account using a CloudFormation template. The template sets up Systems Manager with Patch Baselines for Linux and Windows WorkSpaces. It defines two maintenance windows (on a Sunday, and a Monday at midnight Coordinated Universal TIME( UTC) ), and does a full inventory scan. If you’ve already configured Systems Manager in your account, you can supply the service role you created for hybrid instances. To dive deeper into Systems manager setup and configuration, you can either follow the user guide for Setting up AWS Systems Manager, or follow the AWS Systems Manager Quick Setup guidance.
- Download the Systems Manager setup CloudFormation template.
- Visit the AWS CloudFormation console in your WorkSpaces region.
- Choose Create stack, then select With new resources (standard).
- On the Create stack page, select Upload a template. Choose the template you downloaded in step 1. Choose Next.
- Provide a Stack name. For example, ssm-setup.
- Provide the optional information for the CloudFormation template
- If you have created your own Systems Manager hybrid service roles, enter the IAM profile name.
- Choose Next on the Configure stack options page.
- Review the configuration options. Select the following check box
- I acknowledge that AWS CloudFormation might create IAM resources with custom names
- Choose Create stack. The stack deploys in approximately 4 minutes and creates the following resources:
- An Amazon Linux 2, and a Windows patch baseline
- Two maintenance windows (Sunday and Monday at midnight (UTC) )
- Systems Manager Roles
- Verify that the stack has a status of CREATE_COMPLETE.
Step 4: Create API Gateway
This step creates/updates the Lambda and API Gateway API
- Download the SSM API setup CloudFormation template
- Visit the AWS CloudFormation console in your WorkSpaces region
- Choose Create stack, then select With new resources (standard).
- On the Create stack page, select Upload a template. Choose the template you downloaded in step 1. Choose Next.
- Choose Next on the Configure stack options page.
- Review the configuration options. Select the check box for:
I acknowledge that AWS CloudFormation might create IAM resource with custom names
- Choose Create stack. The stack deploys in approximately 4 minutes and creates the following resources:
- A Lambda function to create the activation. The Lamda function uses an SSM IAM role for hybrid instances defined in the Step 3 for this activation.
- An API Gateway to access the Lambda function
- Identity and Access Management Roles to allow the Lambda function to interact with Systems Manager
- Verify that the stack has a status of CREATE_COMPLETE. Make a note of the Output value for oEucAPIEndPoint – this will be used to update scripts in Step 6.
- (optional) If you are using AWS Managed Active Directory, validate the default global forwarding address on your DNS is set to the corresponding IP address of the AmazonProvidedDNS on the VPC, the VPC+2 address. For more information, review method 1, of concentrating DNS resolution through your Active Directory from integrating your Directory Service’s DNS resolution with Amazon Route 53 Resolvers.
Step 5: Configure script resources for automatic activation
You now have an API Gateway configured, and Systems Manager configured ready and able to help you manage your WorkSpaces. The next step is to configure scripts for automatic activation. The following code builds on software deployment to Amazon WorkSpaces using AWS Systems Manager. There is a code snippet example for Amazon Linux 2 WorkSpaces, and for Windows Workspaces. When creating images for Custom Bundles, remove the SSM agent before creating the image.
In each code snippet, replace the API-VALUE with your oEucAPIEndPoint value. This value was the output from Step 5. Replace the REGIONID-VALUE with the AWS Region code for your Amazon WorkSpaces.
Amazon Linux 2
For testing and validation, you can save the following script to an Amazon Linux WorkSpace, and run it directly.
For deployment at scale, have the script run on WorkSpaces launch and create a custom image. Use this custom image to deploy your Amazon Linux 2 WorkSpaces.
#!/bin/bash
#Uninstall SSMAgent
sudo yum erase amazon-ssm-agent --assumeyes

#Setup Variables
api="API-VALUE"
region="REGIONID-VALUE"
compname=$(hostname)

#Get API Response
response=$(curl -s $api?name=$compname)
acode=$(echo $response | jq --raw-output '.ActivationCode')
aid=$(echo $response | jq --raw-output '.ActivationId')

#Download and Install
mkdir /tmp/ssm
curl s3.amazonaws.com/ec2-downloads-windows/SSMAgent/latest/linux_amd64/amazon-ssm-agent.rpm -o /tmp/ssm/amazon-ssm-agent.rpm
sudo yum install -y /tmp/ssm/amazon-ssm-agent.rpm
sudo systemctl stop amazon-ssm-agent
sudo amazon-ssm-agent -register -code $acode -id $aid -region $region
sudo amazon-ssm-agent -fingerprint -similarityThreshold 1
sudo systemctl start amazon-ssm-agent
Windows
For testing and validation, you can save the following script to an Amazon Windows WorkSpace, and run it directly.
For deployment to Amazon Windows WorkSpaces at scale, create a Group Policy for WorkSpaces that runs the script on startup of a WorkSpace.
#Setup Core Requirements
#Ensure that the Windows environment has powershell version 5.1+ to
#support the restapi calls

[Net.ServicePointManager]::SecurityProtocol = [Net.SecurityProtocolType]::Tls12
Import-Module AWSPowerShell

#Setup Variables
$api = "APIVALUE"
$region = "REGIONID-VALUE"
$ssmregfile = $env:ProgramData + "\Amazon\SSM\InstanceData\registration"
$workingdir = $env:TEMP + "\ssm"
$versionMinimum = [Version]'5.1'

if (-Not [system.diagnostics.eventlog]::SourceExists("SSM-Checkin")) {
    [system.diagnostics.EventLog]::CreateEventSource("SSM-Checkin", "Application")
}

if ((gwmi win32_operatingsystem | select osarchitecture).osarchitecture -eq "64-bit")
{
	$downloadfile = "https://s3.amazonaws.com/ec2-downloads-windows/SSMAgent/latest/windows_amd64/AmazonSSMAgentSetup.exe"
}
else
{
	$downloadfile = "https://s3.amazonaws.com/ec2-downloads-windows/SSMAgent/latest/windows_386/AmazonSSMAgentSetup.exe"
}
if ( Test-Path "$ssmregfile" )
    {
            Write-EventLog -LogName Application -Source "SSM-Checkin" -EventID 1001 -Message "Already registered to SSM ."
    }
else
    {
    if (!(test-path $workingdir))
        {
            New-Item -ItemType Directory -Force -Path $workingdir
        }
    Write-EventLog -LogName Application -Source "SSM-Checkin" -EventID 1021 -Message "Begin Register to SSM for $env:computername"

    if ($versionMinimum -gt $PSVersionTable.PSVersion)
        {
            Write-EventLog -LogName Application -Source "SSM-Checkin" -EventID 1037 -Message "SSM Script requires Powershell 5.1 or later, aborting.."
        }
    else
        {
            push-location $workingdir
            [Environment]::CurrentDirectory = $PWD
            Write-EventLog -LogName Application -Source "SSM-Checkin" -EventID 1036 -Message "WorkingFolder $PWD"

            #Get API Response
            $response = Invoke-RestMethod -UseBasicParsing -Uri ($api+"?name="+$env:computername)
            Write-EventLog -LogName Application -Source "SSM-Checkin" -EventID 1039 -Message "Response:$response"
            $acode = $response.ActivationCode
            $aid = $response.ActivationId
            Write-EventLog -LogName Application -Source "SSM-Checkin" -EventID 1032 -Message "ActivationCode:$acode ActivationId:$aid"

            #Download and Install
            Write-EventLog -LogName Application -Source "SSM-Checkin" -EventID 1031 -Message "WorkingFolder $PWD DownloadFolder: $workingdir"
            New-Item -ItemType directory -Path $workingdir -Force
            (New-Object System.Net.WebClient).DownloadFile($downloadfile, $workingdir + "\AmazonSSMAgentSetup.exe")
            Start-Process $workingdir\AmazonSSMAgentSetup.exe -ArgumentList @("/quiet", "/log", "install.log","ALLOWEC2INSTALL=YES", "CODE=$acode", "ID=$aid", "REGION=$region") -Wait
            Write-EventLog -LogName Application -Source "SSM-Checkin" -EventID 1021 -Message "End Register to SSM."
			Start-Process -FilePath "C:\Program Files\Amazon\SSM\amazon-ssm-agent.exe" -ArgumentList '-fingerprint','-similarityThreshold 1'
			Write-EventLog -LogName Application -Source "SSM-Checkin" -EventID 1041 -Message "Configured similarityThreshold"
        }
    }
Step 6: Validate WorkSpaces are available in Systems Manager
You now have an API Gateway configured, and Systems Manager configured.
- Visit the AWS Systems Manager console in your WorkSpaces region.
- In the navigation pane, choose Inventory from Node Management.
- View the WorkSpaces that have run the activation script in the Corresponding Managed Instances section
Cleaning up
With AWS Systems Manager you can set your account and AWS Region-level settings for hybrid instances to either standard or advanced. With standard on-premises instances, you will be able to register up to 1,000 Amazon WorkSpaces, per account, per Region at no additional charge. To clean up the environment, unregister the WorkSpaces from Systems Manager, then delete each of the AWS CloudFormation stacks you created in the walkthrough. Remove the Group Policy Startup scripts, and the Linux launch image if you have created them.
Conclusion
In this solution you configured an Amazon API Gateway with AWS Lambda functions to automatically generate activation codes for SSM Agent enablement. You have incorporated this into either a WorkSpaces bundle (Linux), or Active Directory Group policy (Windows) to ensure WorkSpaces are automatically assigned to AWS Systems Manager as part of the WorkSpace provisioning process.
Systems Manager advanced on-premises instance management is priced on a pay-as-you-go basis. See the pricing page for details. Visit the AWS Systems Manager documentation or product page to learn more about this service.