AWS for Industries
Making Site Selection Decisions Easy With AWS Data Exchange for Amazon Redshift
Many quick service restaurants (QSRs) and dining brands rely on third-party point-of-interest data to understand if they’re making the right market expansion moves. For example, a QSR looking to place its first location in New York City may want to know the clustering of bars and nightlife venues in Manhattan to set hours of operation that take advantage of the late-night dining scene and maximize profits based on real-world behaviors.
Licensing Foursquare Places (point-of-interest) data and plotting—not just bar and nightlife venues but over one thousand other venue categories—against a market map or standard visualization could help inform where exactly it makes sense to build a location in your newest market.
But as you might know, when it comes to building your own data warehouse and supporting increasing amounts of datasets, organizations are facing infrastructural headwinds in transferring, organizing, and unifying data in the data warehouse. Now, with the recently announced service from Amazon Web Services (AWS) AWS Data Exchange for Amazon Redshift, which helps customers find and subscribe to third-party data, you can readily access data without the need to manage disparate datasets in your data storage. Using the data-share feature from Amazon Redshift, which analyzes structured and semistructured data, you can quickly query, analyze, and build your applications without the overhead of dataset management. The new service gives you all the power of Amazon Redshift features, like federated queries, a simple API, painless access using most programming languages, Amazon Redshift ML, and much more.
In this blog post, I show you how you can build your analytics using AWS Data Exchange for Amazon Redshift, Amazon Location Service map for visualization, and AWS Amplify, a set of purpose-built tools and features that lets front-end web and mobile developers quickly and easily build full-stack applications on AWS. Using AWS Amplify, you can simplify adding authentication through Amazon Cognito, a simple and secure user sign-up, sign-in, and access control, and Amazon Redshift API. To build a sample React application from the programmatic side, I use Mapbox GL JS to render interactive maps and specifically a React wrapper (react-map-gl) and Redshift Data Client to retrieve data from Amazon Redshift. Note, this blog post does not provide the detailed guidance for the infrastructure production configuration as well as third-party tools like Mapbox. It outlines the approach and possible high-level solution, and assumes a development team has necessary experience with AWS services and tools mentioned in the article.
Solution overview
- Subscribe to Foursquare from AWS Data Exchange for Amazon Redshift.
- Create an Amazon Redshift cluster and database from datashare.
- Create a React application and install Amazon libraries.
- Add Amazon Location Service map and library to work with the map.
- Add authentication to React application.
- Configure permissions to access Amazon Redshift from the application.
- Retrieve data from Amazon Redshift and transform it to geojson format.
- Play with visualization.
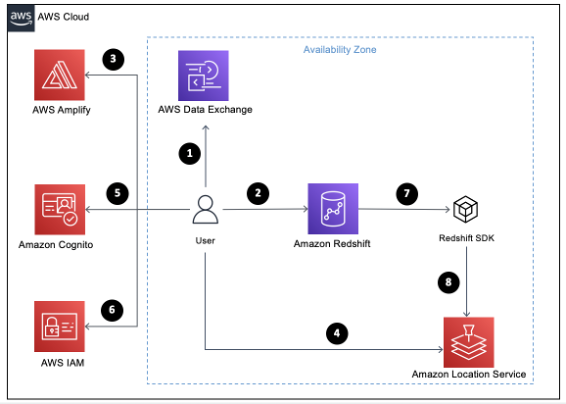
Figure 1 Reference architecture for the proposed visualization sample
Below in the blog post, I will cover all steps in details and provide additional links that can help you to build and customize your own application.
Step 1: Subscribe to Foursquare from AWS Data Exchange for Amazon Redshift
To subscribe to a data product, you can follow these steps:
- Sign in to your AWS account and navigate to AWS Marketplace Subscriptions – Discover products or AWS Data Exchange – Browse catalog. Search for Foursquare and select Foursquare Places 2021: New York City Sample (Redshift accessible).
- On the data product page, choose Continue to Subscribe
- Under Complete Subscription, for Pricing Information, choose a product offer and fill out the subscription request.
- Once the subscription has been approved by Foursquare and is active, open the subscription.
Note: Foursquare’s New York City sample is a limited trial version of data and not meant for business evaluation.
You can learn more about how to work with AWS Data Exchange for Amazon Redshift datasets as a consumer here.
Step 2: Create an Amazon Redshift cluster and database from datashare
To start querying data, you need to create a database from Foursquare’s datashare. At the backend, Amazon Redshift provides you read-only access to live data without copying it. But the database concept is used to control granular access to the data.
- Navigate to Amazon Redshift in AWS Management Console. Select an Amazon Redshift cluster if you already have one to use. Otherwise, follow the documentation to initialize a new cluster.
- Connect to Amazon Redshift query editor. You can check datashares available to you using the following:
SHOW DATASHARES like 'fsq%';
Find share_name, producer_account, and producer_namespace and place them into this statement to create the database from Foursquare data share with the following statement:
CREATE DATABASE <your_database_name> FROM DATASHARE < share_name> OF ACCOUNT <producer_account> NAMESPACE <producer_namespace>;
You can also do the same steps using AWS Management Console, which has everything you need to access and manage the AWS Cloud. Detailed information can be found in AWS documentation.
- Refresh databases list on the left to see the new database created. Now you can start querying the data:
SELECT name, longitude, latitude, address, locality as city, region as state, postcode, country, neighborhood, fsq_category_labels, hours_display FROM <your_database_name>.public.places_nyc_quality;
Foursquare documentation provides a detailed schema description you can use to customize your query.
Note that not all Foursquare’s schema is provided in the New York City trial sample.
Step 3: Create a React application and install Amazon libraries
In this section, I use AWS Amplify for accessing Amazon Location Service. I describe those steps briefly here to overview the process.
- Create React application.
If you need more information about how to start with a React project, please check React documentation. Check that your React application is up and running by using nmp start and navigating to http://localhost:3000.
- Install SDK dependencies.
- Initialize AWS Amplify.
- Initiate AWS Amplify to deploy changes to AWS.
You can navigate to AWS Management Console to see your AWS Amplify application created and to explore it. You can also check full AWS Amplify documentation for more information.
Step 4: Add Amazon Location Service map and library to work with the map
- Create a new Location Service map using AWS Amplify and deploy changes to the cloud.
- To work with the Location Service map in the React application, you need to install react-map-gl, which allows you to easily use Mapbox GL JS in the React application.
To use the latest version of react-map-gl, you need the Mapbox API access token. Please follow the documentation how to use it securely. You can use older version 5 and earlier of react-map-gl, which is compatible with Amazon Location Service without Mapbox API token specified as well.
Step 5: Add an authentication to React application
In my demo application, I use Amazon Cognito to provide basic authentication. Users will see a simple login page to enter the password before accessing our map.
- Add authentication layer using AWS Amplify according to the documentation.
- In this blog post, I use Amazon-location-helpers library to easily authenticate.
- Add reference to your code
and wrap your app with authentication function.
- Navigate to your AWS Amplify application in AWS Management Console, Backend Environments tab, and go to Authentication category. You can find Users pool name and navigate to Amazon Cognito to manage it:
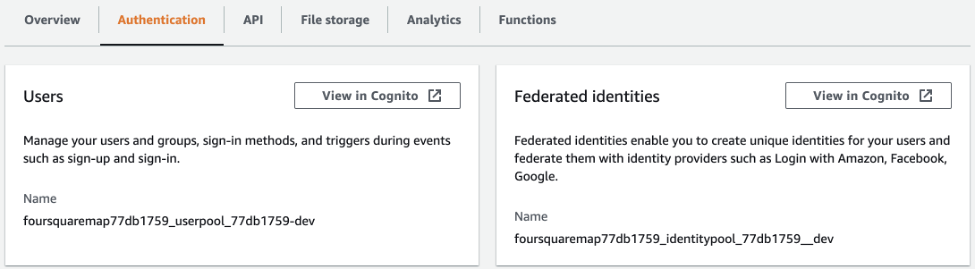
- Go to Users and Groups and create a new user you can use to authenticate in your React application. For more information, you can check AWS Cognito documentation.
Step 6: Configure permissions to access Amazon Redshift from the application
When AWS Amplify creates an authentication category, the framework adds several roles related to your application. You can find the list of created resources in the AWS Amplify application.
- Navigate to the console in AWS Identity and Access Management (AWS IAM), which provides fine-grained access control across all of AWS, and search for amplify* roles. Find the one that was created for authenticated users (it looks like amplify-<you amplify app>-dev-<number>).
- Open the role and go to the Permissions section. Click AttachPolicies, find AmazonRedshiftReadOnlyAccess, and attach the policy.
Note that you can create a stricter custom policy or use one of the predefined policies to limit access to the data.
Step 7: Retrieve data from Amazon Redshift and transform it to geojson format
- Install AWS SDK, which provides all the methods needed to work with Amazon Redshift API.
- Add a reference to your application, initialize the Amazon Redshift data client, add initiate statement, and get statement result calls.
- To retrieve the data from the database created earlier, I used API methods executeStatement, describeStatement, and getStatementResult.
- Transform retrieved data to the Feature collection to assign as geojson source to the map (see Adding Custom Data documentation).
Step 8: Play with visualization
In this blog post, I use clusters for intuitive visualization. You can also add additional map overlays to see relationships with any other data that you have in your data warehouse. From these initial visualizations, you can drill down into neighborhood and zip-code-specific clustering of certain venue categories to make your decisions. You also can configure your map with additional map controls and filters using React Map GL or directly Mapbox GL JS.
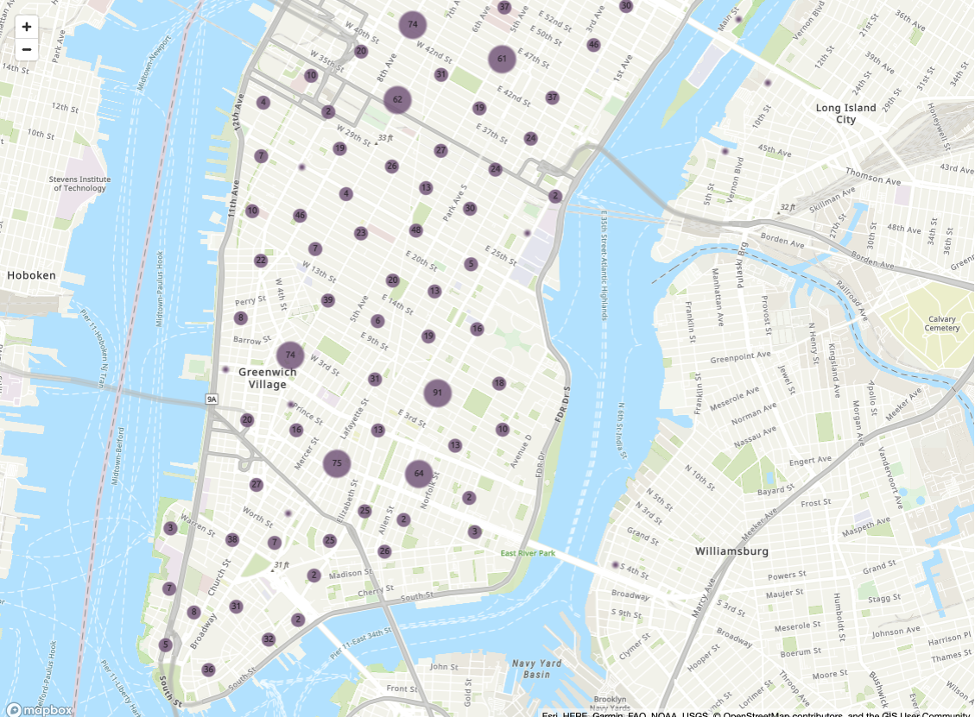
Figure 2 NYC Dining POI clusters
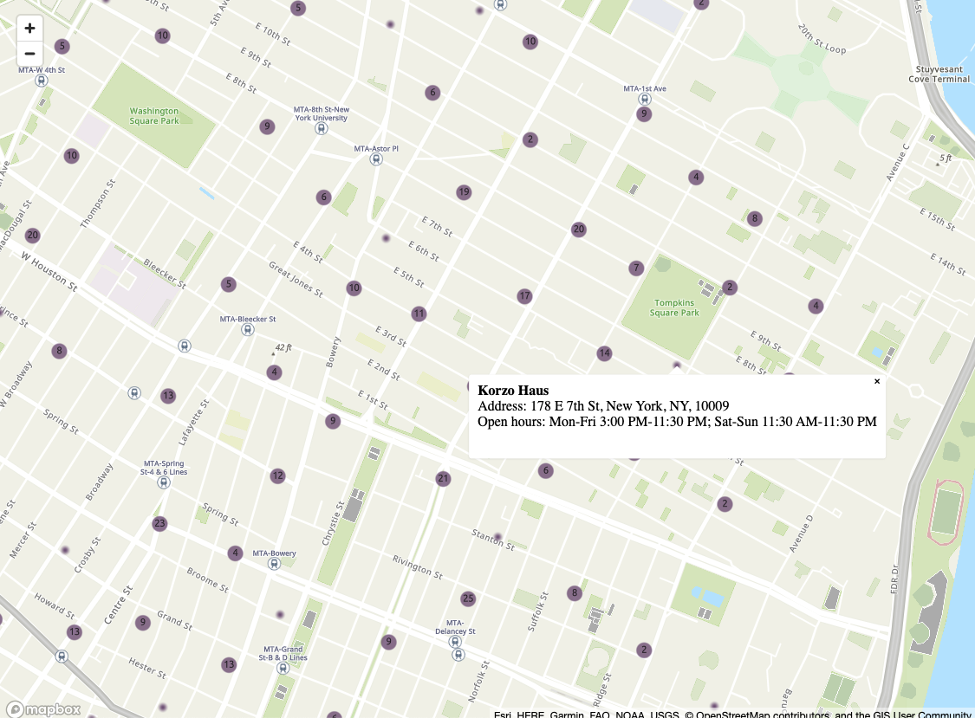
Figure 3 Zoom in NYC Manhattan clusters and POI information
Conclusion
In this post, I showed you how to subscribe to Foursquare, a third-party location data provider, and use the new AWS Data Exchange for Redshift feature to query data in minutes. As a next step, you can enrich your data with additional attributes from the same Amazon Redshift cluster or even use this federated query feature for data access across operational databases, data warehouses, and data lakes. Your data scientists can also use Amazon Redshift ML all without the overhead of managing data in your Amazon S3 bucket. For data visualization, you can use Amazon QuickSight, Amazon Managed Grafana, or display data on the map powered by Amazon Location Service. To simplify Amazon Redshift setup, you can soon use a serverless version of Amazon Redshift to make scalability easier without the need to create and manage Amazon Redshift clusters.
Foursquare, an AWS Travel and Hospitality Competency Partner, empowers businesses to make deliberate decisions. Hotels, restaurants, airlines, and other hospitality companies can now enhance customers’ satisfaction, predict customer needs, offer relevant experiences, and grow their businesses. Location-aware experiences wouldn’t be possible without the data that lies beneath those decisions.