AWS for M&E Blog
Delivering a reliable live video stream using AWS Elemental Link and Amazon IVS
Working remotely has become more common, so many customers are looking for easy-to-setup and cost-efficient ways to deliver a reliable live video stream to their customers, colleagues, and business partners. For example, an auctioneer may want to stream their auctions for online bidding or a teacher may need to deliver remote lectures with live Q&A. For use cases like these, delivering a reliable live stream, even if you have poor network connectivity, is vital to ensuring your audience has a good experience.
In this blog post I show you how to use AWS Elemental Link and Amazon Interactive Video Service to deliver an easy to set up and reliable live video stream that can be embedded in your website or mobile application. AWS Elemental Link is a small, portable, and easy-to-setup device that delivers high-quality HD videofrom your HDMI or SDI source to AWS Elemental MediaLive. AWS Elemental Link uses an advanced video compression technology that continuously adjusts to available bandwidth in order to deliver the best video quality available under all network conditions. AWS Elemental MediaLive encodes an RTMP output that can be ingested by Amazon Interactive Video Service. Amazon IVS is a managed, easy to use live streaming service built on same technology that powers twitch.tv. With Amazon IVS you can create and configure live streams with just few clicks, and start streaming in seconds.
Requirements
- An AWS Elemental Link device, which can be ordered directly from the AWS Management Console: https://aws.amazon.com/medialive/features/link/
- A HDMI or SDI video source. For example, a camera recording your live event
- A wired internet connection (Ethernet)
- Access to AWS account associated with the AWS Elemental Link device
Overview
In this solution, I show you how to take an HDMI or SDI output from your video source and feed it to an AWS Elemental Link device. The AWS Elemental Link device must be connected to the internet via a wired connection (Ethernet). Once the AWS Elemental Link device detects the video input and active internet connectivity, it starts streaming video to AWS Elemental MediaLive. AWS Elemental MediaLive encodes your live stream and pushes the RTMP output to Amazon Interactive Video Service channel. Amazon IVS then transcodes, packages, and delivers a reliable live stream for your audience to consume via the Amazon IVS player SDK, which you can embed in your website and/or mobile application.
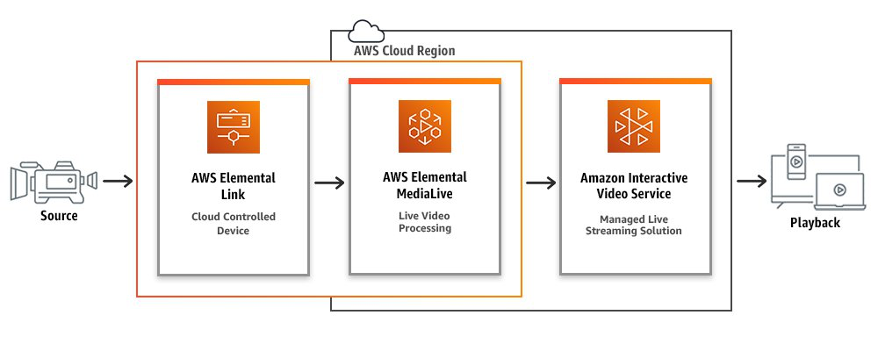
Solution workflow diagram showing various AWS services that video content will pass through.
Tutorial
Create an Amazon IVS channel
First, you need to create an Amazon Interactive Video Service Channel. The IVS Channel hosts and distributes our streaming video to viewers. Viewers watch the video using the IVS Player SDK, which you can embed in your website and/or mobile application. To create the IVS channel:
- Log into your Amazon IVS Console.
- In the Get started box, click Create Channel.
- In the Setup box select Default Configuration and specify a Channel name.
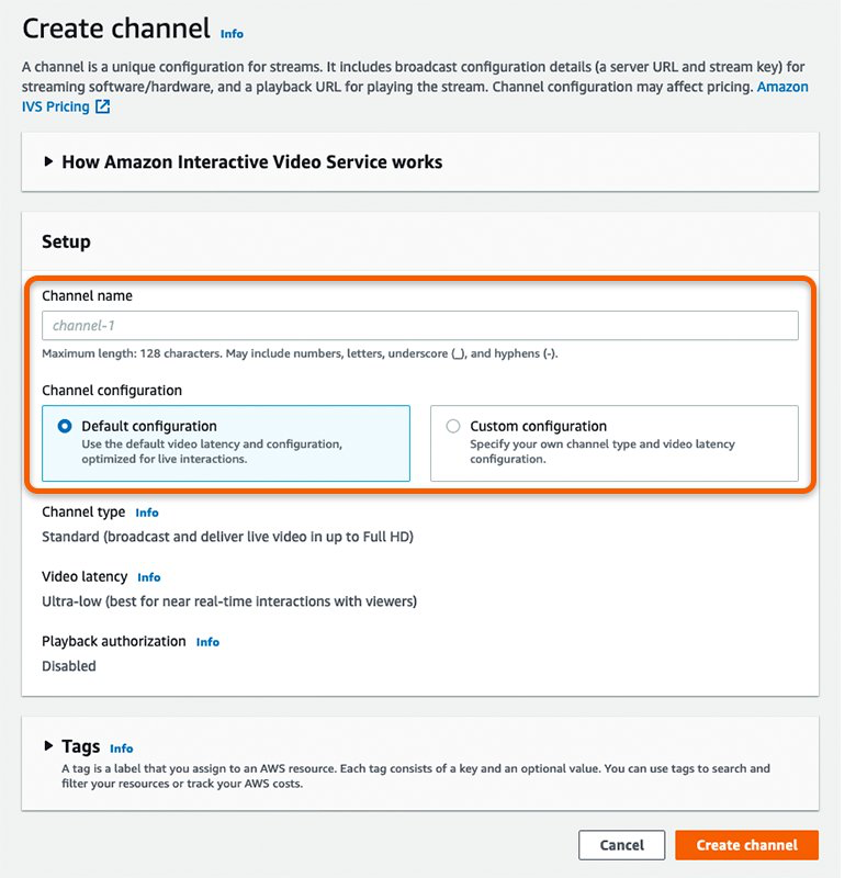
Screenshot of the create channel dialog box with channel name text box on top of setup section.
- Click Create Channel.

Screenshot of channel details page with Ingest server URL, Stream
- After the channel is created, review the details page and make a note of the Ingest server, Stream key and Playback URL values. You use these in next step. Ingest server is the address where IVS receives an incoming RTMP video stream, authenticated using the Stream key. The Playback URL is the endpoint used by the IVS Player SDK to access the live video output by the channel.
Create an AWS Elemental MediaLive Channel
You use AWS Elemental MediaLive to deliver video from our camera to the Amazon IVS service.AWS Elemental MediaLive is a cloud based video encoding service that is integrated with the AWS Elemental Link device. MediaLive receives the video input from the Link device and transcodes, packages, and delivers this to Amazon IVS in an optimized format. To create the AWS Elemental MediaLive Channel do the following steps:
- Log into AWS Elemental MediaLive Console and click on Devices in the navigation pane on the left to view the Link devices associated with this account. Make sure that the Device ID listed on AWS Management Console matches the one on at the bottom of your Link device.
- Click on Channels in the navigation pane, and then choose Create Channel. In General info box, specify a Channel name. Under IAM role, choose Create role from template. Click on Create IAM role.

Screenshot of general info box in MediaLive channel creation page
- With Link device as the input source, MediaLive supports two types of channels, Standard channel with two redundant input pipelines and Single_Pipeline with one input pipeline. An Amazon IVS channel supports only one RTMP input, so for this solution, under Channel Class select SINGLE_PIPELINE from the drop-down menu.

Screenshot of general info box in MediaLive channel creation pag
- In Input attachments, click on Add. In the Attach Input box, select your AWS Elemental Link device and click Confirm.

Screenshot of Attach input box with elemental link device as dropdown menu item in MediaLive channel creation page.
- In Output groups, click on Add. Select RTMP from the Add Output group box and click Confirm.

Screenshot of Add output group box with RTMP as an option in
- Under the RTMP settings of the output group you just created, specify a Group Name. Click on Settings for the RTMP Output 1.

Screenshot of RTMP output group settings box in MediaLive channel creation page with RTMP output settings link at the bottom
- Now we configure the RTMP settings so that AWS Elemental MediaLive can push the live stream to Amazon IVS. In RTMP destination A enter the IVS Channel Playback URL and Stream key captured from IVS channel creation step in following fields:- IVS Channel playback URL in URL textbox
– Stream key in Stream Name textbox
Screenshot of RTMO destination A box in RTMP outputs settings page with text box for URL and Stream Name in RTMP output settings page
- Scroll down to the Stream settings section. Here you configure the video resolution output by MediaLive for delivery to Amazon IVS. Amazon IVS supports Full HD, HD, and SD resolutions. The following is table of stream settings for different resolution supported by Amazon IVS.

- For this tutorial, let’s push the HD video stream to Amazon IVS. In Video under Stream settings, specify 1280 as Width and 720 as Height in pixels for the output video. Under Codec Settings, select H.264. H.264 is a widely used standard for high-definition digital video. It enables great video compression while still maintaining the high video quality. Amazon IVS currently only supports H.264 video codec.

Screenshot of video tab in stream settings box with width, height and codec settings text box in RTMP outputs settings page
- Click on Audio 1 to configure the Audio output settings. MediaLive can encode audio in variety of formats. For use with Amazon IVS we select Aac under Codec Settings. Aac is the successor of the MP3 and generally achieves higher sound quality than MP3 at the same bitrate. Amazon IVS currently only supports Aac audio codec.

Screenshot of audio tab in stream settings box with codec settings drop down menu in RTMP outputs settings page.
- Now that you have configured the MediaLive channel click on Create Channel.
Set up your AWS Elemental Link Device
Now that you have configured your AWS infrastructure to receive, transcode, and deliver your live stream, it’s time to start streaming video to the cloud. Follow these steps to start delivering video from your AWS Elemental Link to AWS Elemental MediaLive:
- Connect a network cable from your internet connection to AWS Link device’s Ethernet port.
- Connect your video source to the Link device with a HDMI or SDI cable.
- Plug in the Link device to power outlet using provided power adapter.
- As the device powers up and initializes the front panel indicators light up. They should show as follows:
a. Power: Blue
b. Online: Blue
c. AWS Link: Blue
d. Streaming: Blue (once the video source is active). Otherwise, the indicator does not light up.
Verify and start your live stream
- Once the Streaming indicator lights up, the live stream from your video source is being pushed to MediaLive on AWS.
- Open your MediaLive Channel console and click on devices. Here you should see a preview of what the AWS Link device is streaming to AWS MediaLive.

Screen shot of Link device video preview in devices page on
- To launch the AWS Elemental MediaLive channel to begin transcoding and delivering video to Amazon IVS, click on Start on the Channel Details page. Note that AWS Elemental MediaLive Output charges start to accrue once you launch the channel, so make sure you see the preview on the preceding step before launching.

A screen shot of status box in MediaLive channel details page.
- After a short time, the channel status box should show the channel status as green. This means the MediaLive channel is active, is ingesting a live stream from Link device, and is pushing it out to Amazon IVS over RTMP protocol.
- Navigate to your Amazon IVS Channel Console and click on the channel you just created. Expand the Live stream box to see LIVE in the status, and the live stream broadcasting from your video source.

A screen shot of player window in Amazon IVS channel details page showing live streaming video content.
Clean up
To stop your stream, on MediaLive console under channel details, click on stop. Make sure that the AWS Elemental Link device is turned off. Amazon IVS only charges for the time the channel is in use. However, there is a nominal charge of $0.01 USD an hour on a prorated basis for idle AWS Elemental Link inputs attached to a stopped MediaLive channel.
Conclusion
With an AWS Elemental Media Link device and Amazon IVS you can create a reliable, virtually configuration free, low-latency live stream in minutes. The AWS Elemental Link device ensures that you get quality video stream irrespective of network conditions. Amazon IVS takes care of your video processing, ingesting, and delivery needs out of the box. You can leave the AWS MediaLive channel and Amazon IVS channel configured so the next time you want to live stream all you have to do is start the AWS MediaLive channel and direct your viewers to the IVS Playback URL in your website or mobile app.
For adding interactivity to your live stream such as polls, Q&A, chats etc., you can use the Timed Metadata feature of Amazon IVS. Read this 3 part blog post series to learn more: Using Amazon Interactive Video Service timed metadata.
Happy Streaming!
This post was guest authored by Anshul Somani.