Microsoft Workloads on AWS
Containerize your legacy ASP.NET application in a few clicks using AWS Migration Hub Orchestrator
Customers are increasingly adopting containers to provide a consistent, powerful environment for their applications to easily run and scale anywhere. Amazon Web Services (AWS) container services make it easier to manage your underlying infrastructure so you can focus on innovation.
In 2020, AWS launched AWS App2Container (A2C), a tool that helps customers containerize legacy ASP.NET and Java applications without making any code changes. While A2C is a very powerful tool that provides extensive customization capabilities, customers have been asking for a guided experience to help them containerize and deploy their applications to Amazon Elastic Container Service (Amazon ECS) without the need to download and install additional tools, such as A2C.
The newly-released replatforming template in AWS Migration Hub Orchestrator addresses this need. You can now containerize and deploy ASP.NET and Java applications to Amazon ECS on AWS Fargate, a serverless, pay-as-you-go compute engine for containers, in a few clicks directly from the AWS Management Console.
In this blog post, we will cover how to containerize and deploy an ASP.NET application running on an Amazon Elastic Compute Cloud (Amazon EC2) for Microsoft Windows Server instance to Amazon ECS on AWS Fargate using AWS Migration Hub Orchestrator. To containerize and deploy an application running on premises to Amazon ECS on AWS Fargate, you can use the rehost applications on EC2 template in AWS Migration Hub Orchestrator to rehost your application to Amazon EC2, and then follow this post to containerize and deploy the application to Amazon ECS on AWS Fargate.
Prerequisites
For this tutorial, you should have the following resources provisioned:
- An Amazon Simple Storage Service (Amazon S3) bucket to store artifacts that AWS Migration Hub Orchestrator will generate while it executes.
- An Amazon EC2 instance running the ASP.NET application that you want to containerize. The Amazon EC2 instance should be a managed node in AWS Systems Manager and have an instance profile role with the necessary permissions attached.
- A supported ASP.NET application.
In this blog post, we will use a real-world, open-source application called nopCommerce. The current versions of nopCommerce are based on ASP.NET Core. Since we want to focus on legacy ASP.NET applications built on .NET Framework, we will use nopCommerce version 3.90, which is built on .NET 4.5.1. The nopCommerce application we’re using in this blog post is installed on an Amazon EC2 instance running Windows Server 2022, IIS 10, and .NET 4.5.1.
Process
To get started with AWS Migration Hub Orchestrator, go to the AWS Migration Hub console and choose Workflow templates to create a new workflow, as shown in Figure 1.
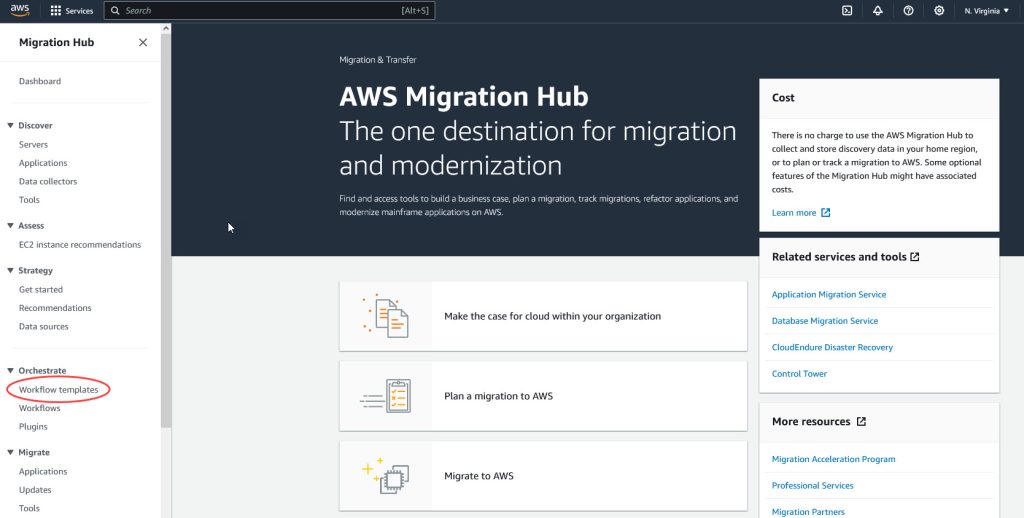
Figure 1 – Workflow templates in AWS Migration Hub console
Choose the workflow template Replatform applications to Amazon ECS and choose Create Workflow (Figure 2). This workflow template is a playbook for executing the replatforming workflow and includes:
- Steps in the replatforming process and their dependencies;
- Services, solutions, and scripts required to automate the replatforming step; and
- Required input parameters, such as source virtual machine, application name, target container settings, and target cluster settings.
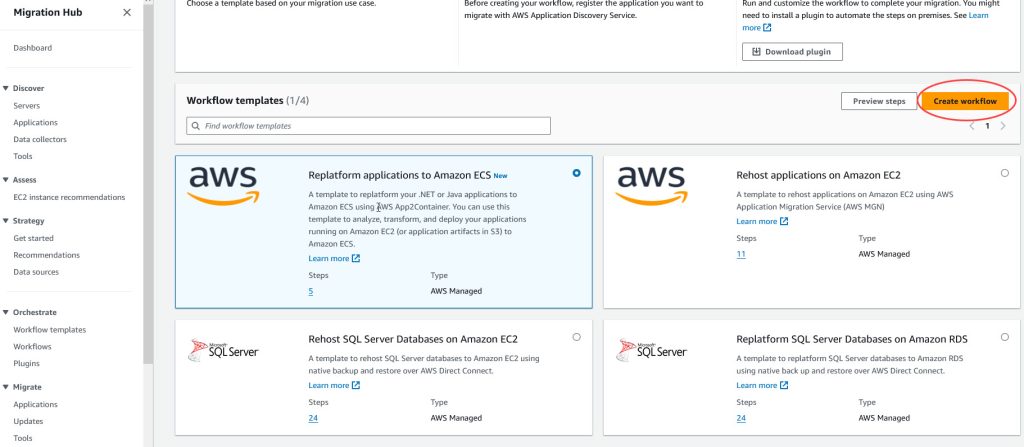
Figure 2 – Replatform applications to Amazon ECS template
To configure your workflow, provide the following details (Figure 3):
- Provide name for your workflow.
- Select AWS Region where the application to be containerized is running.
- Select the Amazon EC2 instance running your application.
- Select the Amazon S3 bucket that Migration Hub Orchestrator will use to store application artifacts as it executes the workflow. Note that the S3 path to store the application artifacts must have the folder prefix application-transformation. An example path is s3://my-bucket/application-transformation-app1.
- Optionally, select AWS Key Management Service key for encrypting resources used by this workflow.
- Optionally, provide a description and tags.
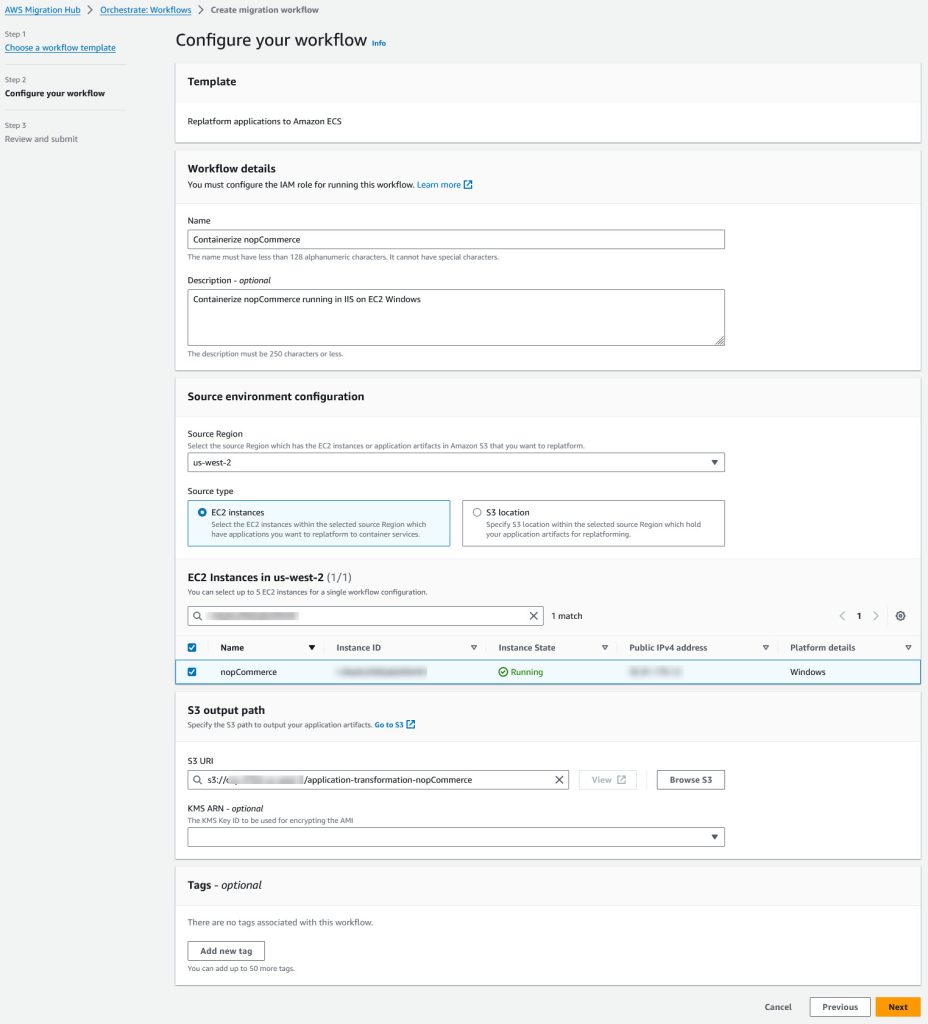
Figure 3 – Configure your workflow
Choose Next to proceed to the Step 3 Review and Submit screen. On this screen, review your configuration and choose Create to create the workflow. It will take several minutes to create your workflow.
When the workflow creation is complete, confirm that your workflow Status is set to Not Started in the list of workflows, as shown in Figure 4.
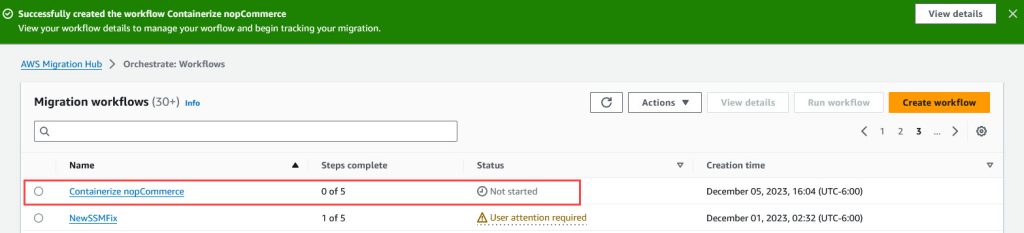
Figure 4 – Select the workflow you created
Choose your workflow and choose Run, as shown in Figure 5, to start the step-by-step process of analyzing and containerizing your application.
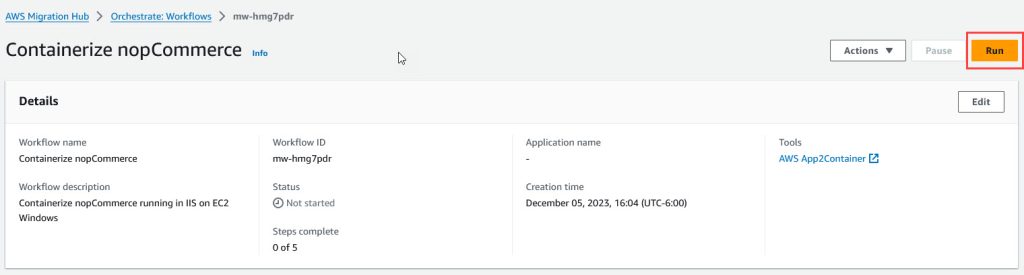
Figure 5 – Run the workflow
The workflow consists of three steps. Let’s examine each step.
Step 1 – Analyze
In this step, Migration Hub Orchestrator discovers the IIS websites installed on the Amazon EC2 instances that you select when configuring the workflow. After discovery is complete, the status of the workflow changes to User attention required, as shown in Figure 6.
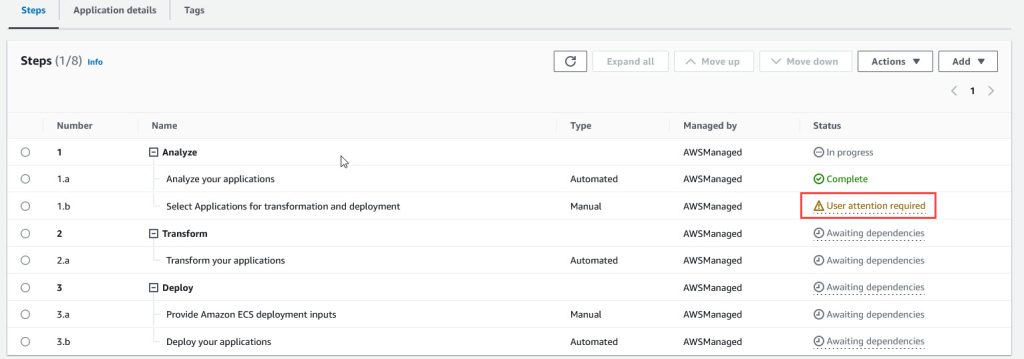
Figure 6 – User Attention required on Step 1 (Analyze)
To proceed, select step 1.b Select Applications for transformation and deployment. Under [Actions], [Change Status], choose Completed. Refer to Figure 7.
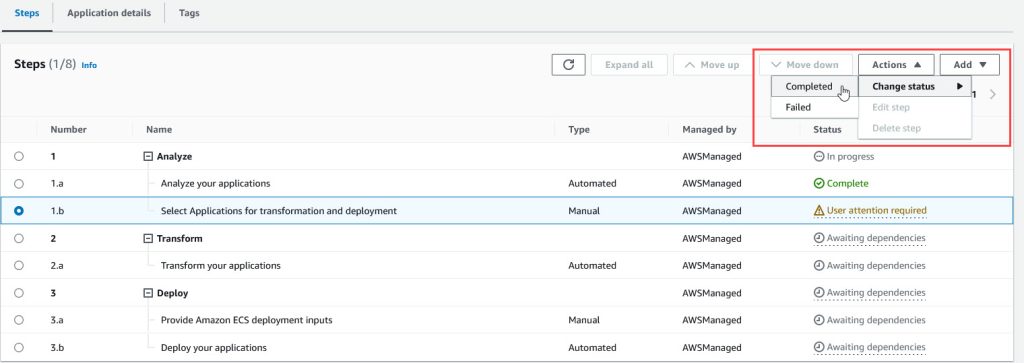
Figure 7 – Change status to Completed on Step 1
In the dialog box that pops up (Figure 8), select the IIS site hosting the application that you want to containerize. If you select multiple applications to containerize, the default option is to create one container image per application, which is recommended for most cases. To combine multiple applications in one container, select the corresponding option.
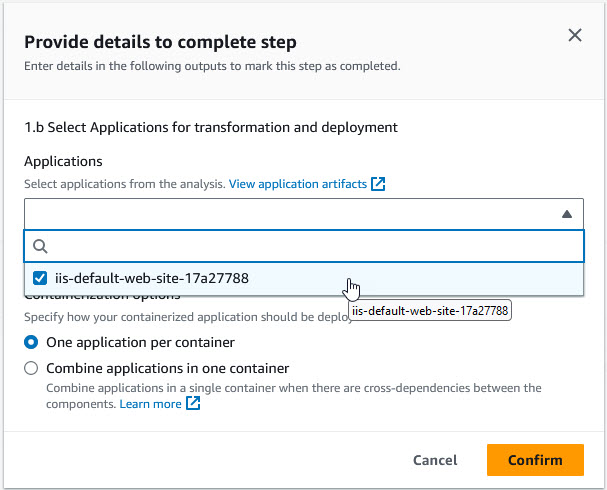
Figure 8 – Select the IIS site hosting your application
Step 2 – Transform
In this step, Migration Hub Orchestrator packages your selected applications into container images, creates a new repository in Amazon Elastic Container Registry (Amazon ECR) to store the container images, and pushes the images into this repository. Migration Hub Orchestrator stores the artifacts used to generate the container images in the Amazon S3 bucket that you configured when creating the workflow.
This is an automated step and no manual action is required. Depending on the size of the application, this step can take up to 30 minutes. When this step is complete, the status of this step will change to Complete, as shown in Figure 9.
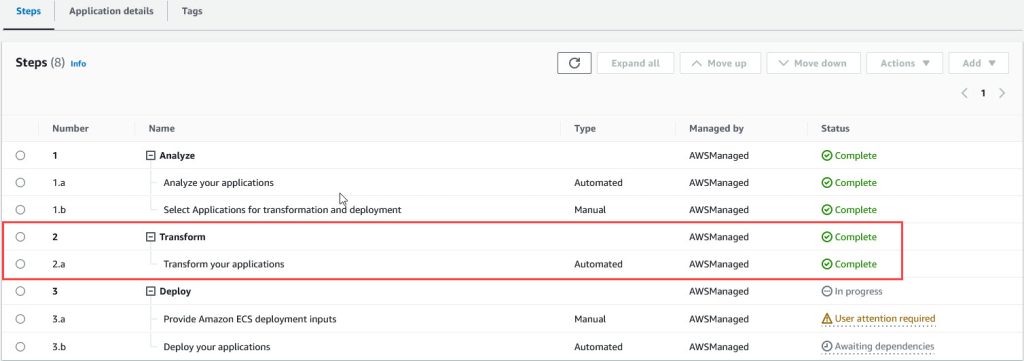
Figure 9 – Step 2 (Transform) in Complete status
Confirm that Migration Hub Orchestrator created a private repository in the Amazon ECR console with the same name as your application. For this tutorial, our application name is iis-default-web-site-17a27788. Refer to Figure 10.
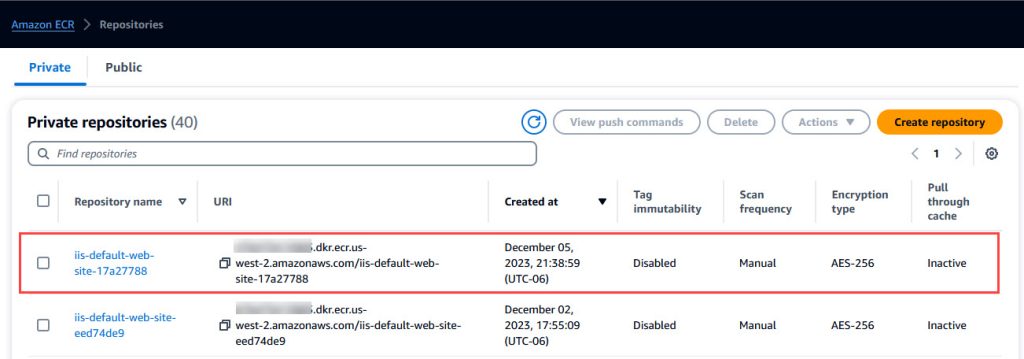
Figure 10 – Application container image in Amazon ECR
Step 3 – Deploy
In this step, Migration Hub Orchestrator will deploy the container image to an existing Amazon ECS cluster that you can optionally configure. If you don’t configure an existing cluster, Migration Hub Orchestrator will create a new cluster. Before proceeding, confirm that the status of step 3.a Provide Amazon ECS deployment inputs is User attention required. To configure deployment parameters, select step 3.a Provide Amazon ECS deployment inputs. Under [Actions], [Status], choose Completed. Refer to Figure 11.
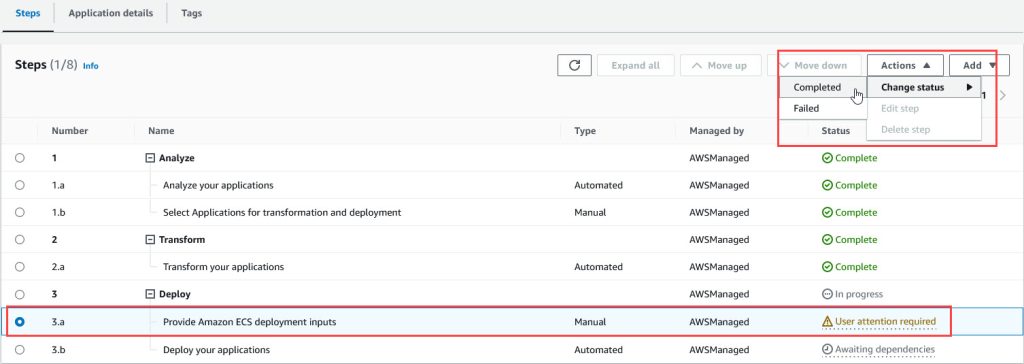
Figure 11 – Change status to Completed on Step 3 (Deploy)
In the dialog box that pops up (Figure 12), configure the following inputs:
- VPC ID – ID of the Amazon Virtual Private Cloud (VPC) that you want the Amazon ECS cluster to be deployed in.
- ECS cluster name (optional) – Select an existing Amazon ECS cluster to deploy to.
- ECS task execution IAM role ARN – Amazon Resource Name (ARN) for an Amazon ECS task execution IAM role.
- Amazon ECS task role ARN (optional) – ARN for an Amazon ECS task IAM role.
- CPU (optional) – Number of CPU units to reserve for the container.
- Memory (optional) – Amount of memory in GB to allocate to the container.
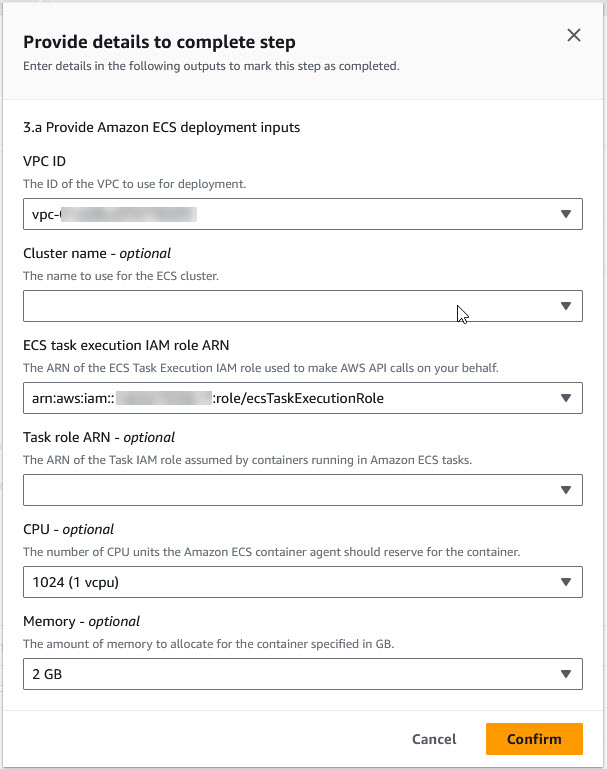
Figure 12 – Provide inputs for deployment to Amazon ECS
To proceed, choose Confirm. Migration Hub Orchestrator will take the following actions:
- If you did not select an existing cluster, Migration Hub Orchestrator will create an Amazon ECS cluster in the VPC you provided with AWS Fargate configured as the capacity provider.
- Migration Hub Orchestrator will create an Amazon ECS task definition configured with the provided values for Task Execution IAM role, Task role, CPU, Memory, and the path of the container image stored in Amazon ECR.
- To keep one or more instances of your application container running at all times, Migration Hub Orchestrator creates an Amazon ECS service.
- To distribute traffic evenly across multiple containers in your service, Migration Hub Orchestrator creates an Application Load Balancer and configures it to send traffic to your application containers.
These actions can take up to 30 minutes to complete. Once complete, the status of the workflow will change to Complete, as shown in Figure 13.
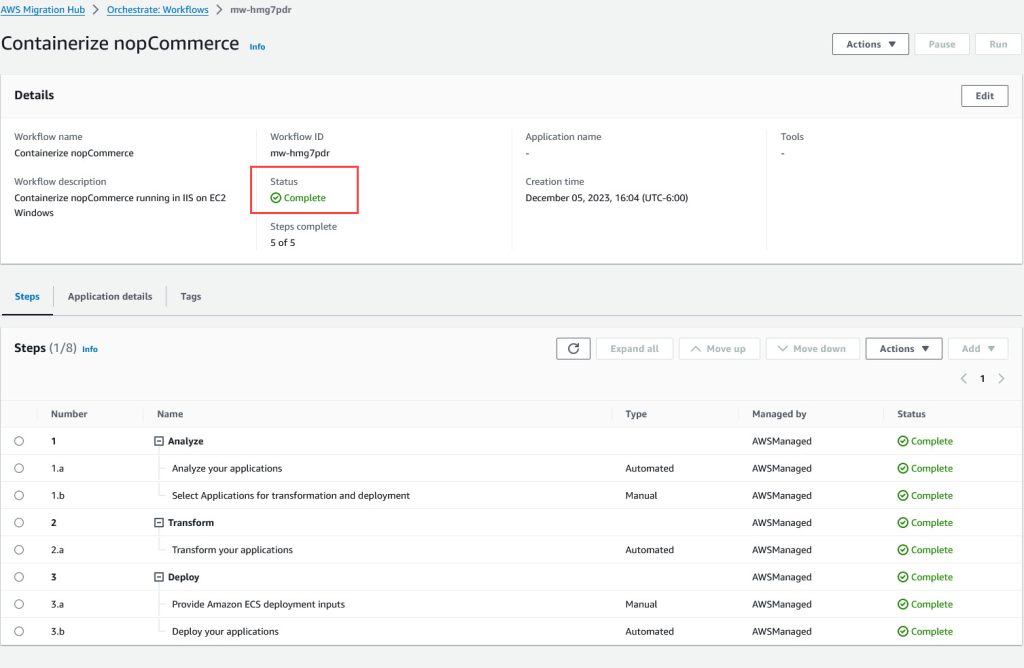
Figure 13 – Completed workflow
In case your application uses session state, note that containers are designed to be ephemeral and can be stopped or destroyed more frequently than virtual machines like Amazon EC2 instances. This makes session state much harder to maintain inside a container. Consider storing session state outside your container in a high performance data store such as Amazon ElastiCache or Amazon DynamoDB.
Confirm that Migration Hub Orchestrator created an Amazon ECS cluster in the Amazon ECS console, as shown in Figure 14.

Figure 14 – Amazon ECS cluster
Choose the cluster name to view details for the Amazon ECS cluster. In the Services tab, confirm that there is a service in Active status. Refer to Figure 15.
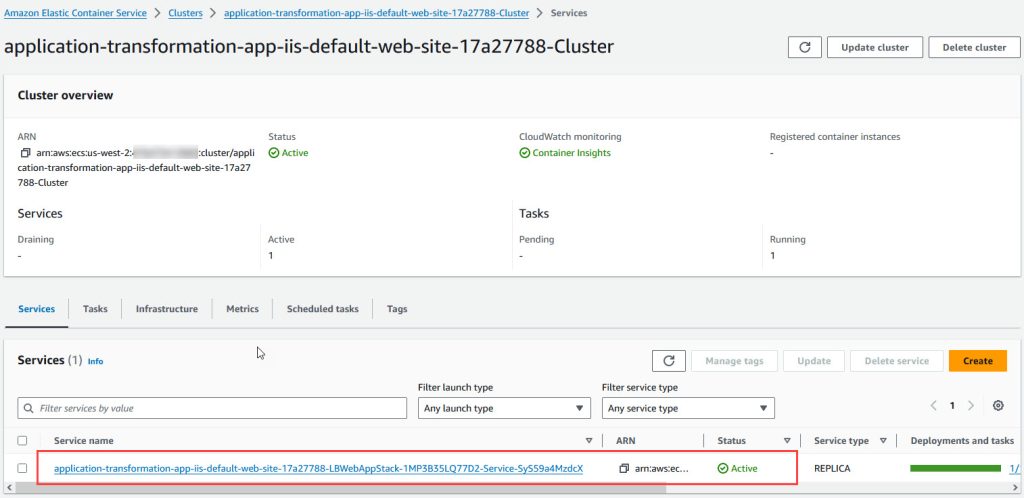
Figure 15 – Amazon ECS service
Choose the service name to view details for the Amazon ECS service. On the Health and metrics tab, confirm that there is an Application Load Balancer with 1 healthy target. Choose View load balancer to view details for the Application Load Balancer. Refer to Figure 16.

Figure 16 – Application Load Balancer status
The Application Load Balancer details page will show the VPC, Availability Zones, Status, and DNS name of the load balancer. Copy the DNS name. Refer to Figure 17.
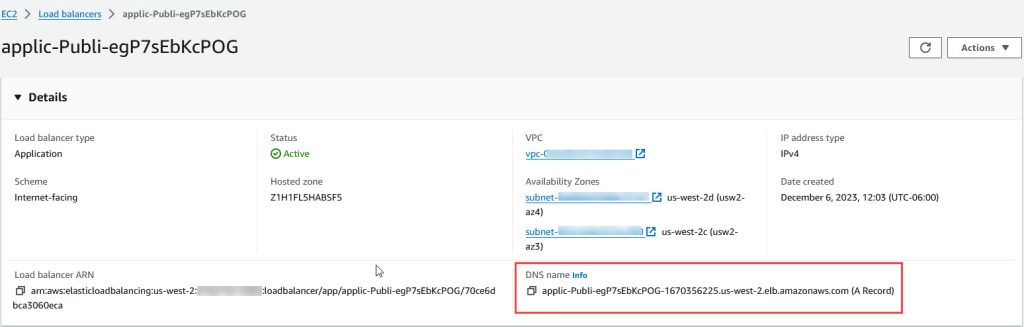
Figure 17 – DNS name of Application Load Balancer
Paste the DNS name into a browser’s address bar and confirm that you can access your application, as shown in Figure 18.
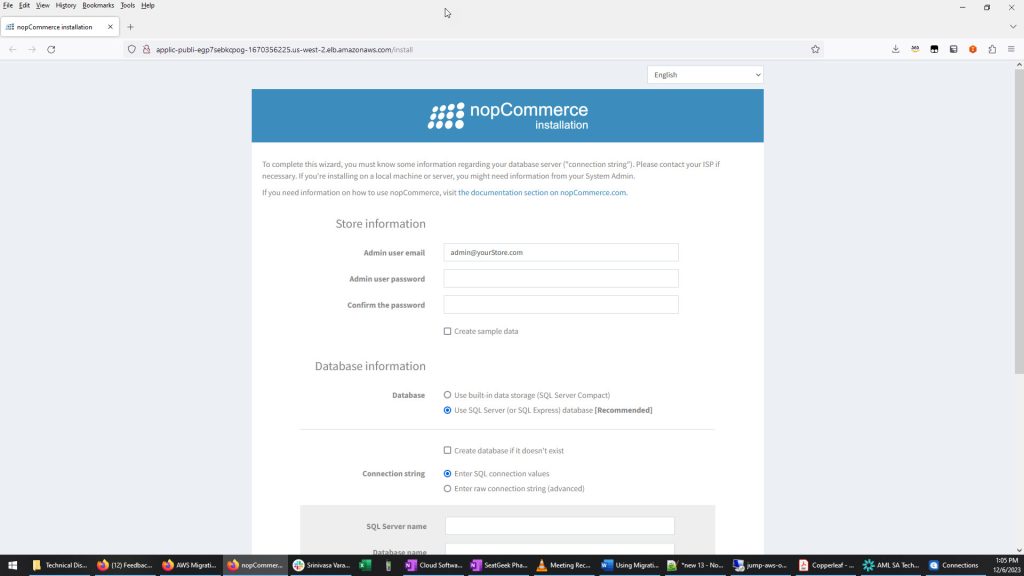
Figure 18 – Containerized application running on Amazon ECS
Cleanup
To delete the resources created in this blog post, filter the stacks in the AWS CloudFormation console on your application name. Make sure the View nested toggle button is OFF and Filter status is set to Active. For the resultant stack, choose Delete. Refer to Figure 19.
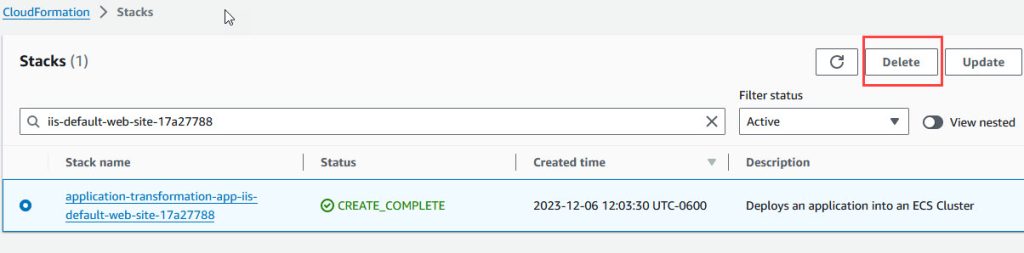
Figure 19 – Delete the AWS CloudFormation stack
Conclusion
In this blog post, you used AWS Migration Hub Orchestrator to containerize and deploy an ASP.NET application directly from the AWS Management Console with a few clicks. Migration Hub Orchestrator helps you containerize and deploy applications to Amazon ECS using a streamlined, web-based experience without the need to download and install any tools.
For more information about the containerization capability of Migration Hub Orchestrator, read the documentation. For a more customized containerization experience, check out AWS App2Container. To learn about deploying a Windows application to Amazon Elastic Kubernetes Service (Amazon EKS), check out this blog post.
AWS has significantly more services, and more features within those services, than any other cloud provider, making it faster, easier, and more cost effective to move your existing applications to the cloud and build nearly anything you can imagine. Give your Microsoft applications the infrastructure they need to drive the business outcomes you want. Visit our .NET on AWS and AWS Database blogs for additional guidance and options for your Microsoft workloads. Contact us to start your migration and modernization journey today.