AWS Cloud Operations Blog
Extending your Control Tower Network security with Amazon Route 53 DNS Firewall
In our previous post, “Securely scale multi-account architecture with AWS Network Firewall and AWS Control Tower”, we described how AWS Network Firewall can be implemented in an AWS Control Tower environment. AWS Network Firewall provides a stateful, managed firewall with rules to filter and block network and application layer traffic coming to your applications. Centralized deployment lets you ensure that all of the VPC traffic across multiple AWS accounts traverses through the centralized inspection point. However, network firewall does not have visibility on DNS queries made through the Route 53 Resolver. Amazon Route 53 DNS Firewall comes to the rescue to ensure that network security is comprehensive and handles the DNS query traffic.
In this post, we extend our solution of AWS Network Firewall with Control Tower to include a centralized deployment of DNS firewall rules that can be applied to existing and new VPCs created with the Control Tower environment. This approach lets network administrators and developers ensure security at the DNS layer with minimal operational overhead.
Architecture overview
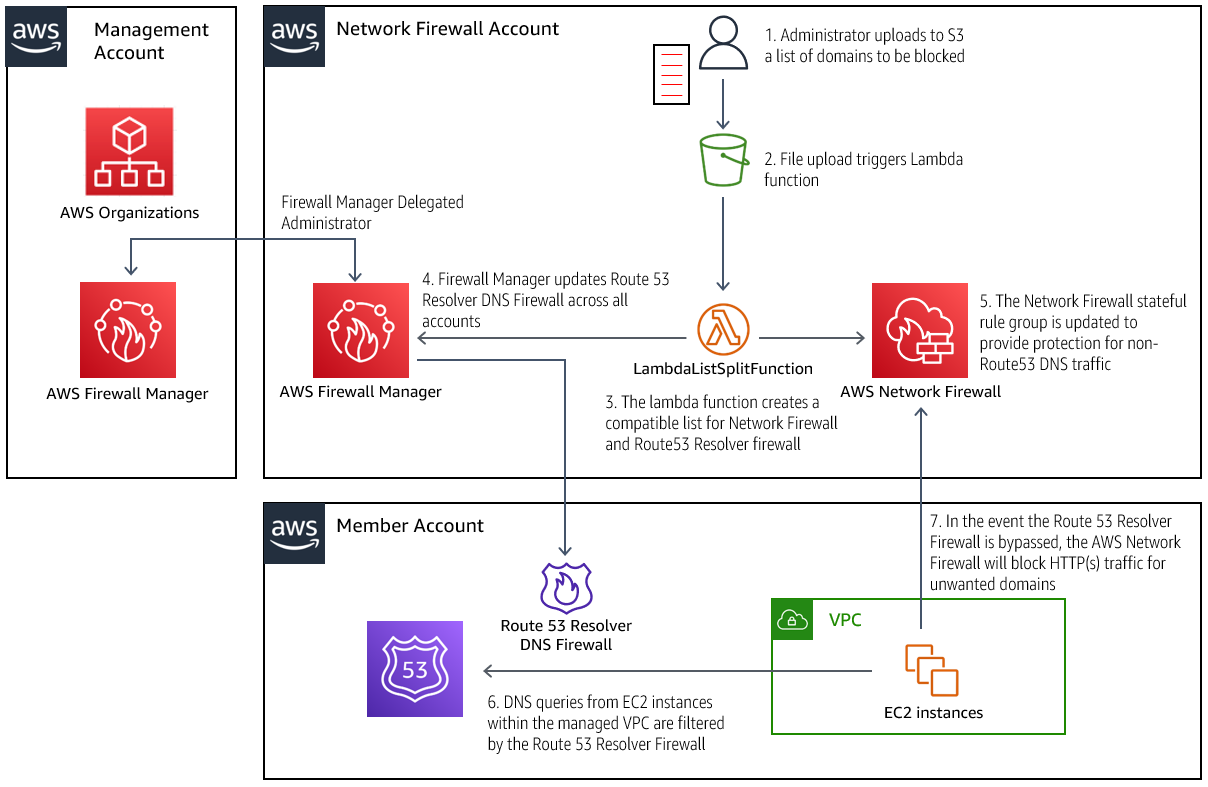
The following figure shows a multi-account structure that was created as part of the solution with some of the Route 53 DNS firewall components that are added as part of this post:
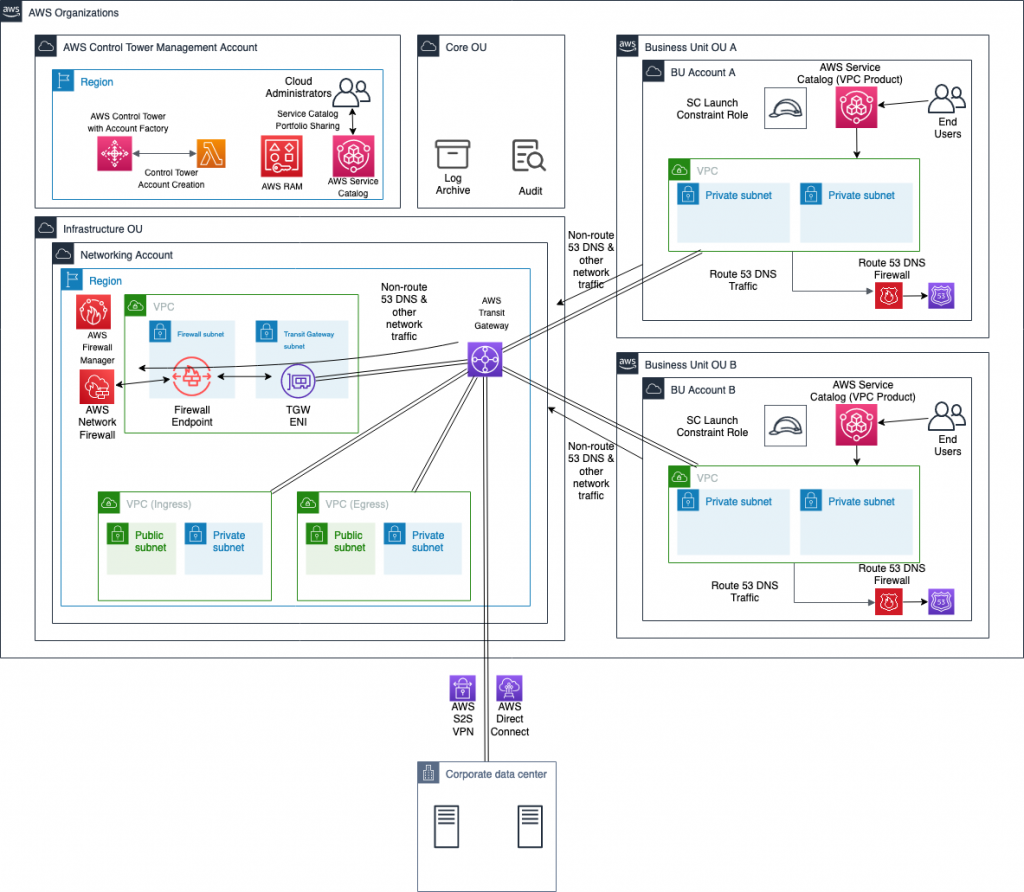
While most of the solution components, such as transit gateway and network firewall, are part of the previous solution, they are explained to ensure completeness. AWS Control Tower is set up in the management account. It creates a security OU that includes log archive and audit accounts. Based on the landing zone best practice, a separate infrastructure OU contains the networking account. This account hosts all of the centralized networking resources that support the networking requirements of the multi-account, multi-VPC architecture.
In this scenario, the networking account includes:
- AWS Transit Gateway for a scalable multi-account, multi-VPC architecture.
- Ingress and egress VPCs that control connectivity to the internet and connectivity to the on-premises network through an AWS Site-to-Site VPN connection or AWS Direct Connect.
This centralized deployment model architecture is described in the Deployment models for AWS Network Firewall post.
This approach lets network administrators govern and control networking requirements from a central location (the networking account). You can create other OUs and AWS accounts using AWS Control Tower, such as OU A with account A and OU B with account B through Account Factory, as shown in the previous figure. This makes it possible to consistently and automatically apply the AWS Control Tower guardrails and security baseline across these new accounts. This solution uses Account Factory and AWS Identity and Access Management (IAM) roles created by AWS Control Tower for the automation.
When the solution is deployed, the following components are created as part of the architecture. This is in addition to the solution components from the previous post which were comprised of a centralized deployment of AWS Network Firewall in the Networking account, AWS Lambda functions for automation, and AWS Service Catalog VPC product.
- A Route 53 DNS Firewall domain list in Networking account associated with AWS Firewall Manager.
- An AWS Lambda function in the Networking account that listens for triggers from an Amazon S3 bucket configured as part of this solution. This Amazon S3 bucket stores a file containing a list of domains that must be blocked to prevent malicious DNS traffic or to meet organizational security guidelines. Based on the trigger, the Lambda function updates the domain list in Route 53 DNS firewall in addition to updating the Network Firewall stateful rule group.
- An AWS Firewall Manager policy that links the Route 53 DNS Firewall domain list in the Networking account to all of the DNS firewalls in other accounts of the AWS Organization, and associates that with all of the VPCs.
The architecture lets any traffic coming from VPCs be routed to the AWS Network Firewall first. The traffic is inspected before it goes to its destination, which could be another VPC, on-premises network, or internet through the egress VPC. DNS queries could be sent to non-Route 53 resolvers, such as Active Directory or other third-party DNS servers. In that case, having a Network Firewall stateful rule with a blocked domain list ensures that HTTP(S) traffic to these domains is blocked even though DNS queries are resolved. If those DNS queries are made to a Route 53 Resolver of the VPC through the “.2 resolver” or through resolver endpoints, then Route 53 DNS Firewall will block those queries. This ensures comprehensive security for your environment from malicious or unallowed domains.
The solution presented in this post ensures that this is pervasive across all of the VPCs in all of the accounts of Control Tower, as well as new AWS accounts created through the Account Factory.
Deploy the solution
While this post adds the DNS firewall component to the architecture, the steps below cover the deployment of the entire solution, the centralized deployment of Network Firewall, Network Firewall integration with Control Tower, and the integration with Route 53 DNS Firewall.
- In your AWS Control Tower environment, identify the networking account that will hold the central transit gateway and firewall.
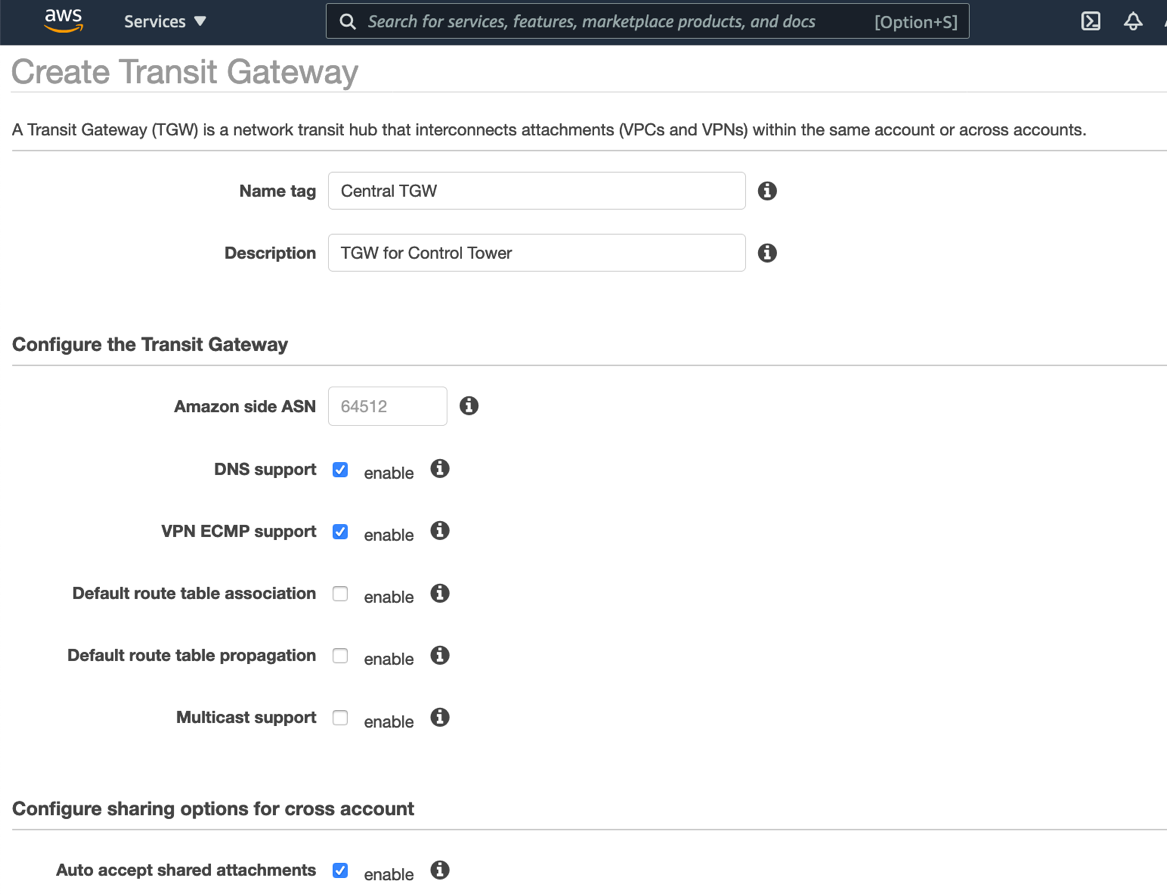
- In the networking account, create a transit gateway. Clear the Default route table association and Default route table propagation Select the Auto accept shared attachments check box. Note the transit gateway ID for later use.
- In the networking account, open the Network Manager console, create a global network, and then register your transit gateway with this global network. Choose the global network, and then enable CloudWatch Logs Insights.

This allows events from AWS Transit Gateway, such as attachment, creation, or deletion, and route table changes, to be sent as events to CloudWatch Events.
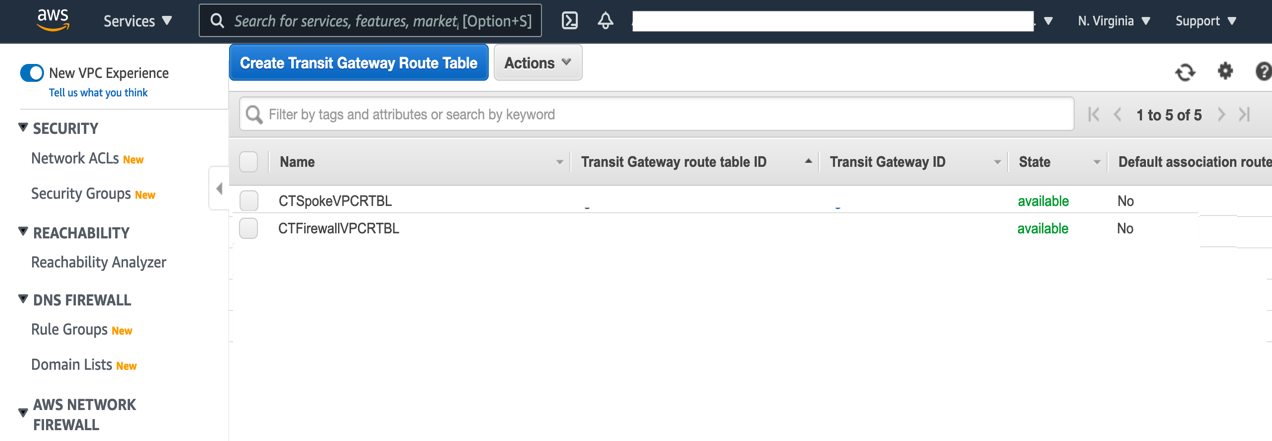
- In the networking account, create two transit gateway route tables: Spoke VPC route table for associating with VPCs, and Firewall route table for associating with the inspection VPC that contains AWS Network Firewall. Record the route table IDs for later use.
- In the networking account, create an Amazon S3 bucket that will be used to store the blocked domains list. Additionally, create a prefix (or folder) named “original”, which is where the blocked domains list will be placed. This prefix should not contain any files, aside from the blockeddomains.txt file. The Lambda function that will be deployed in Step 11 uses an Amazon Simple Storage Service (S3) trigger that looks for PUT events in this specific prefix. If other files are placed in this prefix, then the Lambda function will be inadvertently triggered.
- Use this CloudFormation template to deploy the AWS Network Firewall Deployment Automations for AWS Transit Gateway solution in the networking account. CloudFormation stacks are deployed using the console as explained in the documentation through console or CLI.
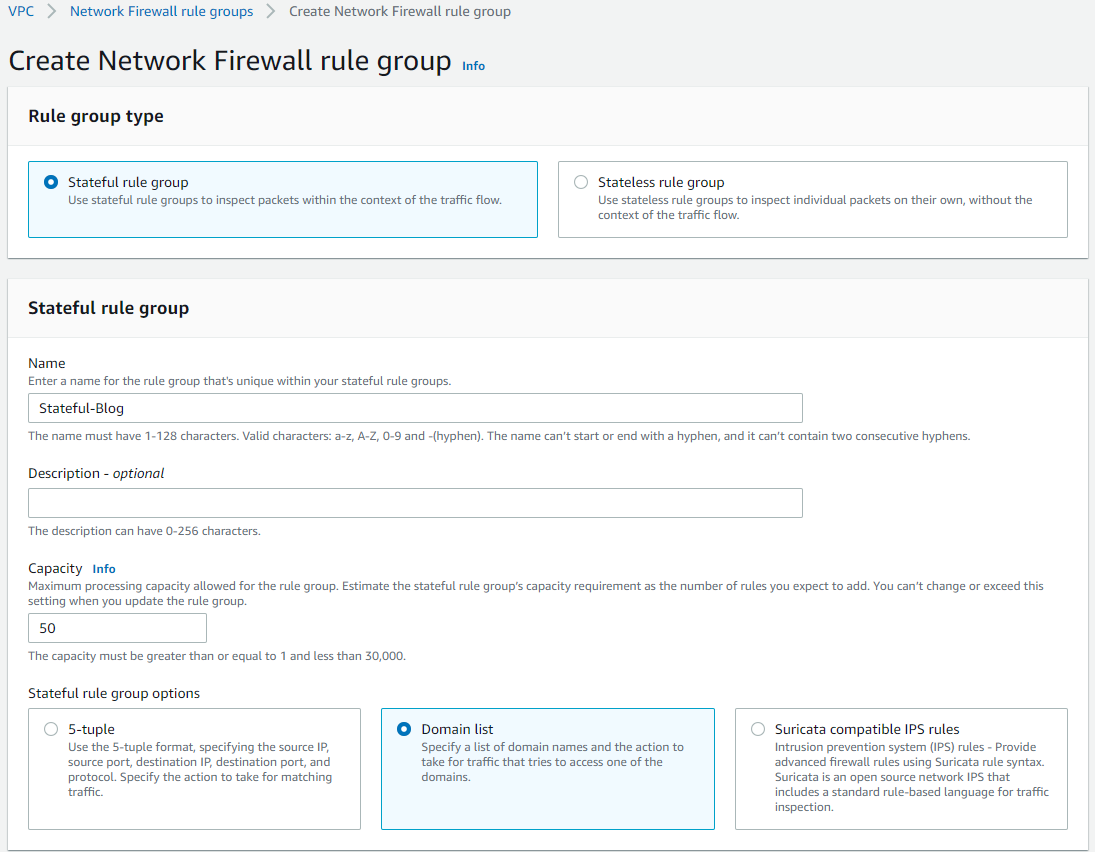
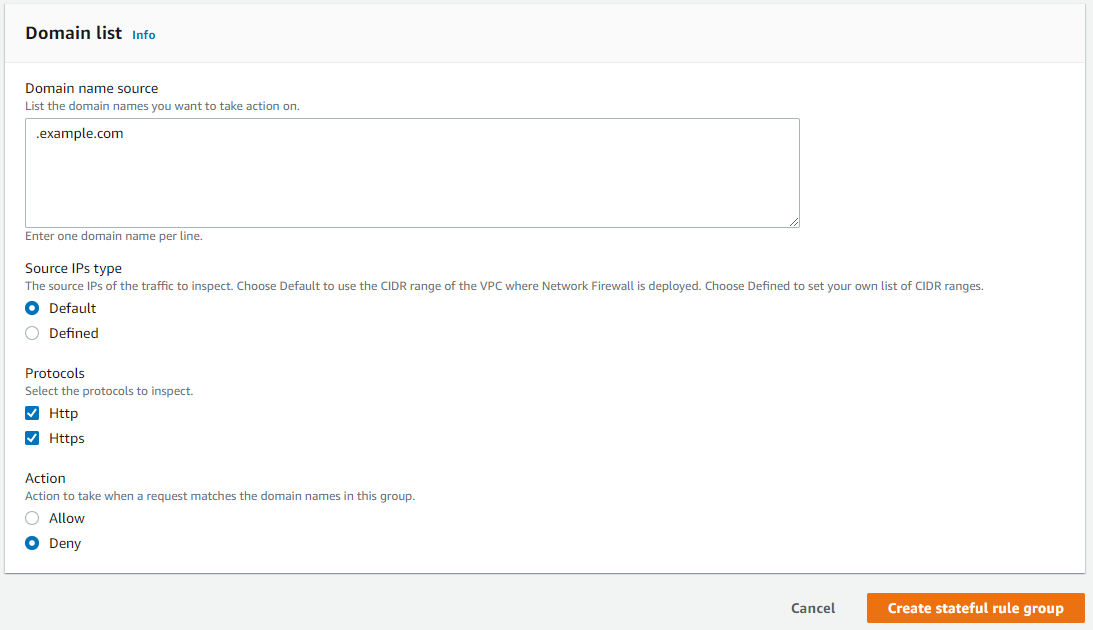
- Create a Stateful rule group for the network firewall deployed in the previous step. The stateful rule group must use the “domain list” type, and contain at least one entry upon creation. “.Example.com” can be used to fulfill this requirement. Both HTTP and HTTPS protocols should be selected, and the action must be set to Deny. Note the name of the Stateful rule group after it is created, as it will be used in Step 11 below.
- The newly-created stateful rule group must be linked to the existing network firewall policy.
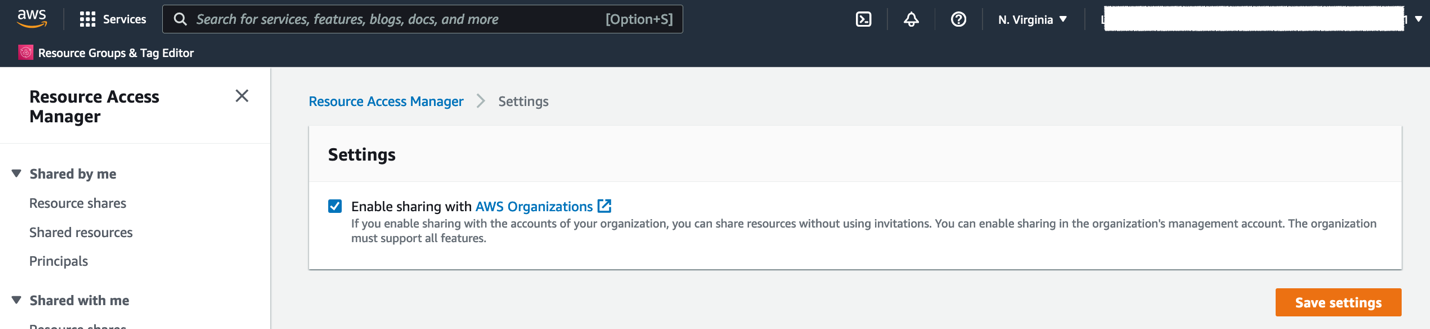
- Using the AWS Control Tower management account, open the AWS Resource Access Manager console. On the Settings page, select the Enable sharing with AWS Organizations
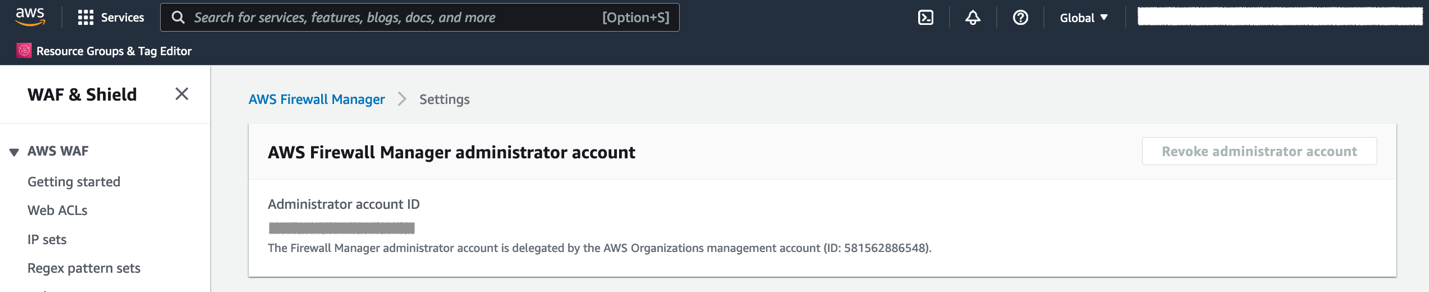
- In the AWS Control Tower management account, go to AWS Firewall Manager console and register your Networking account as Firewall administrator
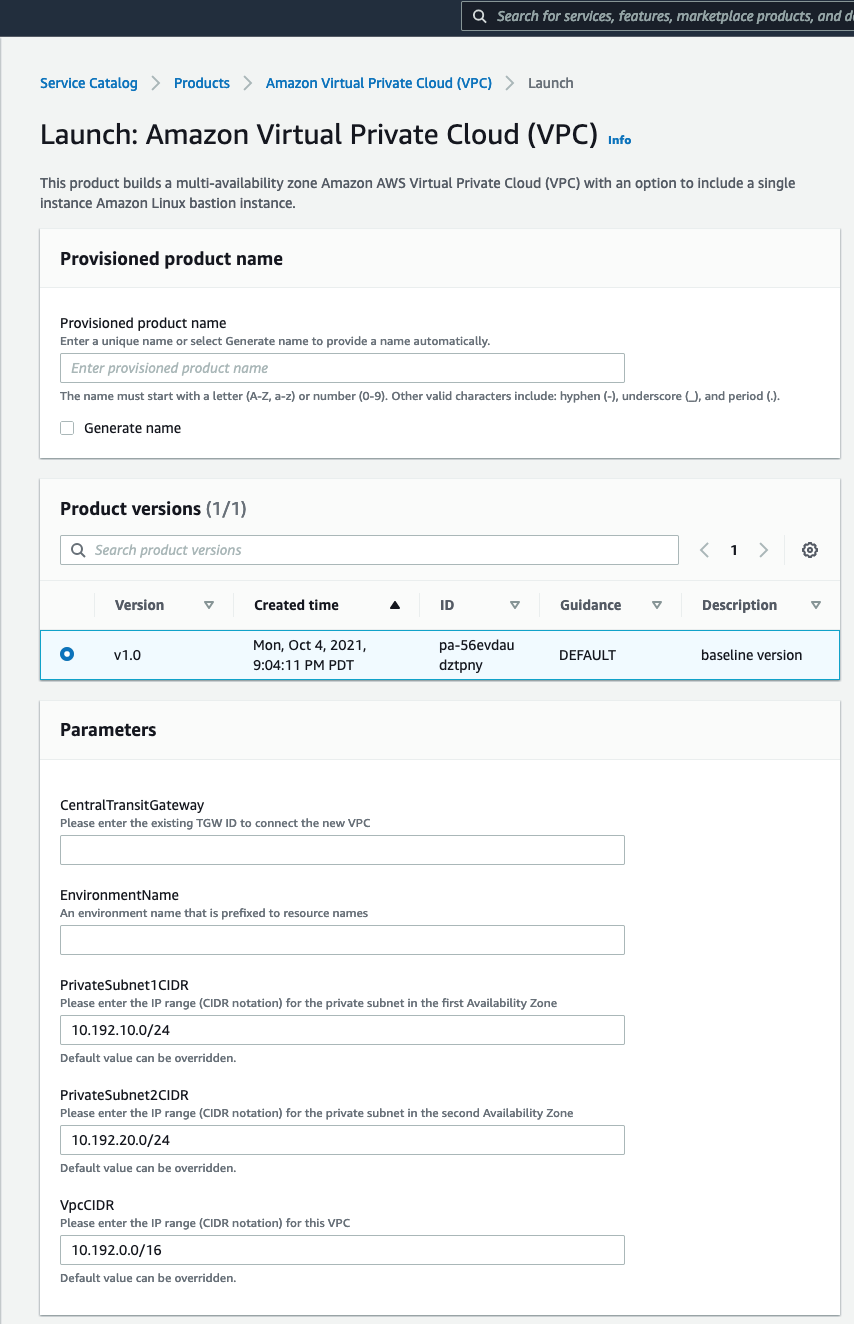
- In the AWS Control Tower management account, use this CloudFormation template to deploy a solution that provides AWS Control Tower integration with AWS Network Firewall and Route 53 DNS Firewall. The CloudFormation stack creation presents with the following screen requiring input parameters for the deployment.
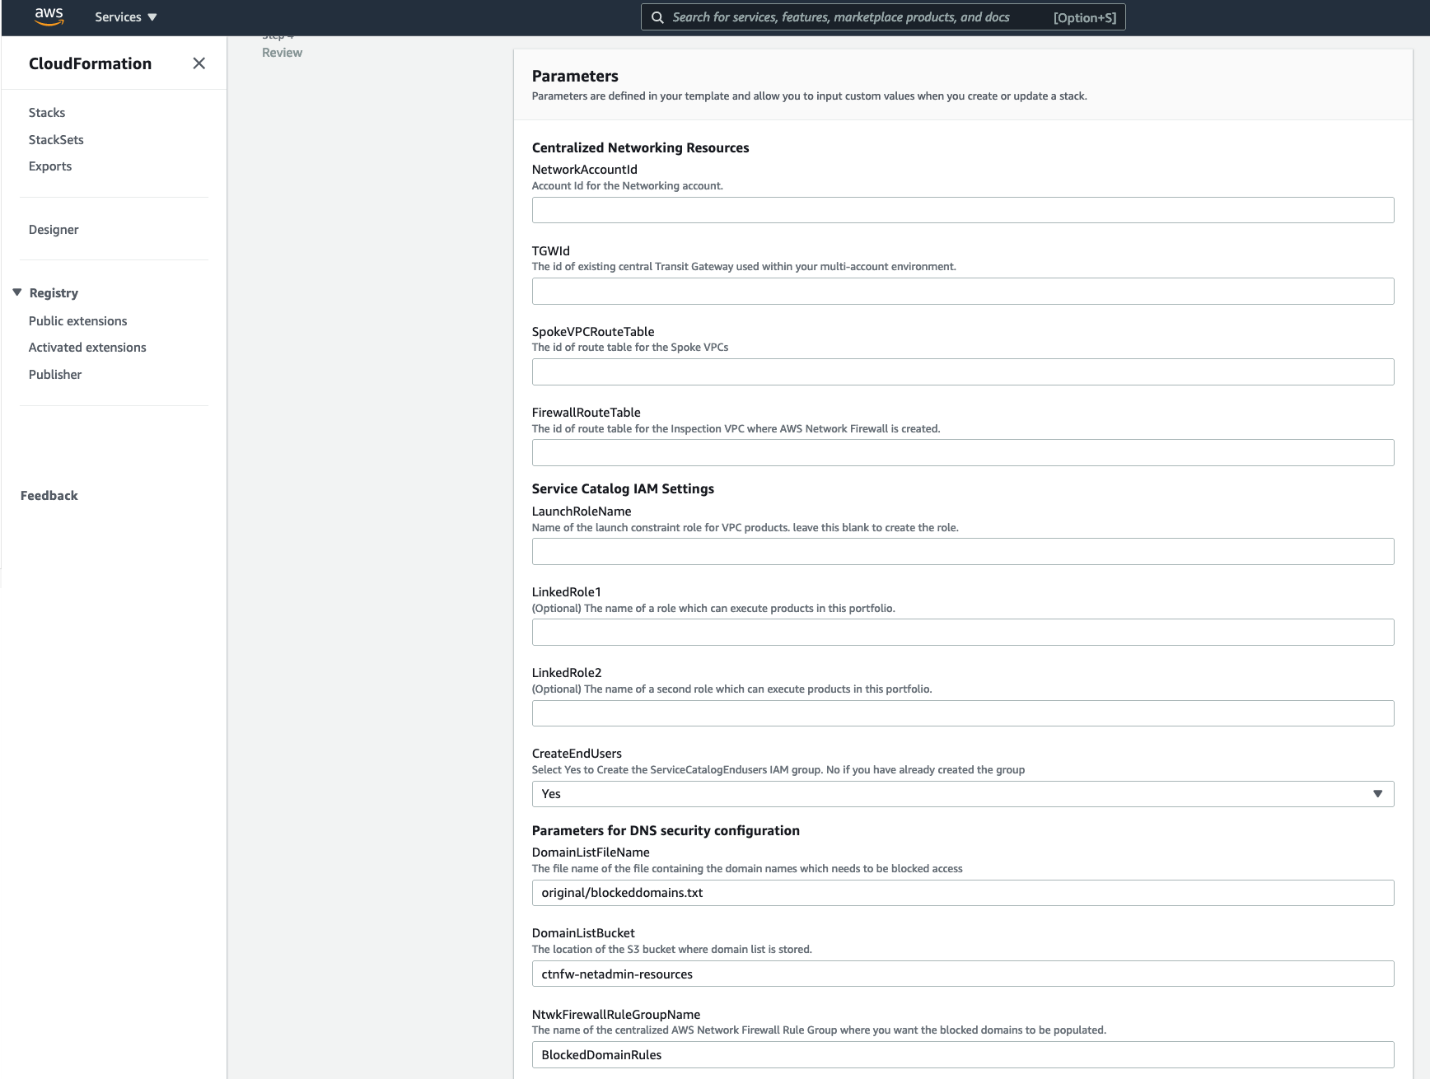
The input parameters required are explained as follows, and shown in the previous figure.
Centralized Networking resources
NetworkingAccountId – AWS Account ID of the networking account in your multi-account environment.
TGWId – Identifier of the centralized transit gateway created in Step 2.
SpokeVPCRouteTable – Identifier of the transit gateway route table used for associating spoke VPCs. This is created in Step 2.
FirewallRouteTable – Identifier of the transit gateway route table to which Inspection VPC is associated. This is created in Step 2.
Service Catalog IAM Settings
LaunchRoleName – This is the name of the service catalog launch constraint role. If you have one in your environment, then you can specify that or leave the field blank. When this is left blank, CloudFormation will create a new one.
LinkedRole1 – Name of the role that can run products in this portfolio.
LinkedRole2 – Name of the role that can run products in this portfolio.
CreateEndUsers – Select Yes to create ServiceCatalogEndUsers IAM group. Select No if you already have this IAM group in your AWS environment.
Parameters for DNS Security configuration
DomainListBucket: The Amazon S3 bucket in Networking account that stores the list of domains to be blocked. Specify the name of the S3 bucket to create.
DomainListFileName: The name of the file that stores the list of domains including the path prefix. The default value is original/blockeddomains.txt. The Amazon S3 trigger relies on the path original/ and the file suffix .txt. The only part of this parameter that supports customization is the file name.
NtwkFirewallRuleGroupName: The name of the network firewall stateful rule group where the domain list will be populated. This rule was created in Step 6.
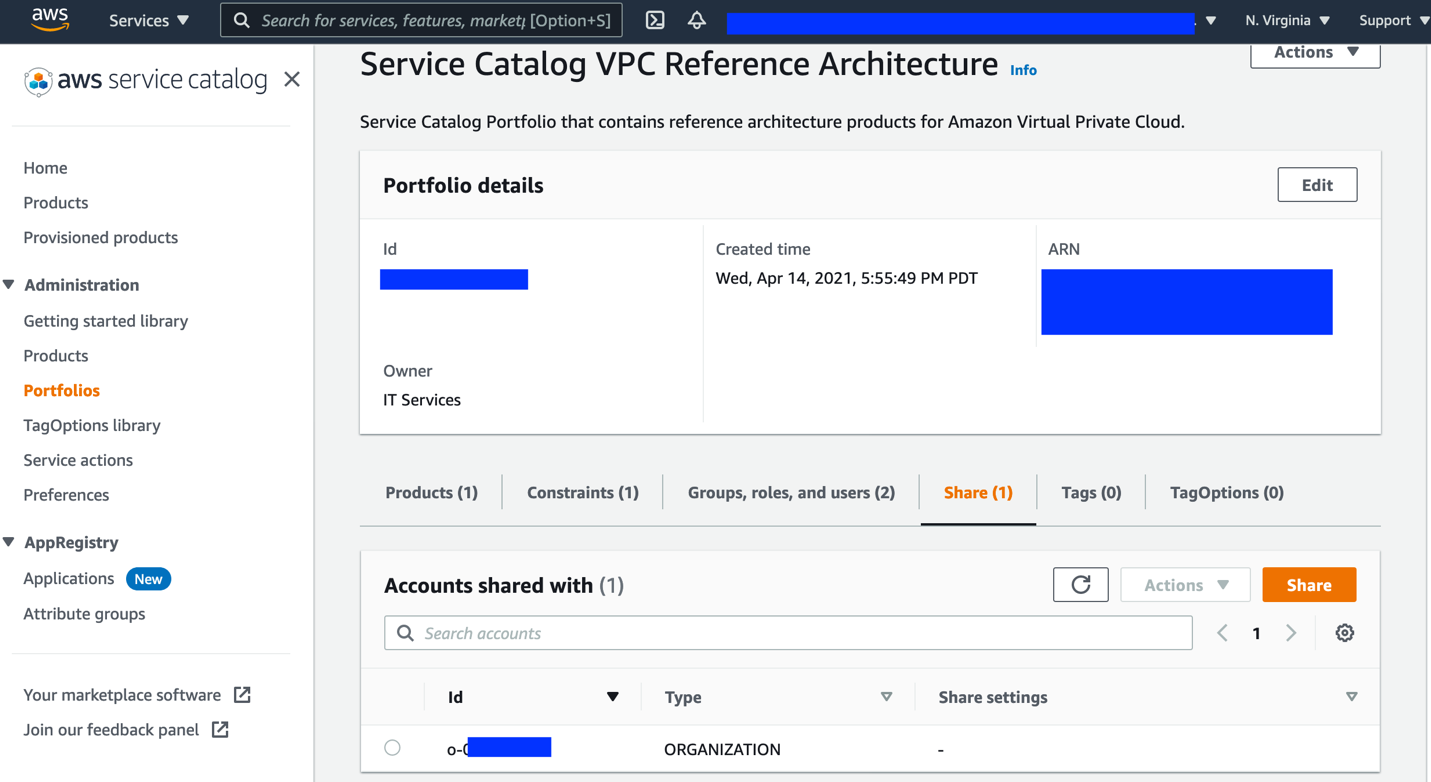
- After it’s deployed, open the AWS Service Catalog console. Expand Administration, choose Portfolios, and then choose the VPC Reference Architecture portfolio. Share the portfolio with AWS Organizations.
How it works
The following figure shows the sequence of events when the cloud administrator updates the blocked domain list in the Amazon S3 bucket.
Updating the blocked domain list in Amazon S3
- An administrator adds or removes entries to the .txt file, and uploads it to the bucket specified in the CloudFormation parameter DomainListBucket.
- Entries in the domain list should be formatted one per line, with no prefixes.
Example:- Example.org
- Example.net
- Entries in the domain list should be formatted one per line, with no prefixes.
- The Amazon S3 event notification triggers the Lambda function to process the new list.
- The Lambda functions process the list, making it compatible for both the Route 53 Resolver DNS Firewall and the AWS Network Firewall. In addition, the Lambda is configured to automatically block all subdomains of the domains specified in the uploaded list. The Lambda function will also process domains removed from the list, which effectively unblocks access to them.
Processing the blocked domain list
- Firewall Manager updates the Route 53 Resolver DNS Firewall across all of the configured accounts with the new list.
- The AWS Network Firewall policy in the networking account is also updated with the newly configured list.
The new blocked domain list is in effect
- When an instance in a protected VPC performs a DNS query, any domains matched by the Route 53 Resolver Firewall are blocked, and an NXDOMAIN response is returned to the client. Domains not blocked are processed normally.
- If an Amazon Elastic Compute Cloud (EC2) instance is configured to bypass the Route 53 Resolver, the traffic will be routed through the AWS Network Firewall in the networking account, where HTTP and HTTPS traffic to blocked domains will be dropped, as was configured in previous figures associated with Steps 7-8.
Testing the solution
Follow the steps below to test the functionality of domain list blocking in DNS firewall and Network Firewall.
- Create a VPC in a member account using the AWS Service Catalog product. This is the “Backend VPC”.
This lets you create a VPC that connects to your centralized transit gateway and with the required route table setup. The VPC CIDR range selected for the Backend VPC must be added to the stateful rule group created earlier. The “Source IP type” parameter in the stateful rule must be changed to “defined”, which will prompt for a list of CIDR ranges. Please see the documentation for more details.
- Create a VPC in the Networking account using the AW Service Catalog product deployed by this solution, similar to Step 1. This is your “Egress VPC”.
- The VPC created above will consist of private subnets. To make this an egress VPC:
- create a public subnet and associate it with the default VPC route table,
- attach an internet gateway to the VPC,
- and then update the default route table to create an entry for 0.0.0.0/0 to the internet gateway. Once this is configured, you have a route out to the internet from your other VPCs connected to the transit gateway via the Egress VPC.
- Launch an EC2 instance in the Backend VPC and set up Session Manager to login to your instance.
- Connect to the instance using Session Manager.
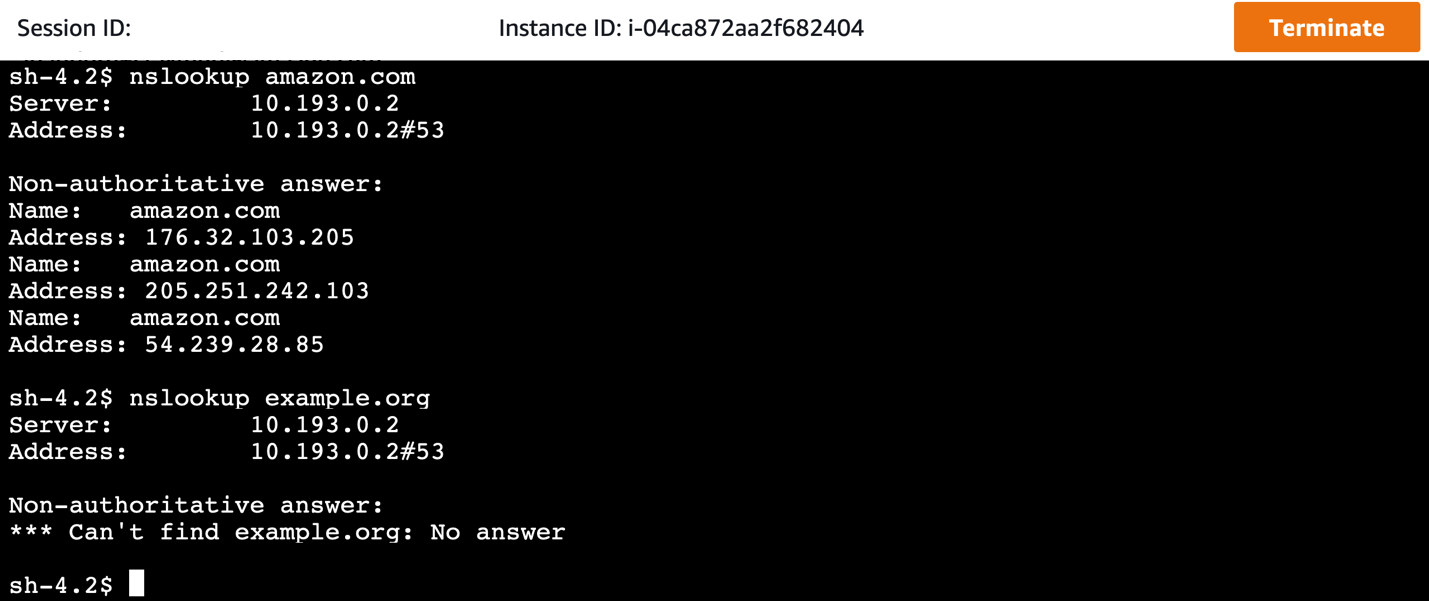
Testing how DNS queries are blocked by the DNS firewall
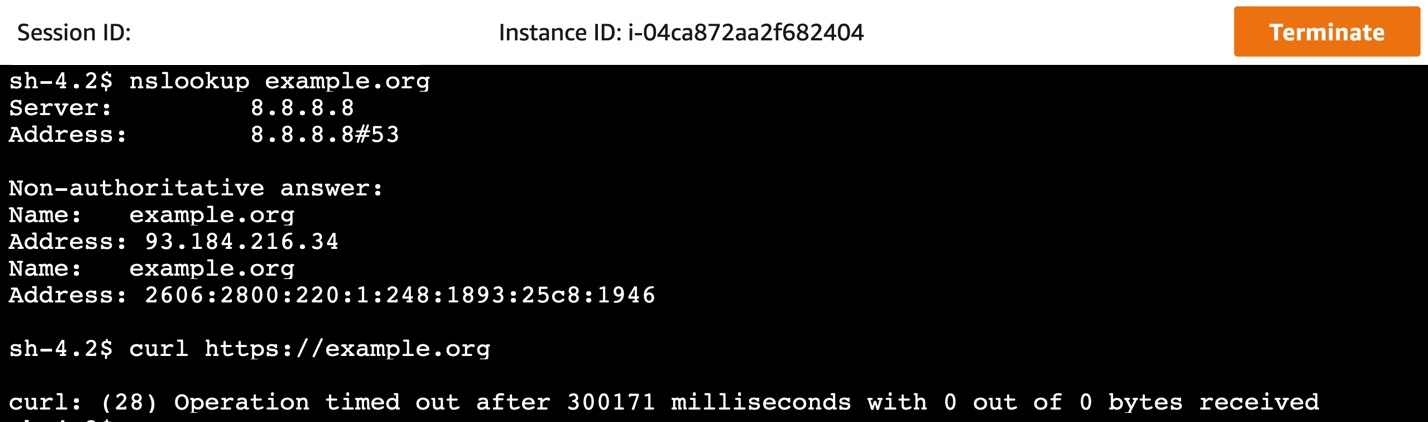
- Query the domain amazon.com (which is not on the blocked domain list). This query runs successfully.
- When we query a domain Example.org that is blocked, we receive an NXDOMAIN response, as the Route 53 Resolver is configured to respond with.
Testing how HTTP(S) traffic to domains is blocked by the Network Firewall
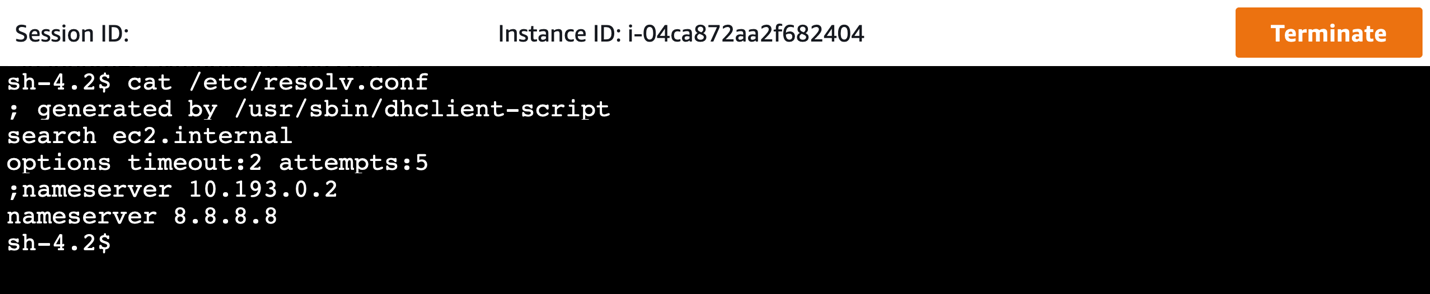
- Invoke a website using cURL, but with the domain resolution done bypassing the DNS firewall. This is done by changing the DNS resolver from our VPC resolver to a public resolver, such as 8.8.8.8. In the Amazon Linux instance, this can be done by modifying /etc/resolv.conf, or by modifying the dhclient.conf file, as explained here.
- If this modification is made, domains that are blocked by the Route 53 Resolver DNS Firewall will now resolve. However, all traffic must still route through the centralized network firewall, where HTTP and HTTPS traffic to these domains will be blocked by the configured stateful rule in network firewall.
Cleanup
Follow these steps to remove the resources deployed by this solution. These steps will not remove the VPCs created by this solution.
- In the member accounts, remove any VPC products launched through the AWS Service Catalog console.
- In the AWS Control Tower management account, complete the following steps:
- Un-share the AWS Service Catalog portfolio.
- Remove the StackSet instances for the NFW-ControlTower-SCLaunchRoleStackSet stack set.
- Delete the CloudFormation stack that the CloudFormation template deployed for integration with AWS Network Firewall.
- In the AWS Control Tower networking account, delete the CloudFormation stack that was deployed for AWS Network Firewall Deployment Automations for AWS Transit Gateway.
Considerations
It’s important to apply and adapt to the specific requirements of your environment. Consider the following:
- If you want to use your own third-party firewalls, use Gateway Load Balancer in the inspection VPC. Additional integration will be needed to apply domain lists to third-party firewalls.
- Although this architecture is designed to inspect either North-South or East-West traffic, you can tailor the routing configurations to inspect only the required traffic paths.
- Create VPCs using the AWS Service Catalog product. Existing VPCs or VPCs created outside of the AWS Service Catalog are not configured to take advantage of the automation with respect to network traffic security. They will require manual reconfiguration to take advantage of the centralized network firewall. However, these VPCs still get attached to the centralized DNS firewall domain lists and enjoy the benefit of DNS security for queries to the Route 53 resolver.
- In addition to Network Firewall and AWS Transit Gateway, this automation uses AWS Lambda, Amazon SNS, Amazon CloudWatch Events, Route 53 Resolver DNS Firewall, Firewall Manager, and AWS Service Catalog, which incur charges. Although the manner in which this solution uses these services keeps the cost to a minimum, you should evaluate the pricing for these services.
- Transit Gateway Network Manager sends events to CloudWatch Events in the us-west-2 AWS Region. Make sure that you have not disabled the Region or have service control policies that prevent you from using that Region.
Conclusion
This post shows how you can extend the network security in AWS Control Tower to include securing DNS traffic in your multi-VPC, multi-account environment in a seamless manner. The combination of Network Firewall and Route 53 Resolver DNS Firewall ensures comprehensive network security for the data traffic as well as DNS traffic. Using this solution, you can improve your security posture by addressing network security at multiple layers across multiple accounts in a seamless manner.