AWS Cloud Operations Blog
How to audit the support level of your AWS accounts using AWS Config
At AWS, we offer a variety of tools to assist our customers during their cloud journey. From AWS re:POST where you can ask AWS related questions to the community, to AWS Skill Builder where customers can view on-demand video content and sign up to attend online and live training sessions. AWS also offers various support plans for customers who are looking for additional 24×7 technical assistance from our teams of experts. We recommend signing up for at least business support if you are running production or business critical workloads on AWS in order to receive live support via chat or phone. For our larger customers, we offer two Enterprise support plans namely, Enterprise and Enterprise On-Ramp which give you access to a dedicated or a pool of Technical Account Managers respectively focused on your account who can proactively engage with your teams.
Sometimes customers wish to confirm that all their AWS accounts have a certain technical support plan. This is especially true for Enterprise customers who might have hundreds or thousands of accounts. Your support level currently can only be viewed from each individual account and logging into each account to retrieve this information can be cumbersome. In this post we show you an approach leveraging AWS Config and the AWS CloudFormation registry to audit the support level of all accounts in your AWS Organization and flag any accounts that don’t have your preferred AWS Support plan.
Prerequisites
- Download and save the following CloudFormation template, this will be used in a later step.
- AWS Config must first be enabled across all accounts in your environment or at least on the accounts where you wish to leverage this solution. See the AWS Config get started documentation for more details.
- Set up the AWS Config Data Aggregator in your management or delegated administrator account to aggregate AWS Config data, as a best practice we recommend aggregating data from all regions.
- We will setup a dev environment in order to create the private extension in the AWS CloudFormation registry that will contain the schema of our custom resource. We recommend the following configuration details:
- Have the latest version of the AWS CLIv2 installed.
- Have the latest version of the AWS CloudFormation CLI version 2.0 installed.
- For consistency with the instructions of this blog, we recommend launching an AWS Cloud9 running Amazon Linux 2 of size t3.small. You can follow the Cloud9 documentation to create a new environment.
- This setup also requires Docker client. Depending on your Cloud9 instance, it may already be installed. Otherwise, please refer to the Docker documentation for instructions.
- You may also use your own local environment if you prefer. In addition to the steps above, you will need to have AWS credentials configured for the AWS CLI.
- We will be using us-east-1 (Northern Virginia) as our home region to deploy this solution.
Solution Overview
Since your account’s support level is currently not a supported resource for AWS Config, we can leverage the CloudFormation registry to define an AWS Config custom resource. The CloudFormation registry supports public and private extensions, for the purposes of this blog we will be publishing our resource type as a private extension. We will publish and enable this extension across the organization using CloudFormation StackSets so the resource type can be used by all accounts. Take a look at the CloudFormation registry documentation for more details.
The CloudFormation template provided below will deploy a few components. A Lambda function that creates a custom Config rule, an IAM role called LambdaExecutionRole with the minimum permissions needed for this solution, and the private extension for the CloudFormation Registry that will be used for the custom resource. You will have the choice of which accounts you deploy the resources to using CloudFormation StackSets.
Note: The CloudFormation registration process will pull a Docker image that may require you to resize your Amazon EBS volume if there isn’t enough space in your Cloud9 environment, we recommend you only take this step if you run into issues during the initial set up. You can find a script to accomplish this task in the Cloud9 section of this blog.
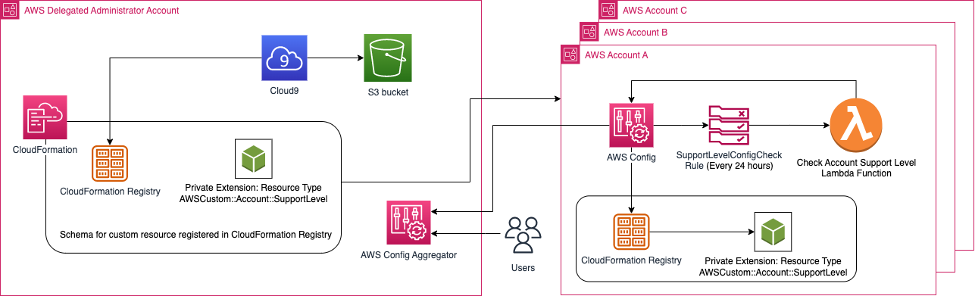
Figure 1: Deployment of private extensions to the CloudFormation Registry on multiple accounts.
Create the resource schema for the CloudFormation Registry
In order to create the custom AWS Config resource, we must first register the configuration data, or schema, of the resource in the CloudFormation registry. To do this, I log into my AWS Cloud9 instance and execute the commands below:
1. You can use the init command to create your resource provider project and generate the required files:
cfn init
2. You will then be asked to enter a few details for the project. First enter “r” to indicate you are creating a new resource.
Initializing new project
Do you want to develop a new resource(r) or a module(m) or a hook(h)?.
>> r
3. You then give the resource type a name, enter AWSCustom::Account::SupportLevel.
What's the name of your resource type?
(Organization::Service::Resource)
>>AWSCustom::Account::SupportLevel
4. Then you will select the language. For this example, we are using Python 3.7
Select a language for code generation:
[1] go
[2] java
[3] python36
[4] python37
[5] typescript
(enter an integer):
>> 4
5. Enter Y when prompted to use Docker.
Important: Docker must be running in your environment or the resource will fail to register in subsequent steps.
Use docker for platform-independent packaging (Y/n)?
This is highly recommended unless you are experienced
with cross-platform Python packaging.
>> Y
This will initialize the project in your current directory and create all the necessary files. You should see the following message on AWS Cloud9
Initialized a new project in /home/ec2-user/environment
6. Then you need to update the schema with one that will represent the custom resource for the account’s support level. This is accomplished by changing the contents of the default awscustom-account-supportlevel.json file that was generated during the init process with the text below. Then save the file.
7. The command below is used to validate the syntax of the schema.
cfn validate
Resource schema is valid.
8. Run the command below to have the CFN-CLI generate the required files for registration. You should see the success message below.
cfn generate
Resource schema is valid.
Generated files for AWSCustom::Account::SupportLevel
Normally, you would register the extension at this point with the cfn submit command. However, since we need to deploy the extension to multiple accounts, we first need to generate the extension project package that contains the necessary files for the extension you want to register. This will allow us to reference its location when deploying it. If your home region is not Northern Virginia, we recommend also passing the --region us-east-1 command below to point to the global endpoint of AWS Support. Run the following command:
cfn submit --dry-run --region us-east-1
This command will take a few minutes since a Docker image needs to be pulled. Once the command is done, you should end up with a zip file.
Resource schema is valid.
Starting Docker build. This may take several minutes if the image 'lambci/lambda:build-python3.7' needs to be pulled first.
Dry run complete: /home/ec2-user/environment/awscustom-account-supportlevel.zip
Deploy the AWS Config rule and the custom configuration item across the Organization
Now that we have the project package for the CloudFormation private extension there are two steps needed to make it available across the Organization so AWS Config can leverage it for its custom configuration item. First, we will store the zip file on Amazon Simple Storage Service (S3) so we can reference it in our CloudFormation template when we deploy the extension. Second, we will deploy the template via StackSets.
We will create an S3 bucket from our AWS Cloud9 environment so we can easily copy the zip file to it. Your AWS Cloud9 instance will require credentials to interact with Amazon S3 to create a bucket and copy the zip file we generated. By default, the service will leverage the credentials of the currently logged-in user to interact with other AWS services. If you don’t have enough permissions to do the task below, we recommend leveraging an instance profile in you AWS Cloud9 environment.
Run the command below to create a bucket, we recommend using a dedicated bucket for this task as we will update its permissions policy.
aws s3api create-bucket --bucket your_bucket_name
Then you will copy the zip file that you just generated to this S3 bucket
aws s3 cp awscustom-account-supportlevel.zip s3://your_bucket_name
We will update the S3 bucket policy so that this object can be downloaded from only a specific role in your accounts as part of the CloudFormation StackSet deployment. StackSets have two permission models, either self-managed or service-managed. For this example, we will be leveraging service-managed permissions as we can leverage a Service-Linked Role (SLR) created by the AWS Identity and Access Management (IAM) service. Take a look at the Organizations documentation to learn more about how CloudFormation StackSets leverages SLRs.
If you are using self-managed permissions, you will need to update the bucket policy below with the specific role ARN that you are using. We have included the aws:PrincipalOrgID condition key to allow read access of the zip file only to a role that belongs to your Organization. Your Organization ID can be found by navigating to the Organization’s service page in the AWS Console.
Note: For this blogpost we are not configuring any encryption on the S3 bucket. However, if your organization mandates the use of encryption for all S3 objects with services such as the AWS Key Management Service (KMS), you will need to also add Decrypt permissions to the KMS key policy for the CloudFormation role used by StackSets.
First, create a JSON file using the S3 bucket policy below with your favorite text editor and save it as bucket_policy.json. This policy contains a few blocks:
- The conditions in the first two blocks are there to lock down access to the zip file we uploaded earlier. The aws:PrincipalArn context key allows the S3 object to only be read by the role leveraged by CloudFormation StackSets and the
aws:PrincipalOrgIdcondition context key to make sure the IAM role belongs to the same AWS Organization. Any other accept attempts will be explicitly denied. - The second block has the permissions needed to avoid locking yourself out of the bucket in the event you wish to modify its permissions. We purposely did not include permissions to delete the object nor the bucket to prevent accidental deletions but this policy will allow you to update that if you choose to delete this S3 bucket at a later time.
Update the Resource field in all policy blocks with your S3 bucket name and the Organization ID in the Condition field. To reiterate, if you are using self-managed permissions with CloudFormation StackSets you must also update the role name in the condition. The Principal statement in the last block should be updated with a different IAM role or username ARN of your choosing used for administrative purposes to manage this S3 bucket policy:
Then set the bucket policy with the following command:
aws s3api put-bucket-policy --bucket your_bucket_name --policy file://bucket_policy.json
Now that we have stored the zip file for the extension on Amazon S3 and updated its bucket policy to only allow the CloudFormation StackSets SLR within each AWS account to access the file, we can now deploy the extension via StackSets. To do so, follow these steps
1. From the AWS CloudFormation console, click on the Create StackSet
2. As mentioned earlier, CloudFormation StackSet have two permission models. In this case select Service-managed permissions.
3. Scroll down to the Specify Template section and select Upload a template file.
4. Choose the template file you downloaded earlier to your local computer and click Next.
5. Enter StackSet name as AuditSupportLevel.
6. In the Parameters section, you will need to pass three parameters to the template:
-
-
- ResouceTypeName refers to the name of the resource type that was created in your schema earlier. In this case enter
AWSCustom::Account::SupportLevel. - The SchemaPackageURL is the location of the object on the S3 bucket, you can find this URL on the Amazon S3 console by clicking on the object, it should look like this:
s3://your_bucket_name/awscustom-account-supportlevel.zip. - Lastly, select the Support Plan that you’d like to audit your accounts against for the SupportPlanInput parameter and then click Next. For this example, I am selecting
Businessas my support level as shown in Figure 2.
Figure 2: CloudFormation template parameters used to setup the registry extension and AWS Config rule
- ResouceTypeName refers to the name of the resource type that was created in your schema earlier. In this case enter
-
7. Once you get to the Configure StackSet options page, leave the defaults and click Next.
8. In the Set deployment options page, go the Deployment targets section and select Deploy to Organization. We recommend deploying the template to all accounts so you can get a complete view of your support level across your AWS Organization.
9. Scroll down to the Specify regions section and choose US East (N. Virginia) as the region since the AWS Support endpoint is located in that region, this step is needed even if you currently don’t use this region.
10. You can set your own preference under Deployment options for concurrency based on your number of accounts, then click Next.
11. On the Review screen, scroll down to the bottom of the page, check the Capabilities box that acknowledges the creation of an IAM role and click on Submit.
Once the deployment is completed, navigate to the AWS Config console, click on Rules and click on the newly created SupportLevelConfigCheck AWS Config rule. This rule will trigger on each account once every 24 hours. You should be able to see the results of the rule after about a minute, if not you can click on the Actions menu and select Re-evalutate as shown in Figure 3 below:
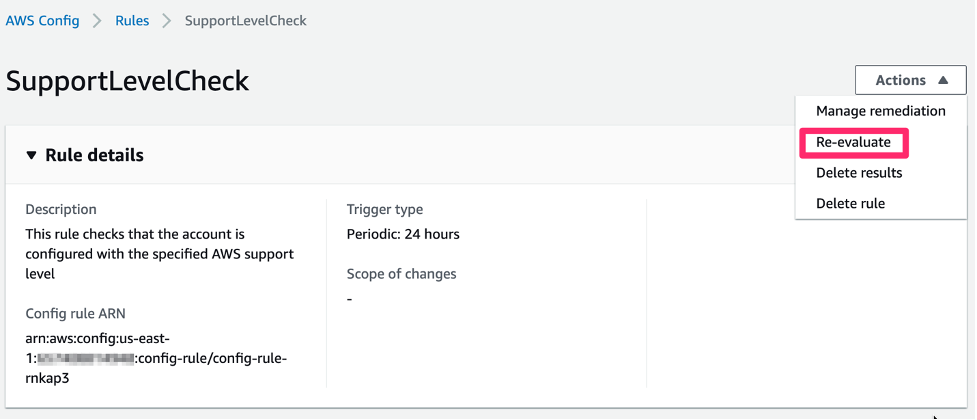
Figure 3: Re-evaluate the results of the AWS Config rule upon creation
This will force the custom rule to evaluate and will trigger the AWS Lambda function that will check your support level. The rule should finish evaluating within one minute, you can then see the results. In Figure 4 below, you can see I am logged into an account that does not have a technical support plan and was flagged as noncompliant by the AWS Config rule.
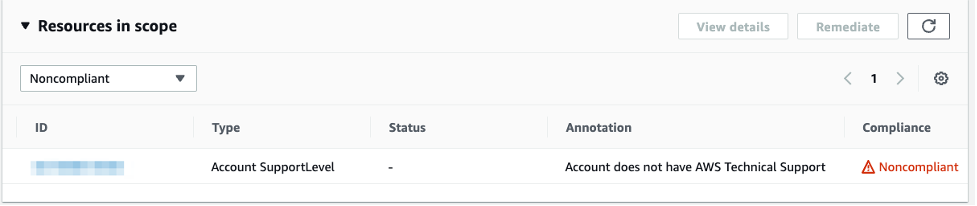
Figure 4: Sample AWS account not in compliance with AWS Config rule
Figure 5 below shows the results of the account that I am currently logged into. It shows that it is compliant with the Business Support level that was selected earlier.
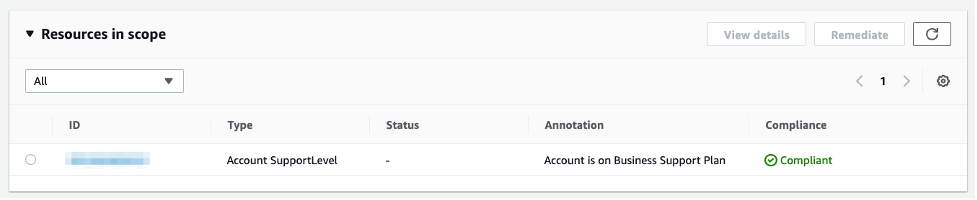
Figure 5: Sample AWS account in compliance with AWS Config rule
You can also view the results of the rules in any other account from the AWS Config delegated administrator or your management account (depending on how AWS Config is configured) by using the AWS Config Aggregator. Figure 6 shows one of my other accounts that is non-compliant where I manually searched for the account and the rule in the Rules section of the Config Aggregator.
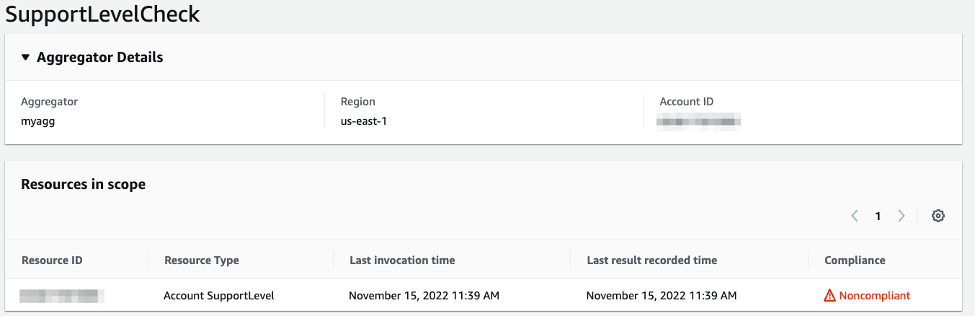
Figure 6: AWS Config Aggregator Rule area
By leveraging the Advanced Query feature of AWS Config, you can also view compliance of the rule for of all your accounts by following these steps:
- From the AWS Config console, click on Advanced Queries
- Click on the New Query button
- Once in the query console, select the name of your aggregator under Query Scope. Enter the query below in the New Query section and click on Run.
SELECT
configuration.targetResourceId,
configuration.targetResourceType,
configuration.complianceType,
configurationItemCaptureTime
WHERE
(
configuration.complianceType = 'COMPLIANT'
OR configuration.complianceType = 'NON_COMPLIANT'
)
AND configuration.configRuleList.configRuleName = 'SupportLevelCheck'
Figure 7 displays the results of the above query to determine if the compliance state of your accounts aligns with your desired support level. The first column of the results will show the AWS account ID, this tells me that in my AWS Organization only one of my accounts is compliant with my preferred support level so I might want to take steps to update my support plan. You can also choose to download this data by clicking on the Export as button and selecting JSON or CSV.
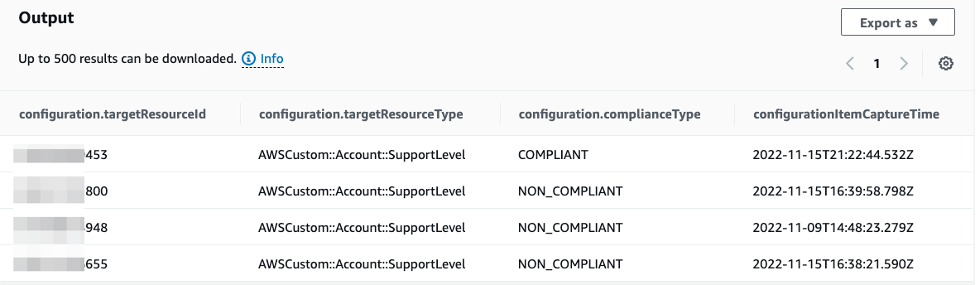
Figure 7: AWS Config Advanced Query console results
You also have the ability to centrally view an individual account’s AWS Support plan. For this solution we have added your AWS Support level as a tag on the AWS Configuration Item itself that you can view by navigating to the actual resource in the AWS Config Aggregator.
To do this follow these steps:
- From the AWS Config Advanced Query console results from earlier, copy the AWS account ID and then navigate back to the AWS Config console
- Expand the Aggregators section of the service menu, and click on Resources.
- Select your aggregator if it isn’t already selected, then in the search bar select filter by account and enter your AWS account ID.
- Add a second filter and select AWS Resource Type. Enter the name of the custom resource we created before AWSCustom::Account::SupportLevel and click on the result.
- Figure 8 displays the AWS Support level as a tag on the resource itself. In this case this AWS account does not have a support plan and I can choose to take action if needed.

Figure 8: AWS Config custom resource details
Deploying this solution will incur a small monthly charge for AWS Config, AWS Lambda, Amazon S3, and Amazon CloudWatch Logs. We have calculated this solution to cost around $3 USD per month for 100 accounts.
Cleaning up
While we recommend to not roll back these steps if you want to continue evaluating your accounts’ AWS Support level, you can follow the steps below to roll back any deployed resources.
- You can choose to remove any resources deployed via CloudFormation StackSets by following the service documentation.
- You will also need to delete the AWS Cloud9 instance if you created one.
- Delete the AWS S3 bucket you created. You first need to update the S3 bucket policy to grant yourself permissions to delete the S3 bucket and object using the same role/user you specified in the policy as mentioned earlier in this blog.
Conclusion
In this blog we discussed how you can audit the AWS Support level for your entire organization by leveraging a custom AWS Config resource and the AWS CloudFormation Registry. With this information your organization can make the decision of whether you need to upgrade your AWS Support plan on any of your AWS accounts.