Networking & Content Delivery
Automating CloudFront Continuous Deployment with a CI/CD Pipeline
In November 2022, Amazon Web Services (AWS) announced the launch of Amazon CloudFront continuous deployment, extending the functionality of your existing CloudFront distributions by allowing you to test and validate configuration changes to a percentage of live traffic before extending to your wider audience. Previously, customers had to do the heavy lifting of changing DNS records and creating separate domains for testing to then override DNS settings on clients for utilizing that endpoint once ready for production. Additionally, changes on lower environments need a hard change to production which can negatively affect production traffic. These efforts create inconsistencies, headaches, and significant overhead between environments that are hard to manage and maintain.
Integrating Amazon CloudFront’s continuous deployment functionality to existing CloudFront distributions allows customers to create a blue-green strategy. This strategy makes sure of a consistent experience throughout the user sessions without the worry of breaking production sites.
By taking this feature a step further and extending it to a continuous integration/continuous deployment (CI/CD) pipeline through AWS CodePipeline, you create a simple, repeatable, and automated approach to release changes to your CloudFront distributions.
This integration allows you and your team to store your code in your repository through AWS CodeCommit, GitHub, or Bitbucket. When a commit is triggered, the CodePipeline pipeline deploys the code through AWS CloudFormation and automatically promotes changes to production once you are satisfied with your testing results. This feature provides a single source of truth without worrying about causing downstream, unforeseen effects.
This post walks you through using your existing CloudFront distributions to create a new continuous deployment policy with staging CloudFront distribution. The deployment is all deployed with CloudFormation stacks through a CI/CD pipeline from staging to your production distributions. For this post, we are using an existing production CloudFront distribution created manually.
Solution overview
In this solution, CodePipeline runs when developers commit code changes into a branch hosted within a CodeCommit repository. CloudFormation deploys the template with the committed changes to the CloudFront staging distribution and creates the continuous deployment policy. CodePipeline sends an email to the configured recipients with a manual approval link. Then, you can run tests against your staging distribution to validate that your changes result in the expected result. Once you have completed your testing, selecting the link in the email from CodePipeline approves the changes for production. Once approved, an AWS Lambda function promotes the staging distribution to the associated production distribution.
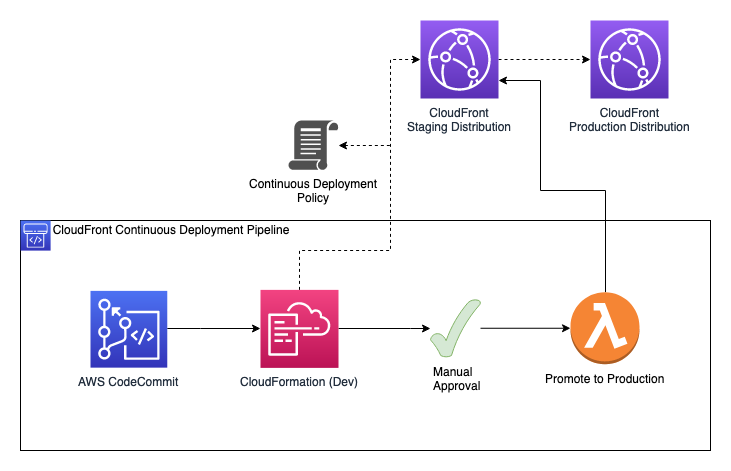
Figure 1: Workflow diagram for the automating of CloudFront Continuous Deployment with a CI/CD pipeline solution.
Prerequisites
To complete this tutorial, you need the following:
- An AWS account and an AWS Region where AWS CodePipeline, AWS CodeCommit, and AWS Lambda are available. View the AWS Regional Services List to confirm for your chosen AWS Region.
- An existing CloudFront Distribution
- We demonstrate with a manually deployed CloudFront distribution and recommend using a test distribution to demo this solution.
- Basic knowledge of AWS CloudFormation.
- Basic understanding of connecting and deploying to CodeCommit repositories.
Deploying the solution
You begin by downloading the repository contents to the local workstation.
Create the CI/CD pipeline
Log in to our AWS account and navigate to the CloudFormation console. Then, you create a new stack using the pipeline.yml template you downloaded from the repository. To build the deployment pipeline, use the provided parameters::
- Repository Name for CodeCommit such as:
CloudFront-ContinuousDeployment - Pipeline Name:
CloudFront-ContinuousDeployment-Pipeline - A name for the stack the pipeline later creates:
staging_cloudfront_distribution - The name of the file used for deploying the policy:
staging_cloudfront_distribution.yml - An email address CodePipeline uses to send approval emails.
- The CloudFront distribution ID for our existing production distribution.
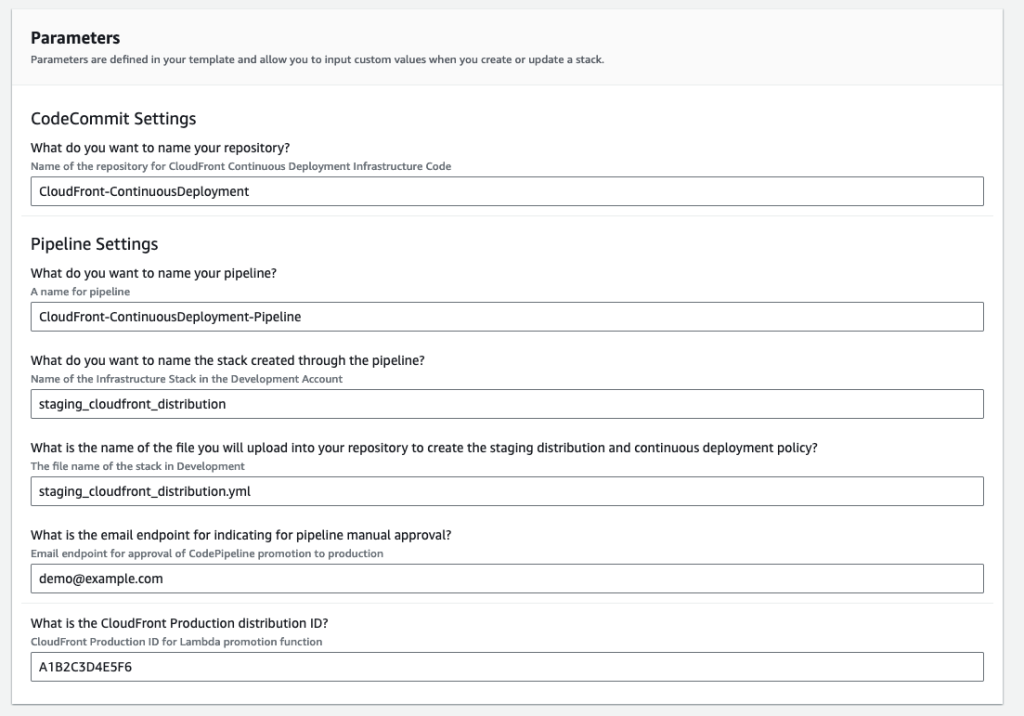
Figure 2: AWS CloudFormation parameters for deploying pipeline.yml
When CloudFormation completes the build of the pipeline, you receive an email address asking to confirm the subscription for notices from CodePipeline. By selecting Confirm subscription in the email, this one-time confirmation completes.
Browse to the CodeCommit dashboard to find the newly created repository.

Figure 3: AWS CodeCommit repository
Next, edit staging_cloudfront_distribution.yml to reflect the traffic configuration for the continuous deployment policy information you want to use.
CloudFront provides two traffic configuration options:
- Weight-based: Routes the specified percentage of viewer requests to the staging distribution. When you use a weight-based configuration, you can also enable session stickiness, which helps make sure that CloudFront treats requests from the same viewer as part of a single session.
- Header-based: Routes requests to the staging distribution when the viewer request contains a specific HTTP header (you specify the header and the value). Requests that don’t contain the specified header and value are routed to the primary distribution. This configuration is useful for local testing, or when you have control over the viewer requests.
For this example, use the weight-based traffic configuration. A single weight configuration of 10% is chosen and the staging_cloudfront_distribution.yml is updated for the CloudFormation template with these settings. These settings reflect an origin change for your distribution showing another static html stage.
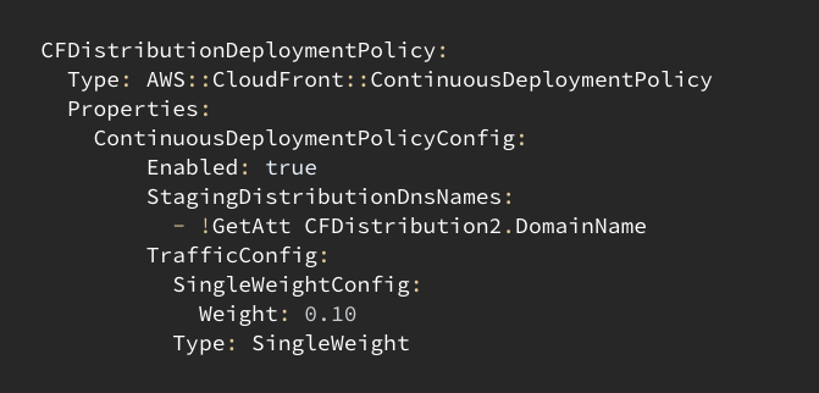
Figure 4: AWS CloudFormation yaml code of AWS CloudFront Continuous Deployment configuration policy.
Now that the template is ready, upload the staging_cloudfront_distribution.yml template to the CodeCommit repository. Then, the pipeline creates the staging CloudFront distribution and new continuous deployment policy. Follow one of the provided options to clone and connect to the repository.

Figure 5: AWS CodeCommit repository highlighting clone options.
Once your developers push the staging_cloudfront_distribution.yml file to the repository, CodePipeline starts its process, deploying the new staging distribution with continuous deployment policy via CloudFormation.
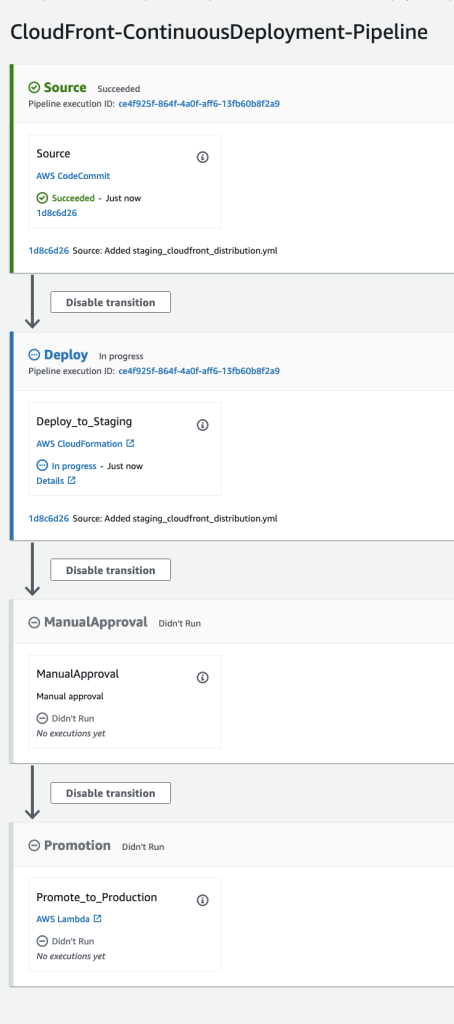
Figure 6: AWS CodePipeline initial deployment for AWS CloudFront staging distribution.
After a few minutes, the new CloudFormation stack creation completes. You must connect the production CloudFront distribution with the newly created continuous deployment policy. You use the cloudfront_continuous_deployment_connection.yml template from the original download to deploy a custom resource to connect the continuous deployment policy ID to the production CloudFront distribution.
You create a new CloudFormation stack using this template which imports two output values from the previous stacks: ProductionCloudFrontDistribution from the pipeline.yml and CFDistributionDeploymentPolicyID
from staging_cloudfront_distribution.yml.
When the stack creation is complete, you navigate to the CloudFront console and view the production CloudFront distribution. You see confirmation that the continuous deployment policy attaches to your production distribution.
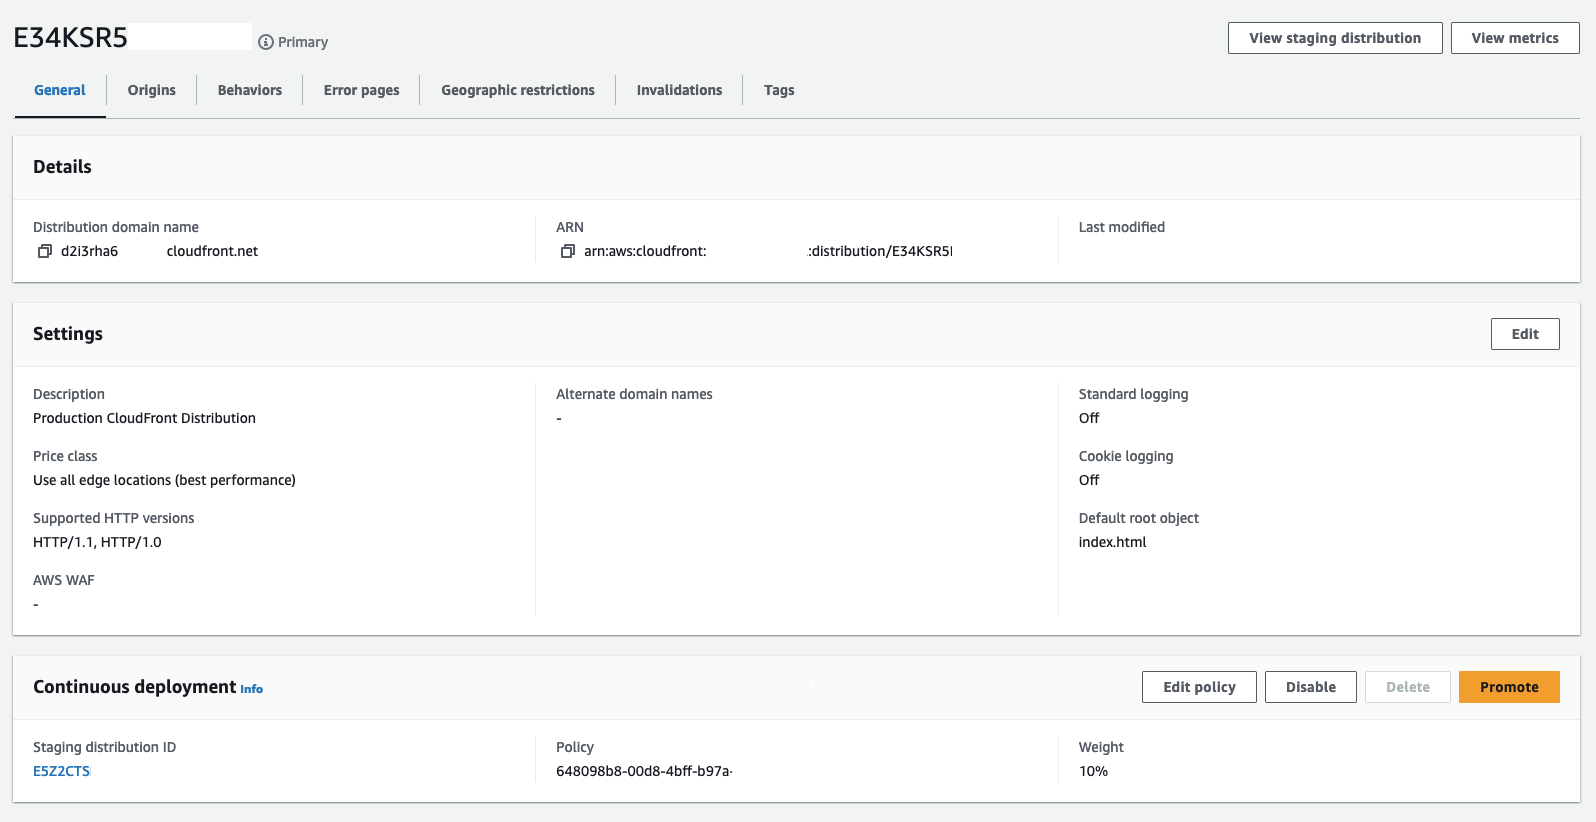
Figure 7: AWS CloudFront production distribution with attached Continuous deployment policy.
Now, let’s verify that the newly created staging distribution and continuous deployment policy are working as expected. For this example, it defines two different Amazon Simple Storage Service (Amazon S3) origins on the production and staging distributions. Your continuous deployment policy is set up to send 10% of traffic to the staging environment. You have also hosted a different index.html file on the Amazon S3 origin for staging to confirm that the staging distribution is working as expected.
Here is the original origin in production, which shows a static page displaying, “Hello, CDN origin is working fine”.
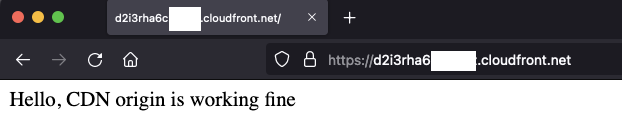
Figure 8: AWS CloudFront production distribution original origin.
The staging distribution sends 10% of traffic to your second origin with the staging content. Verify this by seeing 10% of your requests return the content from this second origin which displays, “Hello, CDN 2 origin is working fine”.
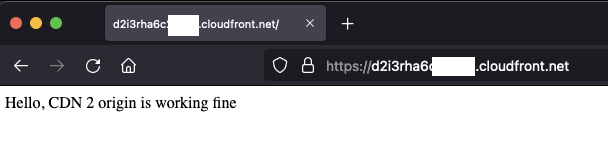
Figure 9: AWS CloudFront staging distribution origin.
CodePipeline sends an email to the email address provided earlier, letting you know a mandatory manual approval is waiting. After you verify that the staging distribution provides the results expect, you approve the manual approval stage and promote the change to production.
You browse to the CodePipeline dashboard and select Review on the ManualApproval stage. You can watch the progress of this promotion within the CodePipeline console or from the CloudFront console.
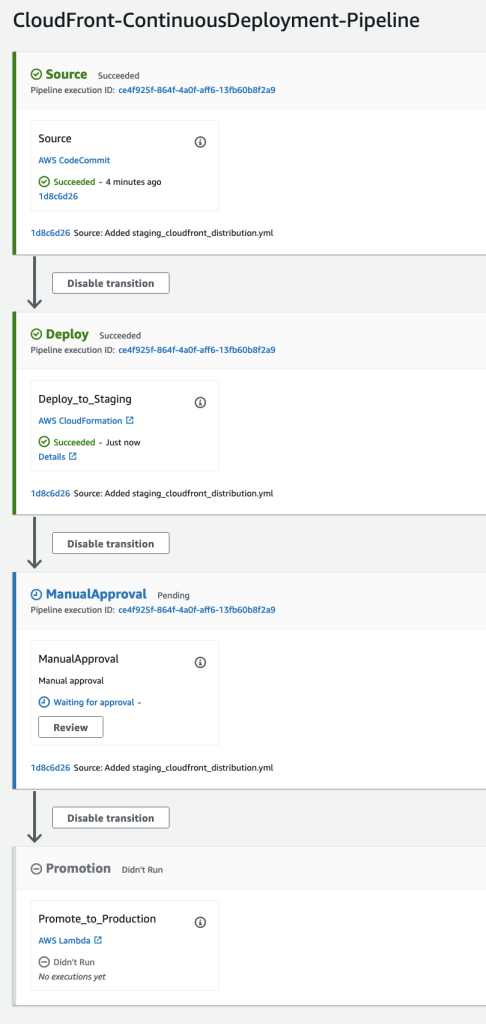
Figure 10: AWS CodePipeline waiting on manual approval stage.
After promoting the change to production, verify its success by browsing to the CloudFront production distribution endpoint and observing the changes for all requests. During the promotion process for CloudFront, the continuous deployment policy gets disabled when the staging distribution promotes to production. Setup by design, this remains connected to the production distribution. The policy is enabled once the pipeline runs again with new changes to the staging distribution. You also see that the continuous deployment policy attached to the production distribution yet is disabled as indicated by the Enable button being available.

Figure 11: AWS CloudFront Continuous deployment policy disabled.
After committing the changes to the staging_cloudfront_distribution.yml file, the pipeline process redeploys and enables the continuous deployment policy for the production distribution. Then, you can go through the verification process again before approving the change to be promoted to production through the manual approval stage. This solution enables a continuous pipeline process for repeatedly deploying changes to a staging CloudFront distribution, facilitating testing and validation, and ultimately promoting changes to production.
Note
You should make sure that the template includes all production origins, behaviors, and policies for the production distribution and not remove them. Otherwise, if an origin, behavior, or policy exists in the production distribution but is not present in staging, it removes the configuration from production when staging is promoted.
Cleaning up
To remove the demonstration setup and minimize costs, you delete the resources created in the following order:
- Delete the
cfn-responseCloudFormation stack. - Empty the artifact Amazon S3 bucket created from the
CloudFront-ContinuousDeployment-Pipelinestack. - Delete the CloudFront Continuous Deployment policy from the production distribution.
- Delete the
staging_cloudfront_distributionCloudFormation Stack. - Delete the
CloudFront-ContinuousDeployment-PipelineCloudFormation Stack.
Conclusion
In this post, you explored the benefits of using CloudFront continuous deployment through CodePipeline for existing CloudFront distributions. By incorporating this process into your current workflow, you can reduce the risk of human error by centrally storing your code for deployment and automating the process for deployment. The solution enables changes to production CloudFront distributions without requiring the shifting of DNS records for testing. Additionally, it provides a repeatable solution that can be applied to any CloudFront distribution within your AWS environment. Make sure to check out the GitHub repository and test out this solution in your environment today.

Jonathan Woods
Jonathan is a Solutions Architect within Small, Medium Business at AWS. He supports SMB customers in their journey to cloud migration and digital transformation. He is based out of Nashville, TN.

Jason Bradley
Jason Bradley is a Senior Solutions Architect at AWS in Nashville with a focus on higher education. He helps customers effectively architect their applications to run on AWS. Jason has over 20 years of experience in IT and higher education, loves reading, movies, and spending time with his son.