Networking & Content Delivery
IP Address Management for AWS Control Tower
For many customers, governing and auditing IP address allocation for at-scale networks is a complex, time-consuming, and potentially error-prone task. This is because application workloads are rapidly migrating to the cloud. Traditionally, network administrators have resorted to using combinations of spreadsheets, home-grown tools, and scripts to track address assignments across multiple accounts, Amazon Virtual Private Cloud (Amazon VPC), and AWS Regions. It takes time and care to avoid errors when updating spreadsheets while application development teams request IP address assignments for VPCs and subnets. Should these errors go unnoticed, they can lead to address conflicts and subsequent downtime, thereby causing serious operational and business issues.
In a large enterprise setup, this problem extrapolates as you have multiple lines of business (LOBs). Each LOB may belong to a separate AWS Organization consisting of multiple AWS accounts. However, having a unified view of IP address allocation and the ability to govern them across multiple Organizations can get even more challenging.
This is where the Amazon VPC IP Address Manager (IPAM) feature makes it easier to organize, assign, monitor, and audit IP addresses at-scale. Moreover, this lowers the management and monitoring burden and eliminates the manual processes. It lets you easily plan, track, and monitor IP addresses for your AWS workloads. Our solution leverages the IPAM to manage IP addresses across multiple Organizations and AWS accounts. In this post, we’ll demonstrate how to use IPAM to simplify the CIDR allocation and management to VPCs in accounts in a multi-org AWS Control Tower environment. We leverage AWS Control Tower Customizations, otherwise known as CfCT, for automation.
Solution overview
The solution leverages AWS Control Tower workflow, which configures AWS CodePipeline, AWS CodeBuild projects, and AWS Step Functions to orchestrate account vending and its management within your organization. A customized configuration package for IPAM implementation across multiple organizations is uploaded to an AWS CodeCommit repository. This triggers a build that zips the individual IPAM configurations required for an Organization to the respective Amazon Simple Storage Service (Amazon S3) buckets used by CfCT (e.g., Main-IPAM-CfCT-Customization or LOB-1-IPAM-CfCT-Customization). An upload to the S3 bucket further triggers customizations workflow within that specific Organization. This customized IPAM solution provisions an IPAM in the Networking Hub account of every Organization. The spoke accounts that are vended by AWS Control Tower use IPs that are allocated from the IPAM in their respective Organization. This is shown in the following figure.
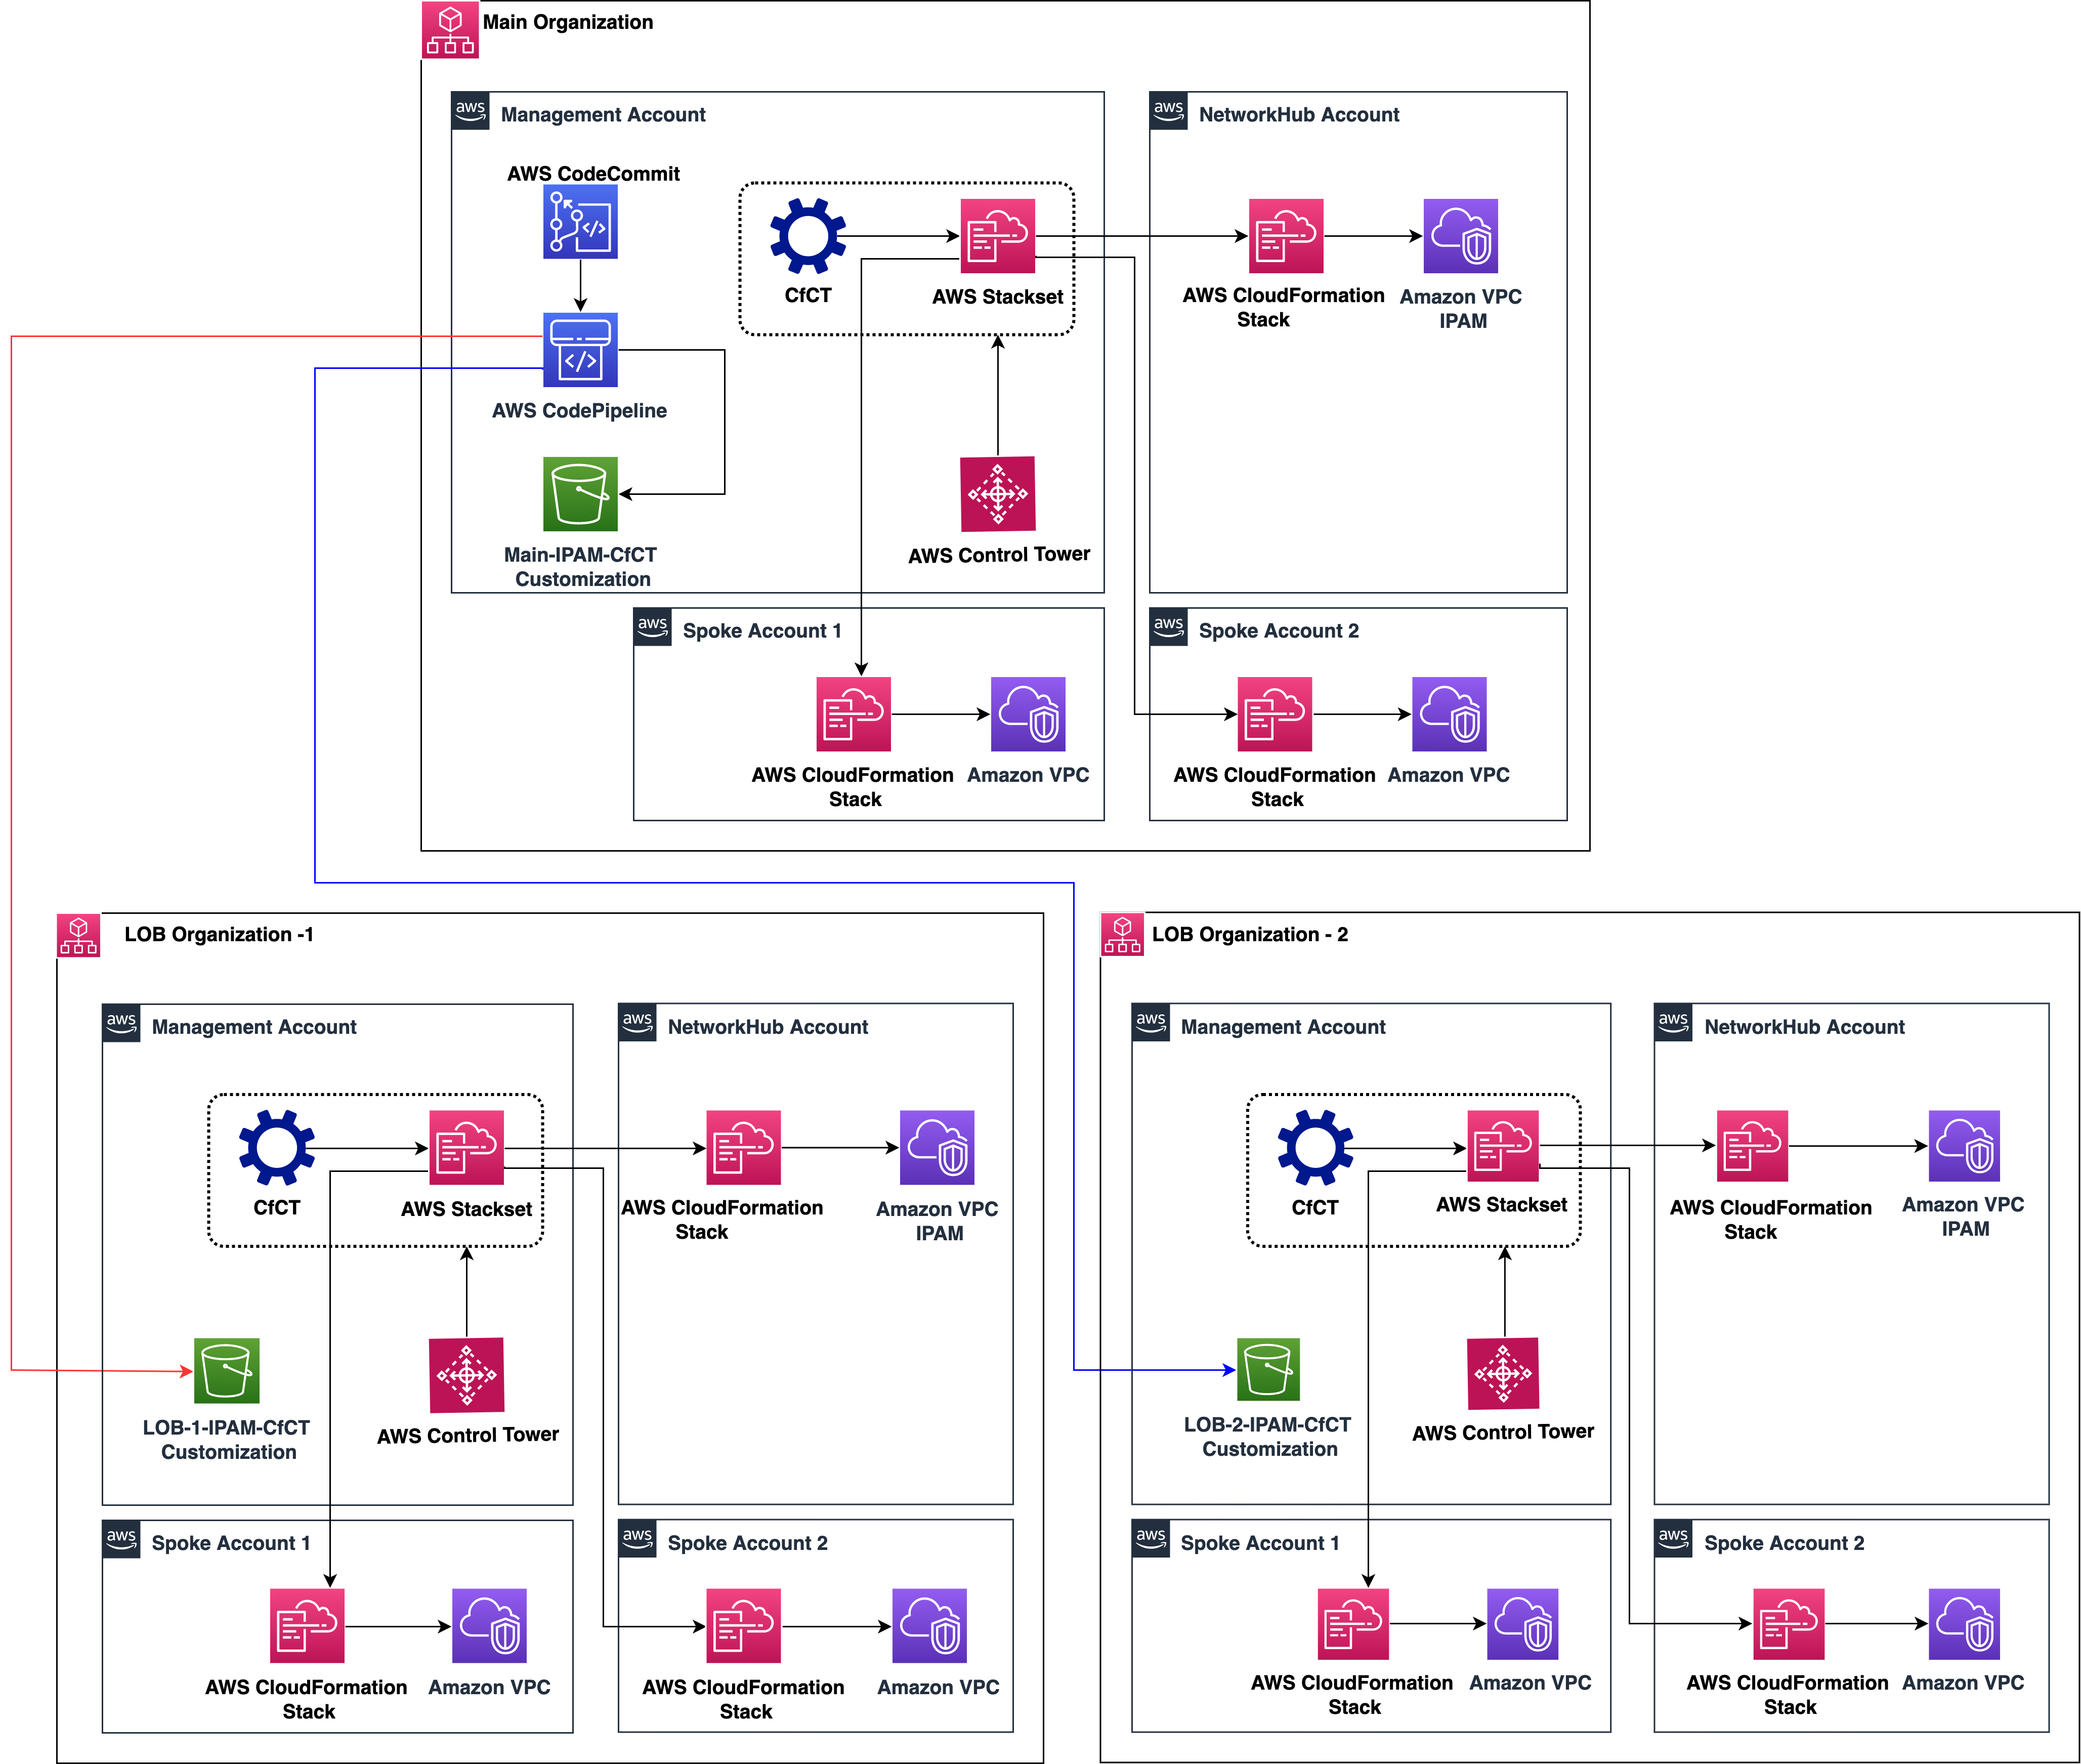
Figure 1: Flexible IP Address Management for AWS Control Tower multi-org setup
Example walkthrough
In this section, we consider a top-level pool (e.g., 10.0.0.0/8) that we use as an input for our IPAM solution. Two regional pools are created from the CIDRs sourced from the top-level pool. A Production IPv4 pool and a Non-Production IPv4 pool are then created from the regional pool. The following figure shows an example of the IPAM pool hierarchy for IPv4 across multiple AWS Regions within a top-level IPAM pool for the main organization. IPv6 isn’t considered for the purpose of this post, but it will follow the same pattern as IPv4.
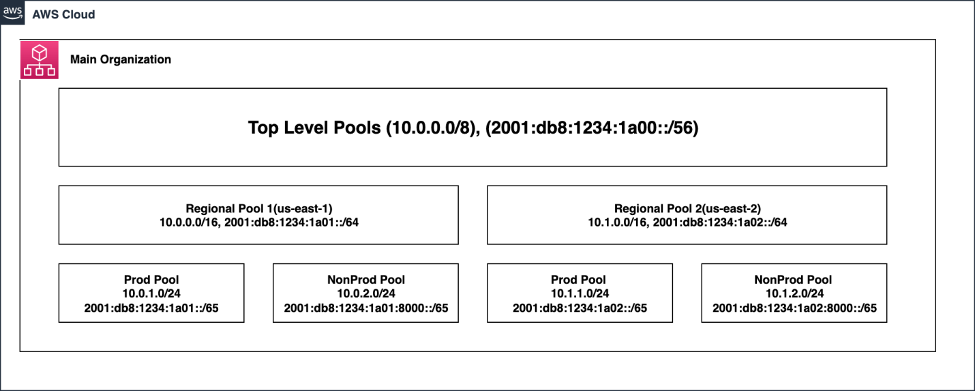
Figure 2: IPAM Pools used in Main Organization
Prerequisites
- The default accounts and the Organizational Unit (OU) structure provisioned through AWS Control Tower are present. In other words, the following accounts are present and enrolled in the AWS Control Tower landing zone:
- Management Account
- Log Archive and Audit Accounts (in Security OU)
- Create Shared Services OU and create a Network Hub Account. Associate the Network Hub Account to the Shared Services OU.
- Deploy the CloudFormation template in the management account. This template creates the AWS Systems Manager parameters and AWS Resource Access Manager (AWS RAM) shares to interact with Organizations.
Branching Strategy
- Main/master – tracks for Main Organization: receives Pull Request (PR) from feature branch to deploy in Main Organization.
- lob-1-ipam-cfct-customization: tracks the LOB Organization 1 and receives PR merge from feature branch to deploy in LOB Organization 1.
Note : You should create one branch per Organization to trigger the respective CodePipelines.
Deployment steps
The deployment of this flexible IPAM solution consists of six sections:
Section 1: Create a CodeCommit repository in the Management account of the Main Organization.
Section 2: Deploy the CodePipeline in the Management account of the Main Organization.
Section 3: Make the necessary changes to the Management Account.
Section 4: Provision a spoke account, and enroll to the required OU (e.g., Development OU).
Section 5: Merge the required branch in the CodeCommit repository to trigger the Pipeline.
Section 6: Validate the VPC creation in the spoke account.
Section 1: Create a CodeCommit repository in the Management account of the Main Organization
- Log in to the Management Account of the Main Organization and create a CodeCommit repository to push the .zip files.
- This repository acts as a source for the continuous integration/continuous development (CI/CD) pipeline that we’ll be deploying in the next step.
- A Makefile is provided in the main directory that defines a set of tasks to be executed during the CodeBuild stage. Copy the Makefile and .cicd/buildspec.yaml template to the root of the CodeCommit repository.
- An example repository structure in CodeCommit is shown in the following figure.
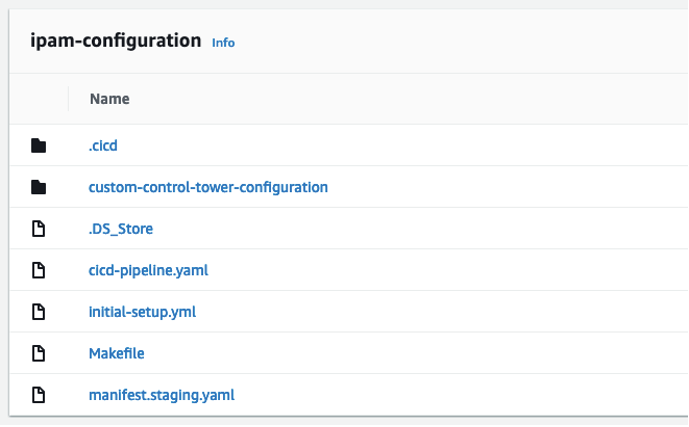
Figure 3: CodeCommit repository structure
Section 2: Deploy the CodePipeline in the Management Account of the Main Organization
- Log in to the Management Account of the Main Organization in the home region of CfCT. Navigate to AWS CloudFormation in the console.
- Create a CloudFormation stack using the cicd-pipeline.yaml template. Provide the repository name created in Step 1.
Section 3: Make necessary changes to the Management Account
- Deploy the customizations for AWS Control Tower in the Management Account. The framework can be deployed using the ‘Launch in the AWS Management Console’ button in the link provided. Use the default parameters when deploying the framework.
- Navigate to the CloudFormation in the console. In the left pane, select stacks. Validate that it is in the CREATE_COMPLETE state.
- Modify the KMS Key policy for CustomControlTowerKMSKey in the Management account to include the pipeline and build roles created in the above section. An example of the KMS Key policy is shown in the following figure.
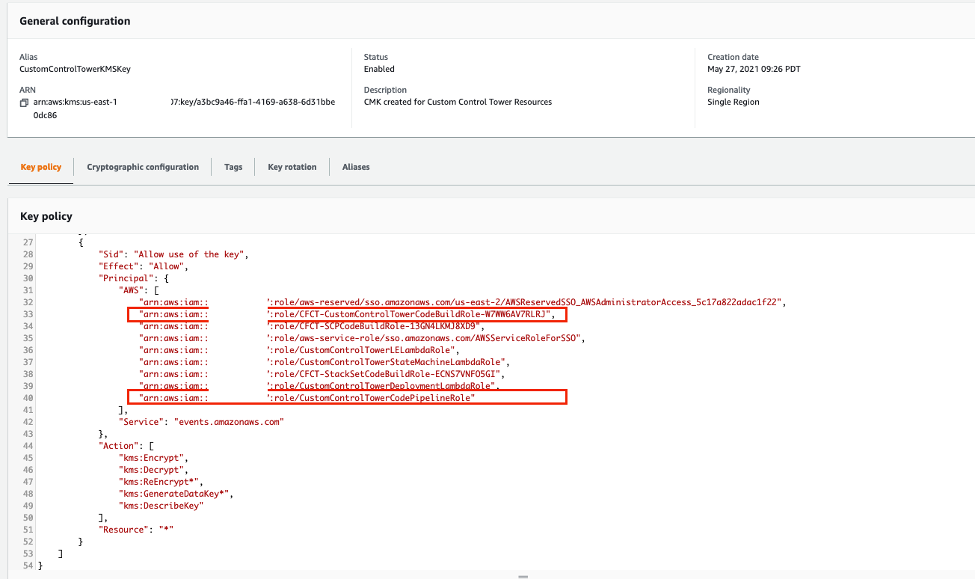
Figure 4: KMS Key Policy with CodeBuild and CodePipeline role permissions
- Update the custom-control-tower-configuration-<accountId>-<cfct-region> S3 bucket’s policy in all of the Organizations for cross-account access.

Figure 5: An example S3 bucket policy
- Download the custom-control-tower-configuration folder.
- Update the manifest.org1.yaml file with values that meets your requirements. Modify the OU in the “deployment targets” section of “vpc-automation-in-spoke-dev” resource. Then, update the “Regions” section with the appropriate Region.
- Modify the parameter values in vpc-automation-in-spoke.json to provision VPCs and subnets with varying sizes (small, medium, or large) as per your requirements. Additionally, update the pEnvironment parameter with one of the allowed values: prod, nonprod, or dev.
- Update the parameters in vpc-automation-in-networking-hub.json with the appropriate values as required.
Note : You should create one “custom-control-tower-configuration” folder per Organization and repeat Steps 4 through 6 for multiple Organizations. Rename the manifest.<orgnumber>.yaml accordingly to make sure that the correct manifest files are used for each Organization.
Section 4: Provision a Spoke Account and enroll to the required OU (e.g., Development)
- Provision a new member account in your AWS Control Tower Landing zone with Account Factory.
- Navigate to the Account Factory page in AWS Control Tower.
- Select the Enroll account item near the top of the page, and enroll the account to the required OU.
- Navigate back to the Management Account and update the “deployment targets” of the “vpc-automation-in-spoke-dev” section in manifest.org1.yaml file with the appropriate OU name (e.g., Development). Then, update the “Regions” section with the appropriate Region. This is shown in the following figure.
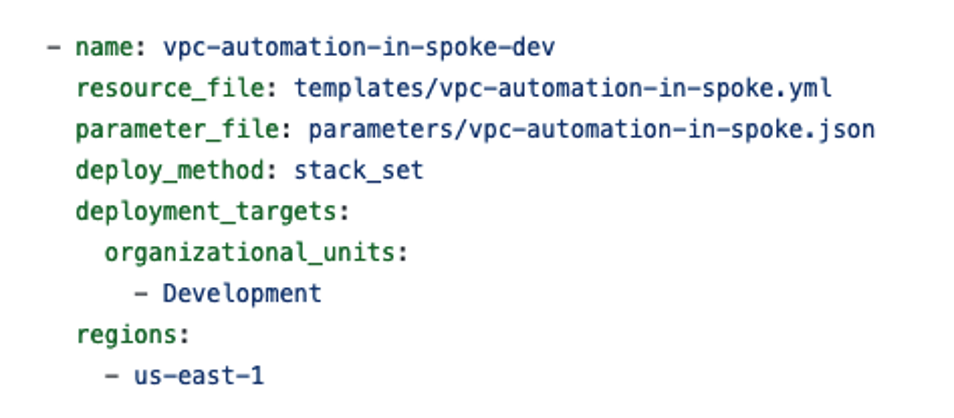
Figure 6: Manifest file showing the deployment targets of vpc automation in spokes
Section 5: Merge the required branch in CodeCommit repository to trigger the Pipeline.
- Make all of your developments in a feature branch.
- Merge the feature branch into a master to trigger the CfCT pipeline in Main Organization. Upon successful merging, the CI/CD pipeline creates a .zip file (custom-control-tower-configuration.zip), and then puts it into the Main Organization’s CfCT S3 bucket (the custom-control-tower-configuration-<accountId>-<cfct-region> bucket).
Section 6: Validate the VPC creation in the spoke account
- After completing the two steps above (under section 5), log in to the spoke account to validate the VPC creation. The VPCs are created based on the size that you provide (small, medium, or large) and the CIDRs in the IPAM pool provisioned for this Organization.
Integrating IPAM solution across multiple organizations
For integrating IPAM solution across multiple organizations, follow the next steps. In this scenario, we consider two organizations – Main Organization and LOB Organization 1.
- Make sure that the prerequisites are satisfied for this environment.
- Download the custom-control-tower-configuration folder. Follow the same deployment instructions as performed in Sections 3, 4, and 5, but perform the actions in Sections 3, 4, and 5 for LOB Organization 1.
- Merge the feature branch into the “lob-1-ipam-cfct-customization” branch to trigger the CfCT pipeline in LOB Organization 1. In this case, the CI/CD pipeline zips and puts the file into the “LOB Organization 1” organization’s CfCT S3 bucket.
Once the customizations pipeline is finished, navigate to the CodePipeline console in the LOB 1 management account to validate that the Custom-Control-Tower-CodePipeline is in the succeeded state. Navigate to the StackSets section of the CloudFormation console to further validate and see the deployed StackSets.
Cleanup
After successfully testing and validating, all of the resources deployed through CloudFormation templates should be deleted to avoid any unwanted costs. Simply go to the CloudFormation console, identify the appropriate stacks, and delete them.
If you followed along with the example setup, then you should clean up any resources that you created to avoid additional charges in the long run. To perform a cleanup of the resources, you must:
- Delete the StackSets that were created in the LOB Organization – 1 and LOB Organization – 2. To delete a stack set, you must first delete all stack instances in the stack set.
- Delete the StackSets that were created in the Main Organization. To delete a stack set, you must first delete all stack instances in the stack set.
- Remove the CodePipelineRole and CodeDeployRole permissions added to the CustomControlTowerKMSKey in the management account of Main Organization.
- Delete the CodePipeline stack created in the management account of Main Organization.
- Delete the CodeCommit repository created in the management account of Main Organization.
Note : If you use a multi-account setup, then you must navigate through account boundaries and follow the above steps as needed to cleanup.
Conclusion
This solution for IPAM that leverages AWS Control Tower customizations demonstrates how easy it is to centrally manage and size your VPCs as per your application requirements. The solution is integrated end-to-end with CfCT. This provides a DevOps approach and an up-to-date overview of the IP address space that’s available across multiple Organizations. Moreover, this solution leveraging IPAM provides the flexibility of having different CIDR sizes allocated to your VPCs.
About the Authors

Shiva Vaidyanathan
Shiva Vaidyanathan is a Senior Cloud Infrastructure Architect at AWS. He provides technical guidance, design and lead implementation projects to customers ensuring their success on AWS. He works towards making cloud networking simpler for everyone. Prior to joining AWS, he has worked on several NSF funded research initiatives on how to perform secure computing in public cloud infrastructures. He holds a MS in Computer Science from Rutgers University and a MS in Electrical Engineering from New York University.

Mokshith Kumar
Mokshith Kumar is a Cloud Infrastructure Architect at AWS. He thrives on learning new technologies and solving complex customer challenges. He enjoys interacting with customers and strives to help accelerate their cloud adoption journey by providing technical guidance and implementation of AWS Solutions. He holds a master’s degree specializing in Computer Networks from the University of Southern California. Off work, Mokshith is an avid swimmer and enjoys listening to music.