AWS Public Sector Blog
Building scalable WordPress sites for public institutions on Amazon Lightsail
A guest post by Manav Sehgal, Head of Solutions Architecture, AWS Worldwide Public Sector India
Countless popular websites maintained by public institutions are built on the WordPress platform. It’s essential that these sites are highly scalable. Amazon Lightsail helps ensure that they can handle high-traffic situations.
These sites often require on-demand scaling during high-traffic spikes, for example, when media coverage mentions government websites or an educational institution is registering during admissions season. Given these requirements, if the website isn’t set up properly, the features that make WordPress popular for public websites can sometimes become a challenge to manage.
Delivering high performance for these websites can be another challenge, as these websites can contain thousands of pages of content and serve millions of users. Such sites also face security threats, including distributed denial of service (DDoS) attacks, website defacement, and SQL injection attacks, among others.
WordPress best practices on AWS
For these reasons, many highly demanding WordPress websites run on AWS. Millions of customers are currently using AWS services and solutions to build sophisticated websites and applications with increased flexibility, security, scalability, and reliability.
AWS provides best-in-class infrastructure and incorporates the popular Well-Architected Framework into its services, which enhances performance, security, reliability, cost optimization, and operational efficiency when running WordPress on the cloud. AWS also provides a choice of WordPress deployment options:
- Simple deployment—A cost-effective, quick, and easy single-server deployment. This option offers the fastest path to re-hosting WordPress websites in the cloud.
- Elastic deployment—A well-architected, highly available, multi-server deployment that uses the power of the hyperscale cloud.
It is possible to migrate from on-premises to a simple deployment option, and then re-platform and re-architect for elastic deployment over time.
Horizontally scaling WordPress on AWS
You can launch a WordPress site in minutes on your own Virtual Private Server (VPS) using Amazon Lightsail. This will deploy the WordPress app and database server on the same VPS. If you choose to deploy using horizontal scaling, your WordPress website can potentially keep scaling as long as the cloud provider can provision instances. However, horizontal scaling requires making re-platforming decisions while distributing the application tiers.
Another benefit of horizontal scaling is that, as you re-platform your application tiers to replicate horizontally, you can also place them in different data centers. In the case of AWS, you place them in collections of data centers called Availability Zones. Amazon Lightsail simplifies access and upgrade to many AWS services required for building high availability, scalability, security, and fault tolerance into your workloads.
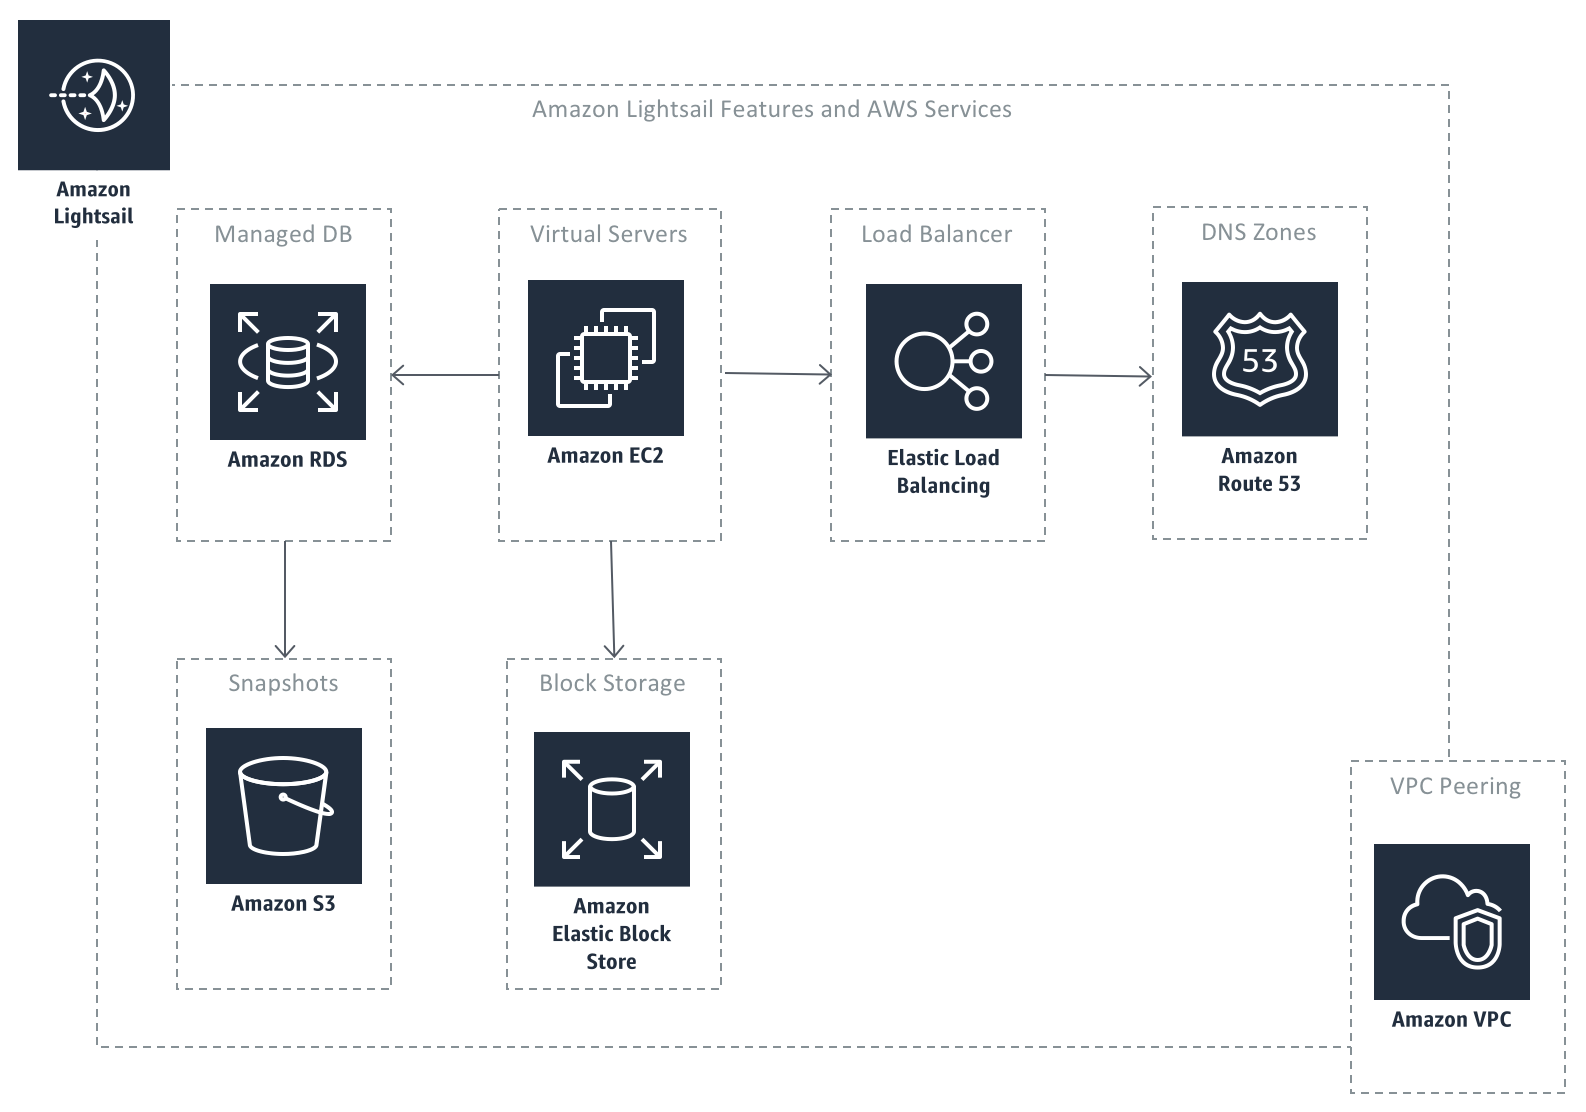
Amazon Lightsail Features and AWS Services
Consider an Amazon Lightsail-based method of horizontal scaling. While you are re-platforming, you may turn on maintenance mode for your WordPress website so that databases do not go out of sync between production and staging.
While re-platforming your site, make changes in a staging area instead of production. You can copy an existing WordPress site that’s already migrated on a single VPS instance on Lightsail. To do so, just create a snapshot of the instance and choose Create New Instance. For more information, see Create a Linux-based instance.
Managed database for WordPress on AWS
The database is the most important resource for any application when it comes to ensuring scalability, fault tolerance, and high availability. Lightsail makes it easy to set up a highly available, managed database using Amazon RDS for MySQL. Once you are logged into your AWS Management Console, you can visit Lightsail Databases to launch a fully configured MySQL or PostgreSQL database in minutes and leave the maintenance to Lightsail.
Make a note of your database name as you will need this when migrating the database from the VPS database to Amazon RDS. Next, choose High Availability, which creates a primary/secondary cluster across multiple Availability Zones and keeps the secondary database synchronously replicated based on updates to the primary database. After you create the database, it can take a while to set up the Amazon RDS high availability cluster. Move to other steps while this one completes. Next, export or dump the database of your VPS MySQL database for import into the Multi-AZ RDS database. Run the following command on the SSH terminal for the instance:
mysqldump -u root -p bitnami_wordpress > backup.sql
Get the password for mysqldump command from `/home/bitnami/bitnami_application_password`
When the RDS database is ready, get the database endpoint, user name, and password for running the import command.
Now, import the SQL dump taken earlier into the RDS database. Remember that the default DB-NAME when setting up RDS on Lightsail is dbmaster, as shown in the previous step.
mysql -u USERNAME -p -h RDS-ENDPOINT -D DB-NAME < backup.sql
You can check if the RDS database created the WordPress tables by running the following query. Type the query into a new file called tables.sql, then replace backup.sql in the preceding command:
SELECT table_name FROM information_schema.tables where table_schema='dbmaster';
Now, switch the database within the WordPress wp-config.php file of the primary instance:
cd ~/apps/wordpress/htdocs
nano wp-config.php
After changing and saving the wp-config.php file, check the services running on your instance and stop the VPS MySQL database. Then, restart the Apache server.
sudo /opt/bitnami/ctlscript.sh status
sudo /opt/bitnami/ctlscript.sh stop mysql
sudo /opt/bitnami/ctlscript.sh restart apache
Despite stopping the VPS MySQL database, your blog is functioning just fine, as it’s now serving the database from Amazon RDS instead.
High availability WordPress on AWS
Before the next step, ensure that you installed the required plugins for your WP environment. Many plugins update WP files, which may only update one server, depending on which administrator account you’re logged into.
As you implement high availability WordPress on AWS, you will need to serve the static assets like images from a source, which are shared by the multiple `wp-core` instances. Please refer to the paper WordPress Best Practices on AWS and the section titled “Static Content Offload,” which suggests offloading static assets to Amazon S3 using WordPress plugins like W3 Total Cache. You can also use WP Offload Media Lite, a plugin purpose built for this use case.
A potential solution for adding plugins after splitting loads between multiple WP Core servers is to create a staging environment for major releases. Create a snapshot from the existing server, then create new instances from snapshots. Then, after the updates, point the servers back to the load balancer, as followed in this deployment scenario.
Now that you have separated the WordPress Core application and the MySQL database, horizontally scale the instance. The best way to do so is by using the same process that you used earlier to copy an instance:
- Create a snapshot from the source instance.
- Create a new instance from the snapshot. Select Availability Zone B for the new instance, as you are also targeting high availability for this architecture.
Check if both instances are pointing to the same RDS database:
- Stop the local MySQL database instance for the new instance (as you did for the first one).
- Make a change using WordPress Admin on one of the instances, then see if the change appears on a frontend served by the other.
It’s time to set up the load balancer to automatically distribute traffic to these instances and failover when one of the instances is down. Attach each instance one at a time.
Check if the load balancer is alternating traffic between both instances by removing the Bitnami banner for one of the instances. Locate the DNS name provided by the load balancer. Refresh the browser a few times and you may see the Bitnami banner for the instance where you did not disable it. To remove the banner, run the following commands:
sudo /opt/bitnami/apps/wordpress/bnconfig --disable_banner 1
sudo /opt/bitnami/ctlscript.sh restart apache
Now, change the DNS zone to resolve the website domain from the earlier specified static IP address to the newly defined load balancer.
Lightsail increases security for WordPress websites by abstracting away server virtualization, issuing operating system patches, and offering easy integration with managed databases. Secured shell-based access to virtual private servers adds to this security layer.
You can enhance these security measures by adding SSL-based encryption for accessing the web resources hosted on Lightsail. You can also add SSL support to the load balancer configuration. After you do, you may have to use one of the available WordPress plugins to fix the mixed HTTPS URL issues.
Summary
This completes the Lightsail portion of the re-platforming process. In this post, you’ve seen how this process can transform a single, monolithic VPS WordPress site into a high availability, multi-AZ, fault-tolerant, and horizontally scalable architecture.
As a next step, public institutions may want to launch a proof-of-concept WordPress website using Lightsail to evaluate and compare features, offering scalability, security, and manageability requirements.
Subscribe to the AWS Public Sector Blog newsletter to get the latest in AWS tools, solutions, and innovations from the public sector delivered to your inbox, or contact us.