AWS Public Sector Blog
How to build secure data lakes to accelerate your nonprofit’s mission

Data is transforming how public sector organizations drive their decision making. With Amazon Web Services (AWS), nonprofits can increase their insights and advance their mission. For example, the Global Emancipation Network (GEN), a nonprofit dedicated to ending human trafficking, uses data to identify traffickers and victims.
Analytics can also help nonprofits identify fundraising prospects, the most effective fundraising methods, and most favorable target markets. This targeted outreach generates efficiencies in determining where to best allocate resources.
Data analytics can help improve membership recruitment efforts by identifying the most effective lead-generating sources. Organizations can use data analytics to identify the best time periods for membership renewals and the most common drop-off sources in the new-member recruitment process.
Using data lakes, nonprofits can use data to influence strategy and inform decisions that produce value and impact. In this post, learn how to build a data lake, ingest data from a PostgreSQL server, give permissions to users to consume the data using AWS Lake Formation, and access and analyze the data using Amazon Athena.
AWS Lake Formation enables nonprofits to set up a secure data lake in days. Doing so is as simple as defining the data sources and the data access and security policies you want to apply. AWS Lake Formation then helps you collect and catalog data from databases and object storage, move the data into a Amazon Simple Storage Service (Amazon S3) data lake, clean and classify your data using machine learning (ML) algorithms, and secure access to your sensitive data.
Building a data lake involves: 1) setting up storage, 2) acquiring and moving data, 3) cleaning, enriching, and cataloging data, 4) configuring and enforcing policies, and 5) making data available to users. This pipeline is illustrated in Figure 1.
 Figure 1: Data lake setup.
Prerequisites
Start with the AWS CloudFormation template built for this demo to create resources and complete necessary setup to ingest and consume the data. The template creates and configures the following:
- Amazon Relational Database Service (Amazon RDS) PostgreSQL instance with a database called
sportstickets, and an AWS Glue database connection calledlf-source-dbto ingest sportstickets data to the data lake. - Amazon S3 buckets named
datalake-<AccountID>andlf-workshop-<AccountID>to store the data. - AWS Identify and Access Management (AWS IAM) users named
lf-datalake-adminandlf-business-analyst, and a role namedLF-GlueServiceRolefor data lake management and access. - Configures
lf-datalake-adminas data lake administrator - Creates
lf-datacatalogdatabase that holds meta data on the data lake - Registers Amazon S3 bucket
datalake-<AccountID>as the data lake storage location, and assigns the roleLF-GlueServiceRolefor AWS Lake Formation service to read and write from the bucket.
Select the button below (or this link) to launch the template with most parameters pre-defined for you. However, you must select an Amazon Elastic Compute Cloud (Amazon EC2) key pair from your account.
![]()
Once the stack completes successfully, you can begin to set up the data lake, populating data from the source database, configuring the permission model and accessing the data using Amazon Athena. Select the Outputs tab of the stack in the CloudFormation console to see the values of LFDataLakeBucketName, AthenaQueryResultLocation keys. These are Amazon S3 buckets that the CloudFormation stack created for you. Please note these values, as you’ll need to refer to them later on.
Enabling AWS Lake Formation permission model
Lake Formation default setting includes “Use only IAM access control” for backward compatibility with the AWS Glue catalog. Leverage Lake Formation permissions by disabling the default settings. Lake Formation permissions control access to data catalog resources, Amazon S3 locations, and the underlying data at those locations. It also provides fine grained access at the table, column and row level for AWS Glue data catalog resources.
1. Login to AWS management console as lf-datalake-admin user using ConsoleIAMLoginURL from CloudFormation Outputs tab. The user’s password can be found in the LFUsersPassword key in the Outputs tab of the CloudFormation stack.
2. In the Lake Formation console, under Data Catalog, select Settings.
3. Uncheck the default permissions “Use only IAM access control for new databases” , “Use only IAM access control for new tables in new databases” and click Save.
4. In the left navigation, under Permissions, choose Administrative roles and tasks.
5. Select IAMAllowedPrincipals in the Database creators section and click Revoke.
6. In the left navigation, under Data Catalog, choose Databases. Select lf-datacatalog and click Edit from Actions menu.
a. Uncheck “Use only IAM access control for new tables in this database” and Save.
Data ingestion using blueprints
1. Access the AWS Lake Formation console at https://console.aws.amazon.com/lakeformation.
2. From the left navigation menu under Register and ingest choose Blueprints and click on Use blueprint. This opens a wizard to create a data ingestion workflow in which you configure data source and destination attributes.
3. Select Database snapshot as the blueprint type to bulk load data from AWS RDS PostgreSQL instance.
4. For Import source configuration:
a. In the Database connection field, select lf-source-db. This is the connection that was created by the CloudFormation stack
b. Enter sportstickets/ for the Source data path.
5. Leave default for Exclude patterns configuration.
6. For Import target configuration :
a. In the Target database field select lf-datacatalog
b. In the Target storage location field enter the name of the S3 bucket. Enter the LFDataLakeBucketName key value found in the Outputs tab of the CloudFormation console for the stack used in this example for the S3 bucket.
c. For the Data format, select Parquet.
7. Leave default for Import frequency.
8. For Import options configuration:
a. In the Workflow name field, enter a workflow name relevant to data source. In this case I entered sportstickets-worklfow
b. In the IAM role field, select LF-GlueServiceRole
c. In the Table prefix field, enter dl. All tables imported are prefixed with this value.
d. Leave default for Maximum capacity and Concurrency
e. Click Create to the workflow. This takes a few minutes to create.
8. Start the sportstickets-workflow to ingest the data from source by selecting it and choosing Start from the Actions menu. This workflow takes approximately 30 minutes to complete.
Granting access permissions
One of the key features of Lake Formation is centrally defining security, governance, and auditing policies in one place, versus doing these tasks per service, and then enforcing those policies for your users across their analytics applications.
Policies are consistently implemented, eliminating the need to manually configure them across services like AWS IAM and AWS Key Management Service (AWS KMS), storage services like Amazon S3, and analytics and machine learning services like Amazon Redshift, Amazon Athena, and Amazon EMR for Apache Spark. This reduces the effort in configuring policies across services and provides consistent enforcement and compliance.
Next, the following steps walk through a permission model set up for a business user lf-business-analyst who has select access to the sport_team_id and first_name columns of the dl_sportstickets_dms_sample_player table. Before continuing, make sure the blueprint workflow from the previous step has successfully completed.
Setting up permissions for lf-business-analyst:
1. Under the Permissions in the left navigation module of the AWS LakeFormation console select Data permissions. Click Grant.
2. In the Grant Permissions page
a. Select IAM users and roles.
b. In the IAM users and roles drop-down, enter lf-business-analyst . The lf-business-analyst user is the business analyst who has access to the dl_sportstickets_dms_sample_player table that is ingested from source database.
3. In the Policy tags or catalog resources section
a. Select Named data catalog resources
b. Choose lf-datacatalog database from the Database dropdown
c. Select dl_sportstickets_dms_sample_player from the Table drop down.
5. For Permissions configuration
a. Select Column-based permissions to grant access to specific columns.
b. Select Include columns for permission filter
c. Select sport_team_id and first_name from the Select columns dropdown
d. Click Grant. See Figure 2.

Figure 2: Setting up data permissions – selecting column columns for fine grained access.
Querying the data
To access the data, use Amazon Athena, which is an interactive query engine that makes it easy to analyze data in Amazon S3. Amazon Athena is already integrated with the AWS Lake Formation permission model.
Accessing data as lf-business-analyst:
1. Login to AWS management console as lf-business-analyst user using ConsoleIAMLoginURL from CloudFormation Outputs tab. The user’s password can be found in the LFUsersPassword key in the Outputs tab of the CloudFormation stack.
2. Search and access Amazon Athena from the management console.
3. Select lf-datacatalog from the Database drop down.
4. Setup query result location to a folder on an Amazon S3 bucket, if you are using Athena service for first time. In the Query results location enter the AthenaQueryResultsLocation key value found in the Outputs tab of the CloudFormation console for the stack used in this example.
5. Author a query to select data from the dl_sportstickets_dms_sample_player table and click Run query. Though the user requested all columns, the query returned only sport_team_id and first_name as per the permission model that was setup earlier. See Figure 3.
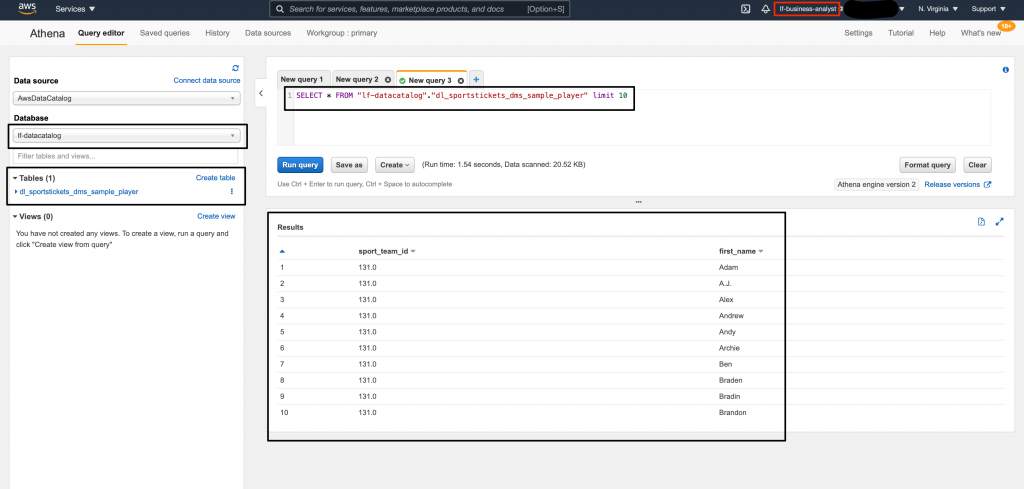
Figure 3: Accessing the data using Amazon Athena as lf-business-analyst – query execution with output.
Clean Up
To avoid ongoing charges to your AWS account, remove the resources you created:
- In the Lake Formation console, delete the blueprint workflow you created.
- Use the CloudFormation console to delete the stack created as part of this demo. Choose the stack, choose Delete, and then choose Delete stack.
There’s no additional cost for using the features of AWS Lake Formation. It builds on capabilities available in AWS Glue and uses the Glue Data Catalog, jobs, and crawlers. It also integrates with services like Amazon CloudTrail, IAM, Amazon CloudWatch, Athena, Amazon EMR, and Amazon Redshift, and others.
To estimate costs for your data lake use case, refer to white paper Cost Modeling Data Lakes.
You can extend the example in this blog to ingest data from other sources, enrich and combine the data using AWS Glue ETL jobs, setup a more robust permission model, and make data available to downstream services such as artificial intelligence (AI), machine learning (ML), or analytics users.
For further reading, read our documentation to start using Lake Formation. To connect with the AWS nonprofit team you can contact us via the AWS nonprofits homepage.
Subscribe to the AWS Public Sector Blog newsletter to get the latest in AWS tools, solutions, and innovations from the public sector delivered to your inbox, or contact us.