AWS Public Sector Blog
Using machine learning to help nonprofits with fundraising activities
Nonprofits can leverage the cloud to reduce the burden associated with their fundraising activities. With machine learning (ML), nonprofits can identify individuals who are more likely to engage and donate to their cause to support their mission.
Read more to learn exactly how you can put these solutions into action and leverage ML to help your nonprofit with fundraising efforts. In this post, discover how to use Amazon Personalize to build a ML model that supports a wide-range of personalization experiences—without prior machine learning experience.
Personalizing donations
For this demo, I used donation data from the Data Science for Good challenge from Kaggle, where DonorsChoose.org provided anonymized data on donor giving from 2012 through 2018. To adapt the datasets for Amazon Personalize, I removed unnecessary columns from the Donoations.csv and Donors.csv files and recommended a donation range to my donors, rather than a specific amount.
Amazon Personalize works well when you have a distinct set of items to recommend. So based on the data, I created four donation values: small for donations less than $50; medium for between $50 and $1,000; large for between $1,000 and $5,000; and x-large for donations larger than $5,000. The categories you create for your own donation data will vary. To perform these modifications, I used AWS Glue, which is a fully managed extract, transform, load (ETL) service that makes it easy to discover, prepare, and combine data for analytics, ML, and application development.
Building the infrastructure
To build the infrastructure, I made an AWS CloudFormation template for you to create an Amazon Simple Storage Service (Amazon S3) bucket to store the donor data, the ETL jobs in AWS Glue to transform the donation data into a format that can be used by Amazon Personalize, and the appropriate AWS Identity and Access Management (IAM) permissions. To set up your environment, use this link or select the Launch Stack button.
![]()
Once the stack completes successfully we’re ready to begin building our ML model. Select the Outputs tab of the stack in the CloudFormation console (Figure 1) to see the name of the Amazon S3 bucket that the CloudFormation stack created for you. Please note this value, as you’ll need to refer to it later on.

Figure 1: The Outputs tab for the stack in the CloudFormation console
Creating a ML personalization model
Amazon Personalize requires at least one interactions dataset, which contains historical and real-time data from interactions between users and items. Remember, we’ve created four categories of donation amounts to use as our items, and our users are the donors who have contributed. Amazon Personalize can provide better recommendations when you also provide a user’s dataset, which contains metadata about your users, including age, gender, or ZIP code.
Our donations data set contains the following:
- A USER_ID column that contains a unique identifier for our donors;
- An ITEM_ID column that contains the value of small, medium, large, or x-large, depending on the size of the donation;
- A UNIX timestamp called TIMESTAMP, which indicates the date the donation was received.
For your actual use case, you may want to change the ranges used to calculate the ITEM_ID column. To change those ranges, you’ll need to modify the code in the AWS Glue job that was created by the CloudFormation stack (my AWS Glue job is named npo-personalize-donations). You can modify the AWS Glue job by selecting the job from the AWS Glue interface, select the Script tab and then select the Edit script button.
The donors data set contains the following:
- A USER_ID column that contains a unique identifier for our donors;
- A CITY column that contains the donor’s city;
- A STATE column that contains the donor’s state;
- A ZIP column that contains the donor’s zip code.
To build a personalization model for our data, navigate to the Amazon Personalize console and select the Get started button on the landing page. Then do the following:
1. In the Dataset group details box that appears, enter a dataset group name. I’m entering donations-dataset-group. Select Next.
2. Amazon Personalize requires you provide a dataset that contains user-item interactions. In the Dataset name and the New schema name fields, enter donations.
3. Our data is already in the format Amazon Personalize requires, so select Next.
4. In the Dataset import job name field, enter donations-import.
5. In the IAM service role field, you should see a service role that starts with AmazonPersonalize-ExecutionRole-. My service role is called AmazonPersonalize-ExecutionRole-npo-personalize.
6. In the Data location field, enter the S3 location of the donation data. The S3 location should be s3://<S3_Bucket>/donations/output/, where <S3_Bucket> is the name of the S3 bucket created by the CloudFormation stack. See figure 2.
7. Select Finish.

Figure 2: Creating a dataset within the Amazon Personalize console
The wizard will automatically navigate you to the Amazon Personalize dashboard. Next to the User-item interaction data label, you should see an indicator that the dataset is being created. See Figure 3. The User-item interaction data should change status to Active after about 15-20 minutes.

Figure 3: User-item interaction data is being created
As the User-item interaction data is loading, we can optionally provide Amazon Personalize with a User dataset as well. The User dataset can provide Amazon Personalize with additional metadata about our users, which can help it provide improved recommendations. To add a User dataset, select the Import button next to User data.
1. In the Dataset name field, enter donors.
2. In the New schema name field, enter donors-schema.
3. In the Schema definition field, enter the following:
{
	"type": "record",
	"name": "Users",
	"namespace": "com.amazonaws.personalize.schema",
	"fields": [
		{
			"name": "USER_ID",
			"type": "string"
		},
		{
			"name": "CITY",
			"type": "string",
	        "categorical": true
		},
		{
			"name": "STATE",
			"type": "string",
			"categorical": true
		},
		{
			"name": "ZIP",
			"type": "string",
            "categorical": true
		}
	],
	"version": "1.0"
}
4. Select Next.
5. In the Dataset import job name field, enter donors-import.
6. Make sure you selected the IAM role used previously in the IAM service role field.
7. In the Data location field, enter the S3 path for the donor data, which should be s3://<S3_Bucket>/donors/output/, where <S3_Bucket> is the name of the S3 bucket created by the CloudFormation stack.
8. Select the Start import button.
The User data should change status to Active after about 15-20 minutes.
Now that all the data has been imported into Amazon Personalize, we’re ready to build a solution. In Amazon Personalize, a solution consists of selecting a recipe, or the algorithm that should be used for the personalization problem you are trying to solve. From the Amazon Personalize dashboard, select the Start button next to the Solution creation label.
1. In the Solution name field, enter fundraising-solution.
2. In the Recipe field, we must select the type of personalization problem we are trying to solve. For this example, select aws-user-personalization, which predicts items a user will interact with. Amazon Personalize provides a variety of recipes, which help solve a number of personalization problems.
3. Select Next.
4. Select Finish.
Amazon Personalize is now building a ML model based on the User-item interaction and User datasets. The process of building a ML- model with these datasets takes about 90 minutes to complete.
Once an Amazon Personalize solution has been created—in other words, a ML model has been trained—we’re ready to deploy and begin using that model. To deploy our ML model, we need to launch an Amazon Personalize campaign. In Amazon Personalize, a campaign is simply a deployed ML model. To begin, select the Create new campaign button under the Launch campaigns section of the Amazon Personalize dashboard.
1. In the Campaign name field, enter fundraising-campaign.
2. In the Solution field, select the solution that we just trained in the previous step. I named my solution fundraising-solution.
3. Select Create campaign.
Amazon Personalize is now deploying a trained ML model for us to use to make donation recommendations. The process of deploying a trained model takes about 8-10 minutes to complete.
Testing the deployed model
Now that you’ve created and deployed the model, let’s test it! To use a model in production, you can use the AWS software development kit (SDK) for your programming language of choice. The Amazon Personalize console also provides a handy way to test our personalization model.
In the Campaigns tab of the Amazon Personalize console, you can test out your ML model. Enter a User ID and any additional metadata you want to provide. As a test, in the User ID field, enter c53df48928dcf41e047a6c95a6b4d205, which is a User ID of one of the users from our dataset. Select Get recommendations and Amazon Personalize provides donation recommendations in the Recommendations section of the page (see Figure 4).
Figure 4: The Campaigns tab of the Amazon Personalize console, providing donation recommendations for a user
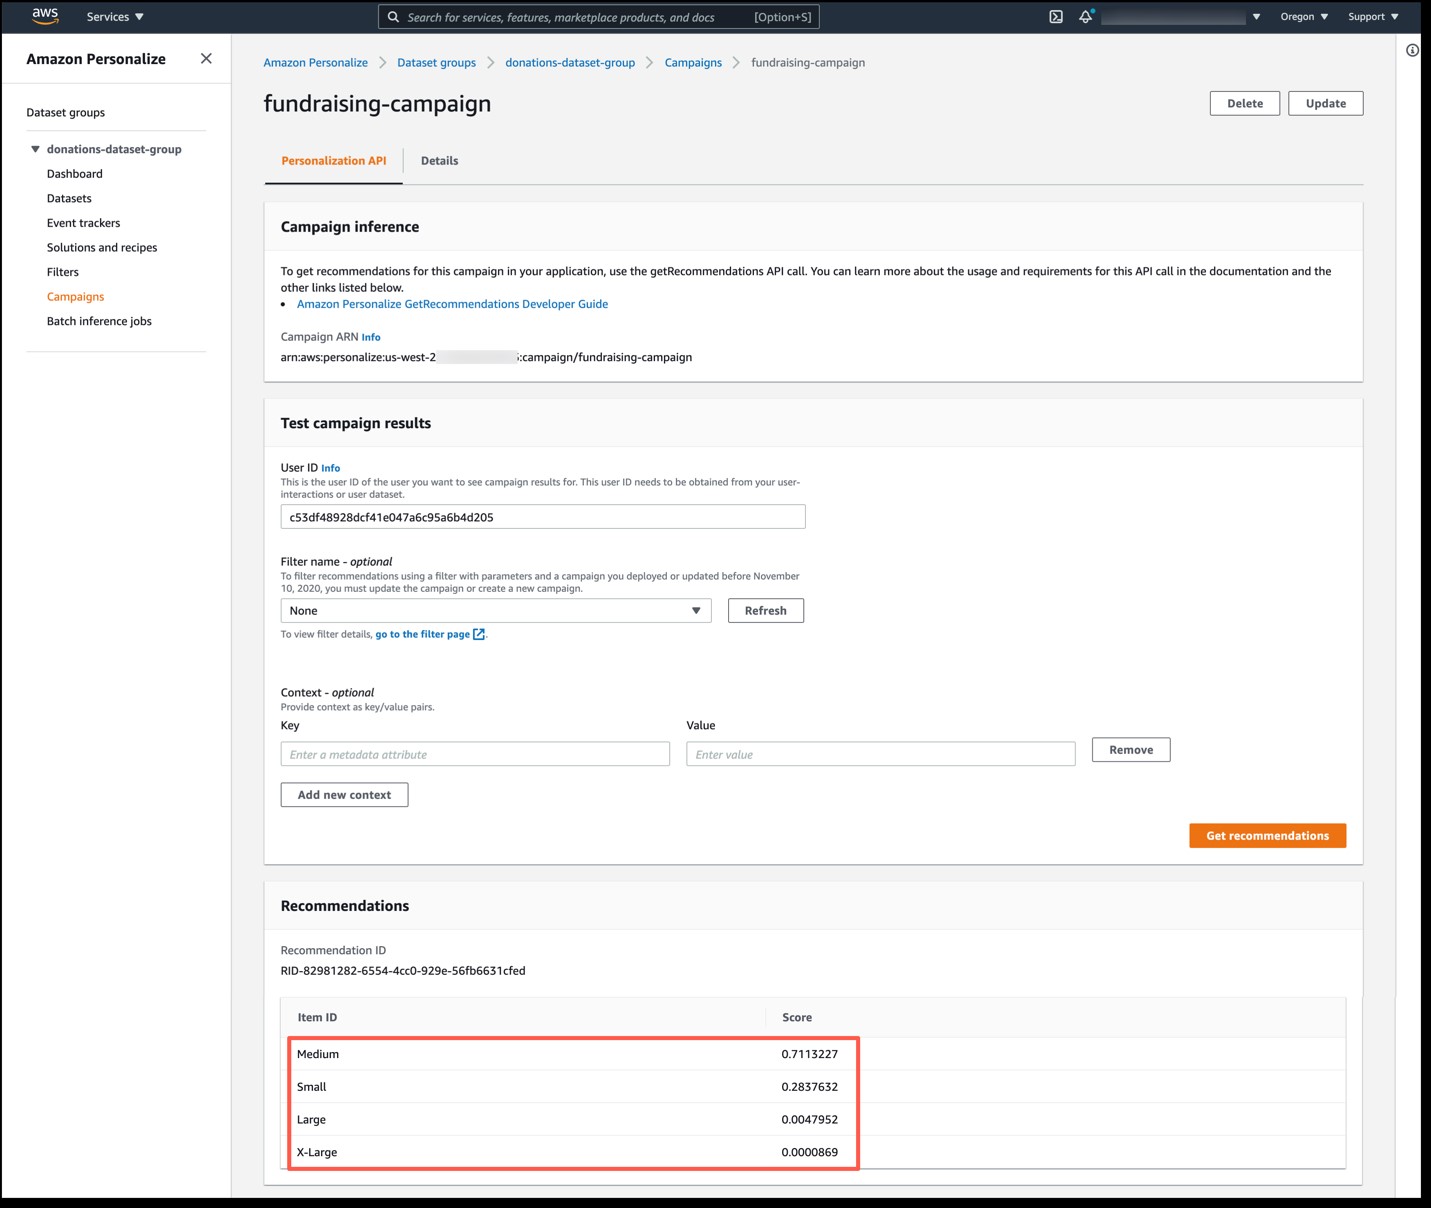
Figure 4: The Campaigns tab of the Amazon Personalize console, providing donation recommendations for a user
All the recommendations that Amazon Personalize provides for a user adds up to 1, with the highest scored items being the ones that Amazon Personalize predicts the user is more likely to interact with. In this example, Amazon Personalize predicts that this user is more likely to interact with a medium donation (with a score of 0.711) followed by a small donation (with a score of 0.283). On my donation website or email newsletter, I could proactively recommend that this user make a medium-sized donation, followed by a recommendation for a small donation. In practice, I would likely not list the donation size of small or medium, but rather would provide a recommended dollar range, based on the sizes I’ve identified.
If you have users who have never contributed before, you can provide user metadata to achieve better recommendations. You can provide User metadata in the Context section of the recommendations page (see Figure 5). You can also supply Context values via the AWS SDKs for Amazon Personalize.

Figure 5: Adding context data to a personalize recommendation
We have successfully used ML to predict recommended donation amounts for our donors. This ML model was simple to set up and required no specialized machine learning or data science background.
Clean up
To avoid ongoing charges to your AWS account, remove the resources you created.
- In the Amazon Personalize console, delete the campaign, solution, datasets, and dataset group you created.
- Use the CloudFormation console to delete the stack created as part of this demo. Choose the stack, choose Delete, and then choose Delete stack.
Cost considerations
With Amazon Personalize, you pay only for what you use. AWS charges you based on the amount of data processed and stored, the compute hours used to train your models, and the throughput of recommendations. For current pricing details and some sample pricing scenarios, see the Amazon Personalize pricing page.
With AWS Glue, you only pay for the time your ETL jobs take to run. You are charged based on the number of Data Processing Units (DPUs) and time required to run your ETL job. For current pricing and ETL job pricing examples, see the ETL jobs and development endpoints tab of the AWS Glue pricing page.
Finally, with S3, you pay only for storage pricing and request and data retrieval pricing. For current S3 pricing, see the Amazon S3 pricing page.
What’s next
In this blog post, you learned how to use ML to provide donation amount recommendations to your members. Specifically, you practiced:
- Creating a ML model through Amazon Personalize without needing any specialized skillset
- Using the ML model to create donation recommendations for members
As a next step, use this pattern to create a recommendation engine based on your own donation data. You can invoke the model created through Amazon Personalize via APIs and integrate it into your website, newsletter, or other member outreach. As you leverage this approach in your donation efforts, you can make sure you’re recommending the right donation amount for each of your members. As you use ML to personalize how you engage with your members, you can reduce the burden associated with your fundraising activities and build better relationships with your supporters.
For more information on Amazon Personalize, read our Getting started guide and view Amazon Personalize examples on GitHub.
Read more stories by this author. Subscribe to the AWS Public Sector Blog newsletter to stay up to date.