AWS Security Blog
Automate Cedar policy validation with AWS developer tools
Cedar is an open-source language that you can use to write policies and make authorization decisions based on those policies. AWS security services including AWS Verified Access and Amazon Verified Permissions use Cedar to define policies. Cedar supports schema declaration for the structure of entity types in those policies and policy validation with that schema.
In this post, we show you how to use developer tools on AWS to implement a build pipeline that validates the Cedar policy files against a schema and runs a suite of tests to isolate the Cedar policy logic. As part of the walkthrough, you will introduce a subtle policy error that impacts permissions to observe how the pipeline tests catch the error. Detecting errors earlier in the development lifecycle is often referred to as shifting left. When you shift security left, you can help prevent undetected security issues during the application build phase.
Scenario
This post extends a hypothetical photo sharing application from the Cedar policy language in action workshop. By using that app, users organize their photos into albums and share them with groups of users. Figure 1 shows the entities from the photo application.
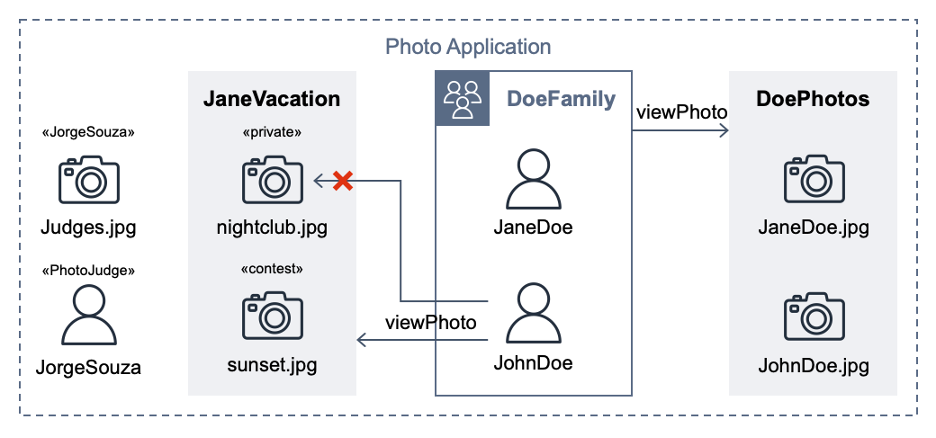
Figure 1: Photo application entities
For the purpose of this post, the important requirements are that user JohnDoe has view access to the album JaneVacation, which contains two photos that user JaneDoe owns:
- Photo sunset.jpg has a contest label (indicating that the role PhotoJudge has view access)
- Photo nightclub.jpg has a private label (indicating that only the owner has access)
Cedar policies separate application permissions from the code that retrieves and displays photos. The following Cedar policy explicitly permits the principal of user JohnDoe to take the action viewPhoto on resources in the album JaneVacation.
permit (
  principal == PhotoApp::User::"JohnDoe",
  action == PhotoApp::Action::"viewPhoto",
  resource in PhotoApp::Album::"JaneVacation"
);
The following Cedar policy forbids non-owners from accessing photos labeled as private, even if other policies permit access. In our example, this policy prevents John Doe from viewing the nightclub.jpg photo (denoted by an X in Figure 1).
forbid (
  principal,
  action,
  resource in PhotoApp::Application::"PhotoApp"
)
when { resource.labels.contains("private") }
unless { resource.owner == principal };
A Cedar authorization request asks the question: Can this principal take this action on this resource in this context? The request also includes attribute and parent information for the entities. If an authorization request is made with the following test data, against the Cedar policies and entity data described earlier, the authorization result should be DENY.
The project test suite uses this and other test data to validate the expected behaviors when policies are modified. An error intentionally introduced into the preceding forbid policy lets the first policy satisfy the request and ALLOW access. That unexpected test result compared to the requirements fails the build.
Developer tools on AWS
With AWS developer tools, you can host code and build, test, and deploy applications and infrastructure. AWS CodeCommit hosts the Cedar policies and a test suite, AWS CodeBuild runs the tests, and AWS CodePipeline automatically runs the CodeBuild job when a CodeCommit repository state change event occurs.
In the following steps, you will create a pipeline, commit policies and tests, run a passing build, and observe how a policy error during validation fails a test case.
Prerequisites
To follow along with this walkthrough, make sure to complete the following prerequisites:
- Install a Git client on your computer.
- For local testing, set up a bash-compatible environment, such as Apple macOS, Windows Subsystem for Linux (WSL), or Git Bash.
- (Optional) Install the Cedar policy language for Visual Studio Code.
- Sign up for an AWS account and set permissions to create the resources used in this example.
- Install the AWS Command Line Interface (AWS CLI) and configure it with your account. For more information, see Installing the AWS CLI and Configuring the AWS CLI.
Set up the local environment
The first step is to set up your local environment.
To set up the local environment
- Using Git, clone the GitHub repository for this post:
- Before you commit this source code to a CodeCommit repository, run the test suite locally; this can help you shorten the feedback loop. To run the test suite locally, choose one of the following options:
- Install Rust by using the rustup tool.
- Compile the Cedar CLI (version 2.4.2) binary by using cargo.
- Run the cedar_testrunner.sh script, which tests authorize requests by using the Cedar CLI.
- Locally evaluate the buildspec.yml inside a CodeBuild container image by using the codebuild_build.sh script from aws-codebuild-docker-images with the following parameters:
git clone git@github.com:aws-samples/cedar-policy-validation-pipeline.git
Option 1: Install Rust and compile the Cedar CLI binary
curl --proto '=https' --tlsv1.2 -sSf https://sh.rustup.rs | sh -s -- -y
cargo install cedar-policy-cli@2.4.2
cd policystore/tests && ./cedar_testrunner.sh
Option 2: Run the CodeBuild agent
./codebuild_build.sh -i public.ecr.aws/codebuild/amazonlinux2-x86_64-standard:5.0 -a .codebuild
Project structure
The policystore directory contains one Cedar policy for each .cedar file. The Cedar schema is defined in the cedarschema.json file. A tests subdirectory contains a cedarentities.json file that represents the application data; its subdirectories (for example, album JaneVacation) represent the test suites. The test suite directories contain individual tests inside their ALLOW and DENY subdirectories, each with one or more JSON files that contain the authorization request that Cedar will evaluate against the policy set. A README file in the tests directory provides a summary of the test cases in the suite.
The cedar_testrunner.sh script runs the Cedar CLI to perform a validate command for each .cedar file against the Cedar schema, outputting either PASS or ERROR. The script also performs an authorize command on each test file, outputting either PASS or FAIL depending on whether the results match the expected authorization decision.
Set up the CodePipeline
In this step, you use AWS CloudFormation to provision the services used in the pipeline.
To set up the pipeline
- Navigate to the directory of the cloned repository.
cd cedar-policy-validation-pipeline - Create a new CloudFormation stack from the template.
- Wait for the message Successfully created/updated stack.
Invoke CodePipeline
The next step is to commit the source code to a CodeCommit repository, and then configure and invoke CodePipeline.
To invoke CodePipeline
- Add an additional Git remote named codecommit to the repository that you previously cloned. The following command points the Git remote to the CodeCommit repository that CloudFormation created. The CedarPolicyRepoCloneUrl stack output is the HTTPS clone URL. Replace it with CedarPolicyRepoCloneGRCUrl to use the HTTPS (GRC) clone URL when you connect to CodeCommit with git-remote-codecommit.
- Push the code to the CodeCommit repository. This starts a pipeline run.
git push codecommit main - Check the progress of the pipeline run.
The build installs Rust in CodePipeline in your account and compiles the Cedar CLI. After approximately four minutes, the pipeline run status shows Succeeded.
Refactor some policies
This photo sharing application sample includes overlapping policies to simulate a refactoring workflow, where after changes are made, the test suite continues to pass. The DoePhotos.cedar and JaneVacation.cedar static policies are replaced by the logically equivalent viewPhoto.template.cedar policy template and two template-linked policies defined in cedartemplatelinks.json. After you delete the extra policies, the passing tests illustrate a successful refactor with the same expected application permissions.
To refactor policies
- Delete DoePhotos.cedar and JaneVacation.cedar.
- Commit the change to the repository.
- Check the pipeline progress. After about 20 seconds, the pipeline status shows Succeeded.
The second pipeline build runs quicker because the build specification is configured to cache a version of the Cedar CLI. Note that caching isn’t implemented in the local testing described in Option 2 of the local environment setup.
Break the build
After you confirm that you have a working pipeline that validates the Cedar policies, see what happens when you commit an invalid Cedar policy.
To break the build
- Using a text editor, open the file policystore/Photo-labels-private.cedar.
- In the when clause, change resource.labels to resource.label (removing the “s”). This policy syntax is valid, but no longer validates against the Cedar schema.
- Commit the change to the repository.
- Sign in to the AWS Management Console and open the CodePipeline console.
- Wait for the Most recent execution field to show Failed.
- Select the pipeline and choose View in CodeBuild.
- Choose the Reports tab, and then choose the most recent report.
- Review the report summary, which shows details such as the total number of Passed and Failed/Error test case totals, and the pass rate, as shown in Figure 2.
- To get the error details, in the Details section, select the Test case called validate Photo-labels-private.cedar that has a Status of Error.
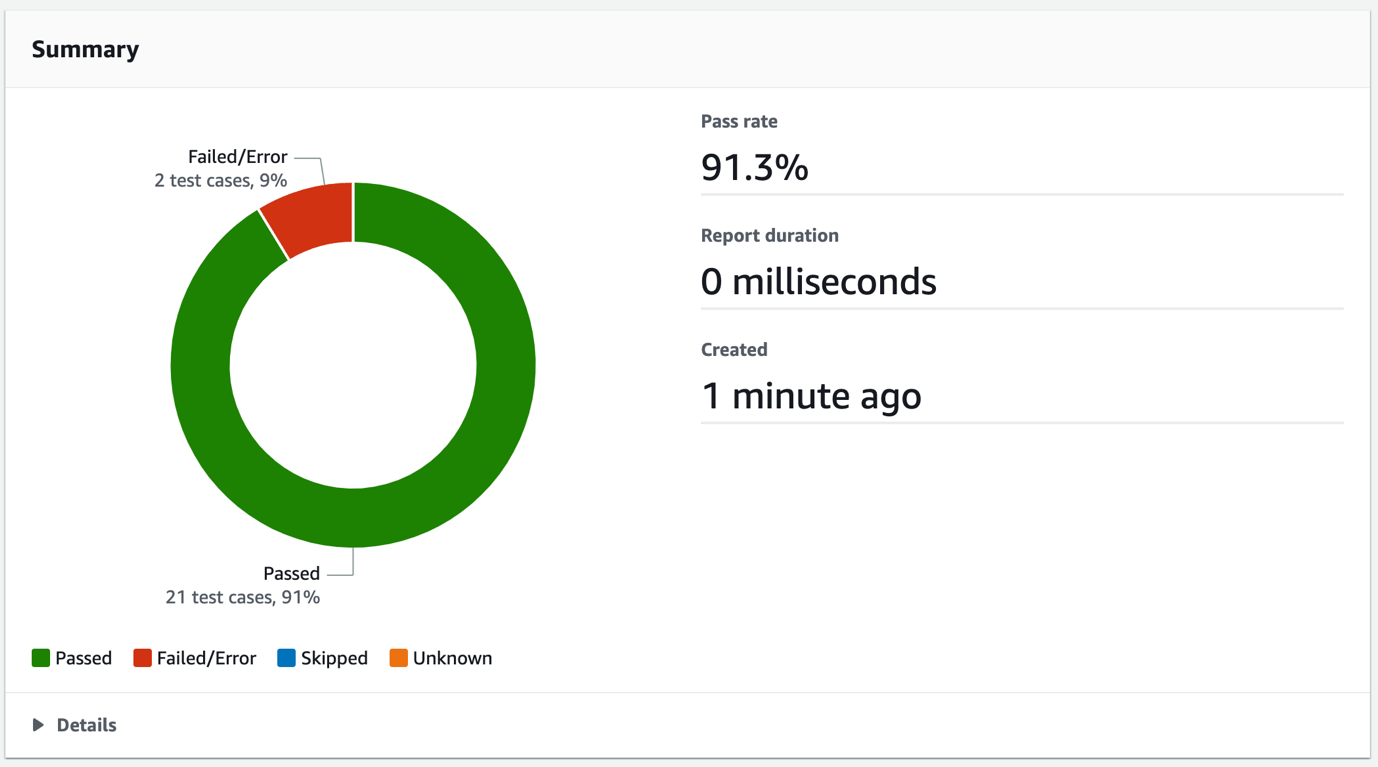
Figure 2: CodeBuild test report summary
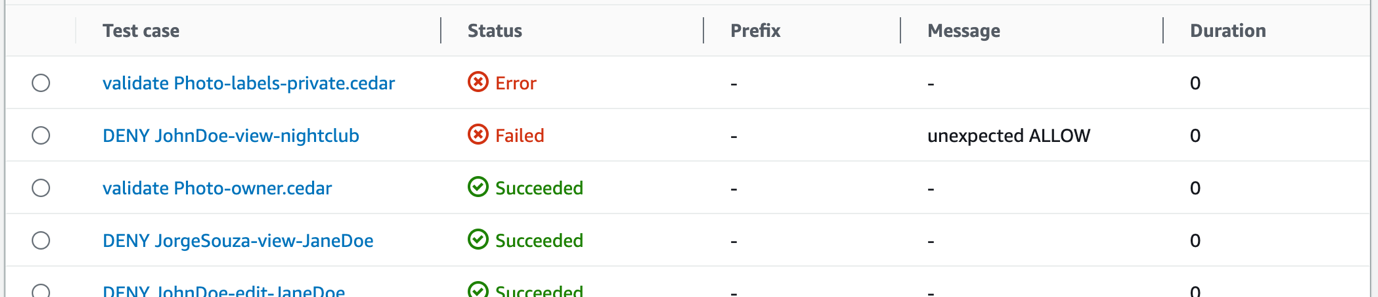
Figure 3: CodeBuild test report test cases
That single policy change resulted in two test cases that didn’t pass. The detailed error message shown in Figure 4 is the output from the Cedar CLI. When the policy was validated against the schema, Cedar found the invalid attribute label on the entity type PhotoApp::Photo. The Failed message of unexpected ALLOW occurred because the label attribute typo prevented the forbid policy from matching and producing a DENY result. Each of these tests helps you avoid deploying invalid policies.
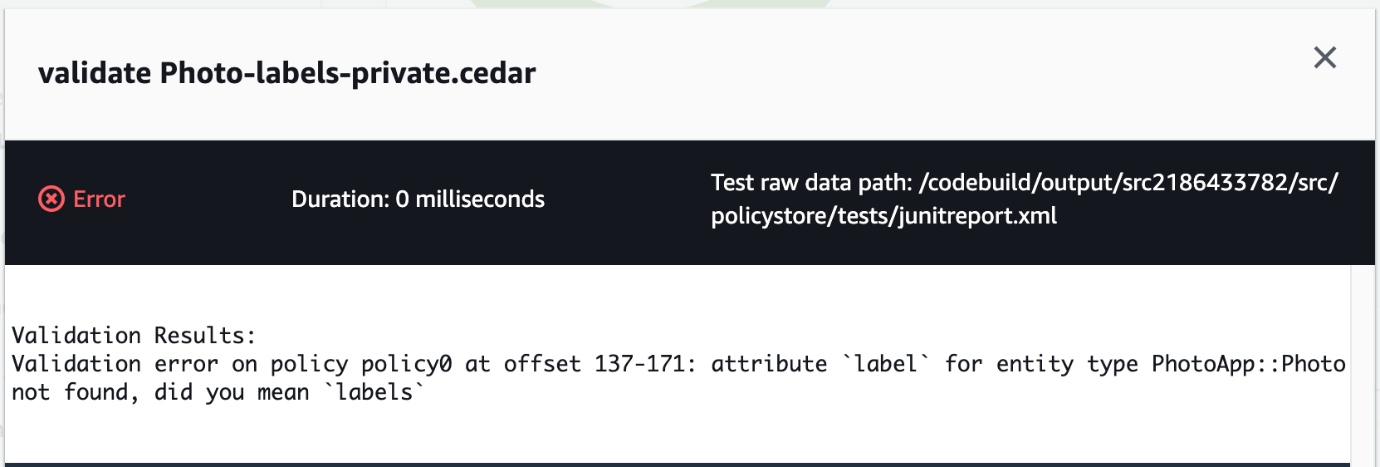
Figure 4: CodeBuild test case error message
Clean up
To avoid ongoing costs and to clean up the resources that you deployed in your AWS account, complete the following steps:
To clean up the resources
- Open the Amazon S3 console, select the bucket that begins with the phrase cedar-policy-validation-codepipelinebucket, and Empty the bucket.
- Open the CloudFormation console, select the cedar-policy-validation stack, and then choose Delete.
- Open the CodeBuild console, choose Build History, filter by cedar-policy-validation, select all results, and then choose Delete builds.
Conclusion
In this post, you learned how to use AWS developer tools to implement a pipeline that automatically validates and tests when Cedar policies are updated and committed to a source code repository. Using this approach, you can detect invalid policies and potential application permission errors earlier in the development lifecycle and before deployment.
To learn more about the Cedar policy language, see the Cedar Policy Language Reference Guide or browse the source code at the cedar-policy organization on GitHub. For real-time validation of Cedar policies and schemas, install the Cedar policy language for Visual Studio Code extension.
If you have feedback about this post, submit comments in the Comments section below. If you have questions about this post, start a new thread on the Amazon Verified Permissions re:Post or contact AWS Support.