AWS Security Blog
Hardening the security of your AWS Elastic Beanstalk Application the Well-Architected way
April 7, 2022: This post has been updated with sample Elastic Beanstalk application with hardened security configurations on GitHub.
Launching an application in AWS Elastic Beanstalk is straightforward. You define a name for your application, select the platform you want to run it on (for example, Ruby), and upload the source code. The default Elastic Beanstalk configuration is intended to be a starting point which prioritizes simplicity and ease of setup. This allows you to quickly deploy a web application on the AWS Cloud. For increased security of production applications, we recommend additional steps you can take to complement the default configuration.
In this post we will describe our recommendations, which are aligned with the AWS Well-Architected Framework, to help you harden the security posture of your Elastic Beanstalk applications. The Well-Architected Framework provides best practices to help you build secure, high-performing, resilient, and efficient infrastructure for your applications and workloads. Focusing on the Security pillar of the framework, we will walk you through additional configurations for increased network protection and protection of data at rest and in transit.
Introduction to Elastic Beanstalk
Elastic Beanstalk is an orchestration service that provisions and operates infrastructure in the AWS Cloud. You can use Elastic Beanstalk to deploy and manage applications in the cloud. Elastic Beanstalk supports many programming languages and frameworks, such as Java, .NET, PHP, Node.js, Python, Ruby, Go, and Docker. Elastic Beanstalk can help you decrease overhead by handling tasks such as resource provisioning, load balancing, auto scaling, and health monitoring. You only need to upload the application code. Elastic Beanstalk automatically integrates with other AWS services such as Amazon CloudWatch for logging and monitoring.
Target scenario for this post
This post shows you how to achieve the following things:
- Launch a highly available Ruby application on Elastic Beanstalk.
- Attach a MySQL database to the application using Amazon RDS.
- Protect your sensitive data.
- Align your application’s security configuration to the Security pillar of the Well-Architected Framework.
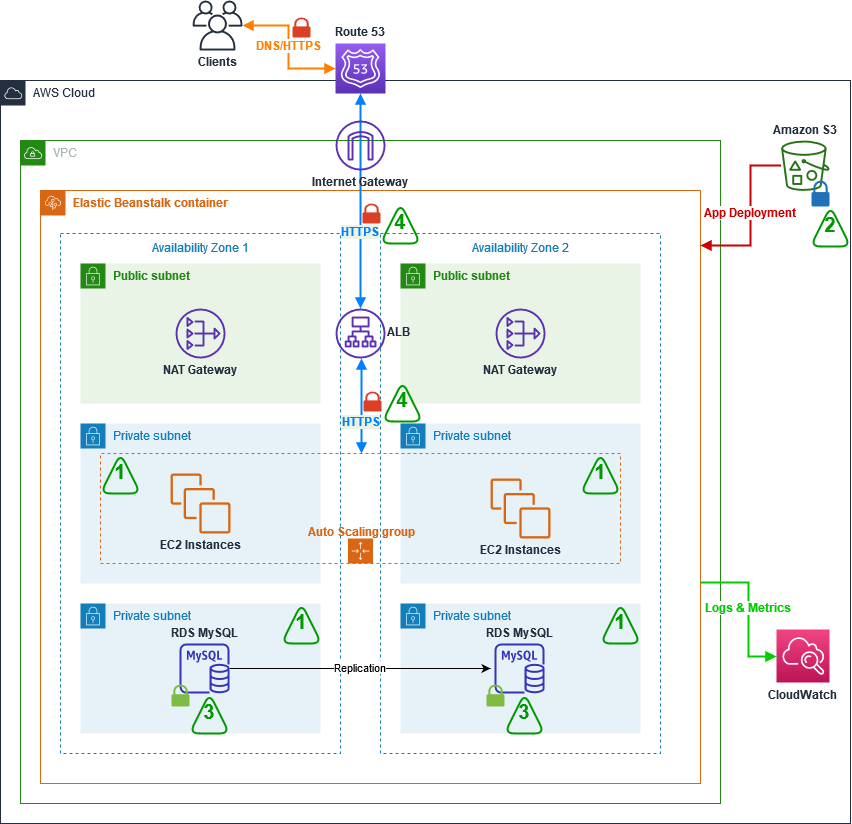
Figure 1: Target architecture for the two-tier web application deployed using Elastic Beanstalk
Figure 1 depicts the target architecture, which is a two-tier web application. Clients resolve the website’s domain name using the Domain Name System (DNS) service Amazon Route 53. An Application Load Balancer (ALB) is used to direct traffic to and from the Amazon EC2 instances which are running the web servers. The EC2 instances are deployed in an Auto Scaling group in private subnets. To ensure that clients can always access the application, the infrastructure is setup so that it can automatically deal with system failures and scale up when there’s an increase in demand. This is done by placing the EC2 instances in the Auto Scaling group across two Availability Zones for high availability. There is also an RDS MySQL database deployed in a private subnet, which is replicated to a stand-by instance in another Availability Zone for disaster recovery. Logs and Metrics are sent to CloudWatch, and Amazon Simple Storage Service (Amazon S3) is used to store logs and source code. Finally, a Network Address Translation (NAT) gateway and Internet gateway manage inbound and outbound traffic to subnets.
The following sections focus on the four main security configurations numbered in Figure 1:
- Deploying the EC2 and RDS instances from the web and database layer in private subnets.
- Encrypting the logging and source code S3 bucket.
- Encrypting the RDS instance and its stand-by replica.
- Encrypting data in transit by using the HTTPS protocol.
Strengthening your Elastic Beanstalk application based on the Security pillar of the Well-Architected Framework
To harden the security of your Elastic Beanstalk application, you can build on top of the default setup to incorporate the following security best practices:
- Protect networks – In the default Elastic Beanstalk setup, the EC2 instances are deployed together with an Application Load Balancer (ALB) in a public subnet. In most cases, EC2 instances do not need to be directly accessible from the internet and therefore should be placed in private subnets. The ALB should be left in the public subnet to provide a single entry-point for inbound traffic from external clients and forward this traffic to the instances over a private network. If these instances need to make a direct outbound connection to the internet, for example to call third-party APIs, we recommend creating a Network Address Translation (NAT) gateway in a public subnet, and adding a route from the private subnet where your instances are running to the NAT Gateway. Your instances can then send requests to the internet and receive corresponding responses through the NAT gateway, but the instances themselves will not be directly accessible from the internet. For more options on interactively accessing instances see AWS Systems Manager.
- Protect data at rest – We recommend encrypting data at rest. Elastic Beanstalk does not encrypt data stored in Amazon S3 buckets by default, so you should modify the default setup to encrypt the bucket. Similarly, when you set up an RDS database directly through Elastic Beanstalk, you don’t have the option to encrypt the database, so you need to set up your database independently and enable encryption.
- Protect data in transit – Web traffic sent between your clients and the ALB over the internet should use HTTPS rather than HTTP. The HTTPS protocol creates an encrypted connection through TLS (Transport Layer Security) between client and server before sending any web traffic. The default setup in Elastic Beanstalk uses HTTP, so the choice to use HTTPS and how to enable it sits with the user. Setting up HTTPS can be done with SSL / TLS server certificates (X.509 certificates) which you manage inside AWS using AWS Certificate Manager or through an external provider. ALB supports TLS-termination, which means that it takes care of the encryption and decryption of the traffic communicated with clients, and then forwards the traffic to the instances over the AWS private network.
Implementing the recommended best practices for your application
To implement the best practices from the section above, you will take the following steps to launch your application, protect networks and to protect data at rest and in transit:
- Create your own VPC with public and private subnets.
- Create a highly-available Elastic Beanstalk application.
- Modify the configuration to deploy instances in private subnets.
- Encrypt the log and source code bucket.
- Launch an encrypted RDS instance.
- Set up encryption in-transit by using the HTTPS protocol.
Create your VPC with public and private subnets
- In the AWS Management Console, go to VPC, and select Launch VPC wizard.
- Select the VPC with Public and Private Subnets option on the left-hand side, as shown in Figure 2.
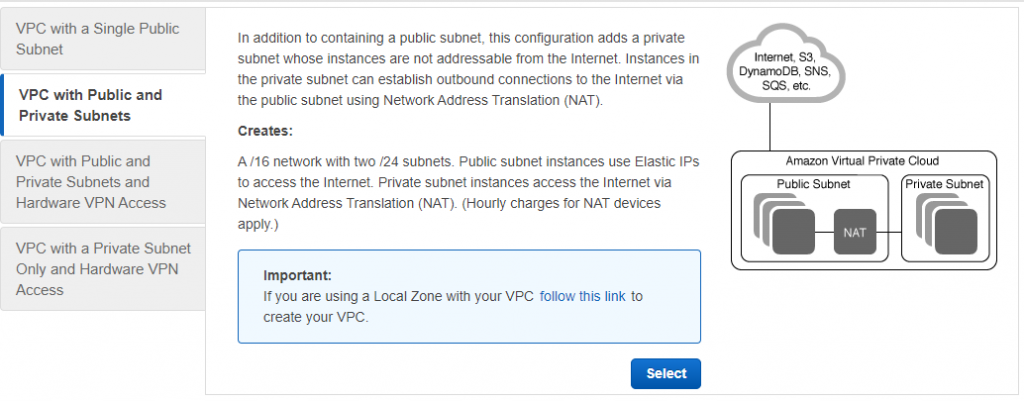
Figure 2: Launch VPC wizard
- Click Select.
- Adjust the VPC specifications as needed. Specify a CIDR range and a name for the VPC. For the private and public subnets, you need to additionally specify the subnets CIDR range as well as which Availability Zone they should be created in. In order for instances in the private subnet to access the internet, the set-up creates a NAT gateway that resides in the public subnet. In order to do that, you need to specify an Elastic IP ID. If you don’t have an Elastic IP yet, under the VPC console go to Elastic IP addresses, click on Allocate Elastic IP address and Allocate. Use the Allocation ID in the VPC wizard.
- Select Create VPC.
- Because the target architecture is highly available, another set of public and private subnets needs to be created and set to reside in a different Availability Zone from the subnets you configured in step 4. This is done by going to the Subnets section in the VPC Console. Click on Create subnet, select the VPC you just created, add a new subnet, making sure to assign it to a different Availability Zone. Press Add new subnet to add a second subnet on the same configuration page. When done, press Create subnet.
- By default, the subnets will use the main routing table, which will treat them as private subnets. In order to make one of the newly created subnets public, it needs to be added to the route table, which has a route to the Internet Gateway. Go to the Route Tables section in the VPC Console and find the route table associated with your newly created VPC, which has the route to the Internet Gateway. This should be the Route Table which has 1 explicit subnet association. Click on the Route Table’s ID, and verify that there’s a route to a target with the igw- prefix. Then, under the Subnet association tab, edit the explicit subnet associations to include the newly created subnet.
After this is done, you should have two public and two private subnets across two Availability Zones for your new VPC.
Create a highly available Elastic Beanstalk application
The following steps will show you how to create a highly available Elastic Beanstalk application.
- In the AWS Management Console, choose Elastic Beanstalk, and then, in the Get Started section, select Create Application.
- Provide a name for the application and define the platform it should run on. In our example, the platform is Ruby.
- Provide the source code for your web application or use the sample code provided in the Elastic Beanstalk setup console.
- To use the sample code, select Sample Application.
- To upload your own source code, in the Source code origin section, for Version label, enter the name of your application code, and then for Source code origin, choose Local file, select Choose File, and navigate to the file that you want to use, as shown in Figure 3.

Figure 3: Source code origin section of the Elastic Beanstalk console
- Select Configure more options
- Depending on your application’s needs, you can select a configuration preset that includes recommended values for several configurations. Select High Availability to include a load balancer and auto scaling for multiple Availability Zones.
Deploy your instances in private subnets
In this step, you will set up Elastic Beanstalk to deploy the Application Load Balancer in public subnets to provide a point of access for inbound traffic from the internet, and you deploy the EC2 instances in a private subnet.
While still in the Configure more options settings:
- In the Network section, select Edit, and then, from the dropdown list, select the VPC that you just created.
- To deploy your instances in private subnets, in the Load balancer settings section, for Load balancer subnets, check the box next to each public subnet, and in the Instance settings section, for Instance subnets, check the box next to each private subnet, as shown in Figure 4.
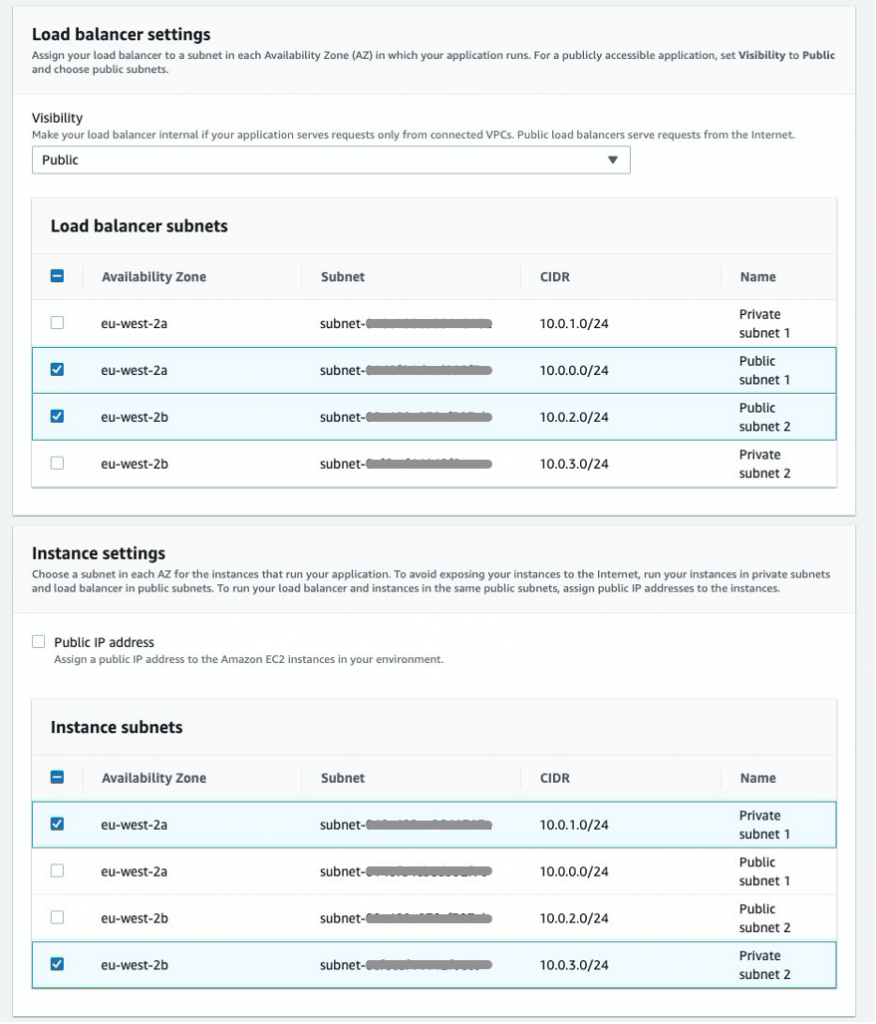
Figure 4: Elastic Beanstalk subnet settings for Load Balancer and instances
- Select Save.
Encrypt the log and source code bucket and block public access
After Elastic Beanstalk has created the application, you can encrypt the S3 bucket.
- Open the S3 console and choose the bucket that was created automatically as part of the Elastic Beanstalk setup. The bucket name will have the following structure: elasticbeanstalk-region-account-id.
- To encrypt the bucket, choose Properties, and then, for Default Encryption, select Edit, and for Server-side encryption, select Enable.
- For Encryption key type, you can use an S3-managed encryption key by selecting Amazon S3 key (SSE-S3). If you want more control over the keys used for encryption, select AWS Key Management Service key (SSE-KMS), which is an encryption key protected by AWS Key Management Service (KMS). Here, you can specify to use an AWS managed key or one of your own Customer managed keys from KMS. For more information on SSE-KMS, visit Protecting Data Using Server-Side Encryption with KMS keys Stored in AWS Key Management Service (SSE-KMS).
- Select Save changes.
Even though the bucket that was created by Elastic Beanstalk is non-public by default, we recommend to enable “S3 Block Public Access” at the account level or at least at the bucket level to prevent tampering or accidentally changing this setting in the future.
- In your S3 console, click on Block Public Access settings for this account.
- If Block all public access is not yet enabled, click on Edit, check the box next to Block all public access and click Save.
- Apart from that, you can also block public access at the bucket level. For this, click on the respective bucket, open the Permissions section and edit Block public access (bucket settings) similarly to how you did in step 2.
Launch an encrypted RDS instance
Elastic Beanstalk allows you to set up and run RDS instances in your Elastic Beanstalk environment. Until recently, the database was tied to the lifecycle of the Elastic Beanstalk environment, and its use was recommended to be limited to development and testing environments only. For example, if you previously launched an RDS instance using Elastic Beanstalk, and the Elastic Beanstalk environment was terminated, the RDS instance would also be deleted. As of October 6, 2021, Elastic Beanstalk now supports Database Decoupling, so that the database will persist when the environment is deleted.
However, Elastic Beanstalk currently does not allow you to set up encryption for your database. For this reason, this post shows you how to set up your Elastic Beanstalk application with a decoupled database, by creating the database directly in the RDS service, separate from your Elastic Beanstalk application. RDS allows you to encrypt your database.
Decoupling your database and setting it up directly through the RDS service in the AWS console will require additional steps for integration with your Elastic Beanstalk application, which this post will walk you through.
Note: If you are using the Elastic Beanstalk service to create your RDS instance, you can select one of three options:
- The first option, enabled by selecting the Create snapshot retention option in the database settings in the Elastic Beanstalk console, makes sure that Elastic Beanstalk creates a snapshot of your database prior to termination. You can restore an existing snapshot of your database through the Elastic Beanstalk console. Bear in mind that there will be downtime of your database between snapshot creation and snapshot restore.
- The second option, Retain, creates a decoupled database, which persists if the Elastic Beanstalk environment has been terminated.
- The third option Delete removes the database upon termination.
In this step, you will create an encrypted RDS database, allow access to the database from your application’s instances only, and add the required environment variables to your application so you can use your database in the application.
- On the RDS service page in the console, select Create database.
- For the database creation method, select Standard create.
- For Engine options, choose MySQL and select the latest version.
- For Templates choose either the Dev/Test or Production template according to your use case.
- In the Settings section, provide a name to use as the database identifier and set a username and password.
- Select the appropriate DB instance class that meets your processing power and memory requirements.
- For Storage, select your storage type and allocate storage.
- If you need Multi-AZ deployment, in the Availability & durability section, choose Create a standby instance.
- In the Connectivity section, select the VPC that you created in the Create your VPC with public and private subnets section earlier in this blog post, and verify that Public access has been set to No. For VPC security group, choose Create new and provide a name to identify the group later on.
- In the Additional configuration section, under Encryption, choose Enable Encryption. You can choose the default AWS KMS key if you’re happy with AWS managing the keys, or provide a custom key if you want more control. Bear in mind that the encryption option cannot be changed after the database has been created.
- Leave the defaults for the remaining settings and select Create database.
After you set up the RDS database and your new Elastic Beanstalk application, you can add the database to your application.
- In the RDS console, go to your newly created RDS database and scroll down to Security group rules.
- Select the security group that has the CIDR/IP – Inbound type.
- Under Inbound rules, select the rule that is listed, and then select Edit inbound rules.
- Under the Source column, make sure Custom is selected, and in the search-box next to it, select the security group associated with your Elastic Beanstalk Auto Scaling group.
Important: As a security best practice, you should allow traffic to your RDS database from your instances only. Therefore, make sure the security group allows traffic only from the Auto Scaling group’s security group, and that it has no additional entries.
- To add the RDS details to the Elastic Beanstalk environment properties, go to your application’s environment in the Elastic Beanstalk service and navigate to Configuration > Software > Edit > Environment Properties. Add RDS_HOSTNAME, RDS_PORT, RDS_DB_NAME, RDS_USERNAME and RDS_PASSWORD as properties and provide the values that you used to set up the database.
- Restart the application by going back to your Elastic Beanstalk environment, and then under Environment actions, choose Restart app server(s).
After the server has restarted, you can access the RDS database in your web application by using the environment properties you set in the console, just as you would if you attached the database directly through the Elastic Beanstalk setup. For more information on using environment properties, visit Environment properties and other software settings.
The new database is now separate from your application and it is encrypted to provide data protection at rest.
Important: The environment properties, including the database username and password, are visible and stored in plain text in the Environment Properties in Elastic Beanstalk.
Depending on your security requirements, you can choose to use AWS Secrets Manager to protect your database credentials, which you can then fetch programmatically in your Elastic Beanstalk instance or through Elastic Beanstalk’s custom environment configuration files (.ebextensions). To learn more about using Secrets Manager to protect and rotate database credentials, see Rotate Amazon RDS database credentials automatically with AWS Secrets Manager. However, this will require additional configuration for Elastic Beanstalk and is beyond the scope of this post.
A second possibility is to use IAM database authentication, which allows you to use your Elastic Beanstalk’s EC2 IAM role to connect to your database. This method leverages short-lived authentication tokens rather than a static database password. In order to set this up, you need to enable IAM database authentication, create an IAM policy to allow IAM database access and create a database account for IAM authentication using the AWSAuthenticationPlugin (for MySQL). Authentication tokens are valid for 15 minutes, and if your web instances need to create a new database connection, or reconnect, authentication tokens will need to be refreshed if they have expired, otherwise the connection will be rejected.
For an implementation guide, check out How do I allow users to authenticate to an Amazon RDS MySQL DB instance using their IAM credentials. For Ruby applications, you can get the authentication token in your application by leveraging the auth_token_generator method in the Ruby aws-sdk.
Set up encryption in transit using the HTTPS protocol
In the Elastic Beanstalk architecture, you can encrypt data in transit at three connection points: from your clients to the load balancer, from the load balancer to the EC2 instances, and from the EC2 instances to the RDS database.
Securing the connection from clients to the ALB
You can use a custom domain name to use HTTPS for your Elastic Beanstalk environment and have your clients can connect securely to your environment. If you don’t have a domain name, you can assign a self-signed server certificate to your ALB to use HTTPS for development and testing purposes.
To secure the connection to your ALB, add a HTTPS listener for the traffic inbound port (typically 443) and attach an TLS / SSL server certificate (X.509 certificate). To generate certificates, use AWS Certificate Manager or third-party providers such as Let’s Encrypt. For a walkthrough on how to set up an HTTPS listener through the console or through .ebextensions configuration files, see the Configuring your Elastic Beanstalk environment’s load balancer to terminate HTTPS.
Securing the connection from the ALB to the EC2 instances
While securing the connection between clients and the ALB is enough for most applications, in some cases a complete end-to-end encryption may be required; for example, to comply with (external) regulations. To secure the connection from your ALB to your application running on an EC2 instance, you must use the .ebextensions configuration files to modify the software running on the instance. You then need to allow the HTTPS traffic to pass through from the ALB to your EC2 instance by allowing inbound traffic on port 443 on the instance’s security group. For a Ruby specific example, see Terminating HTTPS on EC2 instances running Ruby.
For a complete end-to-end encryption walkthrough, see How can I configure HTTPS for my Elastic Beanstalk environment?
Securing the RDS connection
To securely connect from your application to your RDS database, you can use SSL or TLS to encrypt the connection. You will need to download an RDS root certificate and require your application to use this certificate when connecting to the RDS instance to verify the RDS server certificate. For more information on how to download and use the root certificate to setup a secure RDS connection, see the Using SSL with a MySQL DB instance documentation page.
This post has shown you how to align your application with some of the security best practices of the Well-Architected Framework. After completing these steps, your architecture includes four key modifications to improve security:
- The EC2 and RDS instances are deployed in a private subnet.
- The logging and source code S3 bucket is encrypted.
- An encrypted RDS instance is attached.
- Encryption occurs in transit by using the HTTPS protocol.
Conclusion
In this post, we’ve covered the additional configuration you should be aware of to harden the security posture of your Elastic Beanstalk applications, aligning to the Security pillar of the Well-Architected Framework. The final setup you created uses a VPC and private subnets to allow internet access only to resources that require it, and provides encryption at rest and in transit using AWS Cloud Security services and secure protocols. The Well-Architected Framework describes additional concepts, design principles, and architectural best practices for designing and running workloads in the cloud. To learn more, see AWS Well-Architected.
Check out our sample Elastic Beanstalk application with hardened security configurations on GitHub.
If you have feedback about this post, submit comments in the Comments section below.
Want more AWS Security news? Follow us on Twitter.