AWS Physical AI Blog
Improve simulation resiliency with AWS SimSpace Weaver Snapshots

Simulated City, courtesy of Duality.ai. Built with Unreal Engine 5. Powered by AWS SimSpace Weaver
New Feature
AWS SimSpace Weaver has introduced a new feature to enable taking a simulation “snapshot”, which is a full state capture of all the simulated entities at a moment in time. This feature allows customers to backup and restore their simulation, by taking snapshots through an API, then starting the simulation from the snapshot. Customers can even launch multiple branching simulation scenarios in order to gain insights into the issues they’re planning to solve. For more information see the feature announcement: AWS SimSpace Weaver Snapshots are now generally available.
Background
Increasingly, national and local government planners around the globe are simulating cites and highways to plan for large scale events such as concerts or sporting events, and to plan infrastructure improvements to roads and public transportation. Simulation enables them to identify bottlenecks and test potential solutions in a cost-effective manner prior to implementing major infrastructure changes. However, simulating large environments with a high number of entities can be very challenging, and requires high performance computing to achieve real-time performance. AWS SimSpace Weaver is a service that enables customers to scale spatial simulations across multiple Amazon Elastic Compute Cloud (Amazon EC2) instances. AWS SimSpace Weaver handles the provisioning of Amazon EC2 instances, the data management of entities within the simulation, and communication across instances as objects move throughout the simulated environment. This enables customers to focus on the outcomes of their simulations rather than the complexities of setting up distributed simulation infrastructure.
Solution Overview
In this blog, you will learn how to launch a simulation in AWS SimSpace Weaver, capture periodic snapshots at one-minute intervals, and then re-run the simulation, starting from a snapshot. The entire flow will be run in the AWS Cloud by using AWS CloudFormation to create a serverless stack with all the necessary resources to run the job and capture a snapshot. Then you will learn how to start a simulation from the snapshot using the AWS console. Figure 1 shows the architecture of the stack you will deploy.
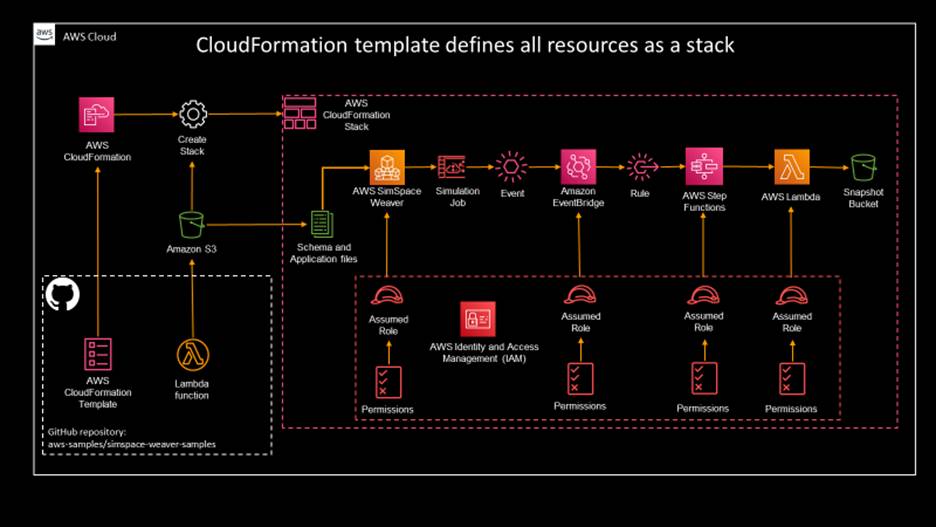
Figure 1 – Snapshot Solution Architecture
The stack creates the following resources:
- An AWS SimSpace Weaver simulation using a sample application
- An AWS Lambda function to control the lifecycle of the simulation and take a snapshot
- An AWS Step Functions state machine that loops over the AWS Lambda function
- An Amazon EventBridge rule that waits for the simulation job to be started, then starts the Step Function state machine
- The AWS Identity and Access Management (IAM) roles and policies to grant the necessary runtime permissions to each of the resources created
AWS Lambda Function Overview
The AWS Lambda function is controls the lifecycle of the simulation job and takes snapshots.
The AWS Lambda function performs these logical steps:
- Waits for the simulation job to be in the “STARTED” status
- Starts the sample application
- Starts the clock
- Takes a snapshot, which is then uploaded to an Amazon Simple Storage Service (Amazon S3) Bucket
The snapshot will only be taken when the simulation job has been started, the application is started, and the simulation clock is started. If those aren’t done, it will attempt to start the application and clock before taking a snapshot. Since those can take a minute or two to be started, it will return false until it takes a snapshot, then it will return true.
AWS Step Functions State Machine Overview
The purpose of the state machine is to take three snapshots of the simulation state. It implements loops around the lambda function, with wait states when waiting for the simulation. The state diagram is Figure 2.
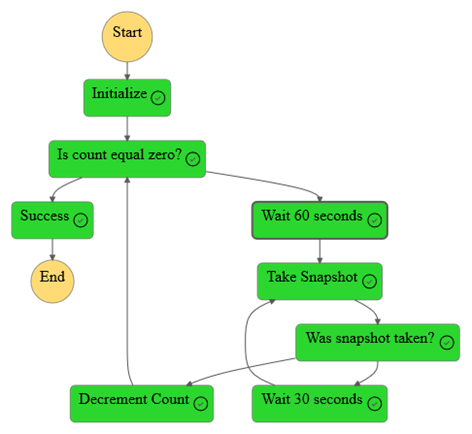
Figure 2 – Snapshot State Machine
The states within the state machine are defined as:
- Initialize – sets the count for the number of snapshots to take (3 in this case)
- Is count equal zero – checks to see if the count has reached 0, if so, ends the state machine execution as a success
- Wait 60 seconds – waits 60 seconds so that the snapshots are taken periodically
- Take Snapshot – calls the Snapshot Lambda function which tries to take a snapshot
- Was snapshot taken – checks if the snapshot was taken
- Wait 30 seconds – waits 30 seconds before retrying the snapshot
- Decrement count – decrements the count by 1
Tutorial Overview
Now that you’ve reviewed the architecture of the stack and the state machine flow, the steps of the tutorial are as follows:
- Create the stack using AWS CloudFormation
- Wait for the snapshot to be created
- Stop the simulation
- Start a new simulation from the snapshot
- Clean-up
Prerequisites
This tutorial requires that you have an AWS account with the following privileges:
- Amazon S3 – create, read and write to bucket
- AWS IAM – create roles and policies
- AWS CloudFormation – create stack
- AWS Lambda – create and invoke function
- AWS Step Functions – create and execute state machines
- Amazon EventBridge – create rule
- AWS SimSpace Weaver – create simulation job
This tutorial also requires an AWS Cloud9 Environment or a Linux based development environment, with the AWS CLI installed.
SimSpace Weaver is available in the following AWS Regions: US East (N. Virginia), US East (Ohio), US West (Oregon), Asia Pacific (Singapore), Asia Pacific (Sydney), Europe (Frankfurt), Europe (Ireland), and Europe (Stockholm). You will need to run this tutorial in one of those regions.
Step 1: Create the stack using AWS CloudFormation
1.1 Download sample code
For this blog, the necessary code has been uploaded to GitHub. In your development environment, run the following to clone the repository:
git clone https://github.com/aws-samples/simspace-weaver-samples.git
cd simspace-weaver-samples/snapshot-sample
Take a look at the repository folder. You will see there are two files: sim_controller.py and snapshot_stack.json.
sim_controller.py is an AWS Lambda function written in Python that will control the Simspace Weaver simulation workflow and capture the snapshot.
snapshot_stack.json is an AWS CloudFormation template that will be used to deploy the stack and start the simulation job, which will then trigger the state machine.
1.2 Create an Amazon S3 bucket
Use the AWS CLI to create an Amazon S3 bucket to upload the sample code files. You will use this bucket when creating the stack. In the instructions below, replace bucket-name with a unique name, see the Amazon S3 Bucket naming rules for more details.
aws s3 mb s3://bucket-name
This bucket will also store your snapshot.
1.3 Upload the files to the Amazon S3 bucket
First, zip the lambda file to deploy it using AWS CloudFormation.
cd simspace-weaver-samples/snapshot-sample
zip -r sim_controller.zip sim_controller.py models/
Then, copy the files needed to the Amazon S3 bucket you created.
aws s3 cp sim_controller.zip s3://bucket-name
aws s3 cp snapshot_stack.json s3://bucket-name
Finally, log in to your AWS account, then navigate to the Amazon S3 console, find your bucket, select the snapshot_stack.json object, then choose Copy URL. This will be used when creating your stack in AWS CloudFormation.

1.4 Create the stack from the AWS console
In your AWS account, navigate to the AWS CloudFormation console and choose Create Stack, With new resources (standard)

On the Create Stack page, choose Template is Ready and Amazon S3 URL. Paste the URL for the snapshot_stack.json file you copied before. Choose Next to proceed to the next step.

On the Specify stack details page, enter snapshot-stack as the Stack name, enter the bucket-name of the bucket you created before (just the string like my-snapshot-bucket) then leave the rest of the Parameters as the default values. Note that the SchemaBucketName and SchemaFilePath parameters are defaulted to the AWS SimSpace Weaver 1-click sample application, but can be changed to create a different simulation job using a different schema. Choose Next to continue.
On the Configure stack options page, choose Next to continue.
On the Review snapshot-stack page, to acknowledge that AWS CloudFormation will create resources in your account. Select the I acknowledge that AWS CloudFormation might create IAM resources with custom names checkbox.

Choose Submit to continue and create the stack
You will now see a new stack being created called snapshot-stack

Once the stack is created, choose the Resources tab to view the resources created.
Step 2: Wait for the snapshot to be created
2.1 View the AWS Step Functions state machine
While the simulation is starting, navigate to the AWS Step Functions console, in the navigation pane, choose State machines.

Select SnapshotMachine then choose View details. This will list the state machine executions, select the newest execution in the list. You will see a view of the current running execution, similar to Figure 3. The green states are states that have been executed successfully at least once, and the blue state is the current state.
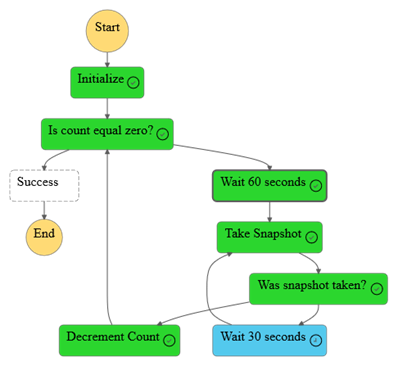
Figure 3 – State machine during execution
2.2 View the AWS Lambda Function
Next, to view the output of the AWS Lambda function, navigate to the AWS Lambda console, then choose Functions in the navigation pane.

Select your SnapshotLambda function.

You should see the function was created as part of your stack.
2.3 View the CloudWatch Logs
To see the output logs, choose the Monitor tab, then choose View CloudWatch Logs. Select your log file to see the output of the AWS Lambda function.

Scroll to the bottom of the log and you will see the current status. It may take 5-10 minutes to complete. The log output will say Snapshot created when it completes a snapshot.
While you’re waiting, for the state machine to complete, you can find more information on running simulations in Simspace Weaver in the user guide, What is AWS SimSpace Weaver? The Quick start tutorial explains how to download the SDK, run a project from your environment, and View your simulation.
Step 3: Stop the simulation
3.1 Navigate to the simulation
Next, navigate to the AWS SimSpace Weaver console. You should see your simulation job SampleSimulation is running.

3.2 Stop the simulation
Select the simulation then choose Actions, Stop

On the Stop SampleSimulation page it will ask you to confirm you want to stop. You will need to type SampleSimulation then choose Stop to stop the simulation.
Step 4: Start a simulation from the snapshot
4.1 Start a new simulation
Once the simulation is in the Stopped state, you will start a new one from a snapshot. Choose Start Simulation from the console.

On the Start Simulation page, for Simulation name, enter SnapshotSimulation, then choose Use a snapshot in Amazon S3.
4.2 Select a snapshot file in S3
Choose Browse S3 to locate the snapshot zip file, within your bucket. You should see three snapshots were taken.

4.3 Start the simulation
For IAM role choose SimSpaceWeaverServiceRole and for Maximum duration enter 1h. Finally choose Start simulation.
4.4 View the state machine
In the console, you will see the new simulation starting from the snapshot you created, and if you go to the AWS Step Functions console, you will see a new execution of your state machine has started.

4.4 More details
The Amazon EventBridge rule is configured to start the state machine any time a new simulation is started in AWS SimSpace Weaver, and you can modify the number of snapshots as desired by changing the count variable in the state machine. This makes the stack re-usable for other simulations.
Clean-up
When you’re finished, you can stop and delete the simulation from the AWS SimSpace Weaver console.
To clean up and delete the resources created by the AWS CloudFormation template, including the simulation job created, navigate to the AWS CloudFormation console, then select the stack you created, snapshot-stack, and choose Delete. Note that this will also delete the IAM role created for AWS SimSpace Weaver.
To delete the Amazon S3 bucket and its contents, navigate to the Amazon S3 console, then follow the user guide to Delete your objects and bucket.
Summary
AWS SimSpace Weaver is a service that scales spatial simulations across compute resources to enable large scale simulations like cities. In this blog, you learned how to run an AWS SimSpace Weaver simulation using AWS CloudFormation and use an AWS Lambda function to capture a snapshot of the state, then start a new simulation from that snapshot. For more information on running simulations in Simspace Weaver, see the user guide, What is AWS SimSpace Weaver?