AWS Storage Blog
Detect malware threats using AWS Transfer Family
Securely sharing files over SFTP, FTP, and FTPS is a staple within many business-to-business (B2B) workflows. Across industries, companies use file transfer to transmit inventory, invoice, and compliance information. It is critical for companies to make sure that shared files do not have any malicious content that could compromise their systems. Guaranteeing the shared files are free of malicious content includes continuous monitoring to detect and respond to security findings for your workloads. As ransomware events continue to become more prevalent and evolve, protecting the integrity of data is paramount for companies. Establishing preventive measures to protect against these events can help companies avoid financial losses and reputational damage. For your file transfer workloads, you can scan each file you receive and isolate compromised files before they ever reach your downstream systems. New files only reach your systems after an automated vetting process runs a series of security tooling, such as anti-malware checks.
Many customers choose AWS Transfer Family as their secure transfer service for files in Amazon Simple Storage Service (Amazon S3) and Amazon Elastic File System (Amazon EFS). Transfer Family supports industry-standard protocols like SFTP, so you can quickly replace self-managed resources with a fully managed environment. Transfer Family managed workflows let you preprocess files using predefined steps such as copy, tag, decrypt, and custom preprocessing with AWS Lambda. For example, you can bring your own code to scan for malicious content, obfuscate personally identifiable information (PII), encrypt sensitive information, and send notifications. Transfer Family managed workflows automatically initialize when the file upload completes and send logs to Amazon CloudWatch.
In this post, we demonstrate how to configure a workflow that invokes Clam Antivirus (ClamAV), an open-source anti-malware engine for detecting trojans, viruses, malware, and other malicious threats. This post provides a means to continuously monitor for threats, isolate malicious content, and periodically update the signature definitions to be prepared for the latest threats. This post includes AWS CloudFormation for one-click deploying this pattern into your environment.
Solution overview
The purpose of this sample architecture is to create a Transfer Family server with a managed workflow which scans each uploaded file with ClamAV. This Transfer Family server uses the SFTP protocol to transfer files into Amazon S3, but workflows support SFTP, FTPS, and FTP Transfer Family servers and file transfers into Amazon EFS. The sample shows file transfers into Amazon S3 and a workflow for scanning files as you receive them. However, the ClamAV workflow step can be added in your current workflow. For example, you may want to decrypt the file first, then scan it with ClamAV. This sample includes a way to refresh the ClamAV code and signature definitions so your workflow step can stay up-to-date without manual effort. The following figure describes the workflows needed to authenticate your Transfer Family server, upload a file and invoke the managed workflow, and regularly update your signature definitions.
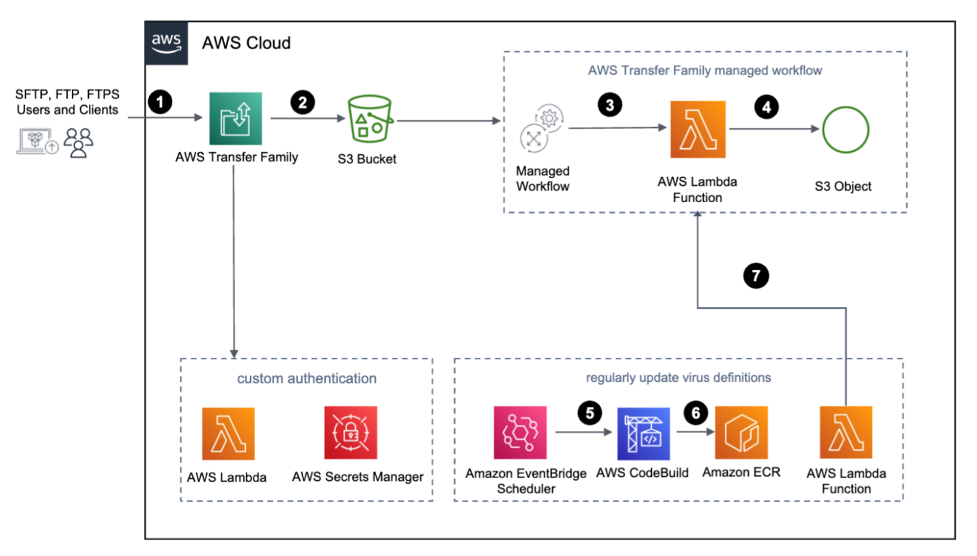
Figure 1: Detect threats using Transfer Family – Architecture
- The user sends an authentication request to the Transfer Family server, which forwards the request to authenticate the user using a custom identity provider.
- The user uploads the files to the Transfer Family server. Each file is put into an S3 bucket and invokes a distinct workflow execution.
- The Transfer Family managed workflow initializes a sequence of processing steps you have configured. In the workflow step, the Lambda function scans each file with a ClamAV installed container image.
- Based on the scan result from the Lambda function, the managed workflow tags the files appropriately either as INFECTED or CLEAN
- An Amazon EventBridge scheduler rule is configured to run based on a cron expression to update the ClamAV image and virus definitions.
- AWS CodeBuild builds the container image, adds the latest ClamAV virus definitions, and uploads to Amazon Elastic Container Registry (Amazon ECR).
- The Lambda function pulls the built container image from Amazon ECR and updates the Lambda function part of the managed workflow.
This solution has multiple steps (including, custom Lambda function and tag) as part of the Transfer Family managed workflow for the same event. In case of state changes happening in any of the steps, additional modifications are needed in the subsequent steps. For example, if you have a custom step to decompress a file and output it to a new Amazon S3 prefix, then you must change the ClamAV image to point to the correct path.
Prerequisites
This post assumes you have a foundational understanding of the following AWS services:
- AWS Transfer Family
- Amazon S3
- AWS Lambda
- AWS Secrets Manager
- Amazon EventBridge
- AWS CodeBuild
- Amazon ECR
- AWS CloudShell (on AWS Regions where AWS CloudShell is not supported, an Amazon Linux 2 instance)
For instructions, refer to Creating an AWS account.
Solution deployment
In this section, you deploy the CloudFormation templates that create the following resources:
- S3 bucket
- Transfer Family server
- Lambda functions
- AWS Secrets Manager secrets
- AWS CodeBuild project
- Amazon ECR repository
- EventBridge rules
- AWS Identity and Access Management (IAM) Roles and Policies
To deploy the CloudFormation template, follow these steps:
- Open AWS CloudShell in your AWS account.
- Clone this post’s GitHub repository using git clone command (git clone: https://github.com/aws-samples/transfer-family-anti-virus-cdk.git)
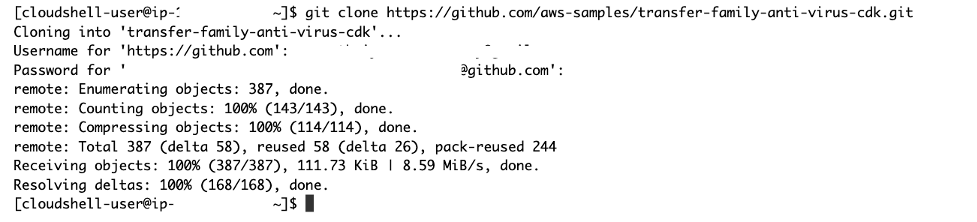
Figure 2: Screenshot of git clone command in AWS CloudShell
- Change directory into the “transfer-family-anti-virus-cdk” folder (cd transfer-family-anti-virus-cdk).
- Provide executable permissions to deployStack.sh bash script (chmod +x deployStack.sh).
- Run the deployStack bash script with the USER_NAME as an argument to create the required resources (./deployStack.sh $USER_NAME).

Figure 3: Screenshot of running the deployStack script
- Copy the SFTPEndpoint from the output and note the user name from the previous step to use later. SFTPEndpoint is the fully qualified domain name of your Transfer Family server.

Figure 4: Screenshot showing the SFTP endpoint output
- Retrieve the password generated and stored in the AWS Secrets Manager secret named SFTP/$USER_NAME to use later.
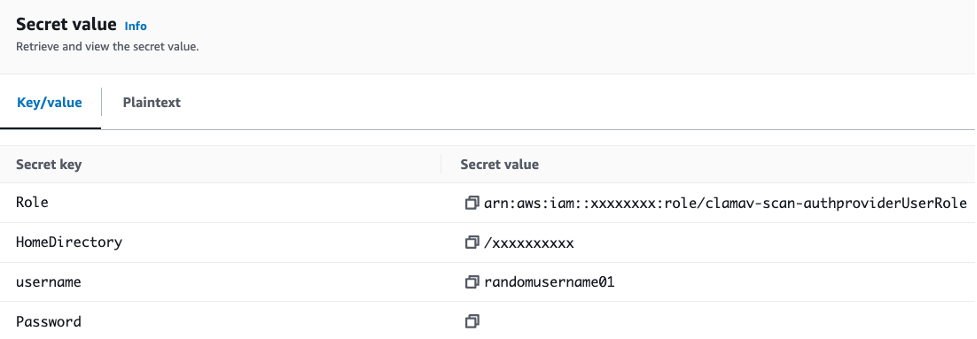
Figure 5: Screenshot showing the username and generated password for use
The script takes less than 20 minutes to run and create the necessary resources for the solution.
Test the configuration
You can test the end-to-end configuration by following these steps:
- Uploading a clean file through the SFTP endpoint, user name, and password from Steps 6 and 7 in the ‘Deploying the solution’ section.
- In a few seconds, the managed transfer workflow is executed and the S3 object in the clamav-scan-landingzone-* bucket is tagged as CLEAN. It’s now accessible for download.

Figure 6: Screen capture of the Amazon S3 Object tag for a clean file
- Download an anti-malware test file from eicar.org, a test file developed by the European Institute for Compute Anti-virus Research. Note that you must adhere to your organization’s information security best practices and guidelines. Make sure you carefully read and understand the terms of use for the test file before downloading.
- Upload the anti-malware test file through the SFTP endpoint, user name, and password from Steps 6 and 7 in the ‘Deploying the solution’ section.
- The managed transfer workflow is executed and custom preprocessing using Lambda function scans the uploaded file for malware.

Figure 7: Screen capture of the CloudWatch Logs for an infected file
- The Amazon S3 object in clamav-scan-landingzone-* bucket is tagged as INFECTED. The file is not available for download, as the solution denies the download of infected objects.

Figure 8: Screen capture of the Amazon S3 Object tag for an infected file
- (Optional) Edit the EventBridge rule (clamav-codebuild-cronEventRule-*) configured to refresh the ClamAV code and signatures. Note that you should troubleshoot and monitor issues using the logs generated in CloudWatch.
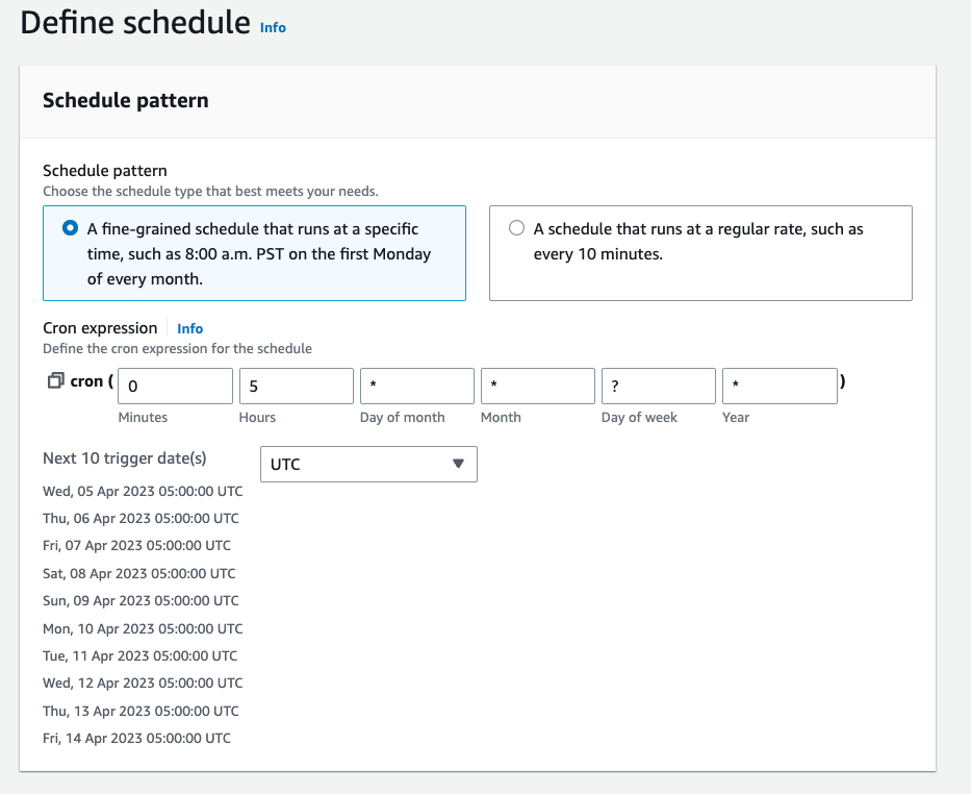
Figure 9: Screen capture of editing an EventBridge scheduled standard rule
Cleaning up
In this post, you created several components that have a cost. To avoid incurring future charges, remove the resources with the following steps:
- Empty the S3 bucket.
- Delete the ECR repository.
- Delete the CloudFormation stack.
- Remove the cloned repository.
Conclusion
In this post, we demonstrated how to automate ingesting and scanning content using AWS Transfer Family and managed workflows. We covered integrating a serverless continuous integration/continuous development (CI/CD) system to keep the scanning system up-to-date with the most recent signature files.
B2B communication includes exchanging files over secure protocols like SFTP, FTPS, and FTP. These capabilities let you quickly integrate open-source tools like ClamAV as a means to continuously monitor for threats, isolate malicious content, and periodically update signature definitions. The solution helps detect and respond to threats that could be encountered by malicious content shared over SFTP, FTPS, and FTP. This is important in the effort to protect the integrity of your data and establishing preventive measures to protect against these malicious events to help avoid reputational damage, financial loss, and other unfavorable scenarios.
You can deploy the complete solution into your account by following the steps mentioned in the “Deploying the solution” section. More advanced users can deploy this post’s GitHub repository using AWS Cloud Development Kit (AWS CDK). For more information about Transfer Family, visit the AWS Transfer Family product page.