AWS Partner Network (APN) Blog
4 Steps to Train and Deploy Machine Learning Models on AWS Using H2O
| |
 |
 |
By Pratap Ramamurthy, Partner Solutions Architect at AWS
H2O is an open source data machine learning platform that provides a flexible, user-friendly tool to help data scientists and machine learning practitioners. It was created by H2O.ai, an AWS Partner Network (APN) Advanced Partner with the AWS Machine Learning Competency.
Moreover, H2O boasts a significant number of users in the data science community. Based on website analytics embedded in the product, H2O is being used by more than 160 of the Fortune 500 companies, including eight of the top 10 banks and seven of the top 10 insurance companies.
In this post, I will show you how to use H2O on Amazon Web Services (AWS) and share best practices for using H2O in the cloud. A typical workflow to create a machine learning model involves collecting data, training the model, and deploying the model. Figure 1 shows a slightly modified workflow, relevant to the usage of H2O on AWS.
Step 1: Set Up H2O
Many data scientists start using H2O on their laptops to analyze small data sets, but to fully harness the power of H2O it should be deployed as a distributed application. This makes AWS the perfect choice for the deployment of H2O, which can be easily deployed directly from AWS Marketplace. You may notice on the Marketplace page that you cannot deploy the Amazon Machine Image (AMI) directly; only using the AWS CloudFormation template.
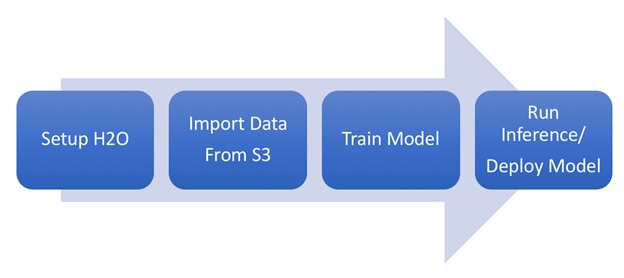
Figure 1 – Typical H2O workflow on AWS in 4 steps.
AWS CloudFormation provides a common language for you to describe and provision all the infrastructure resources in your cloud environment. This CloudFormation template for H2O helps users launch a Well-Architected H2O cluster with a single click of a button. While using this template to deploy, user input is required for configuring external access to the H2O application through Port 54321. Users are requested to open this port to only specific IP addresses, and not to the entire internet.
The H2O software is free to use and you only pay for the AWS resources consumed, which depends on the instance type and cluster size. The recommended instance type is m4.xlarge. If you do not share this H2O cluster and only plan to use it ephemerally, remember to terminate the cluster once the training job is done to avoid unnecessary costs.

Figure 2 – Log in to H2O using the username “h2o” and your instance ID as the password.
Once the cluster is up, you can point your browser to the IP address of an instance in the cluster: http://<public-ip-address>:54321. The default user name is “h2o” and the password is the instance ID. Once you are successfully authenticated, your browser will be redirected to the H2O notebook application called H2O Flow.
H2O Flow is an open source user interface for H2O, and is similar to Jupyter Notebooks. It’s a development environment that allows you to combine code execution, text, mathematics, plots, and rich media. As a side note, you’ll notice that all the H2O products have creative names that relate to water or H2O.

Figure 3 – H2O Flow allows you to combine code execution, text, mathematics, plots, and rich media.
Step 2: Import Data From Amazon S3
The data can be stored in Amazon Simple Storage Service (Amazon S3) and downloaded to the cluster as needed. Amazon S3 is object storage built to store and retrieve any amount of data from anywhere, and is designed to deliver 99.999999999% durability.
When you create the cluster, if you provide an Amazon S3 bucket name that is accessible by this user, the cluster can automatically access the S3 bucket. You can import the data from your H2O Flow by pointing your data location like “s3://bucket-name/objectname” as you can see in Figure 4.

Figure 4 – Importing files through H2O Flow.
Step 3: Train the Model
The rest of the steps are easy to follow in H2O Flow—load the data, choose the different features you want to use, chose a machine learning algorithm and configure the hyperparameters, and train the model. Here is a good tutorial if you’re interested in learning more about H2O Flow, but I will skip those steps here and focus the rest of this post on using H2O on AWS.
In Figure 5, I chose the Titanic dataset from Kaggle which contains the details of all the passengers of the Titanic ship. This is a small dataset ideal for demos. As H2O parses the data, it identifies the data type and the ordinality of each feature. My objective is to predict a survivor from a non-survivor given a passenger’s age, gender, and other details. For this binary classification problem, I choose the Distributed Random Forest (DRF) model. Since this a small dataset, it only took a few seconds to train.

Figure 5 – The DRF model trained on the Titanic dataset shows the logloss error.
Step 4: Deploy the Model
In this step, we will deploy the model as a RESTful endpoint. The first approach to create a RESTful endpoint is to create a Java server and serve the model through that. However, to do that, you ordinarily would have to be running one or more Amazon Elastic Compute Cloud (Amazon EC2) instances continuously. A more cost-effective approach is to deploy it as an AWS Lambda function.
AWS Lambda lets you run code without provisioning or managing servers. You pay only for the compute time you consume, and there is no charge when your code is not running. With Lambda, you can run code for virtually any type of application or backend service—all with zero administration. In our case, we will create a Lambda deployment package in Java.
To create a Lambda deployment package, we need four artifacts:
- The trained model in the form of a Plain Old Java Object (POJO). This POJO is a java file that has encoded the weights that were learned from the data as java code. This can be downloaded from the H2O Flow interface, as highlighted in Figure 4.
- The H2O jar file (h2o-genmodel.jar) that contains the class definition of the model. To avoid any mismatch of version, you should be downloaded from your own H2O cluster, from here: http://<public-ip-address>:54321/3/h2o-genmodel.jar.
- An AWS Lambda handler that will be invoked when Lambda is triggered. I have provided the code that I used for this example.
- The AWS Lambda libraries for java.
AWS Lambda Wrapper Load H2O Model and Make Prediction
At this point, after your training is complete and you have exported your model, you can terminate the cluster to save unnecessary costs.
There are many ways of creating the AWS Lambda deployment package. I have used the Eclipse Java editor for this project, and here you can find the details about setting up the Eclipse editor for AWS. Using Eclipse, I compiled and created a zip file and uploaded it to Amazon S3. This Lambda function can then be invoked using an Amazon API Gateway, which provides a RESTful front end to the Lambda function. A simple Lambda architecture is given in Figure 6.
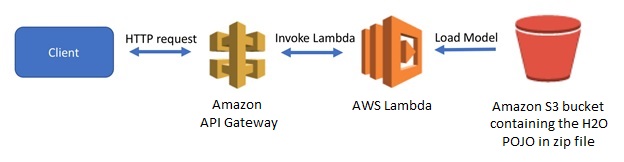
Figure 6 – Architecture of AWS Lambda deployment of H2O.
I used an AWS CloudFormation template to create the Lambda function from the deployment package and the Amazon API Gateway. Using CloudFormation for the automation of the deployment makes my deployments error-free and consistent. You can download the CloudFormation template or launch this CloudFormation stack in your AWS account.
To deploy the AWS CloudFormation template, you need to provide an Amazon S3 bucket and file name of your zip file that contains the Lambda deployment package, and it will create the remaining resources. It takes only a few minutes to create the stack, and once done, it outputs a link to the API Gateway deployment. You can then test the model using curl like this.
Conclusion
In this blog, we looked at setting up an H2O cluster, import data from Amazon S3, create an AWS Lambda deployment package from the model, and finally deploy a RESTful endpoint. Following these steps, you can migrate your H2O Flows to AWS in about 10 minutes.
Check out H2O in AWS Marketplace >>
.
| |
| |
H2O.ai – APN Partner Spotlight
H2O.ai is an APN Advanced Technology Partner with the AWS Machine Learning Competency. They are focused on bringing AI to businesses through software, and H2O is their fully distributed in-memory machine learning platform that supports GLM, Distributed Random Forest, Gradient Boosting Machine, Deep learning, K-means , PCA, and more.
Contact H2O.ai | Solution Overview | Solution Demo | Customer Success | Spec Sheet | Free Trial | Buy on Marketplace
*Already worked with H2O.ai? Rate this Partner
*To review an APN Partner, you must be an AWS customer that has worked with them directly on a project.