AWS Partner Network (APN) Blog
Archiving Amazon MSK Data to Amazon S3 with the Lenses.io S3 Kafka Connect Connector
By Darragh O’Flanagan, Sr. Partner Solutions Architect at AWS
By Guillaume Aymé, Director Marketing, at Lenses.io
 |
As a stream processing platform, Apache Kafka is usually configured with a short retention period during which the data is processed before being deleted. Keeping historical data in Kafka can lead to significant costs as the data grows and impacts the performance of the cluster.
In cases where you need to keep older data, Amazon Simple Storage Service (Amazon S3) provides a cost-effective storage and recovery option where data can be compressed and optimally partitioned for querying.
Amazon Managed Streaming for Apache Kafka (Amazon MSK) is a fully managed, highly available, and secure Apache Kafka service that makes it easy to build and run applications that use Kafka to process steaming data.
In this post, we will discuss how to use the new open source Kafka Connect Connector (StreamReactor) from Lenses.io to query, transform, optimize, and archive data from Amazon MSK to S3. We will also demonstrate how to use Amazon Athena to query the partitioned parquet data directly from S3.
Lenses.io is an AWS Partner and leader in DataOps software that industrializes data platforms on top of Kafka and Kubernetes.
Solution Overview
The architecture diagram below shows an Apache Kafka MSK cluster with Kafka Connect running the S3 Connector, which sinks data to an S3 bucket to be accessed by Amazon Athena downstream.
Lenses.io is deployed to provide monitoring, governance, and self-service administration of the Kafka environment.

Figure 1 – How the connector works.
Prerequisites
For this walkthrough, you should have the following prerequisites:
- AWS account.
- Access to the AWS Management Console with permissions to manage applications.
The following will be deployed:
- Amazon MSK cluster.
- Amazon S3 bucket where we’ll archive the data.
- Amazon Elastic Compute Cloud (Amazon EC2) instance to run the Kafka Connect cluster.
- Amazon EC2 instance to run Lenses for MSK (free trial).
Step 1: Create an MSK Cluster
- Open the Amazon MSK console.
- Click on Create cluster.
- Choose “Quickly create starter cluster with recommended settings.”
- Enter a name for the cluster and choose Create cluster.
- The cluster will take a few minutes to create and will be created in the default virtual private cloud (VPC), with the default VPC security group.
Step 2: Create an S3 Bucket
- Open the Amazon S3 console.
- Choose Create bucket.
- In Bucket name, enter a name for your bucket <BUCKETNAME>. Do not use hyphens or other special characters. This is a requirement of the Connector later.
- Leave checked “Block All Public Access” and other settings as default.
- Choose Create bucket.
Step 3: Create an EC2 Instance to Run Kafka Connect
Create a Key Pair
Follow the steps in Setting Up with Amazon EC2 in the Amazon EC2 User Guide for Linux Instances to create a key pair. If you already have a key pair, you don’t need to create a new one. You can use your existing key pair for this exercise.
Create an IAM Role
You must create an AWS Identity and Access Management (IAM) role before you can launch an instance with that role or attach it to an instance.
To create an IAM role using the console:
- Open the AWS IAM console.
- In the navigation pane, choose Roles, Create role.
- On the Select role type page, choose EC2 and the EC2 use case. Choose Next: Permissions.
- Choose Create policy to open the policy creation tab.
- Open the JSON editor and paste the following policy, replacing the bucket name with the name of your bucket. This policy allows access to the S3 bucket and also to the Kafka functions we’ll need later.
- Choose Next: Add Tags.
- On the Review page, enter the name “MskDataAccessPolicy” for the policy and choose Create policy.
- Return to the Roles and select Create Role. Then, select EC2 and click Next. Refresh the policy list and find and check the newly-created policy.
- Choose Next: Add Tags.
- Choose Next: Review.
- Name the role “MSKDataAccessRole” and choose Create role.
Next, launch an EC2 instance to run Kafka Connect:
- Open the Amazon EC2 console.
- Choose Launch Instance and select “Launch Instance (Without Template).”
- In Step 1: Choose an Amazon Machine Image (AMI), find an Amazon Linux 2 AMI at the top of the list and choose Select.
- In Step 2: Choose an Instance Type t2.small, select an instance type and then choose Next: Configure Instance Details.
- In Step 3: Configure Instance Details, provide the following information:
- For Network, choose default VPC.
- For Subnet, choose a default subnet in any AWS Availability Zone.
- For IAM role, choose “MSKDataAccessRole.”
- Choose Next: Add Storage.
- Choose Next: Add Tags.
- Name your instance and choose Next: Configure Security Group.
- In Step 6: Configure Security Group, set “Assign a security group” to “Select an existing security group.” Choose the default security group.
- Choose Review and Launch.
- Select the check box for the key pair you created, and then choose Launch Instances.
- From the EC2 console, choose Security Groups, identify the default group in the default VPC, and select the Inbound rules tab.
You can’t access your EC2 instance by Secure Shell (SSH) using this security group. Edit the default security group and add a rule to allow SSH. You can use the following settings to add SSH access:
- Type: SSH
- Protocol: TCP
- Port Range: 22
- Source: Anywhere 0.0.0.0/0
You also need to add new rule to allow all traffic from default security group. Use the following setting to add this traffic:
- Type: All traffic
- Protocol: All
- Port Range: All
- Source: <default security group>
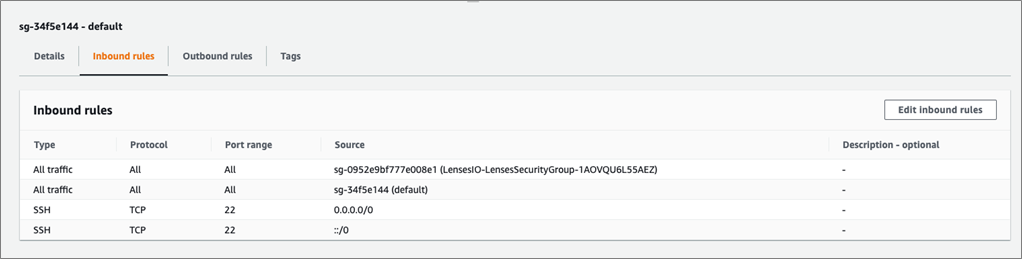
Figure 2 – Allow all traffic from default security group.
Step 4: Install Lenses for Amazon MSK
This process will deploy a Lenses.io instance into your Amazon VPC and connect it to your Amazon MSK and Kafka Connect clusters.
Lenses provides Kafka monitoring, self-service governance, and Kafka security to drastically simplify data operations.
Install Lenses via AWS Marketplace
- Go to AWS Marketplace and launch the deployment. This will automatically subscribe you to a 14-day free trial of Lenses, so no license key is required.
- Ensure you select the region where your MSK cluster is deployed and select Launch CloudFormation as the action.
- Name the stack “LensesIO”.
- For the details of the stack, select an available VPC and subnet. For the connection to MSK, copy the Amazon Resource Name (ARN) of your MSK cluster from the MSK console as well as the associated security group of the cluster.
- Enter the IP address 0.0.0.0/0 to allow all IP addresses access under Lenses Network (SSH Location and Lenses Location field).
- In the Connect JSON field, paste the following configuration, replacing KAFKA_CONNECT_HOST with the private IP address of the Kafka Connect EC2 instance.

Figure 3 – CloudFormation parameters.
- Complete the CloudFormation process and review before launching. The template will take a few minutes to execute. Review the events to monitor progress.
- Take note of the Physical ID of the EC2 instance that has been created. This will act as the default admin password to log into Lenses.

Figure 4 – CloudFormation created resources.
- The Outputs tab will show the URL to the Lenses administration dashboard.
- Log in with username admin and default password as the Physical ID of the EC2 instance deployed.
- You should notice healthy Brokers and Zookeepers but a red/unhealthy status for the Kafka Connect cluster. This is normal because we haven’t yet started the service.

Figure 5 – Lenses administration dashboard.
Step 5: Create ‘manufacturing_failures’ Topic
- From the Lenses menu, choose Explore, Add Topic.
- Enter the name manufacturing_failures, and Create Topic as shown below.
- Click on Topic manufacturing_failures and choose Actions, Change Schema Type, Types and select for Key: String, Value: JSON.

Figure 6 – Add topic “manufacturing_failures.”
We are now ready to install the Kafka Connect Cluster for our Amazon S3 Sink.
Step 6: Install Kafka Connect Cluster
To connect to the EC2 instance deployed in Step 3. Connect via SSH, following the steps in Connecting to your Linux instance using SSH.
- Follow the steps below to install the Lenses S3 Kafka connector and dependencies.
- Open the Amazon MSK console, choose Cluster details, and note the Broker hostnames.

Figure 7 – Broker hostnames in the Amazon MSK console.
- At the EC2 terminal, follow the steps below to configure the connector. Replace BROKERS_HOSTNAME with the entries from the administration console.
- Create a default file sink for the Kafka connector, for our topic.
- Start Kafka Connect.
In Lenses, you should now see a health green status for the Kafka Connect Cluster.
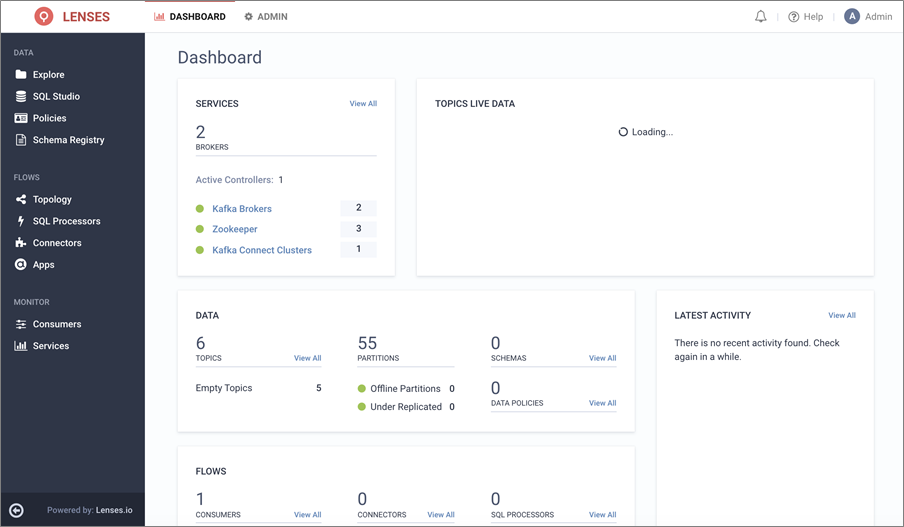
Figure 8 – Health of the Kafka Connect clusters.
Step 7: Configure the S3 Connector Through Lenses
The Lenses.io Kafka Connect S3 Connector extends the connect standard configuration with a SQL command (Lenses Kafka Connect Query Language or “KCQL”).
This defines how to map data from the source (in this Kafka) to the target (Amazon S3). It also includes how data should be partitioned into S3, the bucket names, and the data serialization (such as JSON, Avro, Parquet, Text, or CSV).
KCQL includes the ability to use multiple fields (including payload, keys, and headers) from within the streaming data to define the partitioning in S3 to best optimize the read-access by Amazon Athena or other downstream services.
The query can be formed like this example:
INSERT INTO BUCKETNAME:some_container SELECT * FROM someTopic PARTITIONBY someField1, _header.someHeaderField STOREAS `Parquet` WITH_FLUSH_COUNT = 100
Next, we’ll configure the connector to stream to Amazon S3:
- From the Lenses application, choose Connectors from the top menu.
- Choose New Connector and select AWS S3 Connector.
- Copy the configuration below into the configuration editor replacing your AWS region (aws.region and aws.custom.endpoint) and BUCKETNAME and choose Create Connector.
When complete, the connector configuration should look like this:
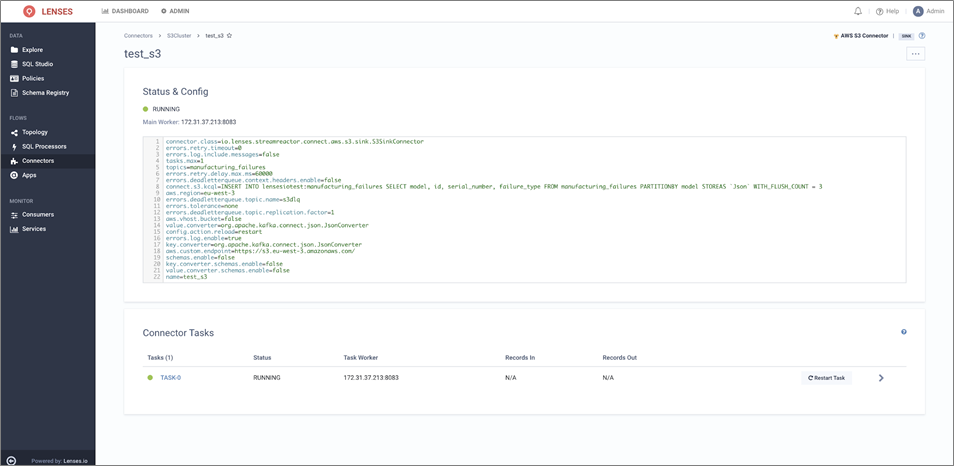
Figure 9 – Connector status and configuration.
Step 7: Produce Some Data
- Choose Explore from the top-level menu, and open the topic manufacturing_failures.
- Choose Actions, and Insert Messages.
- Copy the data below into the message editor and Insert Messages.
- Verify you can see the messages. Explore > topic manufacturing_failures.
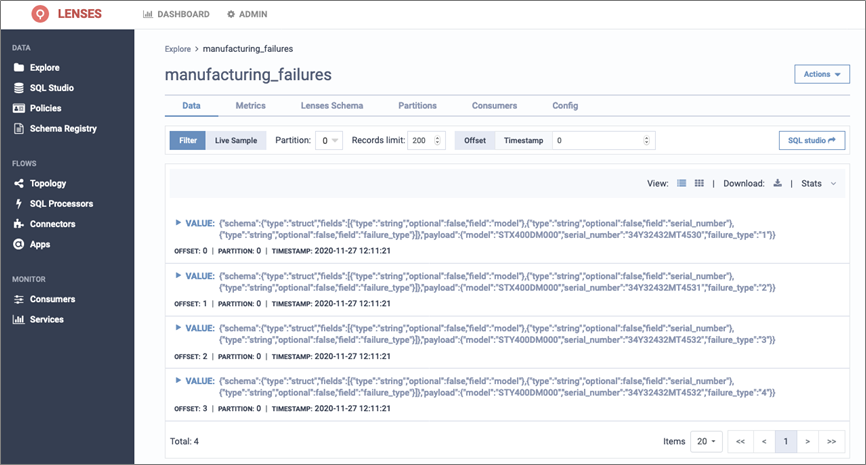
Figure 10 – Viewing messages in our topic.
- In the Amazon S3 console, verify the data has been archived, partitioned, and stored in parquet format correctly in your S3 bucket.

Figure 11 – Data stored and partitioned in Amazon S3.
Step 8: Query the Data with Amazon Athena
- Open the Amazon Athena console.
- In the query editor, paste the DDL below to create a table that can read the parquet partitioned data. Replace BUCKETNAME with the name of the S3 bucket, and choose Run Query.
- We still need to load the partitions for the table. Use the following command in the query editor. Choose Run Query.
MSCK REPAIR TABLE manufacturing_failures;
- Now, we can query the optimized, compressed data with the following SQL and see the results similar to below.
SELECT * FROM "default"."manufacturing_failures" limit 10;
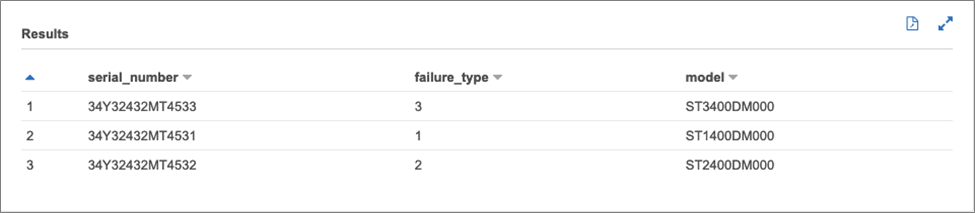
Figure 12 – Amazon Athena query results.
Conclusion
In this post, we demonstrated how to build an analytics-ready, cost-effective way to archive streaming data from Amazon MSK using the open source Kafka Connect Connector, Amazon S3, and Amazon Athena.
With the help of Lenses.io DataOps for MSK, you can operate data across those technologies and efficiently move data out of Kafka to address different analytics workloads without the need of managing complex extract, transform, load (ETL) or streaming applications.
.

.
Lenses.io – AWS Partner Spotlight
Lenses.io is an AWS Partner and leader in DataOps software that industrializes data platforms on top of Kafka and Kubernetes.
Contact Lenses.io | Partner Overview | AWS Marketplace
*Already worked with Lenses.io? Rate the Partner
*To review an AWS Partner, you must be a customer that has worked with them directly on a project.