AWS Partner Network (APN) Blog
Automate AWS Architecture Reviews Using CloudCheckr’s Well-Architected Readiness Advisor
By Vamsi Pitta, Solutions Architect – AWS
By Samiran Ghosh, Solutions Architect – AWS
 |
| CloudCheckr |
 |
Small and medium businesses (SMBs) with limited resources are often challenged with time and resource constraints to perform AWS Well-Architected Reviews on a regular basis.
The AWS Well-Architected Framework provides a consistent approach for evaluating cloud architecture and implementing designs that will scale with application needs over time. Well-Architected Reviews ensure that workloads are secure, high-performing, resilient, and make the most efficient use of cloud infrastructure.
CloudCheckr CMx gives you the visibility and intelligence you need to lower costs, maintain security and compliance, and optimize resources in single or multi-cloud infrastructure.
Further, CloudCheckr’s Well-Architected Readiness Advisor report leverages the AWS Well-Architected Tool to map CloudCheckr’s best practice checks to the 6 pillars of AWS Well-Architected.
In this post, we will walk through the steps for SMBs to leverage CloudCheckr’s Well-Architected Readiness Advisor report to automate architecture reviews by updating AWS Identity and Access Management (IAM) permissions to provide CloudCheckr CMx access to add or edit notes in the AWS Well-Architected Tool. We’ll also review how you can enable the Well-Architected workloads report and take action based on the report.
CloudCheckr is an AWS Cloud Operations Software Competency Partner and AWS Marketplace Seller. The CloudCheckr CMx cloud governance platform helps to secure, manage, and govern complex cloud environments.
Prerequisites
- Foundational knowledge of the AWS Well-Architected Framework
- Define and document a workload in the Well-Architected Tool
- Existing CloudCheckr CMx license, or sign up for a free trial
- Onboard your AWS account to CloudCheckr CMx using the AWS Cost and Usage Report:
- Create an account in CloudCheckr
- Create a cross-account role and select policies using AWS CloudFormation
- Enable tags for cost reports
- Configure the Cost and Usage Report in AWS
- Configure the Cost and Usage Report in CloudCheckr
Step 1: Update IAM Permissions
- Open AWS IAM roles, search for cc-iam-stack, and select cc-iam-stack-IamRole-* from the list.
. - Under Permissions policies, expand CloudCheckr-Inventory-Policy and then choose Edit.

Figure 1 – Permissions policies attached to the role.
- Choose the JSON tab and add the permissions mentioned below. Then click Review policy and Save Changes.
"wellarchitected:getanswer",
"wellarchitected:updateanswer",

Figure 2 – IAM permissions added to CloudCheckr-Inventory-Policy.
Step 2: Enable Well-Architected Workloads Report in CloudCheckr CMx
- Log in to CloudCheckr CMx and navigate to Resources > Well-Architected> List of Workloads.
. - Enable the report to see the list of workloads from AWS Well-Architected Tool.

Figure 3 – Enable the Well-Architected report.
Step 3: Review Well-Architected Readiness Advisor Report
- Navigate to Total Compliance > Well-Architected Readiness Advisor and then Filter workload from the drop-down.

Figure 4 – Well-Architected Readiness Advisor landing page.
- The report shows how each question aligns with the AWS Well-Architected pillars. Note that as of this writing, the “Sustainability” pillar is not supported by CloudCheckr CMx.
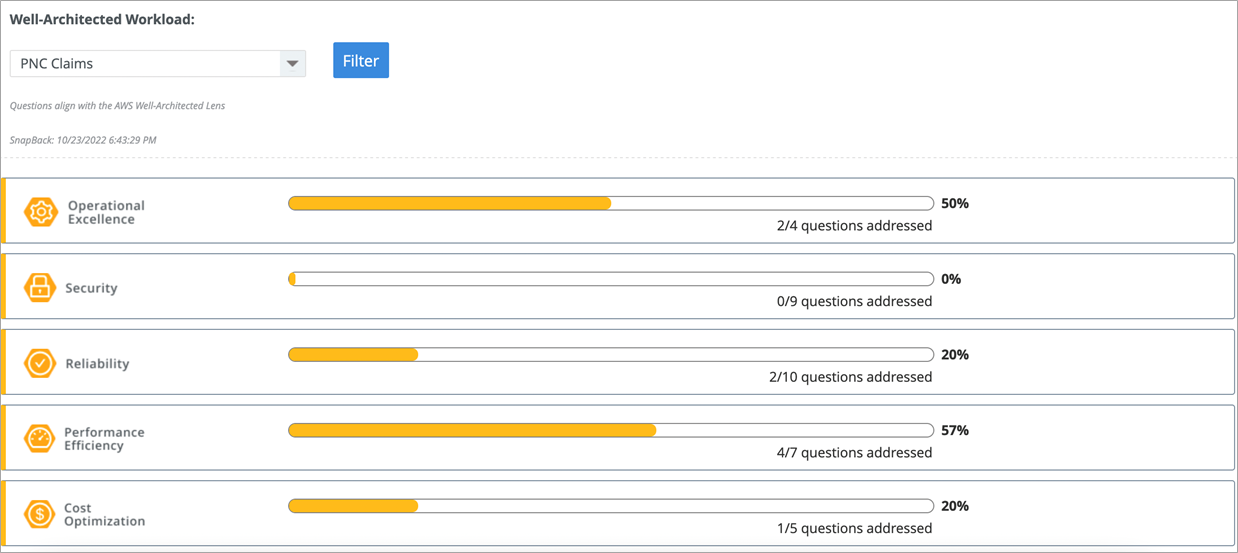
Figure 5 – CloudCheckr CMx supports five AWS Well-Architected pillars.
- Choose to expand each pillar to see how CloudCheckr’s best practice checks map to each question from the AWS Well-Architected Framework. This enables cloud architects to look at each check through the Well-Architected Lens, and helps prioritize actions needed to optimize workloads.

Figure 6 – Well-Architected questions related to the “Security” pillar.
- For example, if you expand the question “How do you protect your data at rest?” you may find, as in this example, several Amazon Simple Storage Service (Amazon S3) buckets do not have default encryption enabled.

Figure 7 – Best practice checks related to protecting data at rest.
- As a best practice to prevent security incidents, it’s highly encouraged to enable default encryption to protect data at rest in Amazon S3.
. - Note that Amazon S3 now applies server-side encryption with Amazon S3 managed keys (SSE-S3) as the base level of encryption for every S3 bucket. Starting January 5, 2023, all new object uploads to Amazon S3 will be automatically encrypted at no additional cost and with no impact on performance.
. - CloudCheckr highlights this check and identifies which S3 buckets don’t have default encryption enabled. The next step shows how to enable default encryption for S3 buckets by logging into the AWS Management Console.

Figure 8 – Enable default encryption for Amazon S3 buckets.
- Additionally, for each pillar use the Edit Notes button to add or edit any additional comments about the check or results. Choose Save Notes to synchronize with AWS Well-Architected Tool.
Conclusion
In this post, we demonstrated how to update AWS IAM permissions to provide CloudCheckr CMx access to add or edit notes in AWS Well-Architected Tool and enable the Well-Architected Workloads Report.
We also showed an example of how to use CloudCheckr’s AWS Well-Architected Readiness Advisor report for architecture reviews to build secure, high-performing, resilient, and efficient infrastructure for a variety of applications and workloads.
You can learn more about CloudCheckr on AWS Marketplace.
.

.
CloudCheckr – AWS Partner Spotlight
CloudCheckr is an AWS Partner and cloud governance platform that helps to secure, manage, and govern complex cloud environments.
Contact CloudCheckr | Partner Overview | AWS Marketplace | Case Studies