AWS Partner Network (APN) Blog
How to Implement Object-Based Authorization in Serverless Applications Using Amazon Cognito
By Ryo Hang, Solution Architect at ASCENDING
By Sean Yuan, Cloud Developer at ASCENDING
By Le Yi, DevOps at ASCENDING
By Gloria Zhang, Director, Marketing & Business Development at ASCENDING
 |
Amazon Cognito is a powerful authentication and authorization service managed by Amazon Web Services (AWS) and is often combined with Amazon API Gateway and AWS Lambda to build secure serverless web services.When building a complex web service such as a serverless application, sooner or later you must deal with permission control.
In this post, we will describe how to implement object-based authorization in serverless applications on AWS.
In particular, we’ll walk through the code and strategy that implements a robust and scalable solution of object-based authorization with Amazon API Gateway, Lambda, and an identity provider like Amazon Cognito. This allows us to secure each item in Amazon DynamoDB for different identity.
ASCENDING is an AWS Advanced Consulting Partner, Public Sector Partner, and AWS Lambda Service Delivery Partner.
The Challenge
Let’s take a look at a real life-scenario. In a payroll system, we have Employee A, Employee B, and their manager, Employee C. They can all use their username and password to log in to the payroll application. This is authentication.
All of them can retrieve their paystubs through role-based authentication using:
REST API GET /api/employee/{employee_id}/paystubs
We can define only the employee role of the company that can access that particular API. However, we need extra protection specifying that Employee A can only request his/her own paystubs. For example:
/api/employee/employee_A_id/paystubs
We want to make sure Employee A can’t access others’ paystubs. We also need to grant Employee C (the manager) permission to access not only their own paystubs but the paystubs of Employees A and B.
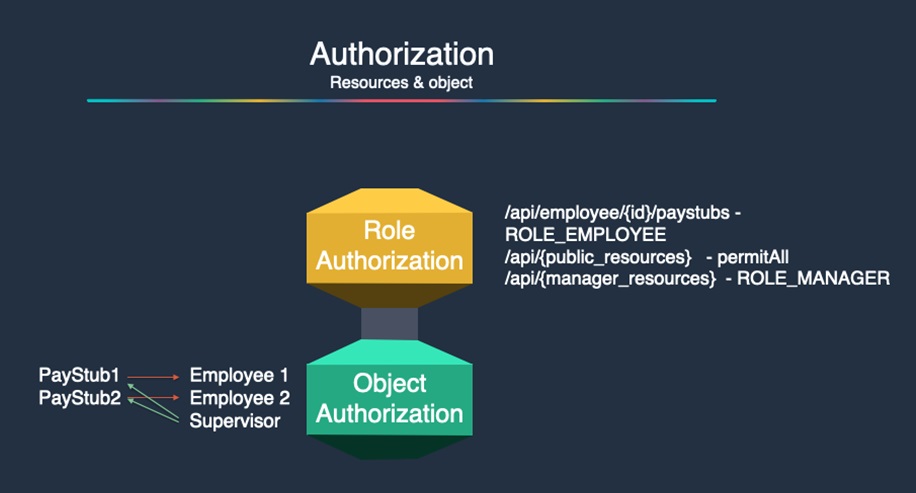
Figure 1 – Role and object authorization.
This scenario is object-based authorization. Popular frameworks like Spring, Django, and Node.js all have libraries to implement it. We will next discuss how to implement an object-based authorization in an AWS serverless architecture.
The Solution
We were able to build a solution completely relying on AWS managed services that fulfilled the current requirement and met future scaling needs.
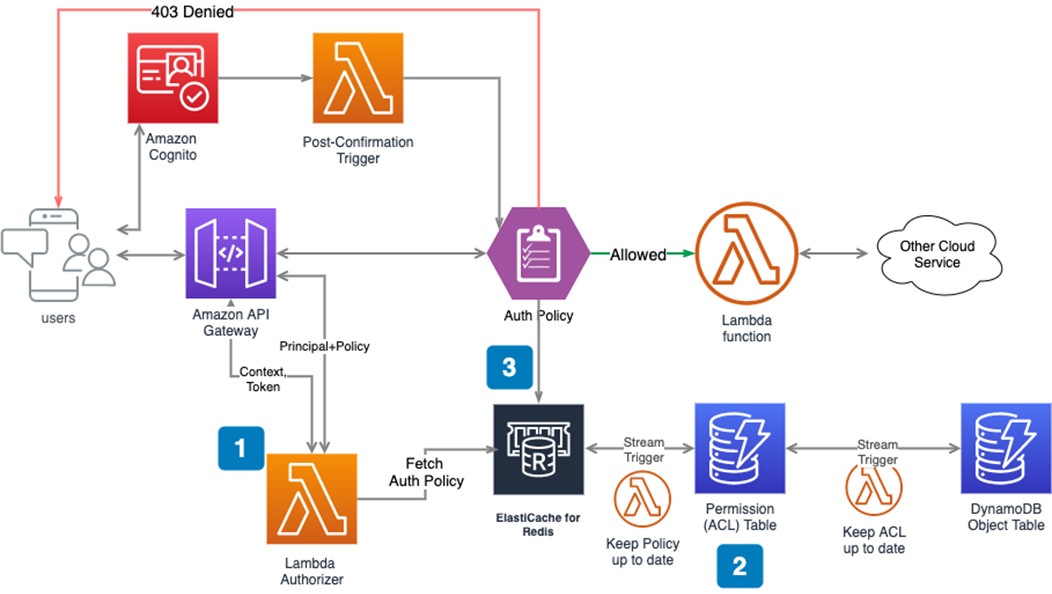
Figure 2 – Architectural diagram.
These are the main processes in the solution:
- An AWS Lambda function is triggered before the API request to control accept or deny.
- Build a policy and ACL object for the Lambda function to determine if the current user has access to the requested object.
- Cache the policy object to accelerate the authorization process in a large scale application.
AWS Lambda Authorizer
The AWS team has integrated Lambda functions in most managed services since the day it was launched in 2015. For each request to Amazon API Gateway, developers can turn on an AWS Lambda authorizer, which returns allow or deny Boolean results.
The authorizer serves as the central brain to determine if the API requester has the permission to relevant API resources.
Here’s how to implement it:
- Create authorizers in Amazon API Gateway.

- Assign the AWS Lambda function to any of the API resources you would like to secure.

- Configure the AWS Lambda authorizer. You can follow the AWS documentation to configure it in the Amazon API Gateway console.
Next, we’ll go into detail about how permission models are built and updated. The authorizer leverages that information to determine if it should allow or deny the request.
Building User Access Control List (ACL)
Building and maintaining user permission up-to-date is a non-trivial task. The solution varies depending on the identity provider (IDP) you use. Let’s take Amazon Cognito as an example. You’ll need to:
- Initialize the ACL
- Maintain the ACL
- Generate a policy from the ACL
- Evaluate the policy
Step 1: Initialize the ACL
Because each user has a unique identification, we can insert an item in the Amazon DynamoDB permission table to describe user permissions upon user registration with Amazon Cognito. In this example, we are using single integer IDs for Employees A, B, and C. In a real application, the UUID strings are quite long.
As the project grows, we can expand the number of columns to describe the access control to other types of objects in the permission table.
This permission table in DynamoDB essentially stores the ACL for each user; the implementation could be different based on your application use cases.
We implemented the Allow and Deny for better logic evaluation. For example, a manager could have access to most employee paystubs, but not to those of his supervisors. Using the Deny feature is much more effective in that case. The logic behind that is very similar to AWS Identity and Access Management (IAM) role evaluation logic.
Code Sample
It’s quite flexible to customize Amazon Cognito. You can trigger a Lambda function to build an ACL for a particular user at a post-confirmation event. We use the following code sample in the Amazon Cognito post confirmation trigger.
Step 2: Maintain the ACL
In a complex project, user permissions are dynamic and change all the time. Let’s consider two simple scenarios:
- Employee A has been promoted to manager, so they will not only have access to they own paystubs but also to the paystubs of their employees.
- The system automatically generates pay stubs for each employee, so the ACL has to change pay stubs objects for each employee.
We chose the Amazon DynamoDB stream to manage user permissions:

We can easily integrate any Lambda function whenever an item in the table is modified or inserted.
Again, for our example, we can write a Lambda function in the paystub table that includes paystub information as well as employee and other information. The Lambda function is run for any new entry or update to an existing entry.
Step 3: Generate a Policy from the ACL
Since we built an ACL for user permissions on each object, it’s time to generate an authorization policy (auth policy) document for the Lambda function authorizer to evaluate if it should allow or deny the user API request.
Step 4: Evaluate the Policy
As you can see, the Lambda function builds the following sample policy JSON from the ACL table based on user UUID (principalId).
These steps complete the policy generation and management.
Amazon API Gateway has an internal policy evaluation mechanism. As long as the AWS Lambda authorizer can return standard policy JSON, Amazon API Gateway automatically evaluates it. Here’s the official document talking about the output standard of the As Lambda authorizer.
However, there’s a small caveat in the AWS Lambda authorizer. For each API request, we need to go through heavy computing of generating a policy again and again. If we inspect the AWS Lambda authorizer at runtime, we notice auth policy JSON is mostly identical for the same user.
Caching for Scaling
In large-scale applications, the policy document is rather huge and which would take some time to generate. To improve the performance and scalability in the future, we can cache it in a cache server.
We recommend using either Amazon ElastiCache for Redis, which is another managed service and great for reducing the maintenance cost. Follow these steps to do so.
Step 1: Read the Policy
We can leverage Redis key-value store to read/write policy documents as values associated with a particular user UUID as key. The AWS Lambda authorizer turns into the following code logic, so it no longer builds policy in real-time. It instead reads policy from the Redis cache first.
Step 2: Update the Policy
Of course, we also have to handle the authorization policy update. If the Amazon DynamoDB permission table has a new entry or updates to an existing entry, it triggers a Lambda function to write into the Redis cache. It’s very similar to how we previously handled the update to the permission table.
Conclusion
Serverless architectures on AWS have evolved so much in the last few years. When we started exploring AWS Lambda functions in late 2015, we used them for only internal processes.
As more and more AWS managed services integrated into Lambda functions, we started to build a highly scalable, available and cost-effective serverless application for our clients.
We were able to write a few Lambda functions and integrate them with Amazon API Gateway, Amazon Cognito, and Amazon DynamoDB to build a sophisticated object-based authorization. Then, we integrated Amazon ElastiCache for Redis for scaling.
You can find the blueprint of an AWS Lambda authorizer in the most popular language on GitHub. Our code repository was built on top of that.
These GitHub repositories also include code samples and references:
- Securing objects in serverless application object-based authorization using Amazon Cognito
- Introducing custom authorizers in Amazon API Gateway
The content and opinions in this blog are those of the third-party author and AWS is not responsible for the content or accuracy of this post.
.

.
ASCENDING – AWS Partner Spotlight
ASCENDING is an AWS Advanced Consulting Partner that is commited to delivering scalable and high available serverless or containerization solutions to customers.
Contact ASCENDING | Partner Overview | AWS Marketplace
*Already worked with ASCENDING? Rate the Partner
*To review an AWS Partner, you must be a customer that has worked with them directly on a project.