AWS Partner Network (APN) Blog
Loading SaaS Application Data into Snowflake Using Amazon AppFlow and AWS PrivateLink
By Andries Engelbrecht, Solution Architect at Snowflake Computing
By Srinivas Kesanapally, Principal Partner Solution Architect at AWS
 |
Customers often need to rely on third-party solutions to extract and transform data from sources such as Slack and Zendesk. Some vendors, however, do not support all of the sources and rely on multiple products to perform ETL (extract, transform, load) and persist data into Snowflake.
This post details how Amazon AppFlow simplifies the data transfer process, and how customers can use AWS PrivateLink for transmitting data over Amazon Web Services (AWS) rather than via the public internet.
Customers have shared feedback that they needed to incorporate helpdesk data for a “customer 360” initiative, with the goal of improving overall customer satisfaction and upsell opportunities based on experience with different product lines.
They used Zendesk as their helpdesk system and required a simple and secure way to integrate that data with their existing customer data on Snowflake. They did not want to invest a significant amount of time and money into the integration, and had a requirement to perform the integration as quickly as possible.
In this post, we’ll demonstrate how quickly and efficiently customers can create a data pipeline from Zendesk to Snowflake. Amazon AppFlow provided a secure and simple way to perform this integration while reducing the time to value and initial investment.
Snowflake Computing is an AWS Advanced Technology Partner with AWS Competencies in Data & Analytics, Machine Learning, and Retail, as well as an AWS service validation for AWS PrivateLink.
Reference Architecture
In this reference architecture, Zendesk customers are securely transmitting their helpdesk data to Amazon AppFlow with OAuth.
Customers configure the OAuth client in Zendesk and use that secret key and account identifier to configure the OAuth connection between Zendesk and Amazon AppFlow.
Customers establish a connection between Amazon AppFlow and Snowflake using an AWS PrivateLink and Snowflake’s username and password with a configured external Amazon Simple Storage Service (Amazon S3) stage.
AWS PrivateLink establishes private connectivity between Amazon AppFlow and Snowflake to ensure secure transmission.
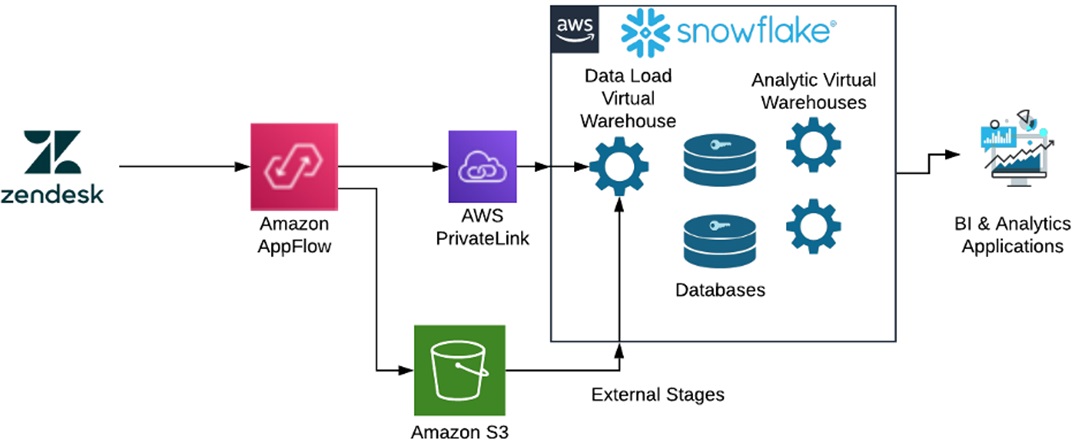
After successfully configuring the connectivity between Zendesk and Amazon AppFlow, and then Amazon AppFlow to Snowflake, customers can orchestrate multiple data flow between Zendesk and Snowflake using the easily navigable Amazon AppFlow’s user interface.
Next, we’ll go over the steps on how you can orchestrate a data pipeline from Zendesk to Snowflake using Amazon AppFlow and AWS PrivateLink. This ensures data transmits securely on the AWS network between Amazon AppFlow and Snowflake.
The first step is to configure Amazon AppFlow Connections to the software-as-a-service (SaaS) applications. In this case, we’re configuring connections to Snowflake and Zendesk.
Snowflake Connection Configuration
To get started, in the Amazon AppFlow console click on Connections on the right-hand menu.
In the Manage Connections drop-down menu, select Snowflake. You’ll now see all existing Snowflake connections, so choose Create Connection.
A Snowflake connection requires you to configure your Snowflake account with an External Stage to an Amazon S3 bucket location. For more information on configuring Snowflake External Stages with S3, see the Snowflake documentation.
Enter the Snowflake connection information as shown below:
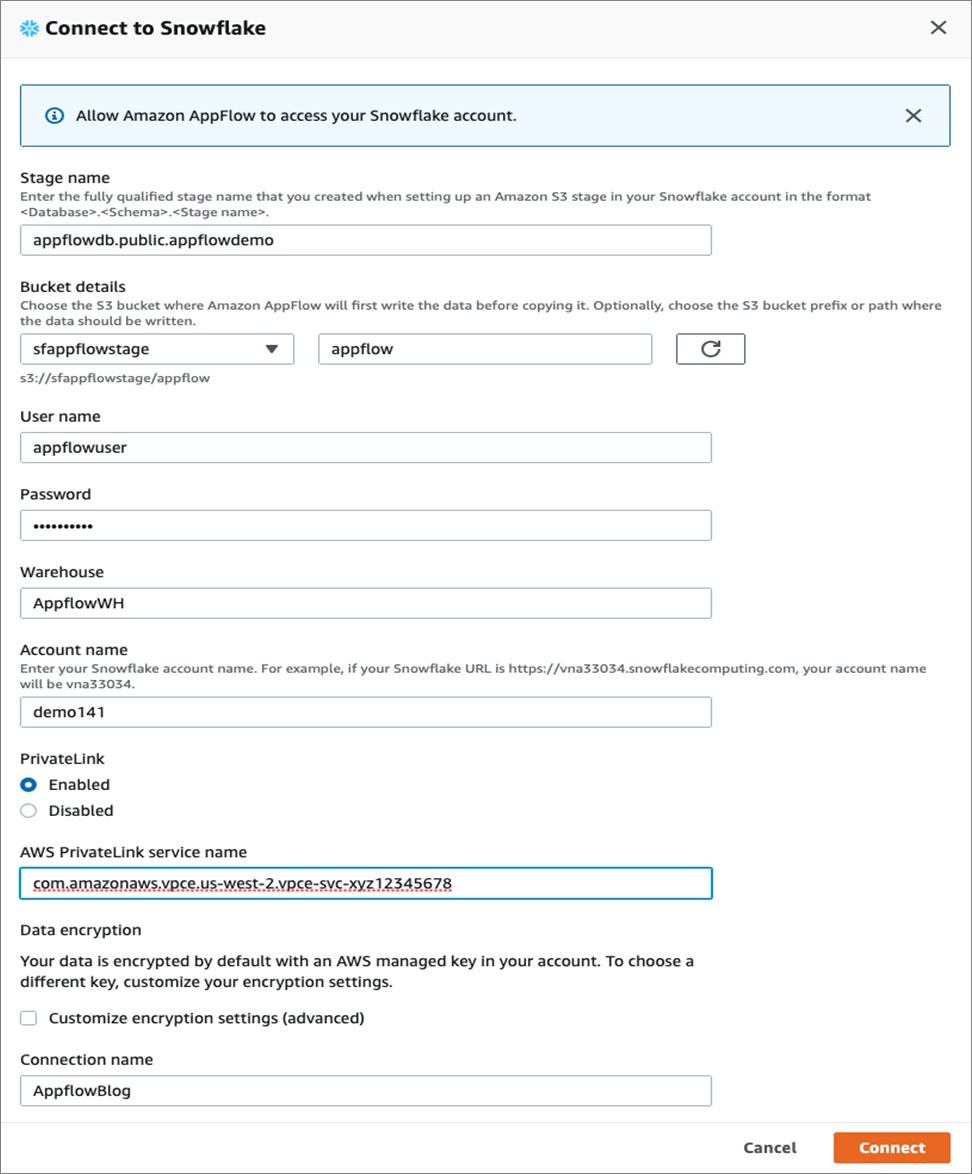
Make sure the Snowflake External Stage points to the S3 bucket and path you create for use with Amazon AppFlow in your account.
Enter the username and password that will be used for the connection, as well as the Snowflake Warehouse that will be used to process the incoming data. Also, enter the Snowflake account name and pay attention to the Snowflake URL and region where your Snowflake account is deployed.
Note the connection configuration doesn’t currently allow you to select a Snowflake Role, and it will utilize the default role of the user. Make sure the default Role for the user has the necessary privileges granted on the Stage, Warehouse, Database, Schema, and tables you want to use.
You can also choose to use AWS PrivateLink by enabling it and entering the Snowflake PrivateLink service name (vpce-id) for your account.
To get your Snowflake account privatelink-vpce-id for AWS PrivateLink, run the following query in Snowflake with ACCOUNT ADMIN role privileges:
select key, value::string from table(flatten(input=>parse_json(system$get_privatelink_config())));
Enter the string value for the privatebank-vpce-id in the AWS PrivateLink service name.
Note that your Snowflake account and Amazon AppFlow need to be in the same AWS region for the AWS PrivateLink option to be available.
Zendesk Connection Configuration
Next, the Zendesk configuration will require you to configure OAuth. We’ll need to configure the OAuth Client in Zendesk.
Log into Zendesk, and in the Admin home page select the gear icon on the left side. Then, select API and OAuth Clients. Click on the + sign on the right hand side to create a new OAuth client.

Pick a Client Name and Unique Identifier. Do not use hyphens in the Unique Identifier name; it will be used as the Client ID in Amazon AppFlow.
In the Redirect URLs, enter the Amazon AppFlow AWS region and URL for OAuth. For example: https://us-west-2.console.aws.amazon.com/appflow/oauth
Once you save the new client, it will generate a secret key. Copy and save it in a safe place.
We can now configure the Amazon AppFlow Connection to Zendesk. Select Connections in the Amazon AppFlow console, and from the drop-down list select Zendesk. Next, select Create Connection on the right hand side of the window.

In the configuration window, enter the Zendesk Unique Identifier as the Client ID. Copy the Client Secret you saved from earlier, and enter your Zendesk Account name in the Account URL.
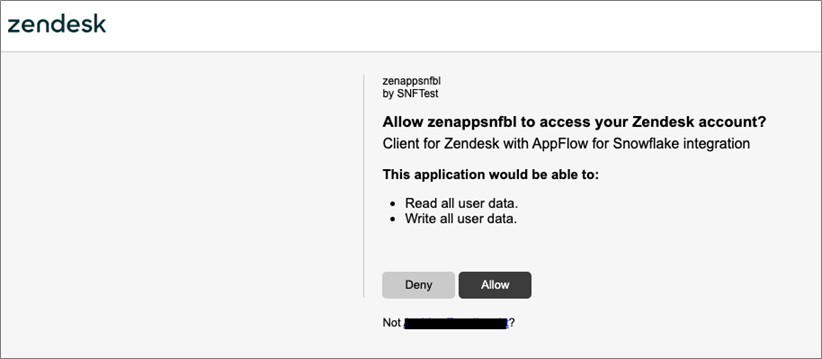
Enter your Connection name. Once you click Continue, it may take a few seconds before you’ll get a new pop-up window requesting you to verify the OAuth connection.
Click Allow to verify the connection. Your Zendesk Connection is now configured.
Configuring Flows
Flows can now be configured after the connections were created. Multiple flows can be created using the same connections if the authentications are valid for the specific data sources and destinations.
Amazon AppFlow can retrieve different data objects depending on the source, in the case of Zendesk user and ticket data.
To configure a flow, select Flows on the left menu bar. You’ll be able to see existing flows and can add another flow, by clicking on the Create Flow button.

You then have to specify the Name and Description of the flow. You can configure custom encryption settings if you don’t want Amazon AppFlow to manage encryption automatically.
In this example, we’ll configure a flow to transfer data from Slack to Snowflake.

On the next screen, you’ll configure the Source and Destinations for the flow.
First, select the source and connection that was previously configured—in this case Zendesk—and then the Zendesk Objects you want as a data source. We will use the Ticket.

You can select Snowflake as a destination using the previously created connection to Snowflake.
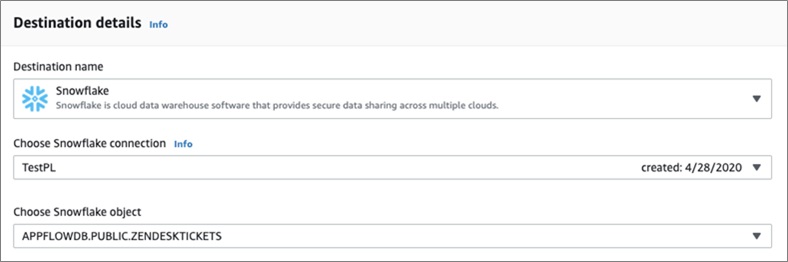
Note that Amazon AppFlow currently requires the Snowflake table objects to be created before configuring the flow.
Below is the DDL for this example and a table that can capture Zendesk Tickets:
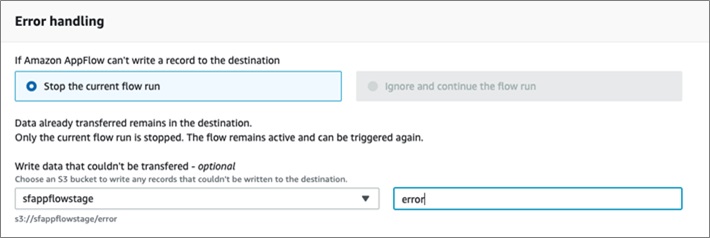
Error handling can be configured to either Stop the current flow or Ignore and continue the flow.
The options will depend on the Destination and Source. It also provides the option to store data that is not able to be transferred in an S3 location.
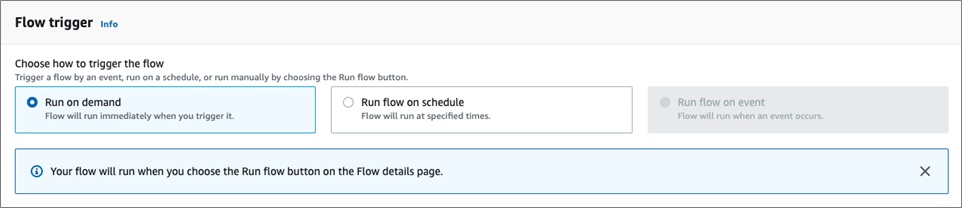
Next, the flow can be triggered to run On Demand or on a Schedule.
On Demand is best suited for bulk loads and will load all the source data. Scheduled loads are incremental loads and will only load new data from the source; it can be used for the initial bulk load, as well.
Currently, Amazon AppFlow requires the mapping of data fields between the Source and Destination. There are two options: one is to manually map the data fields and types, while the other is to upload a CSV file with the mappings.
It can be easier to create a CSV file with the mappings and update it as needed for field mappings, especially if there are various flows for similar objects.

Below is the CSV file format that was used for the Zendesk Tickets to Snowflake flow:
Note that Snowflake’s Variant data type is a convenient and performant way to map objects from various sources, which is typically a JSON data type.
Next, you can add Validations to check certain data fields and apply actions based on the condition.

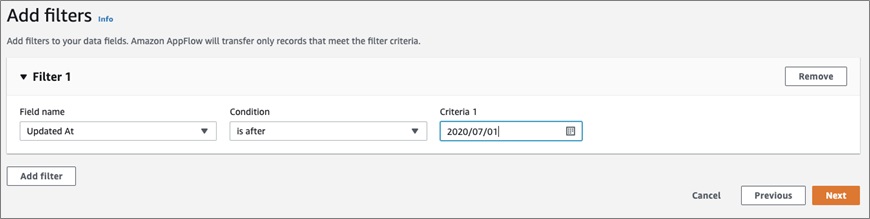
Filter can also be used to only transfer records that meet certain criteria. Again, the filters and fields will depend on the Source.
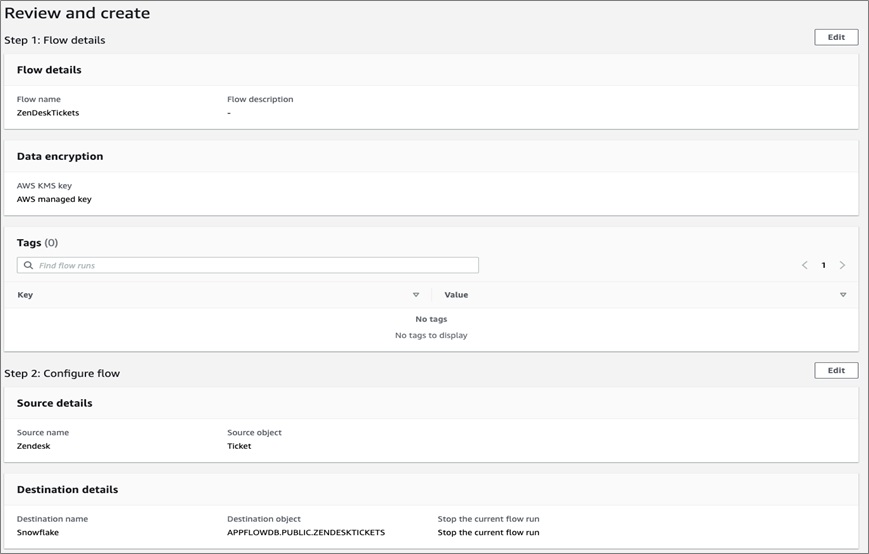
The final step is to review the flow and then create the flow.
For an On Demand flow, you’ll have to click Run flow, and for a Scheduled flow you will have to click Activate flow to start it. In both cases, it may take a little bit of time for the resources to be provisioned and the data to start flowing through Amazon AppFlow.
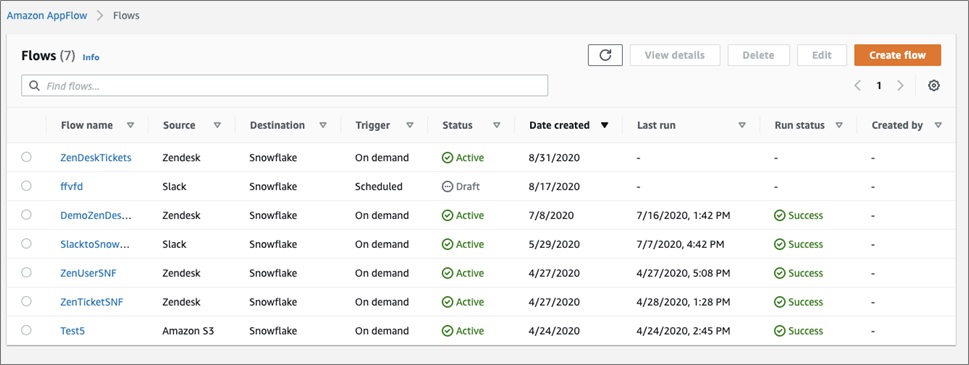
By clicking on Amazon AppFlow > Flows, you will see all of your flows and the current status of each. This gives you the ability to manage and edit the flows that are already created.
Zendesk Users
The same steps can be followed to create flows for Zendesk users. To make the steps easier, the table DDL and CSV mappings are listed below:
Users Field Mapping – (CSV format)
Summary
In this post, you have learned how customers can quickly establish connectivity between Zendesk and Amazon AppFlow, and from Amazon AppFlow to Snowflake securely using OAuth and AWS Private link, respectively.
We have also shown how to orchestrate a data pipeline from Zendesk to Snowflake using Amazon AppFlow. With this integration, customers can transfer their helpdesk data from Zendesk to Snowflake quickly and securely.
Sign up for Snowflake, Zendesk, and AWS to try out the data pipeline showcased in this post.
.

.
Snowflake Computing – AWS Partner Spotlight
Snowflake is an AWS Advanced Technology Partner and enterprise-class SQL data warehouse designed for the cloud and today’s data.
Contact Snowflake | Partner Overview | AWS Marketplace
*Already worked with Snowflake? Rate this Partner
*To review an AWS Partner, you must be a customer that has worked with them directly on a project.