AWS Partner Network (APN) Blog
Securing Your Infrastructure as Code Deployments with AWS and Snyk
By Marco Morales, Partner Solutions Architect – Snyk
By Ricardo Green, Sr. Solutions Engineering Specialist – Snyk
By Shashiraj Jeripotula, Sr. Partner Solutions Architect – AWS
 |
| Snyk |
 |
Software security is often set in the context of the code we write and libraries we use. As infrastructure as code (IaC) becomes more prevalent, projects are being driven by more Agile and DevOps software development lifecycles (SDLCs), introducing more software development workflows to software security.
Snyk is an AWS Partner with Competencies in DevOps and Security that brings software security to your projects including the infrastructure you provision and run on Amazon Web Services (AWS).
When you combine AWS CodeBuild with Snyk to deploy your IaC project, you gain a repeatable process that’s easy to track and manage that happens to include security results. AWS provides the automation while Snyk provides enhanced security.
The disciplines of software development is rich with features and capabilities, but infrastructure authors don’t always know the best practices for security. With the right guidance, some are easy to spot at the time we write those files. Others are better revealed because of dependencies on existing infrastructure and default rules. A well-orchestrated and repeatable process can sometimes bring in security issues.
In this post, we will demonstrate how to manage an IaC project written with Terraform by HashiCorp and deployed with AWS CodeBuild. We’ll review results before a scan, as well as after a scan when hidden issues are often revealed. We’ll also fix those issues.
Snyk is a developer-first security solution that helps organizations use open source and stay secure. It seamlessly and proactively finds and fixes vulnerabilities and license violations in open-source dependencies and containers.
Customer Value
With Snyk, the value for AWS customers includes integration into your existing AWS services, and easy and familiar configuration. For Snyk customers, benefits include faster identification of security issues before and after a deployment, and actionable remediation advice geared toward developers.
Here, you’ll use a public repository with a representative example to mimic your operational environment. As an example, this process is designed to be easy to map to your local workflow.
In this walkthrough, we’ll configure AWS services using IaC files and test configurations locally. We’ll also run the deployment process on AWS as an example of a way to get shared visibility into these definitions.
Prerequisites
For this walkthrough, you should meet the following prerequisites:
- AWS account in a region that supports these services:
- Snyk:
- Snyk account with a Team or higher plan
- Snyk Cloud configured and enabled to work with your AWS account
- Your workstation with the following:
- Terraform CLI
- Snyk CLI
- AWS CLI configured to operate on your desired region
- AWS user role with the following:
AWSCodeCommitPowerUserpolicy attached to the user
- GitHub:
- GitHub account to fork a public repository for your edits and commits
How it Works
The diagram below shows the AWS services plus primary integrations showing a Snyk command line interface (CLI) operation in AWS CodePipeline and deploying Amazon Elastic Compute Cloud (Amazon EC2) plus Amazon Relational Database Service (Amazon RDS) from a CodeCommit repository.
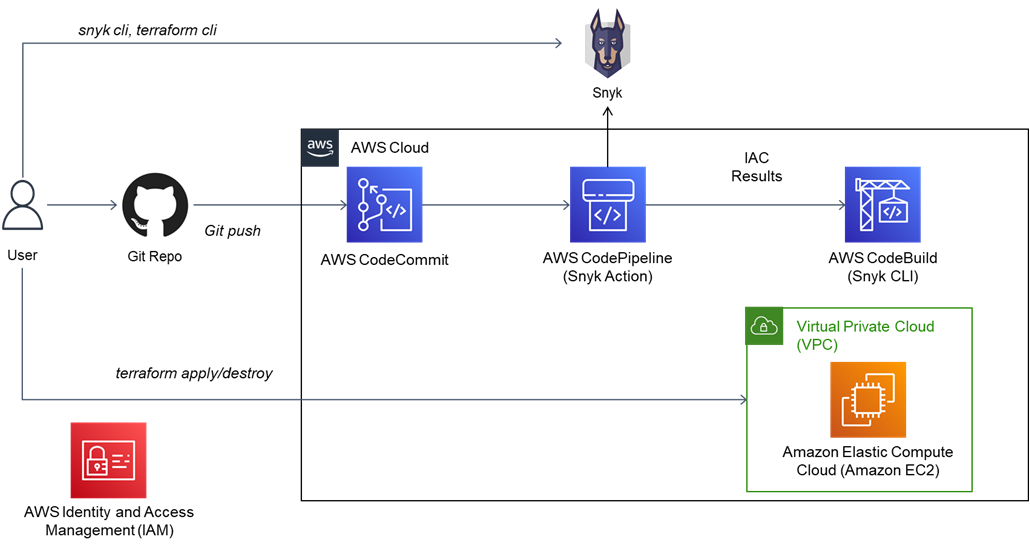
Figure 1 – AWS architecture diagram for this post.
Getting Started
We’ll show you how to utilize AWS services and Snyk to build and deploy secured infrastructure from source. The steps are:
- Create an Amazon S3 bucket for backend storage
- Fork a GitHub repository
- Run the Snyk scans at the CLI and fix local results
- Create an AWS CodePipeline project
- Fix your deployed infrastructure
- Review results
- Cleanup
Step 1: Create an Amazon S3 Bucket for Backend Storage
You will need an Amazon Simple Storage Service (Amazon S3) bucket to save the state of your Terraform actions. Navigate to the S3 service console click on Create bucket.
In the prompts, use the defaults and supply the following custom information and settings:
- Unique name
- Your working region
Copy the name and Amazon Resource Name (ARN) of the S3 bucket; you’ll need it later when configuring your Terraform backend and CodeBuild service role. This walkthrough uses a publicly available repository with known vulnerabilities, and the S3 bucket name will need to match the name you provide.
Step 2: Fork a GitHub Repository
For this walkthrough, navigate to this GitHub repository and fork it:
https://github.com/marcoman/vulnerable-ec2.git
Clone your repository to your workstation and switch to the apn-snyk-terraform branch.
In later steps, you’ll commit changes and add the repository to your AWS CodePipeline.
Step 3: Run Snyk Scans at the CLI and Fix Local Results
At your terminal, change directories to the root your cloned repository and run the following command:
snyk iac test
You will see output with the following information:
This output groups security issues by severity, and includes information such as the title, location of issue, and guidance. We’ll use this guidance to improve your infrastructure as code before a deployment.
In your editor, navigate to the root folder of your repository and edit the file main.tf to uncomment the fix as shown below for root_block_device. Re-run the snyk iac test command to observe the issue is resolved.
The output of the snyk iac test command results in one fewer issue:
This is an example of a default value that does not favor security. The solution is easy and represents examples where default values would typically be overlooked.
The final change is to update the name of the backend Terraform S3 bucket to match yours. Update the file main.tf and match the name of your S3 bucket in the backend section shown below. In this example, you are replacing the name apn-snyk-terraform-20221010 with yours.
At this point, you are encouraged to investigate the other results and address some of them by using the suggested remediation. For example, there are ingress issues for port 22 and port 80 that are also solvable by providing non-default or precise values.
You can now commit your changes to push your results to your forked repository. We’ll use these changes in later steps.
Step 4: Create an AWS CodePipeline
Next, create an AWS CodePipeline in your region. We’ve broken this sequence into sub-tasks to address specific details for the CodePipeline, AWS Identity and Access Management (IAM) roles, and code repository.
Step 4a: Create the AWS CodePipeline
Navigate to the AWS CodePipeline service and create a new pipeline with these details:
- Name: apn-snyk-terraform
- Service Role: New service role
- Allow AWS CodePipeline to create role if necessary: Select the checkbox
- Artifact store: Default location
- Encryption key: Default AWS managed key

Figure 2 – AWS CodePipeline definition page.
Next, you will add a source stage that uses your GitHub repository.
Step 4b: Create a Source Stage for GitHub
To select a source repository, select the GitHub (Version 2) provider. The process is well documented and creates a connection from your GitHub repository as a source for your AWS CodePipeline.
When configured, CodePipeline will be able to autofill and verify your data entry. Figure 3 shows a screenshot showing these fields completed for the source repository.
- Source provider: GitHub (Version 2)
- Connection: You will see the AWS CodeStar connection for GitHub, already authorized for the user.
- Repository name: The source of the fork is the GitHub repository
marcoman/vulnerable-ec2 - Branch name: This post uses the
apn-snyk-terraformbranch. Other branches contain content for other projects.
This example also enables builds when there are changes.
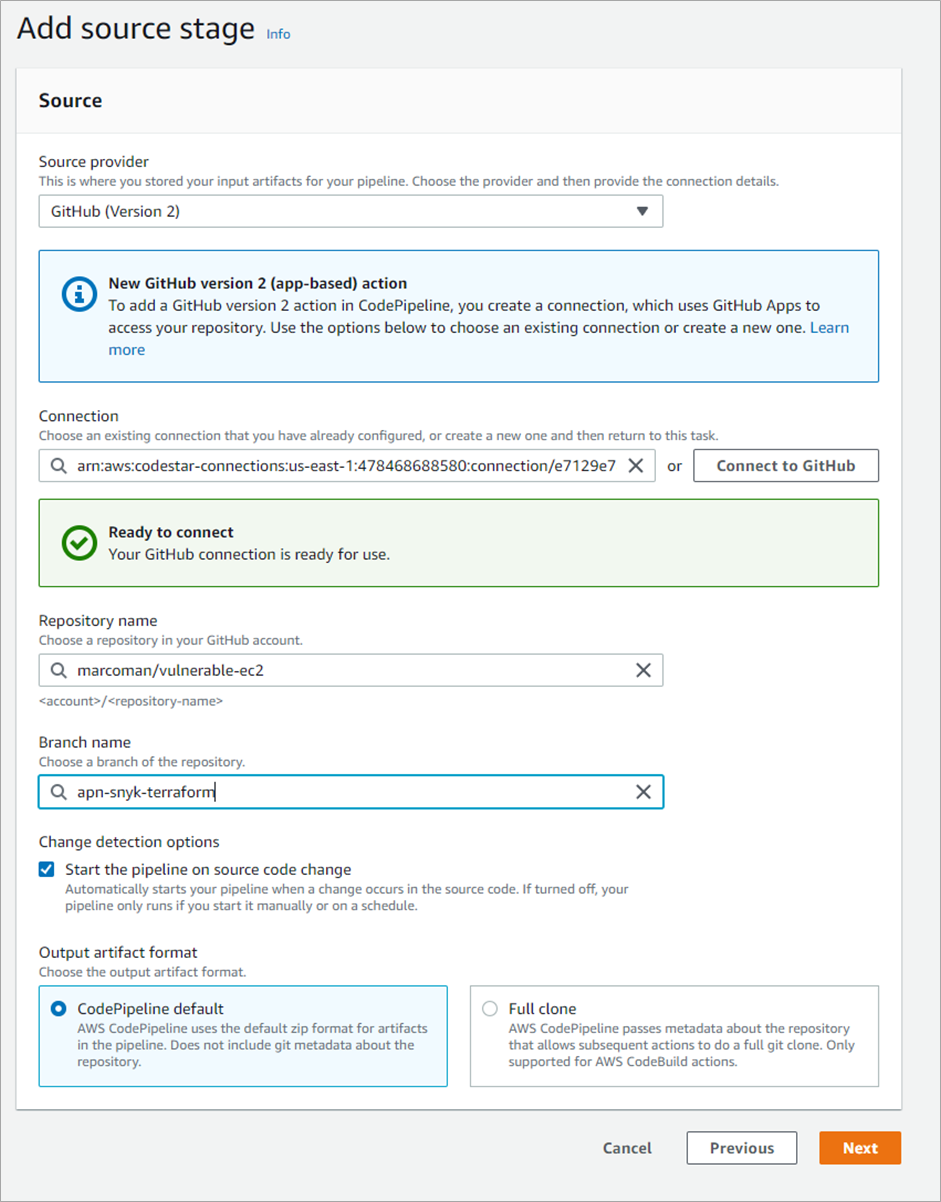
Figure 3 – Defining the source stage to use GitHub.
Step 4c: Create a New CodeBuild Project
The CodeBuild stage will run from an already committed buildspec.yml project on the apn-snyk-terraform branch. When prompted by CodePipeline, select the Create project button.
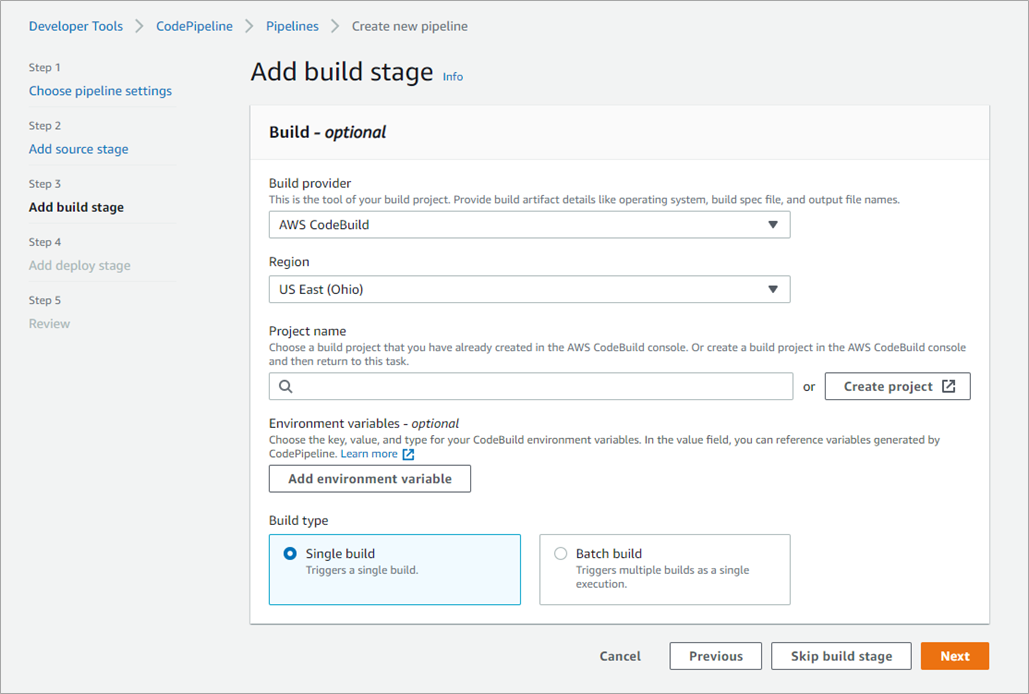
Figure 4 – Add a CodeBuild build stage for your terraform action.
Specify the following values for your build project, and use default values for the rest as shown in Figure 5.
- Project name: We recommend
apn-snyk-terraformbecause we’ll use this name later. - Operating system: Amazon Linux 2, standard runtime, the latest image, and a Linux environment.
- Privileged: Not required
- New service role: Accept the default which contains the name of your CodeBuild project. Note the name for a later step.

Figure 5 – Adding a CodeBuild build project.
Click to finish the CodeBuild definition. Skip the deploy step because we’re using Terraform, and complete the CodePipeline definition.
Step 4d: Update the IAM Roles for CodeBuild
When you first define your pipeline, it will automatically run. It will also fail, because you are missing permissions. We’ll attach two IAM policies to the role assigned for your CodeBuild step.
Navigate to the AWS IAM service and list the roles. In the search box, find the role for your CodeBuild project—the default name should be “codebuild-apn-snyk-terraform-service-role.” Click on the name to modify its definition.
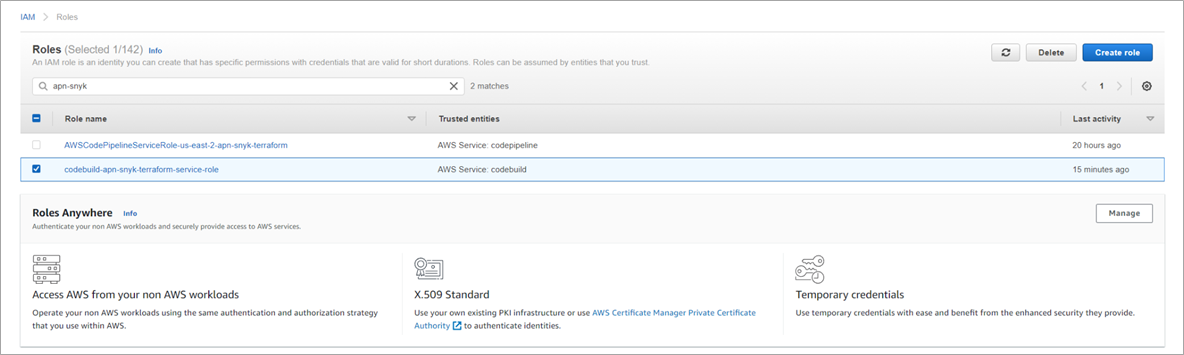
Figure 6 – Selecting your CodeBuild IAM role.
Next, add permissions and attach policies to update the role.

Figure 7 – Select and add IAM permissions to your CodeBuild role.
In this screen, search for two AWS managed policies by name and check their boxes to add them:
AmazonS3FullAccessAmazonEC2FullAccess
The following image shows the result of searching for “ec2full” and finding the policies we want.
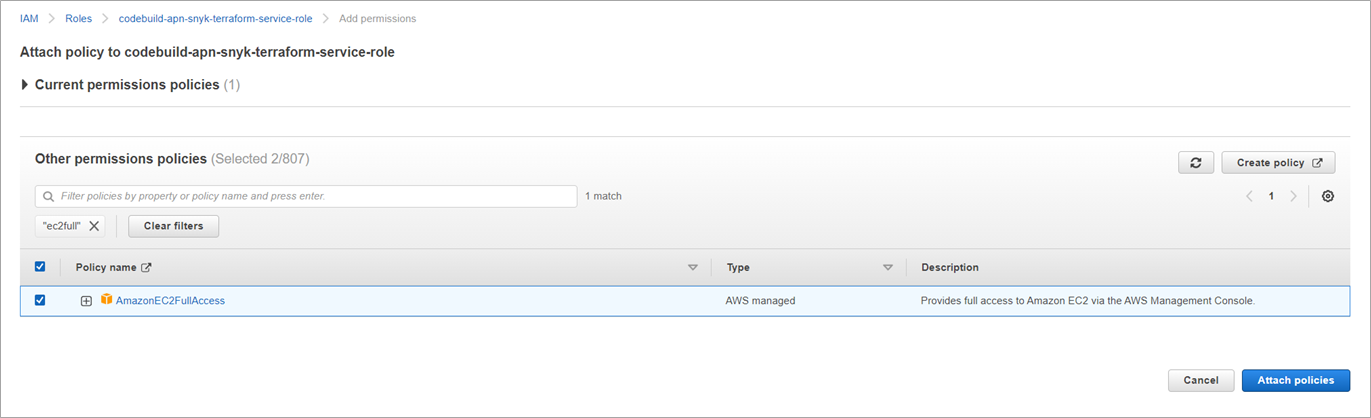
Figure 8 – Attaching policies to your CodeBuild IAM role.
Click the Attach policies button to complete the process and re-run your pipeline by clicking on the Release change button of your pipeline. At this point, your pipeline will successfully deploy an instance to Amazon EC2.
Step 5: Scan and Review the Infrastructure
In this section, we’ll use Snyk to scan your infrastructure to observe issues made visible post-deployment. We’ll use a combination of the Snyk CLI plus the user interface (UI) to see these results.
We use CLI commands in the same spirit as DevOps and developers use at their workstation to get results as they create and deploy applications and infrastructure.
We’ll walk you through these steps:
- Getting your Snyk OrgID
- Setting up a Snyk service account token and triggering a scan
- Using Snyk Cloud to get your scan results
- Filtering Snyk Cloud results
Step 5a: Getting Your Snyk OrgID
The Snyk app shows the results of your infrastructure scans and details about your account and organizations. Navigate to your Snyk account, and then to the Settings > General page to find your organization ID.
The following figure shows an example of the settings page with the Organization ID. We’ll refer to your value as $SNYK_ORG_ID.
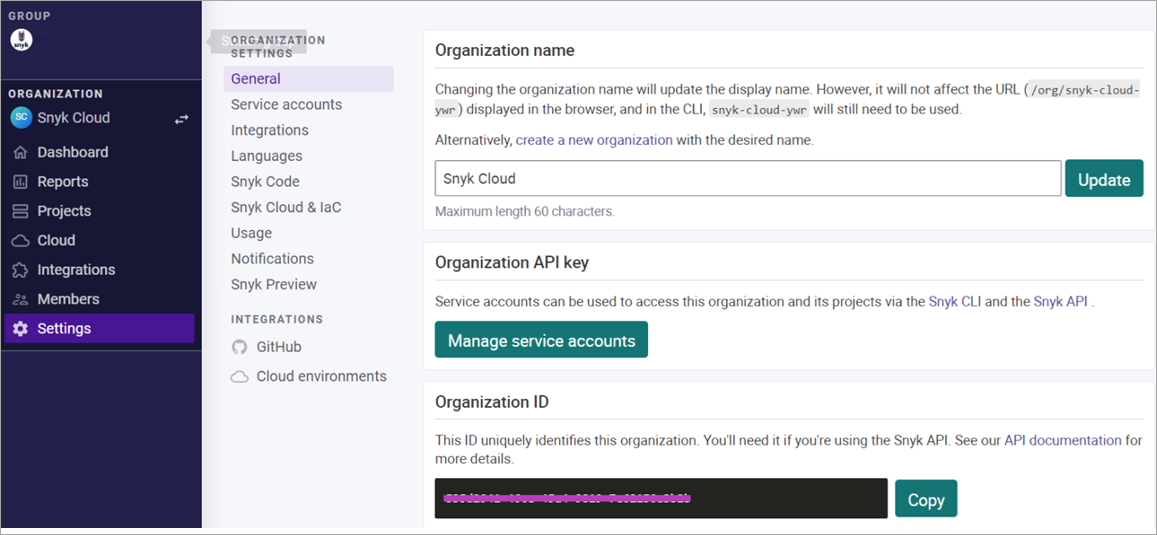
Figure 9 – Getting your Snyk organization ID.
Next, you’ll need to get a Snyk API token as specified in the Snyk broker docs. We’ll refer to this as the $SNYK_API_TOKEN in the examples below.
With $SNYK_ORG_ID and $SNYK_API_TOKEN values, run the following curl command to get your environment ID. The output is your environment ID as a UUID and we’ll refer to it as $SNYK_ENV_ID.
Step 5b: Setting Up Snyk Service Account Token and Triggering a Scan
Snyk automatically scans your cloud environment once a day. In this next step, we trigger a scan to ensure we have results for our most recent infrastructure deployment.
Use the following command, substituting your values (note the use of the heredoc in the payload) to allow the use of the quoted environment variables.
Step 5c: Using Snyk Cloud to Get Your Scan Results
Once triggered, wait a few minutes to allow Snyk to process your queued scan. Run this new command to get the list of results:
This command generates many lines of output, and it’s better to use a targeted query. In the example below, we add a filter for the resource_type of aws_security_group, and we specify a jq filter to find the namespace that contains us-east-2.
This is an example of a query refined by URL and by jq, and you may find one more convenient than the other. The result is the data for the issue shown below with several lines omitted for brevity.
There are several items to review starting with the issue entitled “VPC default security group allows unrestricted egress traffic.”
As a developer on an IaC project, we can make several optimizations and enhancements to our definitions before deployments, but only when we have the context of a running environment are we able to see the whole picture.
This example illustrates how people commonly rely on a default virtual private cloud (VPC), which does not have limits on inbound or outbound traffic and this results in a security issue.
There is often overlap between issues seen in Snyk IaC and Snyk Cloud. The example above starts with an IaC issue with a severity type of “low.” The Snyk Cloud issue, however, is of “medium” severity because we use the context of being in the cloud.
Step 5d: View Results in Snyk Cloud
The Snyk Cloud UI provides the same filters as the CLI to view results interactively. Whether you use the CLI in your local and automated tasks or the UI, the results are available to fit within your workflow.
For the purposes of this post, we tested ideas in the UI and then codified them for sharing as CLI commands. The results from the previous step are shown below.
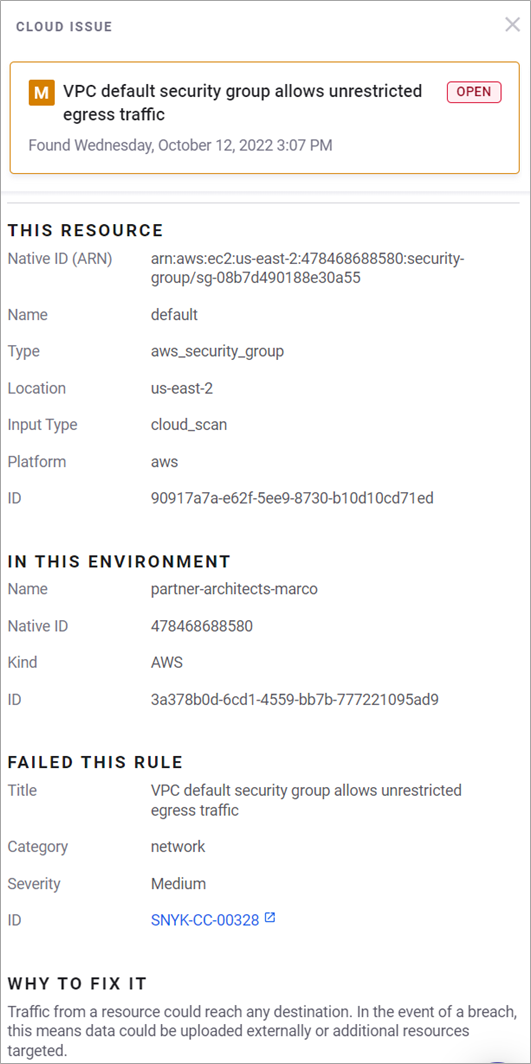
Figure 10 – Snyk Cloud output of the VPC issue.
Step 6: Fix and Re-Deploy the Infrastructure
In this section, we’ll finish by pushing a fix that addresses the default VPC issue by doing the following:
- Fix the issue
- Observe the fix in Snyk Cloud
Step 6a: Fix the Issue
The solution is to limit access via your security group, and the details are specific to your working environment.
Here, we’ll modify the outbound rules on the default security group attached to your default VPC. For our test environment, we’ll delete the outbound rule.
Now, navigate to the security group for your default VPC and edit the outbound rules.

Figure 11 – VPC security group highlighting outbound rule.
Next, select the outbound rule and delete it as shown below.
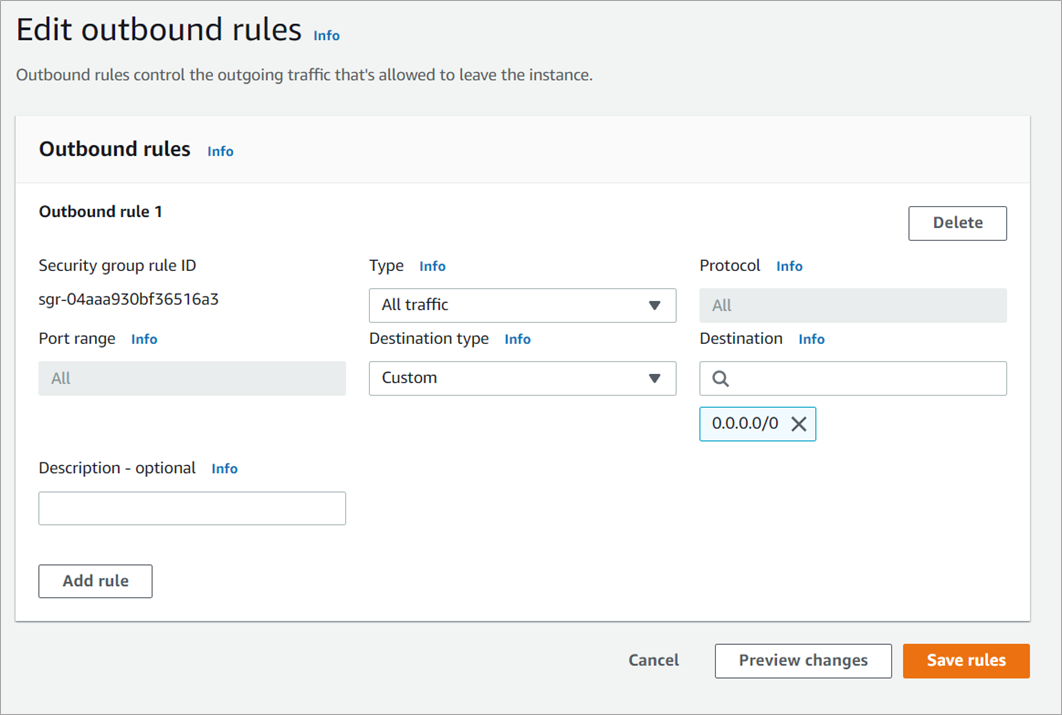
Figure 12 – Deleting the outbound rule.
Alternatively, you may choose to leave the VPC alone and instead modify the egress rules in your IaC definition. For this option, you identify the different lines that specify egress, such as the block for the resource named allow_ssh_from_anywhere.
This solution does not address the VPC issue directly, but it does provide a working solution you solve within your instance. This alternative matches the use case where your team is aware of your infrastructure and is still able to provide more secure infrastructure.
Step 6b: Observe the Fix in Snyk Cloud
Re-run the CLI commands from before to ensure you have fewer results. This is the command to trigger a new scan when your infrastructure is provisioned a second time:
This is the command to get your results when the scan is complete:
For the example where we deleted the security group, the results no longer include the issue as seen from Snyk Cloud.
Step 7: Cleaning Up
Remember to delete any resources you may have created in order to avoid additional costs.
To delete the Terraform-based resource, use your terminal to run the following command:
terraform destroy
Snyk is free to set up and use, and you do not have to clean up resources. You may choose to delete your project from the settings page to remove the results and data associated with the scans performed in this blog.
Summary
In this post, we accomplished the following:
- Created an Amazon S3 bucket for backend storage for terraform plans.
- Forked and modified code.
- Ran Snyk infrastructure as code scans before a deployment and fixed an issue.
- Created an AWS CodePipeline to automate the deployment of the IaC project.
- Fixed an issue in the code and re-deployed the code.
We accomplished these steps in the style and approach of active development, where it’s the best time because ideas are still fresh and easy to fix.
To learn more about AWS CodePipeline, check the documentation. If you have any questions, post them on AWS CodePipeline service forum.
To learn more about Snyk, sign up at the main Snyk website. If you have questions about using Snyk, visit the general Snyk documentation which includes details about setting up and using Snyk with AWS services.
.

.
Snyk – AWS Partner Spotlight
Snyk is an AWS Partner with Competencies in DevOps and Security that brings software security to your projects including the infrastructure you provision and run on AWS.