AWS Partner Network (APN) Blog
Simplifying Serverless CI/CD with CircleCI and the AWS Serverless Application Model
By Rob Sutter, Sr. Developer Advocate – AWS Serverless
 |
CircleCI has made building and deploying your AWS Serverless Application Model (SAM) applications easier with the release of the aws-serverless orb.
Now, developers can deploy and test serverless applications on the Amazon Web Services (AWS) Cloud with minimal configuration, combining the benefits of continuous integration with the power of serverless.
SAM is an open-source framework for building serverless applications on AWS. You define the application using YAML, and SAM transforms and expands your template into AWS CloudFormation syntax, enabling you to build serverless applications even faster.
CircleCI is an AWS Partner Network (APN) Advanced Technology Partner with the AWS DevOps Competency. Its continuous integration and delivery platform allows teams to rapidly release code they trust by automating the build, test, and delivery process.
CircleCI has nine years of experience in the continuous delivery and continuous integration (CI/CD) space, and processes more than 30 million builds each month across Linux, macOS, Docker, and Windows environments. CircleCI is also the only FedRAMP-certified CI/CD tool.
CircleCI orbs are shareable packages of configuration elements, including jobs, commands, and executors. In addition to many community-contributed orbs, CircleCI provides first-party certified orbs, including the aws-serverless orb, which enables builders of all sizes to quickly and easily integrate CI/CD into their SAM apps.
In this post, you’ll learn how to use the aws-serverless orb to add CI/CD to a web app you create with the AWS Serverless Application Model (SAM).
Prerequisites and Assumptions
This post assumes you:
- Have a CircleCI account connected to either Bitbucket or GitHub.
- Know how to create and use a git repository with either provider.
- Can connect a repo to CircleCI.
- Have an AWS account.
If you use AWS Cloud9 as your integrated development environment (IDE), the AWS Command Line Interface (CLI), SAM CLI, Docker, and necessary Docker images are installed for you.
If not, I recommend installing the AWS Toolkit to use SAM with your favorite IDE.
Step 1: Create a New SAM App
To create a SAM app from the CLI, open a terminal and enter the following text:
This creates a SAM app named circleci-demo using the default configuration, a single Node.js 10.x function invoked by an Amazon API Gateway endpoint. The exact output of the command may vary depending on the version of the SAM CLI you have installed.
To see additional runtimes supported by SAM and options for sam init, enter sam init -h.

Figure 1 – Initializing a SAM app with sam init.
Step 2: Create a CircleCI Configuration Using the aws-serverless Orb
Open your SAM app in your favorite IDE and create a folder in the root named .circleci. Inside this folder, create a file named config.yml and paste the following text into the file:
Let’s examine this config file more closely:
- You must use version 2.1 of the config template in order to use orbs. If you are working with an existing CircleCI project, you must enable CircleCI pipelines.
- The orbs stanza brings in reusable orbs from the CircleCI registry. In this case, the only orb you need is the aws-serverless orb. The circleci/ prefix lets you know it’s officially supported by CircleCI, and the @1.0.1 suffix gives you the semantic version.
- Name your imported orb sam; you could name it any valid name you like, such as sam-orb.
- When you call a job from the orb, use the format imported-name/job; in this case, sam/deploy. You also pass it several required parameters:
- name: the name of the step as it appears in the CircleCI dashboard.
- s3-bucket: the Amazon Simple Storage Service (Amazon S3) bucket where CircleCI stores your artifacts. Note that this bucket must already exist.
- stack-name: the name given to your SAM app in the CloudFormation console.
- template: the filename of your SAM template.
Note that you do not have to provide information about the type of executor or the programming language of your functions.
Step 3: Modify Your CircleCI Project Settings
Before you push your config file to our repo for the first time, you need to populate a few environment variables. In the CircleCI dashboard, choose Jobs, find and expand the circleci-demo project, and then choose the cog next to the project name to go to the project settings.

In the settings window, click on Environment Variables and add the following four items:
- AWS_ACCESS_KEY_ID: This is for an AWS Identity and Access Management (IAM) user with sufficient permissions to deploy a SAM app in your AWS account.
- AWS_SECRET_ACCESS_KEY: This is for the IAM user.
- AWS_DEFAULT_REGION: The AWS Region where the SAM app deploys unless otherwise specified.
- AWS_ARTIFACT_BUCKET: The name of the S3 bucket containing the build artifacts.
You can now add the config file to version control, commit, and push to start the build process.
In the CircleCI dashboard, if you expand the build job, you can see the steps that the aws-serverless orb performs.
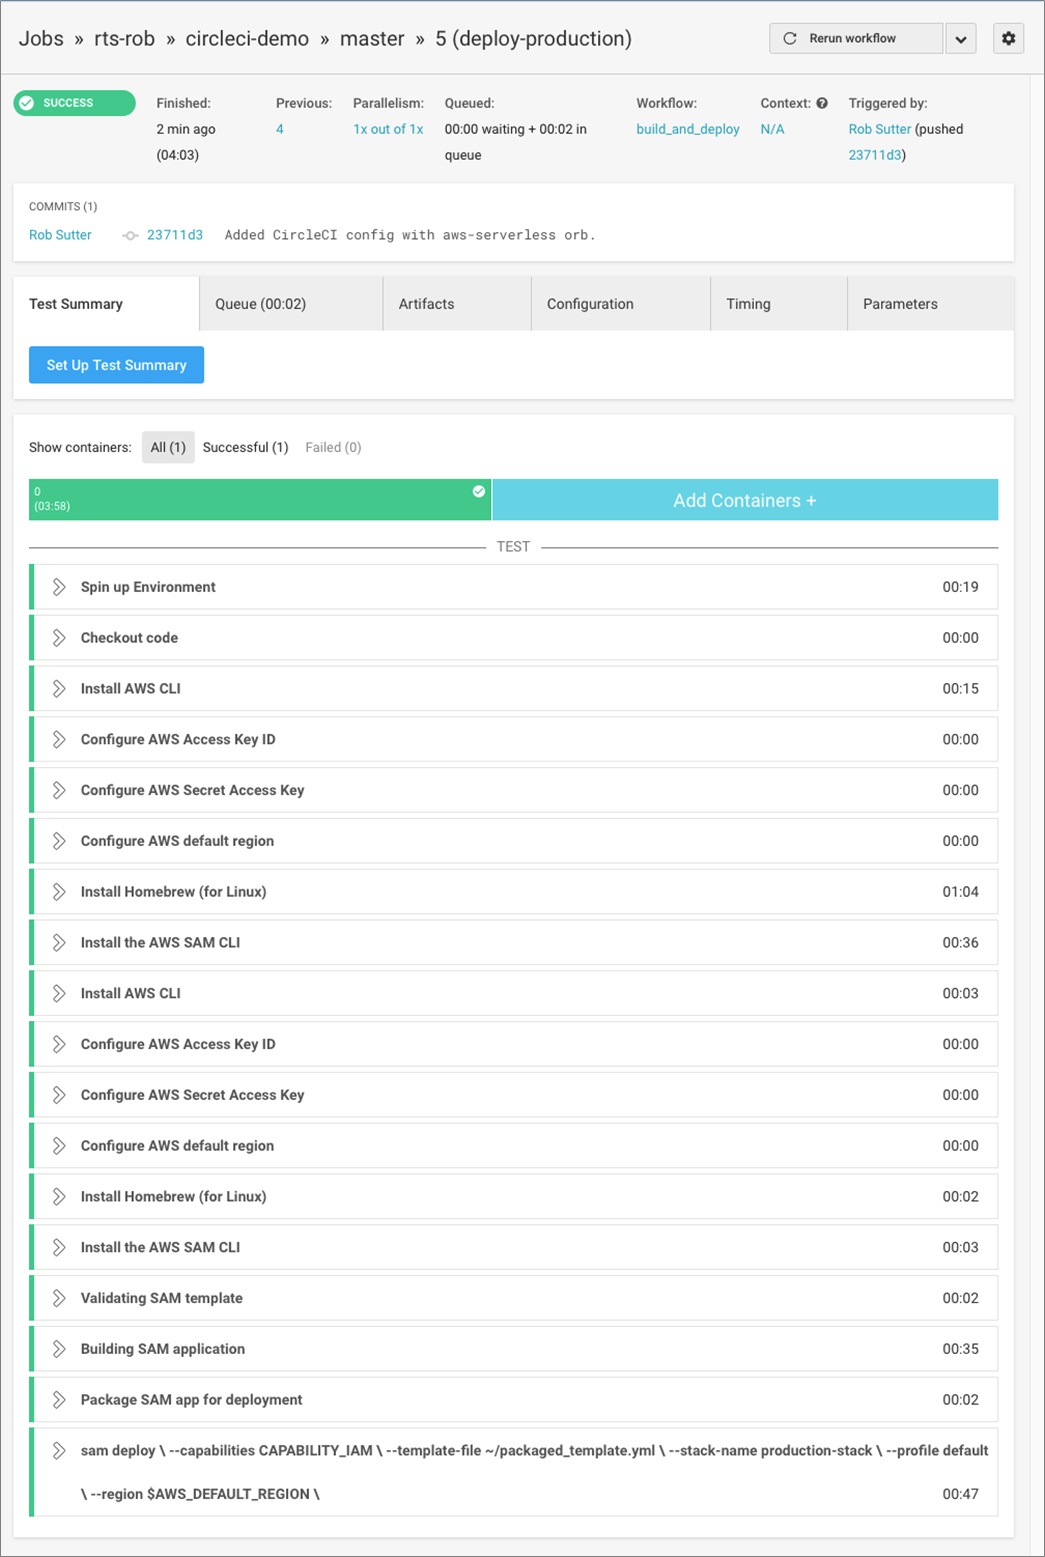
Figure 2 – The CircleCI build steps created by the aws-serverless orb.
Step 4: Add Another Endpoint to Your SAM App
Now that you’ve configured CircleCI to build your SAM project, you can make and deploy changes simply by pushing to your repo.
To demonstrate this, add another API endpoint to your app: /echo. The echo endpoint accepts POST requests and returns the body of the request in its response.
In the IDE, create a folder in the root of your project named echo. Create a file app.js in this folder and paste the following code:
This function takes the body of the event passed in by Amazon API Gateway and returns it in the response with an HTTP status code of 200.
You will also need a package.json file for your new function. For the purposes of this tutorial, copy package.json from the hello-world directory into the echo directory.
Next, open template.yaml in the project root and modify the Resources section as follows:
Note the EchoFunction resource looks similar to HelloWorldFunction. They share the same Amazon API Gateway HelloWorld but there are three differences:
CodeUripoints to your new function.- The
Pathis /echo. - The
Methodis post.
To get the URL of the new echo endpoint, you must add it as a CloudFormation output. Modify the Outputs section as follows:
Now, you have a new API endpoint invoking an AWS Lambda function that echoes the body of the request in the response. Before you commit and push the changes, test locally to confirm everything is working as expected.
Step 5: Test Locally
Before starting a build, you want to ensure the code works. SAM allows you to test locally by invoking individual functions and by mocking a local Amazon API Gateway.
First, test the function. SAM provides a default event in events/event.json that includes a message body of {\“message\”: \“hello world\”}. If you pass that event into the echo function, it should respond with the same body. Make sure Docker is running and paste the following into your terminal:
SAM pulls the required Docker container, mounts the code inside, executes the function, and displays the result. The output should be similar to the following:

Figure 3 – Testing the EchoFunction locally.
Since the function works as expected, next you should ensure the API endpoint is configured correctly. With Docker running, paste the following text into your terminal:
SAM again launches a Docker container, this time with a mocked Amazon API Gateway listening on localhost:3000.
In another terminal, or using Postman, send an HTTP POST request to http://localhost:3000/echo with a JSON body. This example uses httpie but you could also use curl, Postman, or any similar tool.
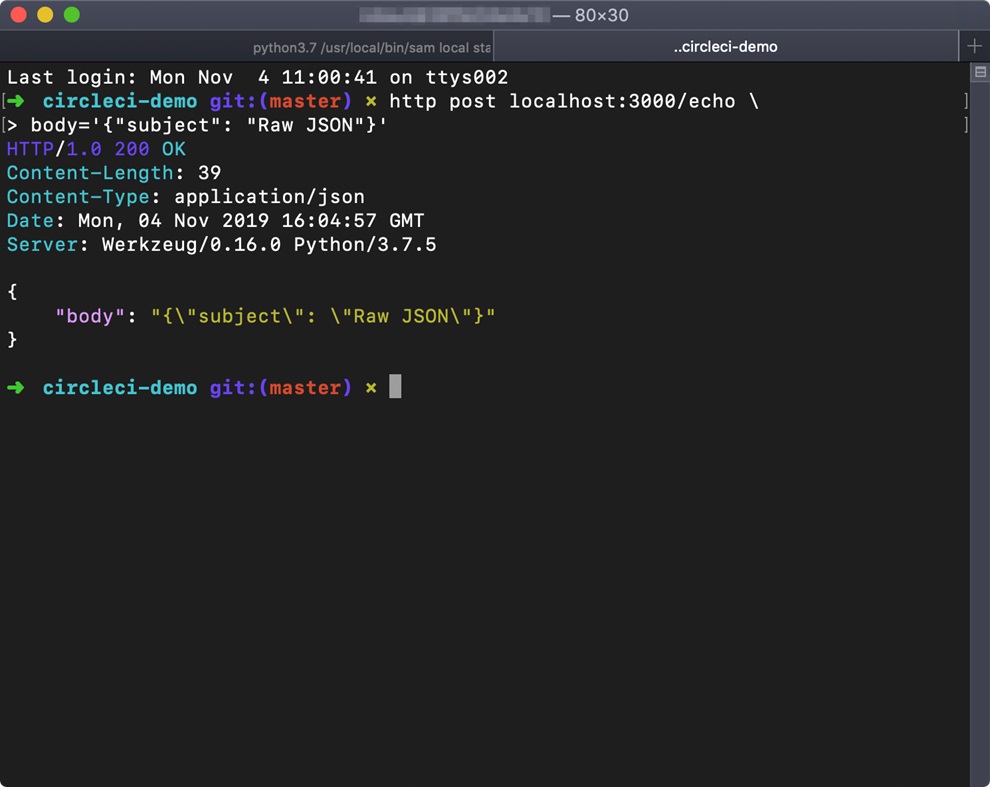
Figure 4 – Testing Amazon API Gateway integration locally.
Now that your function performs as expected and is connected to Amazon API Gateway, you are ready to build and deploy.
Step 6: Deploy Your Changes
Since you have already configured the CI/CD pipeline with CircleCI, you can initiate a new deployment by pushing the changes to your repo:
Back in the CircleCI dashboard, you see the build running:

Once your deployment succeeds, you can retrieve the new endpoint with either the CLI or CloudFormation console.
To use the CLI, save the echo endpoint in an environment variable ECHO_URL so you can refer to the endpoint for testing. Copy and paste the following into the terminal:
Check the result with echo $ECHO_URL, and then test the API by sending an HTTP POST request:

Figure 5 – Obtaining the API endpoint from the CLI.
You can also use the AWS Management Console to find the endpoint. Open the CloudFormation console, choose production-stack and Outputs, and copy the Value of the EchoApi output.
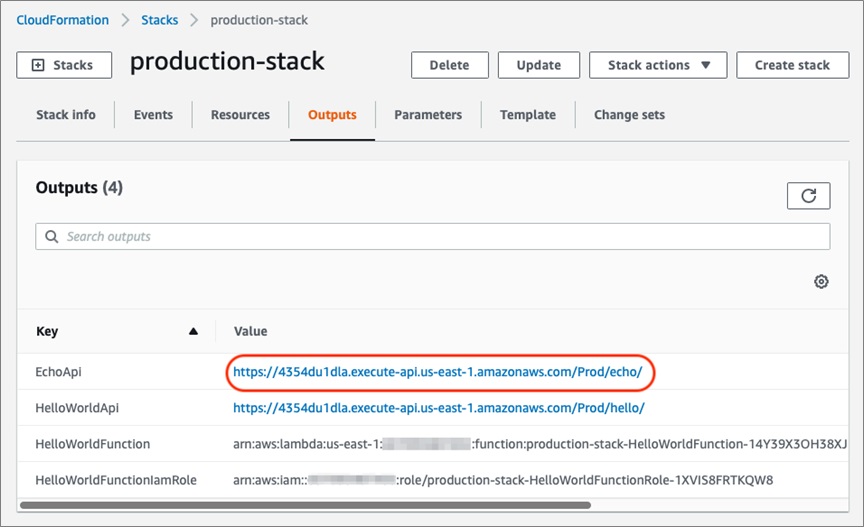
Figure 6 – Obtaining the API endpoint from the AWS Management Console.
Additional aws-serverless Orb Settings
The aws-serverless orb provides a quick and easy way to add a robust CI/CD pipeline to your serverless apps. It’s also powerful, using the SAM CLI to enable complex multi-step workflows.
To access individual SAM CLI commands from the aws-serverless orb, add the install step:
Set the AWS_ACCESS_KEY_ID, AWS_SECRET_ACCESS_KEY, and AWS_DEFAULT_REGION environment variables as above.
Once the SAM CLI is installed in your build environment, you can access other SAM commands. For example, you can use the aws-serverless orb to start the API in the build environment:
For additional commands, see the aws-serverless orb usage examples and commands in the CircleCI Orb Registry. You can also view the full source for the aws-serverless orb.
Conclusion
In this post, you used the CircleCI aws-serverless orb to quickly add CI/CD to a serverless web application. You added additional functionality to the web app and CircleCI automatically built and deployed the changes after you pushed them to the repository.
With CircleCI’s aws-serverless orb, developers can deploy serverless applications in the AWS Cloud with minimal configuration, combining the benefits of continuous integration with the power of serverless.
For more information, see CircleCI Orbs and the AWS Serverless Application Model.
The content and opinions in this blog are those of the third party author and AWS is not responsible for the content or accuracy of this post.
.

.
CircleCI – APN Partner Spotlight
CircleCI is an AWS Competency Partner. Its continuous integration and delivery platform allows teams to rapidly release code they trust by automating the build, test, and delivery process.
Contact CircleCI | Solution Overview
*Already worked with CircleCi? Rate this Partner
*To review an APN Partner, you must be an AWS customer that has worked with them directly on a project.