AWS Big Data Blog
Use Amazon Athena and Amazon QuickSight in a cross-account environment
This blog post was last reviewed and updated May, 2022 to include AWS Lake Formation resource sharing model.
Many AWS customers use a multi-account strategy to host applications for different departments within the same company. However, you might deploy services like Amazon QuickSight using a single-account approach, which raises challenges when you need to use QuickSight in combination with Amazon Athena to build reports and dashboards. AWS offers two ways you can share data catalog cross accounts: The recently announced built-in support for cross-account Data Catalog in Athena and through AWS Lake Formation resource sharing model. With these two methods you can now use AWS Glue Data Catalogs in different accounts to create datasets, and build reports and dashboards from a single AWS account using QuickSight and Athena.
In this post, we will show you how to use these methods to set up cross-account access to Athena for QuickSight.
Glue Catalog sharing
To set up cross-account access, you complete the following steps:
- Grant QuickSight cross-account access to an AWS Glue Data Catalog.
- Register the Data Catalog in Athena.
- Grant QuickSight cross-account access to an Amazon Simple Storage Service (Amazon S3) bucket.
- Add the shared bucket to QuickSight.
- Connect QuickSight to Athena.
The following architecture shows the deployment steps.

Grant cross-account access for the Data Catalog
QuickSight uses a service role to interact with other AWS services. QuickSight creates this role for you under the name aws-quicksight-s3-consumers-role-v0. You need this role to allow access to the Data Catalog cross-account share. To allow the QuickSight service role (Account A, the borrower account) to access the Data Catalog (Account B, the owner account), you need to grant cross-account access by updating the AWS Glue resource policy.
In the AWS account of the Data Catalog, complete the following steps:
- On the AWS Glue console, choose Settings in the navigation pane.
- Under Permissions, enter the following resource policy:
- Choose Save.
The resource policy gives QuickSight access to all the databases and tables in the Data Catalog. You can further scope it down by adding the name of the tables and databases to the resource element.
The following screenshot shows the Settings page on the AWS Glue console and the catalog UI for updating the resource permission.

Register the Data Catalog in Athena
Now you need to register the shared Data Catalog with Athena in the AWS account (borrower) that hosts QuickSight.
- On the Athena console, choose Data sources in the navigation pane.
- Choose Connect data source.
- For Choose where your data is located, select Query data in Amazon S3.
- For Choose a metadata catalog, select AWS Glue Data Catalog.

- Choose AWS Glue Data Catalog in another account.
- For Connection details, enter a Data Catalog name, optional description, and the Data Catalog owner’s AWS account ID.
- Choose Register.
When you complete these steps, you can see the borrowed catalog on the Data sources page on the Athena console.

Grant QuickSight cross-account access to an S3 bucket
Creating a resource policy on the Data Catalog to allow cross-account access for QuickSight is not sufficient. You also need to grant QuickSight access to the S3 bucket where the data is stored. You use the same QuickSight service role that we used for the Data Catalog to update the S3 bucket policy.
In the account of the Data Catalog, complete the following steps:
- On the Amazon S3 console, choose Buckets.
- Choose the bucket that you want to create a policy for, or whose policy you want to edit.
- Choose Permissions.
- Enter the following policy:
- Choose Save changes.
Add the shared S3 bucket to QuickSight
The last step before you can connect QuickSight to Athena is to add the S3 bucket (Account B) as a resource that the QuickSight service role (Account A) can access. To allow your QuickSight service role access to the S3 bucket in another account, perform the following steps:
- On the QuickSight console, on the account drop-down menu, choose Manage QuickSight.
- Choose Security & permissions.
- Choose Add or remove.
- Choose Details.
- Choose Select S3 buckets.
- Under Use a different bucket, add your bucket.
- Choose Finish.
Connect QuickSight to Athena
After you set up the necessary permissions, you can follow the instruction in this section to add a dataset in Athena by using the remote (borrowed) Data Catalog.
- On the Athena console, choose Datasets in the navigation pane.
- Choose New dataset.
- Create a new connection profile by providing a data source name and Athena workgroup.
- Choose Validate connection.
- Choose Create data source.
- In the Choose your table section, for Catalog, choose the catalog you created in Athena.

- Choose a database and table and click on Select.
- Choose Edit/Preview data.
- To create a dataset and analyse the data using the table, choose Visualize.
Lake Formation Catalog sharing
To set up cross-account access, you complete following steps:
- Grant cross-account access to account A using Lake Formation
- Use AWS RAM on account A to accept the AWS Glue Catalog resource share
- Create a resource link for the shared table on account A
- Grant table access to your Quicksight users using Lake Formation
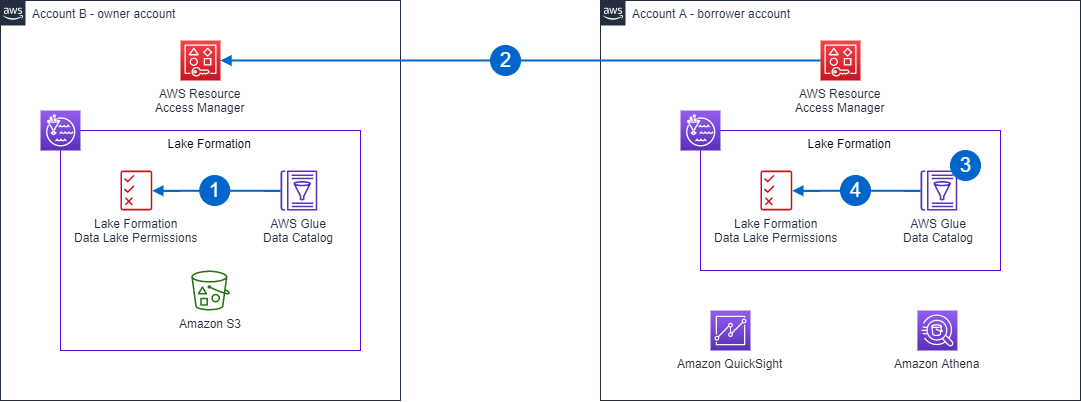
Grant cross-account access to account A using Lake Formation
In Lake Formation console, you can centrally view your AWS Glue Data Catalog Objects such as tables and databases.
In the AWS Account B, log in as your data lake administrator and complete the following steps:
- Open the AWS Lake Formation console, go to Tables in the navigation pane.
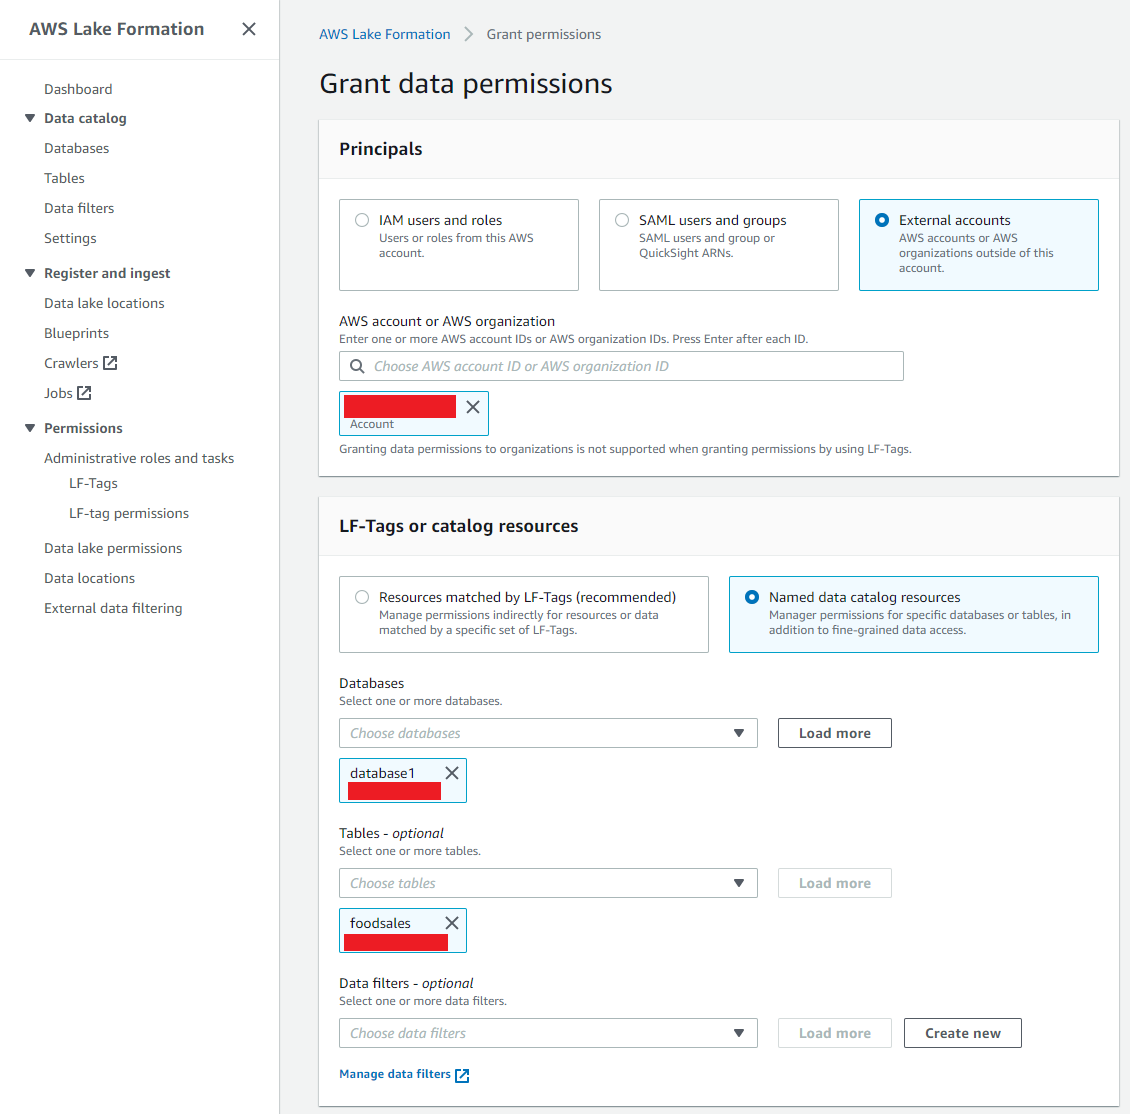
- Select the table that you want to share with Account A, click on Actions, and choose Grant.
- In the grant data permissions menu, in the Principals section, choose External account and enter the account ID of the Account A and press Enter.
- In the Table permissions section choose Select as a table permission.
- In the Grantable permissions section choose Select as a table permission in order to allow the borrower’s data lake admin to grant access the QuickSight user.
- Click Grant.
- Go to Data lake permission in the navigation pane and verify the creation of the data permission that has the Account A number as Principal.

Use AWS RAM on account A to accept the AWS Glue Catalog resource share
When you use the named resource method (databases, tables) to grant Lake Formation permissions on a Data Catalog resource to an external account, Lake Formation uses the AWS Resource Access Manager (AWS RAM) service to share the resource. If the grantee account is in the same organization as the grantor account, the shared resource is available immediately to the grantee. If the grantee account is not in the same organization, AWS RAM sends an invitation to the grantee account to accept or reject the resource grant.
NOTE: The Lake Formation tag-based access control (LF-TBAC) method of granting Data Catalog permissions does not use AWS RAM for cross-account grants. Therefore, cross-account grants are available immediately.
To accept the resource share in AWS RAM, complete the following steps:
- Log into Account A and go to the AWS RAM console.
- In the navigation pane, go to Resource shares under the Shared with me section as shown below.

- Select the Lake Formation resource share and click the Accept resource share button.

Create a resource link for the shared tables on account A
When databases or tables are shared between AWS accounts, naming overlaps may be caused among data catalog resources. In Lake Formation, resource links are Data Catalog objects that link to local or shared resources. Resource links can be named by the receiving account (Account A – borrower account) and are required for integrated AWS services like Amazon Athena and Amazon Redshift.
To create a Lake Formation resource link, complete the following steps:
- Log into Account A and go to the Lake Formation Console.
- On the left navigation pane, go to Tables and select the shared table.
- Click on Actions and select Create resource link.
- In the create resource link menu, enter a resource link name and select a local database to store the resource link in.
- Click Create.
Back in the Tables list in the Lake Formation console, you can see that there’s a new table which is the resource link that we have been just created. Notice that the font of the resource link’s name is italic as resource link names are always italic. The resource link also shows the shared resource that is linked (foodsales table) as well as the shared resource owner (Account B). However, Account A (the borrower account) is the owner of the resource link as shown below.

Grant table access to your Quicksight users using Lake Formation
Now, the data lake administrator can grant data permissions on the newly created resource link table in Lake Formation. In the case of QuickSight, Lake Formation must authorize the relevant QuickSight user to access the shared data.
To test cross account access to Athena for Quicksight, we create a QuickSight user to whom the data lake administrator in Account A will grant access. The format of the QuickSight user ARN is arn:aws:quicksight:<region>:<Account A>:user/<namespace>/<username>.
In a cross-account access scenario in Lake Formation, in order to grant Select permission to a user, the user has to have Describe permission on the resource link since resource links are required for integrated AWS services like Amazon Athena and Amazon Redshift, and Select permission on the shared table to have read access to the underlying resource link data. Therefore, it is a two-step grant process.
In order to grant resource link access to a QuickSight user, complete the following steps:
- Log into Account A as the data lake administrator and go to the Lake Formation Console.
- On the left navigation pane, go to Tables and select the resource link of the shared table created in the previous section.
- Click on Actions and select Grant.
- In the grant data permissions menu, in the Principals section, choose SAML users and groups and enter the ARN of the QuickSight user.
- In the Table permissions section choose Describe as a table permission.
- Click Grant.
Now, the QuickSight user can see that the table exists within Quicksight’s dataset console.

However, if the QuickSight user tries to preview or visualize the data at this stage, an exception will be raised since the user does not have access to the underlying data.
Now, we will grant the user read access to the data in the resource link’s target, which is the table shared by Account B. To do that, complete the following steps:
- Log into Account A as the data lake administrator and go to the Lake Formation Console.
- On the left navigation pane, go to Tables and select the resource link of the shared table created in the previous section.
- Click on Actions and select Grant on Target.
- In the grant data permissions menu, in the Principals section, choose SAML users and groups and enter the ARN of the QuickSight user.
- In the Table permissions section choose Select as a table permission.
- Click Grant.
In the end, the configuration should be as the schema below.

Conclusion
This post showed how the built-in support for cross-account Data Catalog in Athena is used with Quicksight when the data catalog and the S3 bucket containing the data are in a different account. This feature greatly reduces operational overhead by having a single account managing the Data Catalog and its data.
Once you set up your various data sources, you can follow this blog post which walk you through joining your data across various sources. You can also use these new data sources to gain further insights from your data by setting up ML Insights in QuickSight and set graphical representations of your data using QuickSight visuals.
 Lotfi Mouhib is a Senior Solutions Architect working for the Public Sector team with Amazon Web Services. He helps public sector customers across EMEA realize their ideas, build new services, and innovate for citizens. In his spare time, Lotfi enjoys cycling and running.
 Oussama Kandakji is a Solution Architect at Amazon Web Services. He helps French local operators and public sector customers adopt cloud technology and innovate with AWS. Outside of work, he likes reading, playing video games, and spending time with friends and family.