AWS Compute Blog
Deploying an EMR cluster on AWS Outposts to process data from an on-premises database
This post is written by Eder de Mattos, Sr. Cloud Security Consultant, AWS and Fernando Galves, Outpost Solutions Architect, AWS.
In this post, you will learn how to deploy an Amazon EMR cluster on AWS Outposts and use it to process data from an on-premises database. Many organizations have regulatory, contractual, or corporate policy requirements to process and store data in a specific geographical location. These strict requirements become a challenge for organizations to find flexible solutions that balance regulatory compliance with the agility of cloud services. Amazon EMR is the industry-leading cloud big data platform for data processing, interactive analysis, and machine learning (ML) that uses open-source frameworks. With Amazon EMR on Outposts, you can seamlessly use data analytics solutions to process data locally in your on-premises environment without moving data to the cloud. This post focuses on creating and configuring an Amazon EMR cluster on AWS Outposts rack using Amazon Virtual Private Cloud (Amazon VPC) endpoints and keeping the networking traffic in the on-premises environment.
Architecture overview
In this architecture, there is an Amazon EMR cluster created in an AWS Outposts subnet. The cluster retrieves data from an on-premises PostgreSQL database, employs a PySpark Step for data processing, and then stores the result in a new table within the same database. The following diagram shows this architecture.

Figure 1 Architecture overview
Networking traffic on premises: The communication between the EMR cluster and the on-premises PostgreSQL database is through the Local Gateway. The core Amazon Elastic Compute Cloud (Amazon EC2) instances of the EMR cluster are associated with Customer-owned IP addresses (CoIP), and each instance has two IP addresses: an internal IP and a CoIP IP. The internal IP is used to communicate locally in the subnet, and the CoIP IP is used to communicate with the on-premises network.
Amazon VPC endpoints: Amazon EMR establishes communication with the VPC through an interface VPC endpoint. This communication is private and conducted entirely within the AWS network instead of connecting over the internet. In this architecture, VPC endpoints are created on a subnet in the AWS Region.
The support files used to create the EMR cluster are stored in an Amazon Simple Storage Service (Amazon S3) bucket. The communication between the VPC and Amazon S3 stays within the AWS network. The following files are stored in this S3 bucket:
get-postgresql-driver.sh: This is a bootstrap script to download the PostgreSQL driver to allow the Spark step to communicate to the PostgreSQL database through JDBC. You can download it through the GitHub repository for this Amazon EMR on Outposts blog post.postgresql-42.6.0.jar: PostgreSQL binary JAR file for the JDBC driver.spark-step-example.py: Example of a Step application in PySpark to simulate the connection to the PostgreSQL database.
AWS Systems Manager is configured to manage the EC2 instances that belong to the EMR cluster. It uses an interface VPC endpoint to allow the VPC to communicate privately with the Systems Manager.
The database credentials to connect to the PostgreSQL database are stored in AWS Secrets Manager. Amazon EMR integrates with Secrets Manager. This allows the secret to be stored in the Secrets Manager and be used through its ARN in the cluster configuration. During the creation of the EMR cluster, the secret is accessed privately through an interface VPC endpoint and stored in the variable DBCONNECTION in the EMR cluster.
In this solution, we are creating a small EMR cluster with one primary and one core node. For the correct sizing of your cluster, see Estimating Amazon EMR cluster capacity.
There is additional information to improve the security posture for organizations that use AWS Control Tower landing zone and AWS Organizations. The post Architecting for data residency with AWS Outposts rack and landing zone guardrails is a great place to start.
Prerequisites
Before deploying the EMR cluster on Outposts, you must make sure the following resources are created and configured in your AWS account:
- Outposts rack are installed, up and running.
- Amazon EC2 key pair is created. To create it, you can follow the instructions in Create a key pair using Amazon EC2 in the Amazon EC2 user guide.
Deploying the EMR cluster on Outposts
1. Deploy the CloudFormation template to create the infrastructure for the EMR cluster
You can use this AWS CloudFormation template to create the infrastructure for the EMR cluster. To create a stack, you can follow the instructions in Creating a stack on the AWS CloudFormation console in the AWS CloudFormation user guide.
2. Create an EMR cluster
To launch a cluster with Spark installed using the console:
Step 1: Configure Name and Applications
- Sign in to the AWS Management Console, and open the Amazon EMR console.
- Under EMR on EC2, in the left navigation pane, select Clusters, and then choose Create Cluster.
- On the Create cluster page, enter a unique cluster name for the Name
- For Amazon EMR release, choose
emr-6.13.0. - In the Application bundle field, select
Spark 3.4.1andZeppelin 0.10.1, and unselect all the other options. - For the Operating system options, select Amazon Linux release.
 Figure 2: Create Cluster
Step 2: Choose Cluster configuration method
- Under the Cluster configuration, select Uniform instance groups.
- For the Primary and the Core, select the EC2 instance type available in the Outposts rack that is supported by the EMR cluster.
- Remove the instance group Task 1 of 1.

Figure 3: Remove the instance group Task 1 of 1
Step 3: Set up Cluster scaling and provisioning, Networking and Cluster termination
- In the Cluster scaling and provisioning option, choose Set cluster size manually and type the value 1 for the Core
- On the Networking, select the VPC and the Outposts subnet.
- For Cluster termination, choose Manually terminate cluster.
Step 4: Configure the Bootstrap actions
A. In the Bootstrap actions, add an action with the following information:
-
- Name: copy-postgresql-driver.sh
- Script location: s3://<bucket-name>/copy-postgresql-driver.sh. Modify the <bucket-name> variable to the bucket name you specified as a parameter in Step 1.
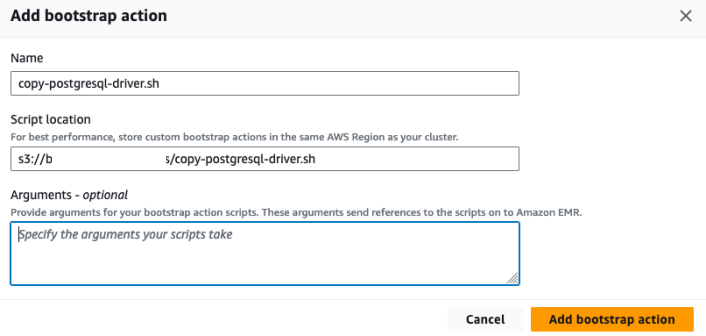
Figure 4: Add bootstrap action
Step 5: Configure Cluster logs and Tags
a. Under Cluster logs, choose Publish cluster-specific logs to Amazon S3 and enter s3://<bucket-name>/logs for the field Amazon S3 location. Modify the <bucket-name> variable to the bucket name you specified as a parameter in Step 1.
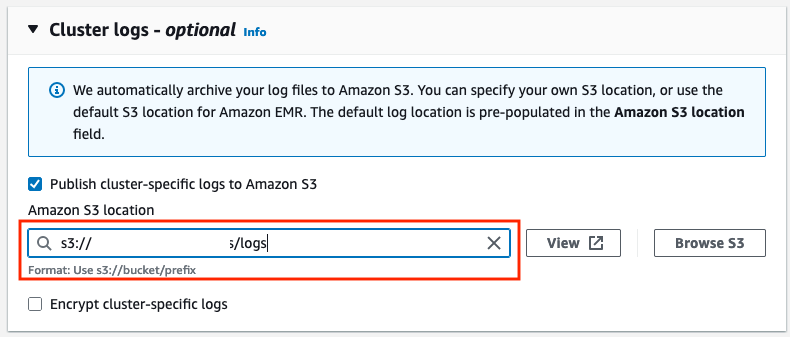
Figure 5: Amazon S3 location for cluster logs
b. In Tags, add new tag. You must enter for-use-with-amazon-emr-managed-policies for the Key field and true for Value.

Figure 6: Add tags
Step 6: Set up Software settings and Security configuration and EC2 key pair
a. In the Software settings, enter the following configuration replacing the Secret ARN created in Step 1:
This is an example of the Secret ARN replaced:

Figure 7: Example of the Secret ARN replaced
b. For the Security configuration and EC2 key pair, choose the SSH key pair.
Step 7: Choose Identity and Access Management (IAM) roles
a. Under Identity and Access Management (IAM) roles:
-
- In the Amazon EMR service role:
- Choose
AmazonEMR-outposts-cluster-rolefor the Service role.
- Choose
- In EC2 instance profile for Amazon EMR
- Choose
AmazonEMR-outposts-EC2-role.
- Choose
- In the Amazon EMR service role:

Figure 8: Choose the service role and instance profile
Step 8: Create cluster
- Choose Create cluster to launch the cluster and open the cluster details page.
Now, the EMR cluster is starting. When your cluster is ready to process tasks, its status changes to Waiting. This means the cluster is up, running, and ready to accept work.
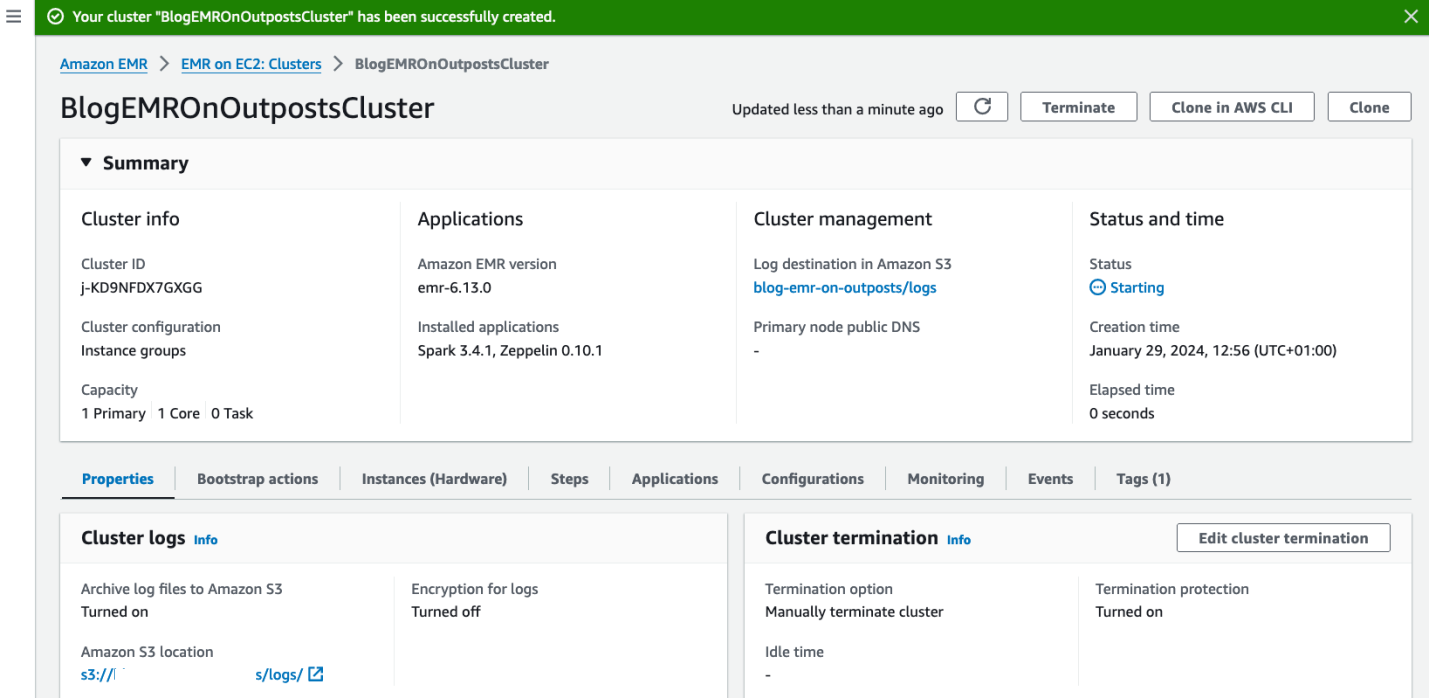
Figure 9: Result of the cluster creation
3. Add CoIPs to EMR core nodes
You need to allocate an Elastic IP from the CoIP pool and associate it with the EC2 instance of the EMR core nodes. This is necessary to allow the core nodes to access the on-premises environment. To allocate an Elastic IP, follow the instructions in Allocate an Elastic IP address in Amazon EC2 User Guide for Linux Instances. In Step 5, choose the Customer-owned pool of IPV4 addresses.
Once the CoIP IP is allocated, associate it with each EC2 instance of the EMR core node. Follow the instructions in Associate an Elastic IP address with an instance or network interface in Amazon EC2 User Guide for Linux Instances.
Checking the configuration
- Make sure the EC2 instance of the core nodes can ping the IP of the PostgreSQL database.
Connect to the Core node EC2 instance using Systems Manager and ping the IP address of the PostgreSQL database.

Figure 10: Connectivity test
- Make sure the Status of the EMR cluster is Waiting.
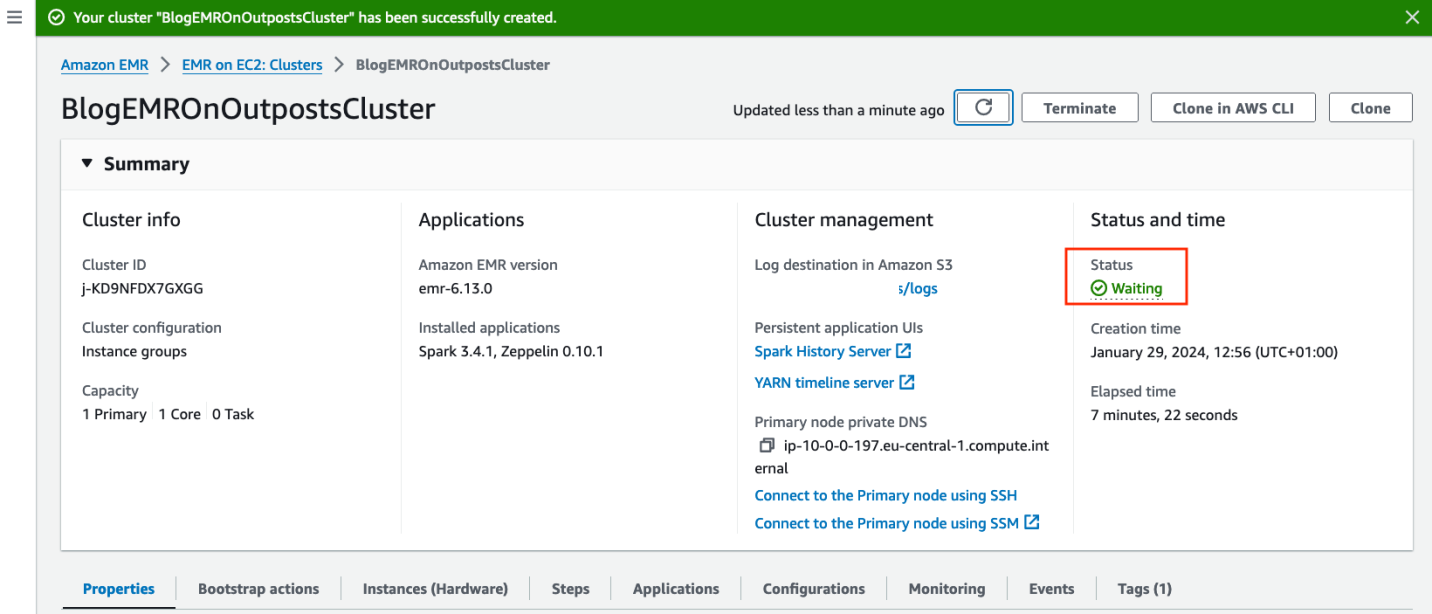
Figure 11: Cluster is ready and waiting
Adding a step to the Amazon EMR cluster
You can use the following Spark application to simulate the data processing from the PostgreSQL database.
spark-step-example.py:
You must upload the file spark-step-example.py to the bucket created in Step 1 of this post before submitting the Spark application to the EMR cluster. You can get the file at this GitHub repository for a Spark step example.
Submitting the Spark application step using the Console
To submit the Spark application to the EMR cluster, follow the instructions in To submit a Spark step using the console in the Amazon EMR Release Guide. In Step 4 of this Amazon EMR guide, provide the following parameters to add a step:
- choose Cluster mode for the Deploy mode
- type a name for your step (such as Step 1)
- for the Application location, choose s3://<bucket-name>/spark-step-example.py and replace the <bucket-name> variable to the bucket name you specified as a parameter in Step 1
- leave the Spark-submit options field blank
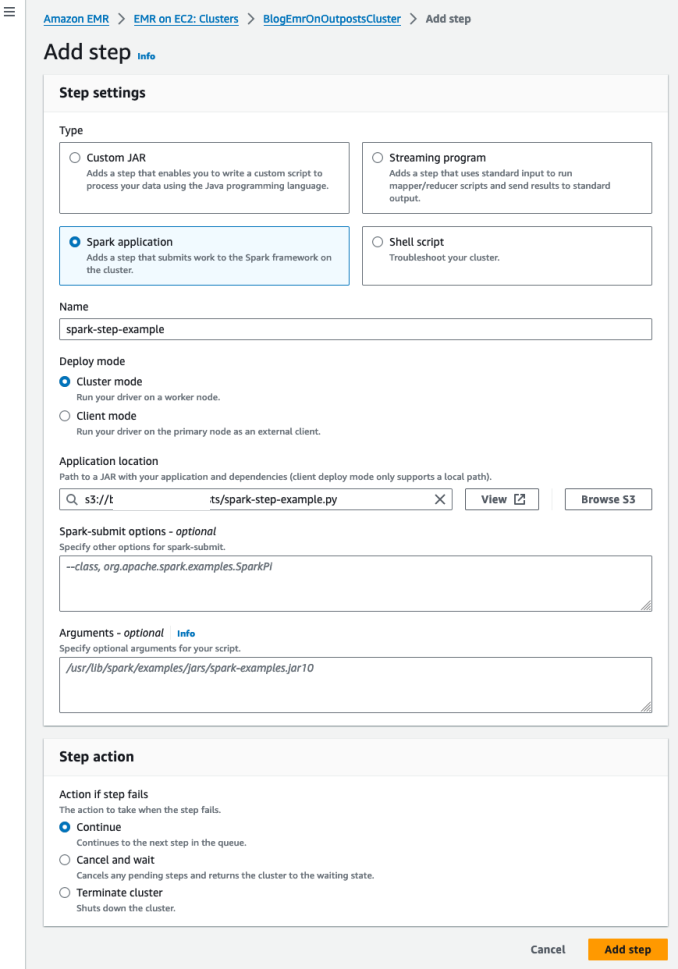
Figure 12: Add a step to the EMR cluster
The Step is created with the Status Pending. When it is done, the Status changes to Completed.

Figure 13: Step executed successfully
Cleaning up
When the EMR cluster is no longer needed, you can delete the resources created to avoid incurring future costs by following these steps:
- Follow the instructions in Terminate a cluster with the console in the Amazon EMR Documentation Management Guide. Remember to turn off the Termination protection.
- Dissociate and release the CoIP IPs allocated to the EC2 instances of the EMR core nodes.
- Delete the stack in the AWS CloudFormation using the instructions in Deleting a Stack on the AWS CloudFormation console in the AWS CloudFormation User Guide
Conclusion
Amazon EMR on Outposts allows you to use the managed services offered by AWS to perform big data processing close to your data that needs to remain on-premises. This architecture eliminates the need to transfer on-premises data to the cloud, providing a robust solution for organizations with regulatory, contractual, or corporate policy requirements to store and process data in a specific location. With the EMR cluster accessing the on-premises database directly through local networking, you can expect faster and more efficient data processing without compromising on compliance or agility. To learn more, visit the Amazon EMR on AWS Outposts product overview page.