AWS Database Blog
Bootstrapping Your Large Production On-Premises SQL Server Databases to Amazon EC2
This blog post explains how to use PowerShell and native Microsoft SQL Server backups to migrate an on-premises SQL Server database to an Amazon EC2 instance.
In general, we recommend that where possible you should make every attempt to migrate your on-premises SQL Server databases to Amazon RDS. You can find more details on how to do this in the Amazon RDS User Guide, specifically in the guide’s SQL Server topic. But in some cases, RDS might not be a viable solution for you. Perhaps this is why you find yourself reading this blog post.
AWS offers many paths to migrating your on-premises SQL Server databases to AWS. We recommend using the native tools for homogeneous database migrations. If you are planning heterogeneous migration, perhaps moving to Amazon Aurora or Amazon RDS for PostgreSQL, then AWS Database Migration Service is a good choice. Otherwise, stick to the native replication options.
The scenario described in this post is that your DBA team uploads your SQL .bak files to Amazon S3. By your team’s executing PowerShell bootstrapping scripts during the cutover downtime, your database will be up and running in AWS.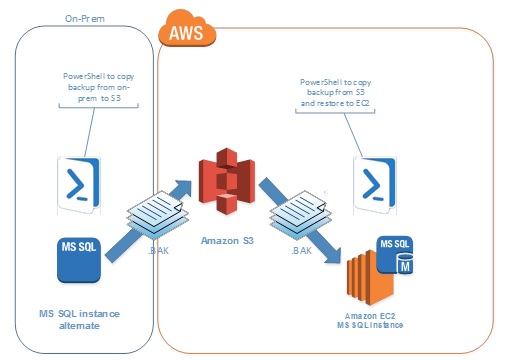
You might typically want to perform the migration during a period of inactivity or low traffic. Following are the key aspects you need to factor in when deciding on your downtime and security. Here are some ways to keep your downtime to a minimum.
- Network bandwidth – Are you using AWS Direct Connect, VPN, or something else? We recommend that you simulate an S3 upload of your .bak file to get an estimate of your upload times.
- Compression – You can also include the option to compress the database backup. Doing this uses slightly more CPU but reduces the migration time because the amount data being transferred is less.
- Backup size – The backup size might have an impact on whether you need to stripe the backup into smaller chunks to improve the upload completion time and success:
- Striping your backups has the potential to dramatically shorten the time it takes for your backups to complete.
- By keeping your individual striped files less than 5 GB, you avoid using multi-part upload capability. For further details, see this topic in the S3 documentation. The max file size for a single file in S3 is 5 TB. Thus, if the database is bigger than that, you have to stripe across multiple files.
- For parallel S3 uploads, you might also want to consider some third-party options out there that can shorten your transition time by uploading your split files in parallel. André Rocha Agostinho, a software engineer, wrote an excellent article using C#, Using C# Parallel to copy files to S3.
- Encryption – You have several options:
- You can back up and upload using AWS KMS encryption and then download and restore using the same encryption. With AWS KMS encryption, even if someone gets access to the S3 bucket where the files are stored they can’t restore the database. In addition, you can use AWS KMS to encrypt the entire S3 bucket, providing an even greater level of security.
- Another option is to include a MEDIAPASSWORD value in SQL Server for the backup, though this is not as secure as encryption and is going to be deprecated by Microsoft soon.
Another important factor to consider is the destination EC2 instance class and Amazon EBS geometry. For a Microsoft SQL Server instance, you can find the recommended DB instance class for your requirements in the DB Instance Class topic in the Amazon RDS documentation, which goes into great detail. The recommended EBS volume type is Provisioned IOPS SSD (io1), which gives highest-performance SSD volume for mission-critical low-latency or high-throughput workloads.
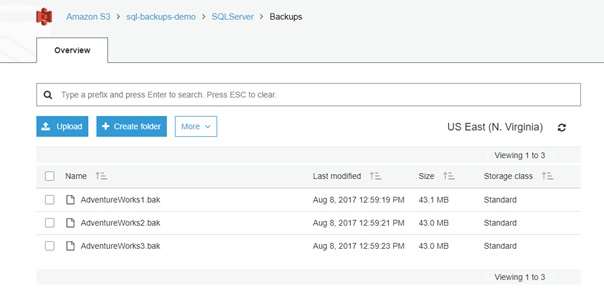
For the purposes of this example, I am going to create a striped backup of the Adventureworks database. You can find an excellent blog post at SQL CAT New Whitepaper: Data Compression: Strategy, Capacity Planning and Best Practices by Sanjay Mishra, et al., on how to determine the optimal number of files you want to stripe your database backups onto. Later, I demonstrate how to do a batch upload to S3.
Get your database backup into AWS
To get your database backup into AWS, you first create striped backups.
Create striped backups
Using the following PowerShell command to back up the database.
Another approach is to back up to S3 directly and restore from S3 directly. This approach is instead of backing up to local disk, copying to S3, downloading to S3, and then doing a restore. Direct backup and restore to and from S3 reduces the migration time by avoiding the number of times we need to read the same blocks.
Upload striped backups to S3
Next, you upload the striped backups to S3 using a PC with AWS Tools for Windows PowerShell installed. You can find details on the Amazon PowerShell site. Connect to your AWS account using an authorized user and execute the command following to back up your database to S3. Ensure that you upload your backup to a private bucket, and encrypt your file.
The prerequisites for this are the following:
- A backup uploaded to an accessible S3 bucket
- An IAM user that has required access to your AWS account
To confirm the successful upload to S3, you can use the following command:
 Provision an IAM role with the correct policies
Next, create an IAM role, SQLMigration, that you can use to allow the EC2 instance to access the S3 bucket holding the backups.
For greater security, I give the IAM role to perform this task read-only policy rights: AmazonS3ReadOnlyAccess.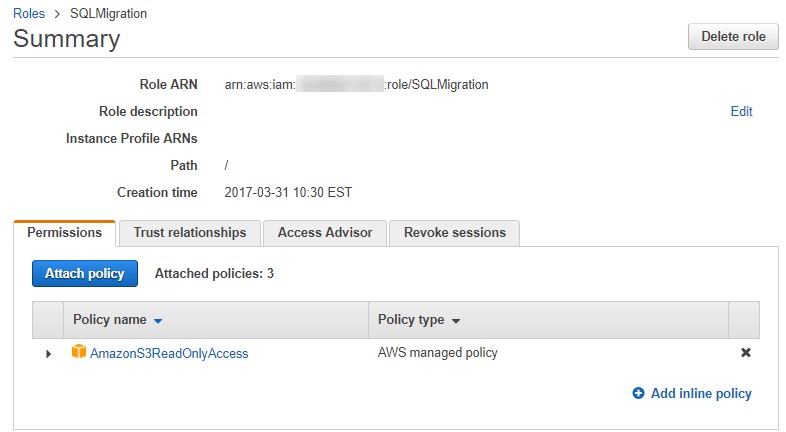
Bootstrap the EC2 instance
Next, you bootstrap the EC2 instance using a PC with AWS Tools for Windows PowerShell installed. You can find details on the Amazon PowerShell site. Connect to your AWS account using an authorized user and execute the command described following to do the following:
- Provision an EC2 instance
- Install SQL and SSMS
- Restore the Adventureworks database uploaded to S3
The prerequisites for this are the following:
- An IAM user that has required access to your AWS account
My scripts are stored and downloaded as needed from S3.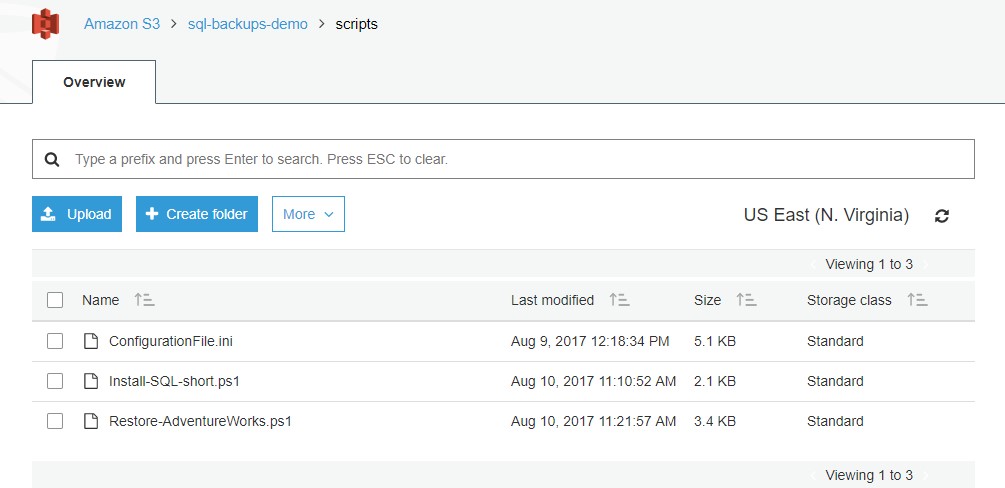
Provision an EC2 instance
The PowerShell script following provisions an EC2 instance. When that instance is launched, it bootstraps itself by downloading scripts to install SQL. Then finally it restores the Adventureworks database.
Install SQL and SSMS
For the purposes of this blog post, I also demonstrate how to bootstrap the SQL installation. If you prefer, you can source an Amazon Machine Image (AMI) preconfigured with SQL Server. However, in some cases you might want to have complete control over the installation.
For the purposes of this example, I am using a ConfigurationFile.ini file to perform the silent install. You can find details about this approach in the Microsoft documentation.
The PowerShell for the SQL installation is shown following. The installations are sourced directly from Microsoft. I tailored ConfigurationFile.ini to my needs and downloaded from S3.
Restore the Adventureworks database uploaded to S3
Once the SQL installation is complete, I query to check the SQL Server service is running before I attempt to do the restore. An excellent PowerShell script by Brenton Blawat shows how to keep querying for a service over a set period before attempting to use it.
The PowerShell command is following:
Conclusion
In this blog post, I demonstrate how to launch and then bootstrap an EC2 instance with SQL Server. After completing the installation, I show how to download and restore your backups from S3 to SQL Server. I also outline a method to check that the service was running and waited until it was before attempting to perform the database restore. Although it’s not really necessary for the size of the Adventureworks database, I striped the database backup to shorten the backup time of on-premises files for uploads to Amazon S3 and download to the Amazon EC2 instance during bootstrapping.
I hope the methods outlined here give you some thoughts on how to migrate your SQL Server databases to AWS, and also some ideas on how to perform the cutover to production environments.
I welcome your comments or questions below.
About the Author
 Stefan Minhas is a senior consultant at Amazon Web Services. He is subject matter expert in the Global Microsoft Specialty Practice, and works to provide guidance and technical assistance in the development and growth of specialty skills across the broader Professional Services community.