AWS Database Blog
Using IAM authentication to connect with pgAdmin Amazon Aurora PostgreSQL or Amazon RDS for PostgreSQL
This blog post was last reviewed and updated July, 2024.
Amazon Relational Database Service (RDS) enables you to use AWS Identity and Access Management (IAM) to manage database access for Amazon RDS for PostgreSQL database instances and Amazon Aurora PostgreSQL clusters. Database administrators can associate database users with IAM users and roles. With IAM database authentication, you don’t need to use a password when you connect to a database cluster. Instead, you use an authentication token.
An authentication token is a unique string of characters that Aurora generates on request, which uses AWS Signature Version 4. Each token has a lifetime of 15 minutes. You don’t need to store user credentials in the database, because authentication is managed externally using IAM. For more information, see Client Authentication on the PostgreSQL documentation website.
This post shows you how to use IAM authentication with tools you might already be using to connect to your Aurora PostgreSQL cluster. The steps will work equally well on your Amazon RDS for PostgreSQL instance. You can follow along using the provided commands to provision resources and configure your environment for IAM authentication.
The post also walks you through connecting to the cluster using either the psql command line tool or pgAdmin using IAM credentials.
Prerequisites
RDS supports Transport Layer Security (TLS) to encrypt client/server communications for PostgreSQL database instances. It is highly recommended to enable SSL/TLS certificate verification. For more information, see Securing connections to RDS for PostgreSQL with SSL/TLS. You must download the certificate from the Amazon S3 bucket that the user guide identifies. Additionally, before you create an Aurora database cluster, you must set up your environment for Amazon Aurora.
We use two different IAM principals in this post. We use the first to run the AWS Command Line Interface (AWS CLI) command to create the database, enable IAM authentication and create IAM resources for IAM database authentication. The second IAM principal maps to the database user account, and we use this to generate authentication tokens which grant access to the database.
Note: This post uses an IAM user for a second IAM principal to demonstrate the feature, but for real workloads, AWS recommends you follow security best practices in IAM by using federated authentication with multi-factor authentication (MFA) for human identities and IAM roles with temporary credentials for machine identities. Refer to Achieve auditability with Amazon RDS IAM authentication using attribute-based access control to learn more on how to use database IAM authentication using federation for human identities.
Setup
You can use your existing Aurora PostgreSQL cluster or RDS for PostgreSQL database and enable IAM database authentication, or you can create a new one. If you don’t have one, you can provision an Aurora PostgreSQL cluster through the AWS Management Console, AWS CLI, AWS Software Development Kit (SDK), or by using an AWS CloudFormation template. This post uses AWS CLI to create a new Aurora PostgreSQL cluster. Refer How to setup Authentication and access credentials for AWS CLI. In this post, we leverage the AWS CLI with the credentials of the first IAM principal to provision a new Aurora PostgreSQL cluster. You have the option to employ either the AWS CLI or an AWS SDK to generate an authentication token. We use the AWS CLI with the credentials of the second IAM principal to generate an authentication token.
Creating a database
If you don’t already have an Aurora PostgreSQL cluster or RDS PostgreSQL instance, you must create one. Configure your database with a security group that allows entry from your client machine. Use the following CLI command:
Replace the placeholders for cluster name, user name, password, subnet name and security group.
If you already have an Aurora PostgreSQL database that you want to work with, you can skip this step.
The preceding command creates a database cluster. If you use the console to create a database cluster, then RDS automatically creates the primary instance (writer) for your database cluster. If you use the AWS CLI to create a database cluster, you must explicitly create the primary instance for your database cluster. See the following code:
Replace the placeholders for instance name and cluster name.
For more information, see Creating an Amazon Aurora DB Cluster.
Enabling IAM authentication
By default, IAM database authentication is disabled on database instances and database clusters. You can enable IAM database authentication (or disable it again) using the console, the AWS CLI, or the RDS API. For more information, see Enabling and Disabling IAM Database Authentication.
To enable IAM authentication from the command line, you must know your cluster name. You can find the name on the RDS console or in the output values of the describe-db-clusters AWS CLI command. See the following code:
The following command enables IAM authentication on the cluster.
Replace the placeholder for the cluster name.
IAM resources for IAM database access
This post attaches a policy with an action of rds-db:connect to a single IAM user. The following diagram illustrates this workflow.

You can construct other Amazon Resource Names (ARNs) to support various access patterns and attach the policies to multiple users or roles. For more information, see Creating and Using an IAM Policy for IAM Database Access.
Policy
To allow an IAM user or role to connect to your database instance or database cluster, you must create an IAM policy. After that, attach the policy to an IAM user or role. For more information, see Create and Attach Your First Customer Managed Policy.
You construct the policy document from the following four key pieces of data:
- The Region of your cluster
- Your AWS account number
- The database resource ID
- Your database user name
Specify an Amazon Resource Name (ARN) that describes one database user account in one database instance using the following format:
Note: dbuser is a keyword in the above ARN format.
For RDS:
In the preceding example code, the following elements are customized for the environment:
- us-east-1 – The Region
- 123456789012 – The AWS account ID
- db-ABCDEFGHIJKL01234 – The identifier for the DB instance
- mydbuser – The name of the database account to associate with IAM authentication.
A resource ID is the identifier for the database instance. This identifier is unique to a Region and never changes. In the example policy, the identifier is db-ABCDEFGHIJKL01234 for database instance and cluster-ABCDEFGHIJKL01234 for database cluster. To find a DB instance resource ID in the console for RDS, Choose Configuration. The resource ID is located in the Configuration section.
Alternatively, you can use the AWS CLI command to list the identifiers and resource IDs for all of your database instances in the current Region. See the following code:
An IAM administrator user can access DB instances without explicit permissions in an IAM policy. For more information, see Create an IAM User. To restrict administrator access to DB instances, you can create an IAM role with the appropriate, lesser-privileged permissions and assign it to the administrator.
Don’t confuse the rds-db: prefix with other RDS API operation prefixes that begin with rds:. You use the rds-db: prefix and the rds-db:connect action only for IAM database authentication. They aren’t valid in any other context.
As of this writing, the IAM console displays an error for policies with the rds-db:connect action. You can ignore this error.
If resource-id is set to * instead of the explicit resource ID, you can use the same policy for all databases in a Region. If it is explicit, you need a new policy for all read replicas or connecting to a restored backup. There is a trade-off with strict authorization control by not locking down the policy to a single cluster, but this feature can help to reduce effort.
This post creates a new IAM user and attaches the policy to the new IAM user using the following AWS CLI commands. You do not need a console password or access keys for this feature. The user from the following example code has neither:
Creating a database user
After you create your IAM user and attach your IAM policy to the user, create a database user with the same name that you specified in the policy. To use IAM authentication with PostgreSQL, connect to the database cluster, create the database user, and grant them the rds_iam role. You can connect as any user that has CREATE USER permissions and execute the following statements:

Connecting
With IAM database authentication, you use an authentication token when you connect to your database cluster. An authentication token is a string of characters that you use instead of a password. After you generate an authentication token, it’s valid for 15 minutes before it expires. If you try to connect using an expired token, the connection request is denied.
In the next step, you will generate an authentication token. The AWS CLI is configured to use the IAM credentials of the second IAM principal created in the prerequisites section of this post.
Generating Token
The authentication token consists of several hundred characters so it can be unwieldy on the command line. One way to work around this is to save the token to an environment variable, and use that variable when you connect. The following example code shows how to use the AWS CLI to get a signed authentication token using the generated-db-auth-token command, and store it in a PGPASSWORD environment variable:
In the preceding example code, the parameters to the generate-db-auth-token command are as follows:
- –hostname– The host name of the DB cluster (cluster endpoint) that you want to access.
- –port– The port number used for connecting to your DB cluster.
- –region– The Region in which the DB cluster is running.
- –username– The database account that you want to access.
PGPASSWORD environment variable behaves the same as the password connection parameter. If the PGPASSWORD environment variable is set, there is no need to explicitly pass this in connection string as mentioned below.
Connecting to the cluster using psql
For the general format for using psql to connect, see the following code:
The parameters are as follows:
- host – The host name of the database cluster (cluster endpoint) that you want to access.
- port – The port number used for connecting to your database cluster.
- sslmode – The SSL mode to use. For more information, see Using SSL with a PostgreSQL database Instance on the PostgreSQL documentation website.
It is recommended to use sslmode to verify-full or verify-ca. When you use sslmode=verify-full, the SSL connection verifies the DB instance endpoint against the endpoint in the SSL certificate.
You can use verify-full with RDS PostgreSQL and Aurora PostgreSQL cluster and instance endpoints. For Aurora PostgreSQL reader and custom endpoints, use verify-ca.
- sslrootcert – The SSL certificate file that contains the public key. For more information, see Using SSL with a PostgreSQL database Instance.Download the SSL/TLS certificates from Using SSL to Encrypt a Connection to a DB Instance.
- dbname – The database that you want to access.
- user – The database account that you want to access.
The following example code shows using the command to connect, uses the environment variables that you set when you generated the token in the previous section:

Connect to the cluster using SQL Workbench/J
Connecting to your Aurora PostgreSQL cluster using SQL Workbench/J is slightly different from how you might have previously launched the app. We can start SQL Workbench/J via command line using the .jar file so that you can pass in the token.
A detailed description of the values passed into the command follows.
url: The JDBC connection URL consisting of the cluster name and database name.driver: The full class name of the driver. It requires correct spelling and is case sensitive.username: The database user name.password: The generated token.driverjar: The full path name to the .jar file containing the JDBC driver. It cannot be a relative path.

Connect to the cluster using DBeaver
You can use DBeaver Community or Enterprise edition to connect to a PostgreSQL database instance. DBeaver is multi-platform database tool for developers, database administrators, analysts and all people who need to work with databases. You can start DBeaver from command line to pass in the token.

Connect to the cluster using pgAdmin
You can use the open-source tool pgAdmin to connect to a PostgreSQL database instance. Complete the following steps:
- Find the endpoint (DNS name) and port number for your database Instance.
- On the RDS console and then choose Databases.
- From the list of your database instances, choose the PostgreSQL database instance name.
- On the Connectivity & security tab, record the endpoint and port number.
You need both the endpoint and the port number to connect to the database instance.
The following screenshot shows the endpoint and port number from the database instance details.

- Install pgAdmin from the pgAdmin
You can download and use pgAdmin without having a local instance of PostgreSQL on your client computer. - Launch the pgAdmin application on your client computer.
- Under Dashboard, choose Add New Server.
- In the Create – Serversection, under General, for Name, enter a name to identify the server in pgAdmin.
- Deselect Connect now?

- Under Connection, For Host, enter the endpoint.
For example, this post entersmypostgresql.abcdefg222hq.us-east-1.rds.amazonaws.com. - For Port, enter the assigned port.
- For Username, enter the user name that you entered when you created the database instance.
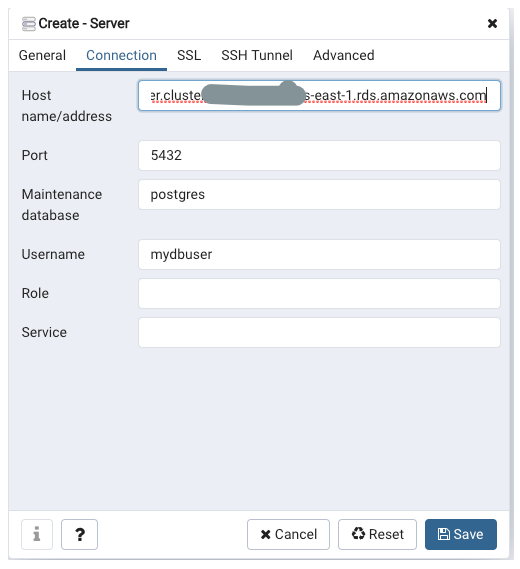
- As on optional but recommended step, under SSL, change the SSL mode.
- As part of this optional step, also enter the path of the certificate (downloaded earlier for SSL certificate verification) based on SSL mode selected.

It is recommended to use sslmode to verify-full or verify-ca. When you use sslmode=verify-full, the SSL connection verifies the DB instance endpoint against the endpoint in the SSL certificate.
You can use verify-full with RDS PostgreSQL and Aurora PostgreSQL cluster and instance endpoints. For Aurora PostgreSQL reader and custom endpoint use option verify-ca.
- Choose Save.
For information about troubleshooting, see Troubleshooting Connection Issues. - After you create the server, connect to it using the temporary token that AWS CLI returned to get a signed authentication token using the
generated-db-auth-tokencommand.

- To access a database in the pgAdmin browser, choose Servers.
- Choose, the database instance.
- Choose, Databases.
- Choose the database instance’s database name.

- To open a panel where you can enter SQL commands, under Tools, choose Query Tool.
Limitations
There are limitations when you use IAM database authentication. Your application must generate an authentication token. Your application uses that token to connect to the database cluster. If you exceed the limit of maximum new connections per second, the extra overhead of IAM database authentication can cause connection throttling.
For more information, see IAM Database Authentication for MySQL and PostgreSQL.
Conclusion
There are many advantages to using IAM authentication with your RDS for PostgreSQL and Aurora PostgreSQL databases.
IAM database authentication eliminate the need to manage database-specific user credentials on your end. You do not need to maintain database-specific passwords, you can simply use IAM credentials to authenticate to database accounts.
Network traffic to and from the database is encrypted using SSL. You can use IAM to centrally manage access to your database resources, instead of managing access individually on each database cluster. For applications running on Amazon EC2, you can use profile credentials specific to your EC2 instance to access your database instead of a password, for greater security. You can use an authentication token when you connect to Amazon RDS or Amazon Aurora from another AWS compute service, such as AWS Lambda. By using a token, you can avoid placing a password in your code. Alternatively, you can use an AWS SDK to programmatically create and use an authentication token. This post showed you how to use IAM authentication instead of a password with tools such as the psql command line tool and pgAdmin. You can adapt these instructions and processes to other tools.
About the Author

Ajeet Tewari is a Solutions Architect for Amazon Web Services. He works with enterprise customers to help them navigate their journey to AWS. His specialties include architecting and implementing highly scalable distributed systems and leading strategic AWS initiatives.