AWS Developer Tools Blog
Run an Active-Passive, multi region API using Aurora RDS Global Cluster
Increasingly enterprises and customers run and manage applications at a global scale that need to be resilient and highly available. In order to deliver the best possible experience to their end consumers, these applications need to safeguard against risks of service disruptions and downtime. Risks due to service downtime, due to natural disasters, hardware failures, or human errors are simply much greater because customers have come to expect high availability; that is access anytime and from any location. Service instability or downtime very easily leads to customer dissatisfaction, financial loss, and negative impact on the brand.
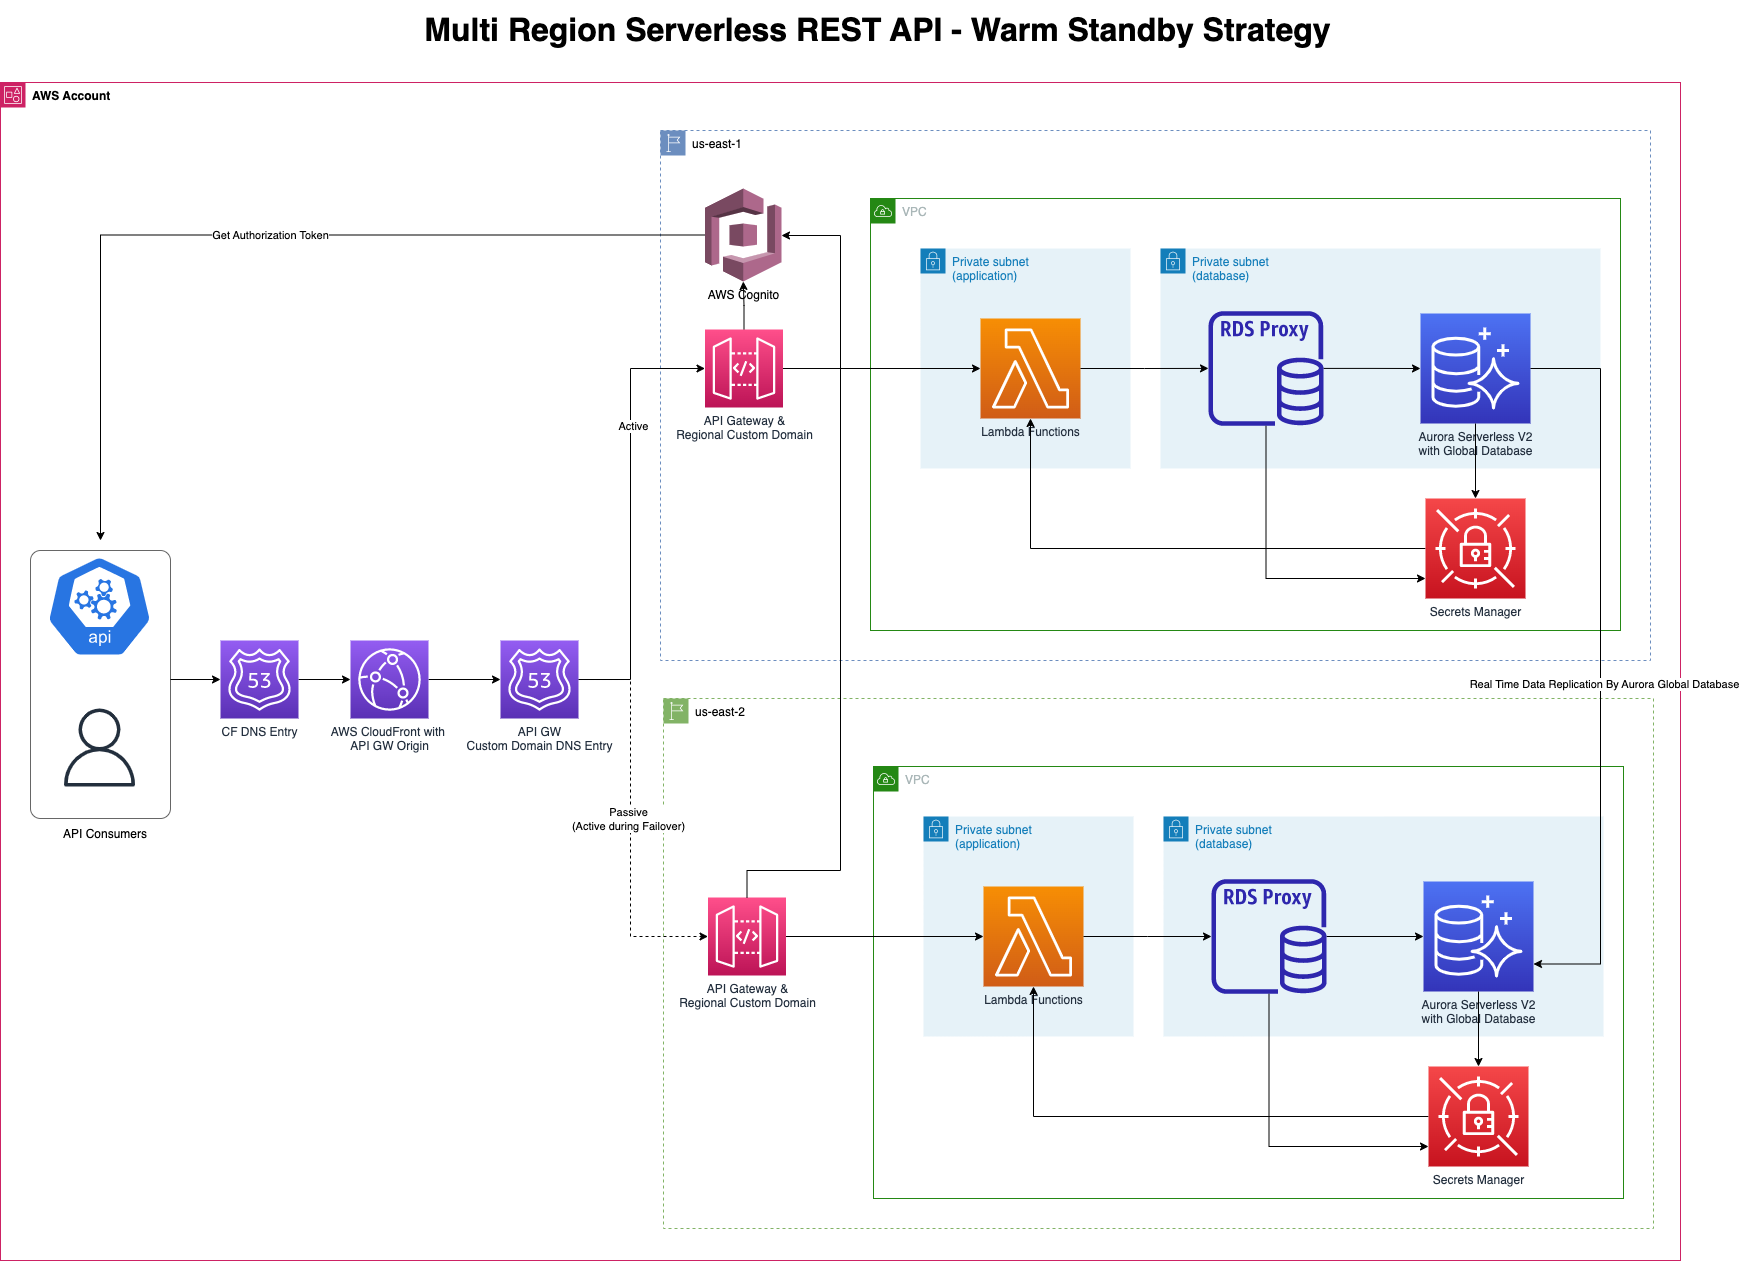
In this post, we demonstrate how to build and run REST APIs that are highly available across multiple AWS regions using an “active-passive” setup. The solution will show how to use Aurora RDS Global Database in a primary AWS region (“ex: us-east-1”) and available as read-only in secondary region (“ex: us-east-2”). The CI/CD automation provided in this solution will provide options to mock or mimic a failure on the primary region and will initiate application traffic flowing through the secondary region. We will deploy a simple ToDo application using AWS Services like API Gateway, AWS Lambda, Amazon Aurora. All these services are deployed in both the primary and the secondary region. AWS Lambda handles the incoming request from the API Gateway and talks to an Amazon Aurora Relational Database. Aurora Global Database feature synchronizes the data between the primary and the secondary region. The example solution includes an automated CI/CD process integration using AWS CodeCommit and AWS CodePipeline to initiate and test the secondary region failover capability.
With Amazon Aurora global database, you can power your globally distributed applications with a single Aurora database that spans multiple AWS Regions. Aurora global databases are designed for applications with a worldwide footprint. An Aurora global database consists of one primary AWS Region where your data is written, and up to five read-only secondary AWS Regions. You issue write operations directly to the primary DB cluster in the primary AWS Region. Aurora replicates data to the secondary AWS Regions using dedicated infrastructure, with latency typically under a second. The read-only secondary DB clusters (AWS Regions) allow you to support read operations closer to application users. Some of the major advantages include global reads with local latency, scalable secondary Aurora DB clusters, fast replication from primary to secondary Aurora DB clusters, recovery from Region-wide outages. Please refer here to learn more.
An Aurora global database provides more comprehensive failover capabilities than the failover provided by a default Aurora DB cluster. By using an Aurora global database, you can plan for and recover from disaster fairly quickly. Recovery from disaster is typically measured using values for RTO and RPO. Managed planned failover feature is intended for controlled environments, such as operational maintenance and other planned operational procedures. By using managed planned failover, you can relocate the primary DB cluster of your Aurora global database to one of the secondary Regions. Because this feature synchronizes secondary DB clusters with the primary before making any other changes, RPO is 0 (no data loss). Managed planned failover is designed to be used on a healthy Aurora global database. To recover from an unplanned outage or to do disaster recovery (DR) testing, follow the “detach and promote” process detailed in Recovering an Amazon Aurora global database from an unplanned outage. To learn more, see Performing managed planned failovers for Amazon Aurora global databases. Please refer here to learn more. In this blog, we will use AWS Code Pipeline to mock the managed failover (this can be modified to unmanaged failover in the configuration provided).
The infrastructure for the example solution is defined using AWS Cloud Development Kit (CDK), an open source software development framework to model and provision your cloud application resources, supported in TypeScript, JavaScript, Python, C# and Java. For this solution, we use TypeScript. Completing this walkthrough successfully would take you about couple of hours (including installing prerequisites etc.); so plan accordingly. Here are the key steps at a high-level —
- Deploy Initial Setup: Deploy infrastructure and application stacks in primary and secondary region using CDK. See below for detailed stack contents.
- Review Application Components: Review and validate the application stack that has CRUD AWS Lambda Functions. The APIs exposed interacts with AWS Lambda and Amazon Aurora Database in the primary region by default
- AWS CodeCommit Setup: Git clone your Code Commit repository – “ToDoMgmtRepo” (spun as part of this solution into your AWS Account).
- Initiate Secondary failover: This section mimics the application region failover scenario and will redirect the API traffic to the secondary region. US-EAST-1 is used as primary and US-EAST-2 as secondary in this blog post. This is configurable within the “.env” file in the provided solution. Code checkin will set the CI/CD solution within your account for testing this approach. AWS CodeCommit and AWS CodePipeline is used for this purpose.
Architecture Diagram
Manage Failover using Amazon CloudFront
In this example we use Amazon CloudFront to deliver content, APIs or applications over HTTPS using the latest version Transport Layer Security (TLSv1.3). The communication is encrypted and secure between viewer clients and CloudFront. CloudFront supports multiple origins for backend architecture redundancy. CloudFront’s origin failover capability serves content from a backup origin when the primary origin is unavailable using the automation, which is also included in the solution.

Manage Failover using – Route53
We recommend the following solution architecture for customers using registered domain name (DNS) systems like Amazon Route 53. Using Amazon Route 53 you can build highly available applications by setting routing policies to pre-determine and automate responses in case of failure, such as redirecting traffic to alternative AWS Regions. You can learn more about DNS-based load-balancing in this blogpost.
Prerequisites
- Set up your AWS CLI. For steps, see Getting Started (AWS CLI) We used AWS CLI 2.7.16
- Install the latest version of AWS CDK. We used Version 2.54.0
- Install the latest version of Node JS. We used v16.15.1
- Install the latest version of jq. We used Version 1.6
- AWS CodeCommit user setup in “us-east-1” region (primary region used for this solution). Make sure to setup in your local account to validate CI/CD initiated secondary region failover process. Please refer here for the steps.
Solution
Deploy Initial Setup
First step is to deploy CDK, infrastructure and application stacks in primary and secondary region. You need to download the source from the GitHub that has the source code for AWS CDK that spins up the infrastructure. Below we show how to use the downloaded code.
   $ mkdir multi-region-rest-api
   $ cd multi-region-rest-api
   $ git clone https://github.com/aws-samples/run-active-passive-multi-region-apis
   $ cd `run-active-passive-multi-region-apis`
Note: Overall setup, testing and tear down process could take approximately two hours. So please plan accordingly. We have provided a “deploy.sh” as part of the code base root folder that will take care of the below steps. Alternatively, you can run the the following commands in a command line/terminal.
   $ npm install

   $ npm run build
   $ cd assets/lambda
   $ npm install
   $ cd ../..
   $ npm run package
   $ cdk synth

   # Note bootstrapping in two regions. Checkout for failures (already existing/cdk mismatch etc.,)
   $ cdk bootstrap

   $ cdk deploy ToDoMgmt --require-approval never
   $ cdk deploy ToDoMgmt/PriDeploy/ToDoMgmt-infra-pri --require-approval never
   $ cdk deploy ToDoMgmt/PriDeploy/ToDoMgmt-app-pri --require-approval never

   # This creates the initial table on the primary cluster. This can be done from AWS Lambda console also
   $ aws lambda invoke --payload '{"action": "CREATE_TABLE"}' --function-name ToDoMgmt-app-pri-CreateTableFunction --cli-binary-format raw-in-base64-out  /dev/stdout

   ### Note. This will create AWS services for the secondary region. While this is executing, you can validate the primary region (refer "Testing" section below)
   $ cdk deploy ToDoMgmt/SecdDeploy/ToDoMgmt-infra-secd --require-approval never
   $ cdk deploy ToDoMgmt/SecdDeploy/ToDoMgmt-app-secd --require-approval never
   $ cdk deploy ToDoMgmt-failover --require-approval never
Once the above CDK commands are completed successfully, multiple AWS CloudFormation stacks are created. Take a moment to identify the major components. The CloudFormation stack spins up the following resources, which can be viewed in the AWS Management Console. Go to the AWS console to locate the deployed stack resources (sample provided below).
- Primary Region – us-east-1
- CDKToolkit – If a CDK toolkit stack is not in the region, this will create a new AWS CloudFormation stack.
- ToDoMgmt
- ToDoMgmtRepo – AWS CodeCommit repository
- ToDoMgmtPipeline – AWS CodePipeline, AWS S3 buckets
- SecdDeploy-ToDoMgmt-infra-pri
- ToDoMgmt-infra-pri – AWS VPC, Subnets, Amazon Aurora Database Cluster, RDS Proxy, etc.,
- SecdDeploy-ToDoMgmt-app-pri
- ToDoMgmt-app-pri – AWS API Gateway, AWS Lambda Functions (ToDos CRUD functions),
- Secondary Region – us-east-2
- CDKToolkit – If a CDK toolkit stack is not in the region, this will create a new AWS CloudFormation stack.
- ToDoMgmt-support-us-east-2
- SecdDeploy-ToDoMgmt-infra-secd
- SecdDeploy-ToDoMgmt-app-secd
Review Application Components
Next we will review the deployed APIs, AWS Lambda and RDS solution. The stacks should have been deployed to us-east-1 and us-east-2 regions as per the solution provided. To validate the connectivity of the lambda, refer “Initial Testing and Validation” on the “Testing” Section.
The solution uses Amazon Cognito to setup user pools. API Gateway uses this user pool for authorization process. Please refer this in
- AWS Console > API Gateway > ToDoMgmtAPI
- Click on resources (on left pane) > “GET” > “Method Request”
- “Authorization” section will show something like this “ToDoMgmtPriDeployToDoMgmtapppritodoAuthorizerB4BD9BA9”. Similarly, OAuth Scopes will show “api/upsert-delete”. Please do review “Authorizers” (on the left pane) to review the Amazon Cognito User pool details also
- Notice client credentials of OAuth type is used and the application has “api/upsert-delete” as a custom scope
- AWS Lambda section will have the functions created with “ToDoMgmt” on their name. This can be viewed in AWS Console
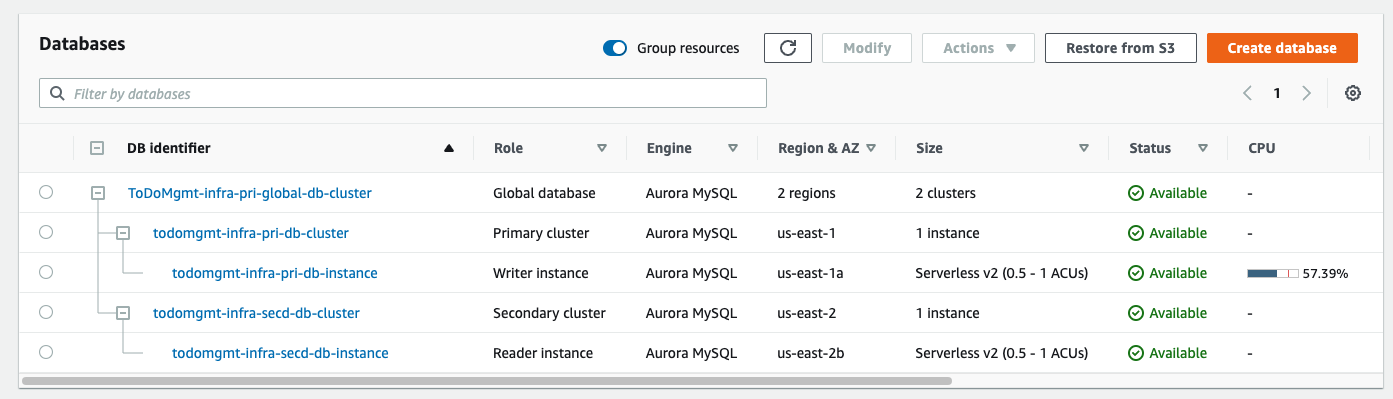
- Amazon RDS will have a RDS Global Cluster created like “ToDoMgmt-infra-pri-global-db-cluster”. You can refer this in Amazon RDS Console. At this point the “us-east-1” has the primary cluster and “us-east-2” has the Secondary Cluster with reader instances. The API/AWS Lambda directs all the traffic to the primary cluster on the global database (Refer “Testing” section for detailed testing)

AWS CodeCommit Setup
The provided solution has “local_codecommit_setup.sh” (“bash script”) that can be run to check-in code into your local AWS CodeCommit repository, that was built as part of the initial infrastructure setup. The provided script automates copying the necessary code files, builds the packages and will initiate the AWS CodePipeline.
Optionally, you can run the below steps in a command line/terminal.
aws codecommit list-repositories
cd .. mkdir run-active-passive-multi-region-apis-codecommit
cd run-active-passive-multi-region-apis-codecommit
git clone codecommit::us-east-1://ToDoMgmtRepo
cd ..
# Copy required code files to CodeCommit repo folder path
cp run-active-passive-multi-region-apis/README.md run-active-passive-multi-region-apis-codecommit/ToDoMgmtRepo
cp run-active-passive-multi-region-apis/cdk.json run-active-passive-multi-region-apis-codecommit/ToDoMgmtRepo
cp -r run-active-passive-multi-region-apis/lib run-active-passive-multi-region-apis-codecommit/ToDoMgmtRepo
cp -r run-active-passive-multi-region-apis/bin run-active-passive-multi-region-apis-codecommit/ToDoMgmtRepo
cp run-active-passive-multi-region-apis/tsconfig.json run-active-passive-multi-region-apis-codecommit/ToDoMgmtRepo
cp -r run-active-passive-multi-region-apis/assets run-active-passive-multi-region-apis-codecommit/ToDoMgmtRepo
cp run-active-passive-multi-region-apis/cdk.context.json run-active-passive-multi-region-apis-codecommit/ToDoMgmtRepo
cp run-active-passive-multi-region-apis/deploy.sh run-active-passive-multi-region-apis-codecommit/ToDoMgmtRepo
cp run-active-passive-multi-region-apis/package.json run-active-passive-multi-region-apis-codecommit/ToDoMgmtRepo
cp -r run-active-passive-multi-region-apis/util run-active-passive-multi-region-apis-codecommit/ToDoMgmtRepo
cp -r run-active-passive-multi-region-apis/.env run-active-passive-multi-region-apis-codecommit/ToDoMgmtRepo/.env
cp -r run-active-passive-multi-region-apis/.gitignore run-active-passive-multi-region-apis-codecommit/ToDoMgmtRepo/.gitignore
cp -r run-active-passive-multi-region-apis/tsconfig.json run-active-passive-multi-region-apis-codecommit/ToDoMgmtRepo/tsconfig.json
cd run-active-passive-multi-region-apis-codecommit/ToDoMgmtRepo
# Remove node_modules
rm -rf assets/lambda/node_modules/
# git add and commits to your AWS CodeCommit "ToDoMgmtRepo"
git add . && git commit -m "initial commit" && git push
Step 4 – Initiate Failover and Secondary region Deployment
- Below steps are provided to mock and test the automated secondary region failover using AWS CodePipeline. This can be done with any other similar CI/CD tools like Jenkins/GitHub/GitLab etc., With this we will validate the multi-region capability of the APIs and the Global RDS Aurora Database
- In AWS Console, navigate to AWS CodePipeline. The solution spins up a “ToDoMgmtPipeline” and “ToDoMgmt-failover<auto-guid>” pipelines
- ToDoMgmtPipeline – As soon as the code is checked in into AWS CodeCommit (Step #3), the pipeline triggers the code build and deploys the APIs into primary and secondary region. Remember the initial infrastructure had already spun up the primary/secondary VPCs with required Global RDS Aurora database cluster
- ToDoMgmt-failover-<auto-guid>
- To initiate the failover this pipeline is used. The execution of the pipeline would require a manual approval in this example. This could be similar to any other processes/approvals that may be required during real-world deployments by DevOps/CloudOps teams
- Click “Edit” > “Environment Variables”. Please note these major environment variables that are needed for primary to secondary (or vice versa). Also while editing environment variables, uncheck the checkbox that says ‘Allow AWS CodeBuild to modify this service role so it can be used with this build project’.
# Source region, cluster details
AWS_SRC_REGION=us-east-1
SRC_CLUSTER_ID=todomgmt-infra-pri-db-cluster
SRC_RDS_PROXY_NAME=todomgmt-infra-pri-rds-proxy

# Target region, cluster details
AWS_DEST_REGION=us-east-2
TARGET_CLUSTER_ID=todomgmt-infra-secd-db-cluster
TARGET_RDS_PROXY_NAME=todomgmt-infra-secd-rds-proxy

# Cloudfront on the target (secondary region)
CLOUDFRONT_NEW_ORIGIN_DOMAIN_NAME=yocmqg8yo2.execute-api.us-east-2.amazonaws.com
* Save the environment variables on the AWS CodeBuild
* On the left pane on the console, click on AWS CodePipeline, select “ToDoMgmt-failover-<auto-guid>”. Click on “Release Change”
* Once the Failover deployment is done, please note the secondary RDS becomes active in the global RDS cluster
* At this point you should be able to call the Amazon CloudFront URL (as described below in the “Testing” section), to GET/POST/DELETE.
* Note the earlier submitted TODO ids on the primary can be retrieved again since the RDS has promoted the secondary region (us-east-2) cluster as primary now
Registered the primary cluster as Target Group in the RDS Proxy

[Container] 2023/01/11 21:12:39 Phase complete: BUILD State: SUCCEEDED
[Container] 2023/01/11 21:12:39 Phase context status code:  Message:
[Container] 2023/01/11 21:12:39 Entering phase POST_BUILD
[Container] 2023/01/11 21:12:39 Phase complete: POST_BUILD State: SUCCEEDED
[Container] 2023/01/11 21:12:39 Phase context status code:  Message:


Points to Consider
- In this example solution, we used Amazon CloudFront to route the traffic to primary and secondary regions. Real world applications can use their organization’s approved DNS systems like Amazon Route53 to distribute the traffic to these APIs.
- The solution uses AWS Cognito using client credentials OAuth flow type. The application APIs provided in the solution sets/uses this custom scope from the primary region including the failover scenarios. This is to avoid modifying authorization process end points on the frontend/web applications. This can be customized based on end user’s need by having a redundancy in the secondary region also.
Testing
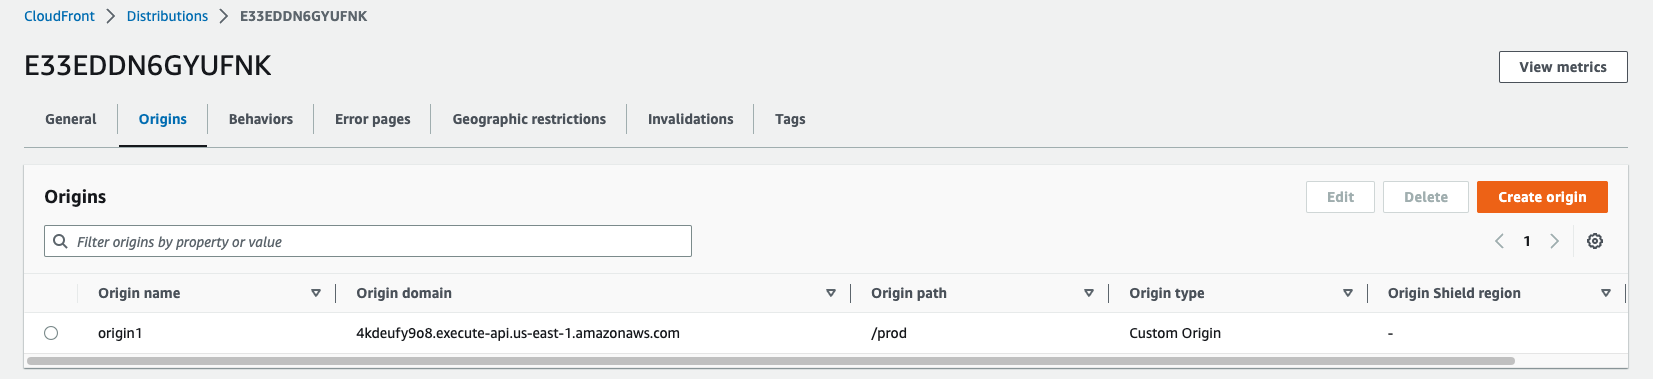
Amazon CloudFront distribution is available to test the APIs that are exposed in the primary (and also in the secondary region). Please note, below steps are given for testing the APIs in the primary (“us-east-1”) region. The exposed CloudFront distribution routes the traffic to the API Gateway on the primary region. After the failover is initiated, this CloudFront distribution’s origin will point to the secondary API Gateway endpoint. Make sure to use that CloudFront URL while validating secondary region failover. A sample is provided here
A sample output is provided from the CloudFormation output – ToDoMgmt/PriDeploy/ToDoMgmt-infra-pri (PriDeploy-ToDoMgmt-infra-pri)
   Outputs:
   ToDoMgmtPriDeployToDoMgmtapppriC2AF5460.CloudfrontUrl = d1wxd7hbxugicb.cloudfront.net
   ToDoMgmtPriDeployToDoMgmtapppriC2AF5460.ToDoMgmtApiEndpointFAEC7298 = https://z019sn00q3.execute-api.us-east-1.amazonaws.com/prod/
API Gateway is exposed to outside world using Amazon Cognito Authorization. To validate the AWS Lambda and Amazon RDS Setup, do the following.
Initial Testing and Validation
Below we show you how to test the AWS Lambda function from command line
aws lambda get-function --function-name ToDoMgmt-app-pri-CreateTableFunction

### This is one time only to setup up the initial database/tables
aws lambda invoke --payload '{"action": "CREATE_TABLE"}' --function-name ToDoMgmt-app-pri-CreateTableFunction --cli-binary-format raw-in-base64-out  /dev/stdout

### Insert a sample TODO
aws lambda invoke --payload '{"task": "Test Primary", "status": "wip"}' --function-name ToDoMgmt-app-pri-UpsertToDos --cli-binary-format raw-in-base64-out  /dev/stdout

### Insert a sample TODO
aws lambda invoke --payload '{"task": "Test Primary", "status": "wip"}' --function-name ToDoMgmt-app-pri-UpsertToDos --cli-binary-format raw-in-base64-out  /dev/stdout

### Update the sample TODO
aws lambda invoke --payload '{"id": "1", "task": "Test Primary", "status": "wip"}' --function-name ToDoMgmt-app-pri-UpsertToDos --cli-binary-format raw-in-base64-out  /dev/stdout

### Delete a sample TODO
aws lambda invoke --payload '{"id": "1"}' --function-name ToDoMgmt-app-pri-GetToDos --cli-binary-format raw-in-base64-out  /dev/stdout
Validate API Gateway, Amazon Cognito Pool Setup
Amazon Cognito Validation
- Navigate to AWS Amazon Cognito Console and select the “ToDoMgmt” User pool
- Goto the “App Integration” tab and retrive the “Cognito domain” url. This will be something like – https://todomgmt-dev-api-.auth.us-east-1.amazoncognito.com
- Retrieve the “App Client Id” and “App Client Secret” values from “App Clients” settings on the user pool
- Run the curl command to validate this. (A sample command provided below)
   curl --location --request POST 'https://todomgmt-dev-api-<YOUR_ACCOUNT_NUMBER>.auth.us-east-1.amazoncognito.com/oauth2/token' \
   --header 'Authorization: Basic <your base64 encoded string of clientId and clientSecret>' \
   --header 'Content-Type: application/x-www-form-urlencoded' --data-urlencode 'grant_type=client_credentials'
- Response will have “access_token” value. This will be used for the API validation
API Validation
- Navigate to AWS API Gateway Console > “Stages”
- Retrieve the “GET”, “POST”, “DELETE” endpoints individually. Note POST is used for CREATE and UPDATE operations
- Validate the APIs using the earlier retrieved access tokens as below. Some of the sample curl commands are provided below
### GET

   curl --location --request GET 'https://d1wxd7hbxugicb.cloudfront.net/v1?id=1' \
--header 'Authorization: eyJraWQiOiJzb2ZEcmZTdEZyMHBpYksxZ0ZIZWgrdWpNZitcL0dSM2ZoVGZCb1RFVUd5TT0iLCJhbGciOiJSUzI1NiJ9.eyJzdWIiOiI2OWN0NGVzY2NqMTJ2MnN0NWQ2dHE0cHY4aiIsInRva2VuX3VzZSI6ImFjY2VzcyIsInNjb3BlIjoiYXBpXC91cHNlcnQtZGVsZXRlIiwiYXV0aF90aW1lIjoxNjcxODIxNzg0LCJpc3MiOiJodHRwczpcL1wvY29nbml0by1pZHAudXMtZWFzdC0xLmFtYXpvbmF3cy5jb21cL3VzLWVhc3QtMV9MaWVWdGdHY2EiLCJleHAiOjE2NzE4MjUzODQsImlhdCI6MTY3MTgyMTc4NCwidmVyc2lvbiI6MiwianRpIjoiNTQ3NzQxMGEtNGFjMS00OGIxLWI0YTktYWEyMGYxYzgxMjY0IiwiY2xpZW50X2lkIjoiNjljdDRlc2NjajEydjJzdDVkNnRxNHB2OGoifQ.TIuSOHvlQS-loWt4h1uFgmbyiEyRlpiESlHWziq9razEFwu08jLwBHnAO_ku8ZYJKbPrJFyZeLVYCDQX04joCE8Nnq7Ma6MtmrmXc7a2lHStEdj5U3KK6Dg3NJbR3Fg1TMhG95ggaK7KaE7wP4WNlGrivvFjc_0LNv5r_G9hrhwRfFYt27LyGGgZlGaF-lDE9TyPL9mBlad5X6IZU0BAyuFm-bFU9A3aokc7l5R6bN2_x26X-jxmwS5SHaxuSrm3-TLUJYmh10YGIT-R7hkGRzYivcJaBC_-jh5Rs-pWa_Gqxz4hAqZGUEFckVAmEJ0b_mVxQQaLgfr5v6AX9y5MCw'

### CREATE

curl --location --request POST 'https://d1wxd7hbxugicb.cloudfront.net/v1' \
--header 'Authorization: eyJraWQiOiJzb2ZEcmZTdEZyMHBpYksxZ0ZIZWgrdWpNZitcL0dSM2ZoVGZCb1RFVUd5TT0iLCJhbGciOiJSUzI1NiJ9.eyJzdWIiOiI2OWN0NGVzY2NqMTJ2MnN0NWQ2dHE0cHY4aiIsInRva2VuX3VzZSI6ImFjY2VzcyIsInNjb3BlIjoiYXBpXC91cHNlcnQtZGVsZXRlIiwiYXV0aF90aW1lIjoxNjcxODIxNzg0LCJpc3MiOiJodHRwczpcL1wvY29nbml0by1pZHAudXMtZWFzdC0xLmFtYXpvbmF3cy5jb21cL3VzLWVhc3QtMV9MaWVWdGdHY2EiLCJleHAiOjE2NzE4MjUzODQsImlhdCI6MTY3MTgyMTc4NCwidmVyc2lvbiI6MiwianRpIjoiNTQ3NzQxMGEtNGFjMS00OGIxLWI0YTktYWEyMGYxYzgxMjY0IiwiY2xpZW50X2lkIjoiNjljdDRlc2NjajEydjJzdDVkNnRxNHB2OGoifQ.TIuSOHvlQS-loWt4h1uFgmbyiEyRlpiESlHWziq9razEFwu08jLwBHnAO_ku8ZYJKbPrJFyZeLVYCDQX04joCE8Nnq7Ma6MtmrmXc7a2lHStEdj5U3KK6Dg3NJbR3Fg1TMhG95ggaK7KaE7wP4WNlGrivvFjc_0LNv5r_G9hrhwRfFYt27LyGGgZlGaF-lDE9TyPL9mBlad5X6IZU0BAyuFm-bFU9A3aokc7l5R6bN2_x26X-jxmwS5SHaxuSrm3-TLUJYmh10YGIT-R7hkGRzYivcJaBC_-jh5Rs-pWa_Gqxz4hAqZGUEFckVAmEJ0b_mVxQQaLgfr5v6AX9y5MCw' \
--header 'Content-Type: application/json' \
--data-raw '{ "task": "Sample Task new", "status": "wip" }'

curl --location --request POST 'https://d1wxd7hbxugicb.cloudfront.net/v1' \
--header 'Authorization: eyJraWQiOiJzb2ZEcmZTdEZyMHBpYksxZ0ZIZWgrdWpNZitcL0dSM2ZoVGZCb1RFVUd5TT0iLCJhbGciOiJSUzI1NiJ9.eyJzdWIiOiI2OWN0NGVzY2NqMTJ2MnN0NWQ2dHE0cHY4aiIsInRva2VuX3VzZSI6ImFjY2VzcyIsInNjb3BlIjoiYXBpXC91cHNlcnQtZGVsZXRlIiwiYXV0aF90aW1lIjoxNjcxODIxNzg0LCJpc3MiOiJodHRwczpcL1wvY29nbml0by1pZHAudXMtZWFzdC0xLmFtYXpvbmF3cy5jb21cL3VzLWVhc3QtMV9MaWVWdGdHY2EiLCJleHAiOjE2NzE4MjUzODQsImlhdCI6MTY3MTgyMTc4NCwidmVyc2lvbiI6MiwianRpIjoiNTQ3NzQxMGEtNGFjMS00OGIxLWI0YTktYWEyMGYxYzgxMjY0IiwiY2xpZW50X2lkIjoiNjljdDRlc2NjajEydjJzdDVkNnRxNHB2OGoifQ.TIuSOHvlQS-loWt4h1uFgmbyiEyRlpiESlHWziq9razEFwu08jLwBHnAO_ku8ZYJKbPrJFyZeLVYCDQX04joCE8Nnq7Ma6MtmrmXc7a2lHStEdj5U3KK6Dg3NJbR3Fg1TMhG95ggaK7KaE7wP4WNlGrivvFjc_0LNv5r_G9hrhwRfFYt27LyGGgZlGaF-lDE9TyPL9mBlad5X6IZU0BAyuFm-bFU9A3aokc7l5R6bN2_x26X-jxmwS5SHaxuSrm3-TLUJYmh10YGIT-R7hkGRzYivcJaBC_-jh5Rs-pWa_Gqxz4hAqZGUEFckVAmEJ0b_mVxQQaLgfr5v6AX9y5MCw' \
--header 'Content-Type: application/json' \
--data-raw '{ "task": "Sample Task new for failover", "status": "wip" }'

### UPDATE

curl --location --request POST 'https://d1wxd7hbxugicb.cloudfront.net/v1' \
--header 'Authorization: eyJraWQiOiJzb2ZEcmZTdEZyMHBpYksxZ0ZIZWgrdWpNZitcL0dSM2ZoVGZCb1RFVUd5TT0iLCJhbGciOiJSUzI1NiJ9.eyJzdWIiOiI2OWN0NGVzY2NqMTJ2MnN0NWQ2dHE0cHY4aiIsInRva2VuX3VzZSI6ImFjY2VzcyIsInNjb3BlIjoiYXBpXC91cHNlcnQtZGVsZXRlIiwiYXV0aF90aW1lIjoxNjcxODIxNzg0LCJpc3MiOiJodHRwczpcL1wvY29nbml0by1pZHAudXMtZWFzdC0xLmFtYXpvbmF3cy5jb21cL3VzLWVhc3QtMV9MaWVWdGdHY2EiLCJleHAiOjE2NzE4MjUzODQsImlhdCI6MTY3MTgyMTc4NCwidmVyc2lvbiI6MiwianRpIjoiNTQ3NzQxMGEtNGFjMS00OGIxLWI0YTktYWEyMGYxYzgxMjY0IiwiY2xpZW50X2lkIjoiNjljdDRlc2NjajEydjJzdDVkNnRxNHB2OGoifQ.TIuSOHvlQS-loWt4h1uFgmbyiEyRlpiESlHWziq9razEFwu08jLwBHnAO_ku8ZYJKbPrJFyZeLVYCDQX04joCE8Nnq7Ma6MtmrmXc7a2lHStEdj5U3KK6Dg3NJbR3Fg1TMhG95ggaK7KaE7wP4WNlGrivvFjc_0LNv5r_G9hrhwRfFYt27LyGGgZlGaF-lDE9TyPL9mBlad5X6IZU0BAyuFm-bFU9A3aokc7l5R6bN2_x26X-jxmwS5SHaxuSrm3-TLUJYmh10YGIT-R7hkGRzYivcJaBC_-jh5Rs-pWa_Gqxz4hAqZGUEFckVAmEJ0b_mVxQQaLgfr5v6AX9y5MCw' \
--header 'Content-Type: application/json' \
--data-raw '{ "id": "2", "task": "Sample Task Updated", "status": "done" } '

### DELETE

curl --location --request DELETE 'https://d1wxd7hbxugicb.cloudfront.net/v1' \
--header 'Authorization: eyJraWQiOiJzb2ZEcmZTdEZyMHBpYksxZ0ZIZWgrdWpNZitcL0dSM2ZoVGZCb1RFVUd5TT0iLCJhbGciOiJSUzI1NiJ9.eyJzdWIiOiI2OWN0NGVzY2NqMTJ2MnN0NWQ2dHE0cHY4aiIsInRva2VuX3VzZSI6ImFjY2VzcyIsInNjb3BlIjoiYXBpXC91cHNlcnQtZGVsZXRlIiwiYXV0aF90aW1lIjoxNjcxODIxNzg0LCJpc3MiOiJodHRwczpcL1wvY29nbml0by1pZHAudXMtZWFzdC0xLmFtYXpvbmF3cy5jb21cL3VzLWVhc3QtMV9MaWVWdGdHY2EiLCJleHAiOjE2NzE4MjUzODQsImlhdCI6MTY3MTgyMTc4NCwidmVyc2lvbiI6MiwianRpIjoiNTQ3NzQxMGEtNGFjMS00OGIxLWI0YTktYWEyMGYxYzgxMjY0IiwiY2xpZW50X2lkIjoiNjljdDRlc2NjajEydjJzdDVkNnRxNHB2OGoifQ.TIuSOHvlQS-loWt4h1uFgmbyiEyRlpiESlHWziq9razEFwu08jLwBHnAO_ku8ZYJKbPrJFyZeLVYCDQX04joCE8Nnq7Ma6MtmrmXc7a2lHStEdj5U3KK6Dg3NJbR3Fg1TMhG95ggaK7KaE7wP4WNlGrivvFjc_0LNv5r_G9hrhwRfFYt27LyGGgZlGaF-lDE9TyPL9mBlad5X6IZU0BAyuFm-bFU9A3aokc7l5R6bN2_x26X-jxmwS5SHaxuSrm3-TLUJYmh10YGIT-R7hkGRzYivcJaBC_-jh5Rs-pWa_Gqxz4hAqZGUEFckVAmEJ0b_mVxQQaLgfr5v6AX9y5MCw' \
--header 'Content-Type: application/json' \
--data-raw '{ "id": "2" } '
Troubleshooting
- AWS CloudFormation stacks failure: If you notice any of the CloudFormation stack failures, please follow below steps to triage.
- CDKToolkit – Bootstrapping issues. If the CDK toolkit stack is not in the region the solution will create a new stack. Note if there is an earlier CDK version or a conflict, CDK will throws error/incompatibility error. You may have to delete the stack from AWS Console > CloudFormation > CDKToolkit > “Delete”
- Infra stack: Review the AWS service limits. If you see a VPC failure, Ex: 5 VPCs per region; A new VPC is created “ToDoMgmt-infra-pri-vpc”
- Amazon Global Database – Aurora global databases are available in certain AWS Regions and for specific Aurora MySQL and Aurora PostgreSQL versions only. Please review your failure or limitations here
- Database Connectivity: If you notice any of the database connectivity issues, please follow below steps to triage.
- AWS lambda connects using RDS Proxy. Check if the RDS proxy is in healthy state. This can be checked in cli or using AWS Console
- Sample cli will be as follows:
$aws rds describe-db-proxy-targets —db-proxy-name todomgmt-infra-pri-rds-proxy
- Output will be as follows:
{ "Targets": [ { "RdsResourceId": "todomgmt-infra-pri-db-cluster-1", "Port": 3306, "Type": "TRACKED_CLUSTER" }, { "Endpoint": "todomgmt-infra-pri-db-instance.ck8aehji9nvn.us-east-1.rds.amazonaws.com", "TrackedClusterId": "todomgmt-infra-pri-db-cluster-1", "RdsResourceId": "todomgmt-infra-pri-db-instance", "Port": 3306, "Type": "RDS_INSTANCE", "Role": "UNKNOWN", "TargetHealth": { "State": "UNAVAILABLE", "Description": "DBProxy Target unavailable due to an internal error" } } ] }
- RDSCluster Connectivity:
- Inactivity in Aurora Serverless – RDS Table could put the RDS in suspended state to reduce the cost. You might receive a communication error after no activity while trying to invoke the database DDL/DML statements. If the application provided API times out (especially after the initial setup, you may have to invoke the POST/GET call invoke on the /api/todo endpoint). You might notice this by connecting to the SQL in Query Editor with below output. Retrying the select queries will warm up the RDS database for subsequent connection to be served.
Communications link failure The last packet sent successfully to the server was 0 milliseconds ago. The driver has not received any packets from the server. - Table/Model entity will not be created unless ToDo Url “CREATE LAMBDA” is triggered. This sets up the required ToDo table. Refer “Initial Testing and Validation” step in “Testing” section
- Inactivity in Aurora Serverless – RDS Table could put the RDS in suspended state to reduce the cost. You might receive a communication error after no activity while trying to invoke the database DDL/DML statements. If the application provided API times out (especially after the initial setup, you may have to invoke the POST/GET call invoke on the /api/todo endpoint). You might notice this by connecting to the SQL in Query Editor with below output. Retrying the select queries will warm up the RDS database for subsequent connection to be served.
- Error – Cloning into ‘ToDoMgmtRepo’…
- Make sure to check your saved passwords (or KeyChain access in MAC) in your PC. Refer the prerequisites to setup AWS CodeCommit user access in your account
fatal: repository 'https://git-codecommit.us-east-1.amazonaws.com/v1/repos/ToDoMgmtRepo/' not found
Solution Cleanup
As described above, the solution is deployed in two AWS regions. A “delete.sh” is provided that automates this process. If you wish to run this manually, please find the steps below
### Delete the secondary region CloudFormation Stacks
cdk destroy ToDoMgmt/SecdDeploy/ToDoMgmt-app-secd --require-approval never --force
cdk destroy ToDoMgmt/SecdDeploy/ToDoMgmt-infra-secd --require-approval never --force

### Delete the primmary region CloudFormation Stacks
cdk destroy ToDoMgmt/PriDeploy/ToDoMgmt-app-pri --require-approval never  --force
cdk destroy ToDoMgmt/PriDeploy/ToDoMgmt-infra-pri --require-approval never --force

### Delete the S3 bucket (AWS CodePipeline Artifacts are stored here)
ALL_S3=$(aws s3api list-buckets --query 'Buckets[*].[Name]' --output text | grep "todomgmt-")
for TODO_BUCKET in $ALL_S3 do    aws s3 rm s3://$TODO_BUCKET --recursive
done
### Delete the primary ToDo Stack
cdk destroy ToDoMgmt --require-approval never --force

### Optionally you can delete CDKToolkit. Please note if you are using CDK for your other application, you may refrain from deleting this.
cdk destroy CDKToolkit --require-approval never --force
- Make sure to check if all the system components are removed from your account to delete the stacks. You can visually validate that by navigating to AWS Consolee > CloudFormation. “ToDoMgmt” stacks are removed
Conclusion
To recap, in this post we built and deployed a simple ToDO API application across a primary and secondary AWS regions using various AWS services. Many AWS customers have business requirements that require expedient recovery from regional failure with little-to-no application data loss. An applications’s Recovery Time Objective (RTO) and Recovery Point Objective (RPO) are important metrics when considering failover and disaster recovery solutions. This solution allows for an RTO that can in the order of few minutes and RPO that’s typically in seconds. Learn more here.
We walked through in this example how to deploy the application code with infrastructure as code template. The solution uses AWS CodeCommit and AWS CodePipeline tools to initiate the failover process to validate the core API. We encourage you to test this example and see for yourself how this overall application design works within AWS. Then, it will be just the matter of replacing your individual code base and use any CI/CD process using publicly available tools. If you implement this example and run into any issues, or have any questions or feedback about this blog please provide your comments below!
References
- Amazon RDS Proxy now supports creating proxies in Aurora Global Database primary and secondary regions
- Cross-Region DNS-based load balancing and failover – Real-Time Communication on AWS (amazon.com)
- AWS Multi-Region Fundamentals
About the Author
|
Subramanian Thangavelu (Subhu) is a Cloud Application Architect at AWS. His expertise is in application optimization, serverless solutions with AWS and building Infrastructure as Code (IaC) using AWS CDK & AWS Cloudformation.
|
 Sivasubramanian Ramani (Siva Ramani) is a Sr Cloud Application Architect at AWS. His expertise is in application optimization, serverless solutions with AWS. Sivasubramanian Ramani (Siva Ramani) is a Sr Cloud Application Architect at AWS. His expertise is in application optimization, serverless solutions with AWS. |
