Artificial Intelligence
Bring your own pre-trained MXNet or TensorFlow models into Amazon SageMaker
Not only does Amazon SageMaker provide easy scalability and distribution to train and host ML models, it is modularized so that the process of training a model is decoupled from deploying the model. This means that models that are trained outside of Amazon SageMaker can be brought into SageMaker only to be deployed. This is very useful if you have models that are already trained, and you want to use only the hosting part of SageMaker instead of the entire pipeline. This is also useful if you don’t train your own models, but you buy pre-trained models.
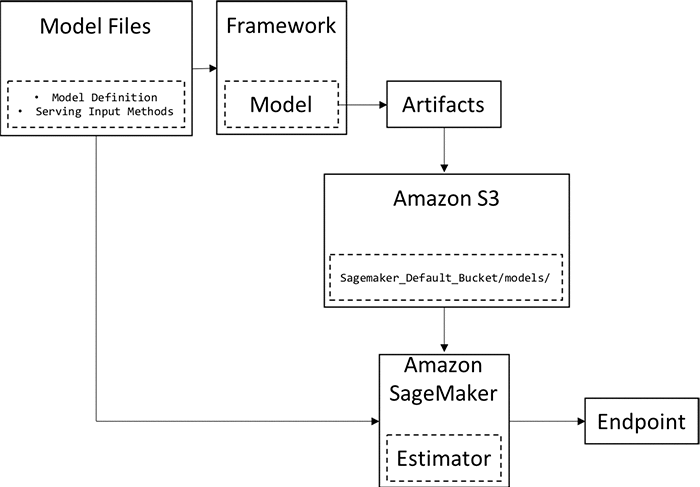
This blog post explains how to deploy your own models on Amazon SageMaker that have been trained on TensorFlow or MXNet. The following is an overview of the entire process.
- Step 1: Model definitions are written in a framework of choice.
- Step 2: The model is trained in that framework.
- Step 3: The model is exported and model artifacts that can be understood by Amazon SageMaker are created.
- Step 4: Model artifacts are uploaded to an Amazon S3 bucket.
- Step 5: Using the model definitions, artifacts, and the Amazon SageMaker Python SDK, a SageMaker model is created.
- Step 6: The SageMaker model is deployed as an endpoint.
What is a model and how do I get my hands on one?
A trained model file is simply the model artifact that is created by the training process. It contains the values of all the parameters of the model and some additional metadata about the model architecture, which says how these parameters are connected to each other. Different frameworks have different ways of exporting the model files.
TensorFlow
TensorFlow models can be exported from a trained TensorFlow Estimator. The model files have to follow protocols for Amazon SageMaker to be able to understand it. Consider the following definition of a simple TensorFlow Estimator:
This is a classifier model that expects as input a 4-dimensional numeric column feature in a dictionary keyed by INPUT_TENSOR_NAME. All TensorFlow model exports need a serving input function. The job of the serving input function is to provide an input pipeline to the exported model, when it is deployed. Fortunately, TensorFlow provides a builder to create this serving function. Consider the following piece of code:
This method creates a feature_spec, which is a dictionary of string→ feature values that our TensorFlow model expects. This should have the same structure and dimensionality that the estimator_fn expects of input features as well. We can use the TensorFlow export method to export our model.

Amazon SageMaker expects TensorFlow models to be tarballs (tar.gz files) that when exported will have all the artifacts within the directory export/Servo. The following code shows how this can be accomplished:
MXNet
Analogous to TensorFlow Estimators, MXNet uses MXNet Modules to represent models. In addition to the model params file saved using the checkpoint method, Amazon SageMaker needs the input data shape stored as a .json file. We can simply modify the MXNet checkpoint saver to create appropriate model artifacts that Amazon SageMaker can understand. The following piece of code gets that accomplished:
How to host the model on Amazon SageMaker
Before hosting a model, the model artifacts have to be moved to an Amazon S3 bucket After the artifacts are in the S3 bucket, the model can be deployed as an endpoint on Amazon SageMaker. To perform these tasks, we can make use of the that accompanies Amazon SageMaker. The Python SDK conveniently provides us an API to upload our models into S3.
You can verify this upload by checking the Amazon SageMaker default bucket that is already created in your AWS account. The prefix is the directory under which the model is stored. Converting this model that is at S3, into an Amazon SageMaker endpoint is a two-step process. A SageMaker model is first created, which prepares the model to be deployed and initializes the model constructor.
For TensorFlow model artifacts:
For MXNet model artifacts:
The syntaxes for either frameworks are similar and they initialize a SageMaker Estimator model. The entry_point argument takes the file that contains the code with which the model artifacts were created. This file is important because it contains the definition of the model and the serving functions that are required to reconstruct the model back at the endpoint. This doesn’t limit when the code was written or the model was created. As long as the models and code match versioning, this will work in the same way. A simple deploy command from the API will host the model.
The arguments gives us options to choose the number of instances and the type of instances at which to deploy our model. This innocent looking call does a lot of things under-the-hood. It creates a container with our files and our models in it, provisions hardware according to our specifications, and returns us an endpoint with which we can perform inference. This method might take a several minutes to finish. After the endpoint is created, the SDK also provides methods to query the endpoint. In the case of our TensorFlow model, we had a feature dimension of 4. To query the TensorFlow endpoint, we could do the following:
After we are done, the endpoint should be destroyed, so you are not charged for compute resources that you aren’t using. The SDK also provides methods to delete endpoints:
Keep in mind that when you bring your own models into SageMaker frameworks, the Amazon SageMaker endpoint containers are maintained independently for particular versions of the frameworks. For instance, models that are trained on MXNet 1.0 can’t be deployed on a SageMaker container that supports MXNet version 0.12. The artifact builder needs to ensure that compatible artifacts are built. The allows you to bring in multiple versions of models using appropriate parameters for version selection. The documentation here shows the usage of these parameters.
Notebooks
The code and details in this blog post are also available in notebook format. There are two notebooks that demonstrate how to bring your models into Amazon SageMaker for deployment, one each for TensorFlow and MXNet. Refer these for a complete tutorial.
Conclusion
In this blog post we showed you how you can use Amazon SageMaker to deploy models that have been trained outside the Amazon SageMaker setup using TensorFlow or MXNet. The blog demonstrates how to export models from TensorFlow or MXNet into a format that can be consumed by Amazon SageMaker.
About the Author
 Ragav Venkatesan is a Research Scientist with AWS Deep Learning. He has an MS in Electrical Engineering and a PhD in Computer Science from Arizona State University. His current area of research includes Neural Network compression and Computer Vision algorithms.