Artificial Intelligence
Enable business analysts to access Amazon SageMaker Canvas without using the AWS Management Console with AWS SSO
April 2024: This post was reviewed and updated for accuracy.
IT has evolved in recent years: thanks to low-code and no-code (LCNC) technologies, an increasing number of people with varying backgrounds require access to tools and platforms that were previously a prerogative to more tech-savvy individuals in the company, such as engineers or developers.
Out of those LCNC technologies, Amazon SageMaker Canvas, a visual point-and-click interface for business analysts to build machine learning (ML) models and generate accurate predictions without writing code or having any previous ML experience.
To enable agility for users with a non-technical background while ensuring security of the environments, many companies have chosen to adopt single sign-on technology. AWS IAM Identity Center is a cloud-based single sign-on service that makes it easy to centrally manage SSO access to all your AWS accounts and cloud applications. It includes a user portal where end-users can find and access all their assigned AWS accounts and cloud applications in one place, including custom applications that support Security Assertion Markup Language (SAML) 2.0.
In this two-part blog series, we first walk through walk you through the necessary steps necessary steps to configure single sign-on(SSO) for SageMaker Canvas using IAM Identity Center for Amazon SageMaker Studio Classic. In part 2, we walk through the necessary steps to configure SSO for SageMaker Canvas using IAM Identity Center for SageMaker Studio- new.
In this first post, we walk you through the necessary steps to configure SageMaker Canvas as a custom SAML 2.0 application in IAM Identity Center so that your business analysts can seamlessly access SageMaker Canvas with their credentials from IAM Identity Center or other existing identity providers (IdPs), without the need to launch Canvas from AWS Management Console.
Solution overview
To establish a connection from IAM Identity Center to the Amazon SageMaker Domain, you must complete the following steps:
- Create a user profile in Studio for every IAM Identity Center user that needs to access SageMaker Canvas.
- Create a custom SAML 2.0 application in IAM Identity Center and assign it to the users.
- Create the necessary AWS Identity and Access Management (IAM) SAML provider and IAM Identity Center role.
- Map the necessary information from IAM Identity Center to the SageMaker domain via attribute mappings.
- Access the SageMaker Canvas application from IAM Identity Center.
Prerequisites
To connect SageMaker Canvas to IAM Identity Center, you must have the following prerequisites set up:
- IAM Identity Center in one of the supported AWS Regions. For instructions, refer to Getting started.
- A SageMaker domain using IAM. For instructions, refer to Onboard to Amazon SageMaker Domain Using IAM
Create a Studio domain user profile
In a Studio domain, every user has their own user profile. Studio apps like Studio IDE, RStudio, and SageMaker Canvas can be created by these user profiles, and are bound to the user profile that has created them.
For IAM Identity Center to access the SageMaker Canvas app for a given user profile, you have to map the user profile name to the user name in IAM Identity Center. This way, the IAM Identity Center user name—and therefore the user profile name—can be passed automatically by IAM Identity Center to Canvas.
In this post, we assume that IAM Identity Center users are already available, created during the prerequisites of onboarding to IAM Identity Center. You need a user profile for each IAM Identity Center user that you want to onboard to your Studio domain and therefore to SageMaker Canvas.
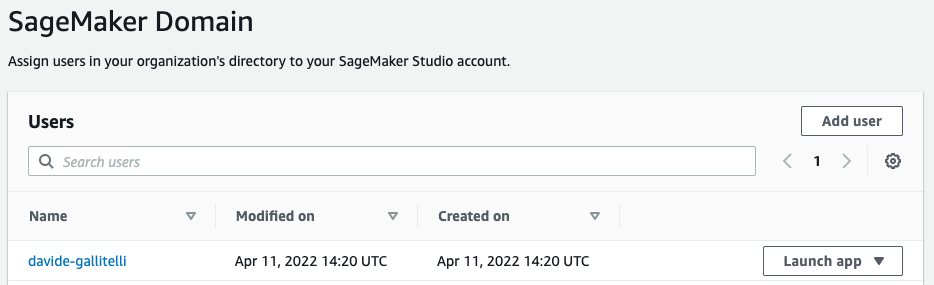
To retrieve this information, navigate to the Users page on the IAM Identity Center console. Here you can see the user name of your user, in our case davide-gallitelli.

With this information, you can now go to your Studio domain and create a new user profile called exactly davide-gallitelli.
If you have another IdP, you can use any information provided by it to name your user profile, as long as it’s unique for your domain. Just make sure you map it correctly according to IAM Identity Center attribute mapping.
Create the custom SAML 2.0 application in IAM Identity Center
The next step is to create a custom SAML 2.0 application in IAM Identity Center.
- On the IAM Identity Center console, choose Applications in the navigation pane.
- Choose Add a new application.
- Choose Add a custom SAML 2.0 application.

- Download the IAM Identity Center SAML metadata file, which you use during IAM configuration.
- For Display name, enter a name, such as
SageMaker Canvasfollowed by your Region. - For Description, enter an optional description.
- For Application start URL, leave as is.
- For Relay state, enter
https://YOUR-REGION.console.aws.amazon.com/sagemaker/home?region=YOUR-REGION#/studio/canvas/open/YOUR-STUDIO-DOMAIN-ID. - For Session duration, choose your session duration. We suggest 8 hours.
The Session duration value represents the amount of time you want the user session to last before authentication is required again. One hour is the most secure, whereas more time means less need for interaction. We choose 8 hours in this case, equivalent to one work day. - For Application ACS URL, enter https://signin.aws.amazon.com/saml.
- For Application SAML audience, enter
urn:amazon:webservices.
After your settings are saved, your application configuration should look similar to the following screenshot.
 You can now assign your users to this application, so that the application appears in their IAM Identity Center portal after login.
 - On the Assigned users tab, choose Assign users.
- Choose your users.

Optionally, if you want to enable a lot of data scientists and business analysts in your company to use SageMaker Canvas, the fastest and easiest way is to use IAM Identity Center groups. To do so, we create two IAM Identity Center groups: business-analysts and data-scientists. We assign the users to these groups according to their roles, and then give access to the application to both groups.

Configure your IAM SAML provider and IAM Identity Center role
To configure your IAM SAML provider, complete the following steps:
- On the IAM console, choose Identity providers in the navigation pane.
- Choose Add provider.
- For Provider type, select SAML.
- For Provider name, enter a name, such as
AWS_SSO_Canvas. - Upload the metadata document you downloaded earlier.
- Note the ARN to use in a later step.

We also need to create a new role for IAM Identity Center to use to access the application.
- On the IAM console, choose Roles in the navigation pane.
- Choose Create role.
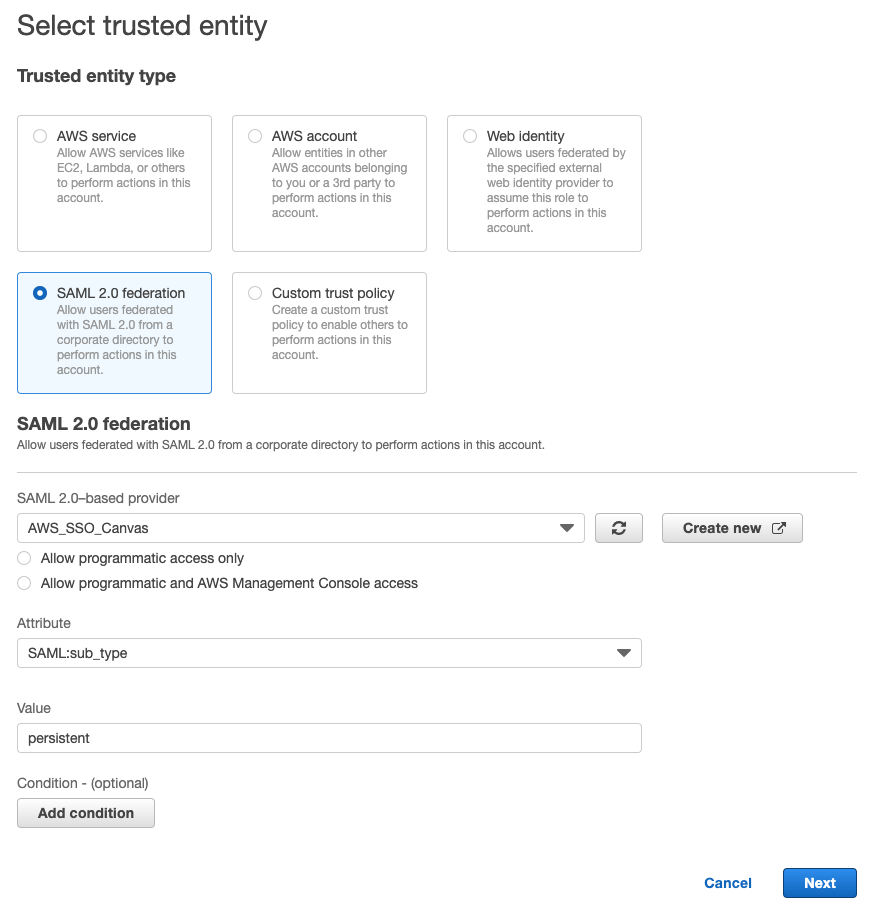
- For Trusted entity type, select SAML 2.0 federation.
- For SAML 2.0-based provider, choose the provider you created (
AWS_SSO_Canvas). - Don’t select either of the two SAML 2.0 access methods.
- For Attribute, choose SAML:sub_type.
- For Value, enter
persistent. - Choose Next.
We need to give IAM Identity Center the permission to create a Studio domain presigned URL, which we need to perform the redirect to SageMaker Canvas. - On the Permissions policies page, choose Create policy.
- On the Create policy tab, choose JSON and enter the following code:
- Choose Next:Tags and provide tags if needed.
- Choose Next:Review.
- Name the policy, for example
CanvasSSOPresignedURL. - Choose Create policy.
- Return to the Add permissions page and search for the policy you created.

- Select the policy, then choose Next.
- Name the role, for example
AWS_SSO_Canvas_Role, and provide an optional description. - On the review page, edit the trust policy to match the following code:
- Save the changes, then choose Create role.
- Note the ARN of this role as well, to use in the following section.
Configure the attribute mappings in IAM Identity Center
The final step is to configure the attribute mappings. The attributes you map here become part of the SAML assertion that is sent to the application. You can choose which user attributes in your application map to corresponding user attributes in your connected directory. For more information, refer to Attribute mappings.
- On the IAM Identity Center console, navigate to the application you created.
- On the Attribute mappings tab, configure the following mappings:
| User attribute in the application | Maps to this string value or user attribute in AWS SSO |
Subject |
${user:email} |
https://aws.amazon.com/SAML/Attributes/RoleSessionName |
${user:email} |
https://aws.amazon.com/SAML/Attributes/PrincipalTag:SageMakerStudioUserProfileName |
${user:subject} |
https://aws.amazon.com/SAML/Attributes/Role |
<ARN OF THE SAML PROVIDER FROM IAM>, <ARN OF THE CANVAS SSO ROLE FROM IAM> |
- Choose Save changes.

You’re done!
Access the SageMaker Canvas application from IAM Identity Center
On the IAM Identity Center console, note down the user portal URL. We suggest you log out of your AWS account first, or open an incognito browser window. Navigate to the user portal URL, log in with the credentials you set for the IAM Identity Center user, then choose your SageMaker Canvas application
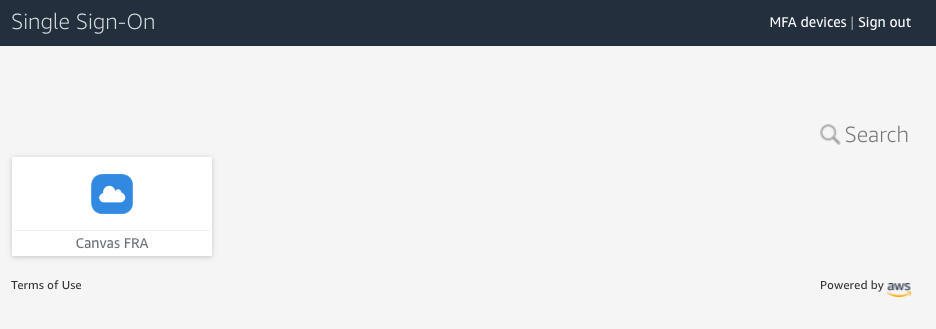
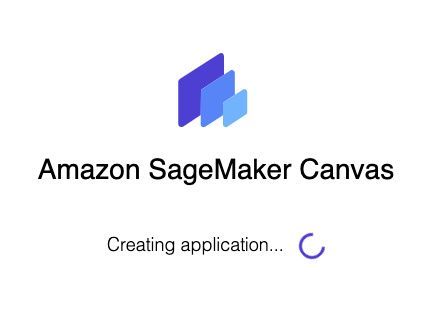
You’re automatically redirected to the SageMaker Canvas application.
Clean up
To avoid incurring future session charges, log out of SageMaker Canvas.

Conclusion
In this post, we discussed a solution to enable business analysts to experience no-code ML via SageMaker Canvas in a secured and unified way through a single sign-on portal. To do this, we configured SageMaker Canvas as a custom SAML 2.0 application within AWS IAM Identity Center. Business analysts are now one click away from using SageMaker Canvas and solving new challenges with no-code ML. This enables the security needed by cloud engineering and security teams, while allowing for the agility and independence of business analysts teams. A similar process can be replicated in any IdP by reproducing these steps and adapting them to the specific SSO.
To learn more about SageMaker Canvas, check out Announcing Amazon SageMaker Canvas – a Visual, No Code Machine Learning Capability for Business Analysts. SageMaker Canvas also enables easy collaboration with data science teams. To learn more, see Build, Share, Deploy: how business analysts and data scientists achieve faster time-to-market using no-code ML and Amazon SageMaker Canvas. For IT administrators, we suggest checking out Setting up and managing Amazon SageMaker Canvas (for IT administrators).
About the Authors
 Davide Gallitelli is a Specialist Solutions Architect for AI/ML in the EMEA region. He is based in Brussels and works closely with customer throughout Benelux. He has been a developer since very young, starting to code at the age of 7. He started learning AI/ML in his later years of university, and has fallen in love with it since then.
 Dhiraj Thakur is a Solutions Architect with Amazon Web Services. He works with AWS customers and partners to provide guidance on enterprise cloud adoption, migration, and strategy. He is passionate about technology and enjoys building and experimenting in the analytics and AI/ML space.
Audit History
Last reviewed and updated in April 2024 by Dhiraj Thakur | Solutions Architect