AWS for M&E Blog
Introducing AWS Elemental MediaConnect inputs for AWS Elemental Live appliances
AWS Elemental Live 2.21.2 GA introduces a new input type for use with AWS Elemental MediaConnect that makes it easier to securely and reliably ingest content. In this article, I review use cases where MediaConnect inputs are helpful, and show how to configure both MediaConnect and Elemental Live to utilize this capability.
This new input type utilizes the SRT protocol to provide a robust, secure transmission from cloud to ground. In this implementation, Elemental Live acts as the “caller” and MediaConnect as the “listener” as defined in the SRT specification.
Cloud to ground workflows
An intrinsic part of AWS Media Services is the contribution of on-premises video to the AWS Cloud for further processing and distribution. However, there are also instances when video needs to go from cloud to on-premises. For instance, distribution from a content provider or an intra-company workflow from ground to cloud and back again. In many cases customers need to bring processed video back to an on-site location for distribution, transmission, or monitoring. This workflow can also include cloud-based processing and distribution, represented below.
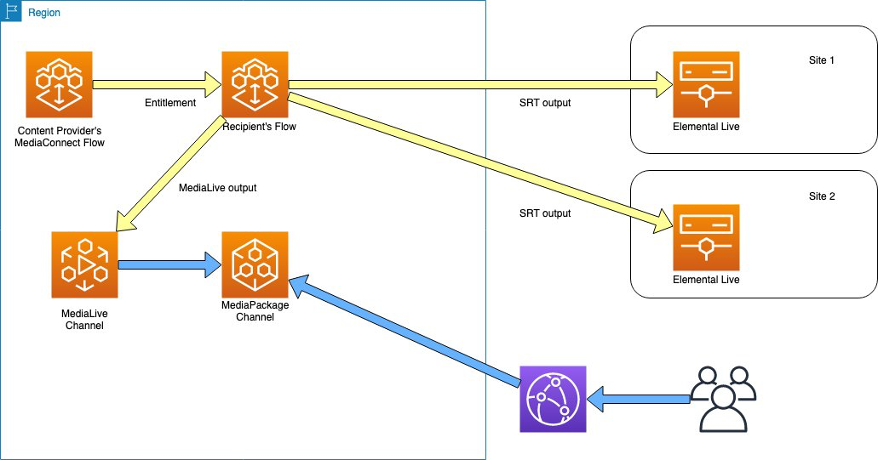
Cloud-based processing and distribution workflow
Requirements
To set up a workflow from MediaConnect to an Elemental Live appliance requires the following. I describe how to retrieve/create this information in the steps that follow.
- MediaConnect flow details — The flow ARN and output ARN are required inputs to Elemental Live for access
- AWS credential pair for Elemental Live to access MediaConnect
- Accessible IP address for the ground encoder — if using public internet, this will likely be the IP address(es) of a public firewall or router, and not the actual IP address of the Elemental Live unit.
Overview
Step 1: Determine IP address
Step 2: Create MediaConnect output
Step 3: Obtain credential pair
Step 4: Configure Elemental Live input
Step 1: Determine IP address
There are two possible network configurations you can use to receive your MediaConnect flow into Elemental Live:
- Amazon Virtual Private Cloud (VPC) over AWS Direct Connect: This configuration allows your on-premises network to attach to AWS with a secure, dedicated communications channel. Using this approach requires additional configuration and setup on your network, as well as configuration of a VPC interface on MediaConnect. Setting up these additional items are outside the scope of this article, although the rest of the configuration steps are similar.
- Public internet connection: This configuration uses your existing, internet-accessible network to access AWS via publicly accessible addresses. This is the method I describe in this post.
To determine the IP address(es) your appliance uses to access AWS, you need to know a little bit about your network. If you have access to a system with a web browser on the same subnet as your Elemental Live appliance, it is possible to identify the public IP address of your network using a search engine. However, if your network uses multiple IP addresses for public internet access, this might not be a reliable indication. Check with your network administrator to confirm if there is a range of IP addresses that your encoder might use. This range would be expressed in CIDR notation and can be used directly with MediaConnect.
Important: AWS Elemental strongly recommends placing your Elemental Live appliance behind a suitable network firewall and router to prevent direct access from the general internet.
Step 2 — Create MediaConnect output
For the purpose of this article, I assume the MediaConnect flow that provides the feed already exists. As a result, the only thing to do on MediaConnect is create the output that Elemental Live accesses.
a. In the MediaConnect console, locate the flow you want to use and click on the name to open the flow properties page.
b. Halfway down the page, choose the Outputs tab.
c. Choose Add output. The Add output dialog appears.
d. Assign a unique name to the output, and choose the appropriate output type.
e. For Protocol, choose SRT listener.
f. Optionally, add a description.
g. Set the maximum latency for the output in milliseconds.
h. Choose a port number for the SRT traffic. Values between 1024 and 65535 are legal, except for ports 2077 and 2088. Check with your network administrator in case there are additional restrictions for your firewall.
i. Provide the CIDR range(s) from step 1, above, in the CIDR allow list field. If you have more than one range to reference, you can add up to three via the Add button below the field.
j. If you want to utilize encryption, proceed to the Encryption section of the dialog and tick the Enable box. The Role ARN and Secret ARN drop-down boxes appear, to allow you to specify which secret contains the encryption key (see MediaConnect documentation on setting up static key encryption here)
k. Choose Add output. In a few seconds the output is added to the list for the flow.
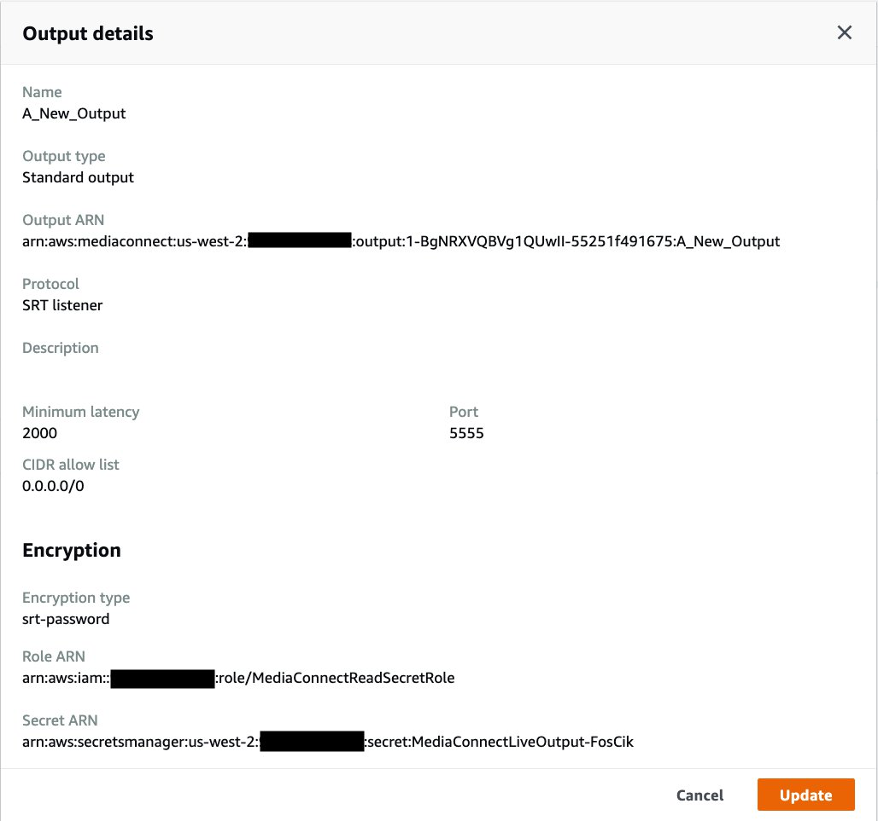
Output details
Copy the Flow ARN and Output ARN for this output. You need them for your input definition in Elemental Live.
Step 3 — Obtain credential pair
If you have an IAM administrator, obtain the IAM credential from them. The user requires read-only permissions for secretsmanager (GetResourcePolicy, GetSecretValue, DescribeSecret, ListSecretVersionIds), mediaconnect (DescribeFlow, ListFlows, ListEntitlements), and iam:GetRole. The user credentials are in the form of an Access Key ID and a Secret Key.
Step 4 — Configure Elemental Live input
Create or edit an event as usual. For your input, select AWS Elemental MediaConnect. The input fields appear as below:

Elemental Live input
a. For Flow ARN, copy the ARN of the MediaConnect flow from step 2 above.
b. For Output ARN, copy the ARN from the SRT listener output you created.
c. For Interface, optionally enter the name of the network interface you want to use to initiate the connection to MediaConnect. If left blank, the system routing table will determine which interface is used.
d. For Access Key ID/Secret Access Key, use the IAM credential pair obtained in Step 3.
Once this information is completed, (and providing the MediaConnect flow is in ACTIVE state), the preview button for the input should be able to access and display the source.
Summary
In this post I demonstrated how to configure an input on Elemental Live using the new MediaConnect input type. I reviewed the steps in configuring the output in the MediaConnect console, and explained how to gather the needed information for a successful delivery of content. Full documentation for MediaConnect is available here, and Elemental Live documentation is here.
If you have questions, feedback, or would like to get involved in discussions with other community members, visit the AWS Developer Forums: Media Services.